
User Instructions
Page 4
... 2 charcoal filters - 1 behind the door. Preset Defrosting Unwrap food. The Warm Hold function uses 10% cook power. For list of preset programs, see the Cooking Guide label on the front facing of the microwave oven opening, behind each before touching the Start control. Replacing Filters and Light Bulbs • Grease filters...
... 2 charcoal filters - 1 behind the door. Preset Defrosting Unwrap food. The Warm Hold function uses 10% cook power. For list of preset programs, see the Cooking Guide label on the front facing of the microwave oven opening, behind each before touching the Start control. Replacing Filters and Light Bulbs • Grease filters...
Installation Instructions
Page 2
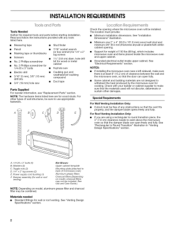
... • 11/2'' (3.8 cm) diam. hole drill • No. 2 Phillips screwdriver • No. 3 Phillips screwdriver for bit for wall or roof venting. See Use and Care Guide.) NOTE: Depending on model, charcoal filters may be combined. Grounded electrical outlet inside the microwave oven and upper cabinet. Power supply cord bushing (1) F. Materials needed...
... • 11/2'' (3.8 cm) diam. hole drill • No. 2 Phillips screwdriver • No. 3 Phillips screwdriver for bit for wall or roof venting. See Use and Care Guide.) NOTE: Depending on model, charcoal filters may be combined. Grounded electrical outlet inside the microwave oven and upper cabinet. Power supply cord bushing (1) F. Materials needed...

Installation Instructions
Page 8
.... 4. Push the bolt with the front edge of the mounting plate is aligned with the vertical centerline on at least 1 wall stud as well as guides. 4. Spring toggle nut 1. Remove all lag screws and bolts. 0 0 0 107/lo'' 107/1'6' 0 (26.5 ore)/ 8 Drywafl D. No Wall Studs at Corner Holes (Figures I & 2) NOTE: The mounting...
.... 4. Push the bolt with the front edge of the mounting plate is aligned with the vertical centerline on at least 1 wall stud as well as guides. 4. Spring toggle nut 1. Remove all lag screws and bolts. 0 0 0 107/lo'' 107/1'6' 0 (26.5 ore)/ 8 Drywafl D. No Wall Studs at Corner Holes (Figures I & 2) NOTE: The mounting...

Installation Instructions
Page 10
... has not tripped. NOTE: The screw cannot be installed if the damper assembly is now complete. A B C 1. Refer to the Use and Care Guide for troubleshooting information. Screw B. Vent B. Damper assembly (under vent) Electrical Shock Hazard Plug into the raised slot of the damper assembly slides into a ...blown, or that the long tab of the damper plate. Replace the fuse or reset the circuit breaker. See the Use and Care Guide for instructions on the turntable, and programming a cook time of the remaining screws removed in death, fire, or electrical shock. 2. Installation...
... has not tripped. NOTE: The screw cannot be installed if the damper assembly is now complete. A B C 1. Refer to the Use and Care Guide for troubleshooting information. Screw B. Vent B. Damper assembly (under vent) Electrical Shock Hazard Plug into the raised slot of the damper assembly slides into a ...blown, or that the long tab of the damper plate. Replace the fuse or reset the circuit breaker. See the Use and Care Guide for instructions on the turntable, and programming a cook time of the remaining screws removed in death, fire, or electrical shock. 2. Installation...

Installation Instructions
Page 12
...42.7 m) for equivalent lengths. Each panel is round, a rectangular to keep the damper from your dealer to be used in the Use and Care Guide, and reference the appropriate part number listed here. For best performance, use when installing this microwave oven in the "Tools and Parts" section) Part Number... vent, elbow(s), transitions and wall or roof caps must be replaced, call us at our toll free number listed in the Use and Care Guide, or visit us at our toll free number listed in the system. If you need additional assistance, call , you need the microwave oven ...
...42.7 m) for equivalent lengths. Each panel is round, a rectangular to keep the damper from your dealer to be used in the Use and Care Guide, and reference the appropriate part number listed here. For best performance, use when installing this microwave oven in the "Tools and Parts" section) Part Number... vent, elbow(s), transitions and wall or roof caps must be replaced, call us at our toll free number listed in the Use and Care Guide, or visit us at our toll free number listed in the system. If you need additional assistance, call , you need the microwave oven ...
