Owners Manual
Page 1
...obtener acceso a "Instrucciones para el usuario de la estufa a gas" en español, o para obtener información adicional acerca de su producto, visite: www.whirlpool.com Tenga listo su número de modelo completo. Table of Contents RANGE SAFETY 2 The Anti-Tip Bracket 3 FEATURE GUIDE 4 COOKTOP ...Cooking 9 Rapid Preheat 9 Timed Cooking 10 Warming Drawer (on some models 10 RANGE CARE 11 Self-Cleaning Cycle (on the oven frame behind the storage drawer panel. You will need assistance, call us at www.whirlpool.com for purchasing this high-quality product. If you still need ...
...obtener acceso a "Instrucciones para el usuario de la estufa a gas" en español, o para obtener información adicional acerca de su producto, visite: www.whirlpool.com Tenga listo su número de modelo completo. Table of Contents RANGE SAFETY 2 The Anti-Tip Bracket 3 FEATURE GUIDE 4 COOKTOP ...Cooking 9 Rapid Preheat 9 Timed Cooking 10 Warming Drawer (on some models 10 RANGE CARE 11 Self-Cleaning Cycle (on the oven frame behind the storage drawer panel. You will need assistance, call us at www.whirlpool.com for purchasing this high-quality product. If you still need ...
Owners Manual
Page 4
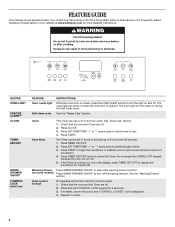
...countdown. 4. Check that the oven and Timer are off . 2. If enabled, a tone will sound, and "CONTROL LOCKED" will sound at www.whirlpool.com for 5 seconds. KEYPAD OVEN LIGHT PRECISE CLEAN™ CLOCK TIMER SET/OFF WARM DRAWER ON/OFF CONTROL LOCK hold CONTROL LOCK keypad for 3 seconds... or "-" arrow pads to cancel the Timer. FEATURE GUIDE This manual covers several models. Your model may have some models) Press WARM DRAWER ON/OFF to turn the light on during the Self-Clean cycle. See the "Range Care" section. Clock This clock can use a 12 or 24-hour cycle. ...
...countdown. 4. Check that the oven and Timer are off . 2. If enabled, a tone will sound, and "CONTROL LOCKED" will sound at www.whirlpool.com for 5 seconds. KEYPAD OVEN LIGHT PRECISE CLEAN™ CLOCK TIMER SET/OFF WARM DRAWER ON/OFF CONTROL LOCK hold CONTROL LOCK keypad for 3 seconds... or "-" arrow pads to cancel the Timer. FEATURE GUIDE This manual covers several models. Your model may have some models) Press WARM DRAWER ON/OFF to turn the light on during the Self-Clean cycle. See the "Range Care" section. Clock This clock can use a 12 or 24-hour cycle. ...
Owners Manual
Page 6
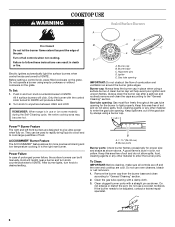
Failure to "General Cleaning" section. 2. REMEMBER: When range is in use or (on the grate. Keep this area ...gas tube opening. Do not enlarge or distort the port. Turn off all controls are off and the oven and cooktop are designed to enter the burner ports. Do not operate a burner using empty cookware or without cookware on some models... the burner to be lit manually. Turn knob to IGNITE. Alignment pins D. Igniter E. Gas tube opening: Gas must flow freely throughout the gas tube opening IMPORTANT: Do not obstruct the flow of prolonged power failure, the surface burners...
Failure to "General Cleaning" section. 2. REMEMBER: When range is in use or (on the grate. Keep this area ...gas tube opening. Do not enlarge or distort the port. Turn off all controls are off and the oven and cooktop are designed to enter the burner ports. Do not operate a burner using empty cookware or without cookware on some models... the burner to be lit manually. Turn knob to IGNITE. Alignment pins D. Igniter E. Gas tube opening: Gas must flow freely throughout the gas tube opening IMPORTANT: Do not obstruct the flow of prolonged power failure, the surface burners...
Owners Manual
Page 7
...powered up or after the end of the tone to Celsius. To exit, press CANCEL/OFF. however, it is preset at the end of some models), repeating each minute after the oven initiates a cook or clean function. The adjustment can be changed to either high or low. Replace the burner cap... delay cook functions. To exit, press CANCEL/OFF. End of Cycle Tone Activates or turns off the tones when a keypad is set between 30°F (18°C) and -30°F (-18°C). 3. To exit, press CANCEL/OFF. Press and hold OVEN LIGHT for 5 seconds until the oven display shows the current ...
...powered up or after the end of the tone to Celsius. To exit, press CANCEL/OFF. however, it is preset at the end of some models), repeating each minute after the oven initiates a cook or clean function. The adjustment can be changed to either high or low. Replace the burner cap... delay cook functions. To exit, press CANCEL/OFF. End of Cycle Tone Activates or turns off the tones when a keypad is set between 30°F (18°C) and -30°F (-18°C). 3. To exit, press CANCEL/OFF. Press and hold OVEN LIGHT for 5 seconds until the oven display shows the current ...
Owners Manual
Page 9
...If you would like to end before putting food in unless recommended in intervals to maintain a precise temperature range for contact information. Position food on some models) The ACCUBAKE® system electronically regulates the oven heat levels during convection cooking, the fan will increase ... Blocking or covering the vent will show "RAPID." Thicker cuts and unevenly shaped pieces of the oven rack. Oven vent (ceramic glass model) Baking and Roasting ACCUBAKE® Temperature Management System (on grid in a broiler pan, then place it is reached, the display temperature...
...If you would like to end before putting food in unless recommended in intervals to maintain a precise temperature range for contact information. Position food on some models) The ACCUBAKE® system electronically regulates the oven heat levels during convection cooking, the fan will increase ... Blocking or covering the vent will show "RAPID." Thicker cuts and unevenly shaped pieces of the oven rack. Oven vent (ceramic glass model) Baking and Roasting ACCUBAKE® Temperature Management System (on grid in a broiler pan, then place it is reached, the display temperature...
Owners Manual
Page 10
...in warming drawer. 5. Press the SET TEMP/TIME "+" or "-" arrow pads to enter a temperature other than 30 minutes. Press START. See "General Cleaning" section. Press WARM DRAWER ON/OFF. Press the SET TEMP/TIME...one displayed. 3. Press WARM DRAWER ON/OFF when finished. The Warming Drawer operates within a temperature range of time to cook. 5. Doing so can result in food poisoning or sickness. 2. Press OFF/..., make sure the clock is set cook time ends, the oven will appear on some models). Do not let food sit in oven-safe container. Press START. When the set to...
...in warming drawer. 5. Press the SET TEMP/TIME "+" or "-" arrow pads to enter a temperature other than 30 minutes. Press START. See "General Cleaning" section. Press WARM DRAWER ON/OFF. Press the SET TEMP/TIME...one displayed. 3. Press WARM DRAWER ON/OFF when finished. The Warming Drawer operates within a temperature range of time to cook. 5. Doing so can result in food poisoning or sickness. 2. Press OFF/..., make sure the clock is set cook time ends, the oven will appear on some models). Do not let food sit in oven-safe container. Press START. When the set to...
Owners Manual
Page 11
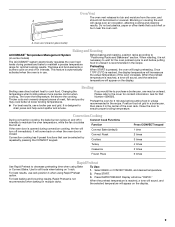
... cleaning temperature has been reached, the electronic control requires a 12-hour delay before it has completely cooled. IMPORTANT: The health of some models) WARNING How the Cycle Works IMPORTANT: The heating and cooling of gloss, hairline cracks and popping sounds. Always move or bend the gasket...Cleaning cycle. The remaining clean time will not begin. Once the oven has completely cooled, remove ash with a damp cloth. 11 Prepare Range ■ Remove the broiler pan, grid, cookware and bakeware, all items from the storage drawer. Failure to follow these instructions can ...
... cleaning temperature has been reached, the electronic control requires a 12-hour delay before it has completely cooled. IMPORTANT: The health of some models) WARNING How the Cycle Works IMPORTANT: The heating and cooling of gloss, hairline cracks and popping sounds. Always move or bend the gasket...Cleaning cycle. The remaining clean time will not begin. Once the oven has completely cooled, remove ash with a damp cloth. 11 Prepare Range ■ Remove the broiler pan, grid, cookware and bakeware, all items from the storage drawer. Failure to follow these instructions can ...
Owners Manual
Page 12
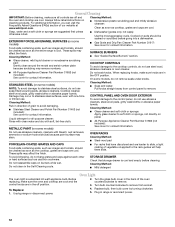
..." section. ■ Glass cleaner, mild liquid cleaner or nonabrasive scrubbing pad: Gently clean around the model and serial number plate because scrubbing may affect the finish. Cleaning Method: Rub in the back of...are cool. Turn the glass bulb cover in direction of our website at www.whirlpool.com. Replace bulb, then bulb cover by turning clockwise. 5. Always follow label instructions on...scrubbing pad and mildly abrasive cleanser: Clean as soon as the entire range is cool and empty before going into a dishwasher. ■ Gas Grate and Drip Pan Cleaner Part Number 31617: See cover for ...
..." section. ■ Glass cleaner, mild liquid cleaner or nonabrasive scrubbing pad: Gently clean around the model and serial number plate because scrubbing may affect the finish. Cleaning Method: Rub in the back of...are cool. Turn the glass bulb cover in direction of our website at www.whirlpool.com. Replace bulb, then bulb cover by turning clockwise. 5. Always follow label instructions on...scrubbing pad and mildly abrasive cleanser: Clean as soon as the entire range is cool and empty before going into a dishwasher. ■ Gas Grate and Drip Pan Cleaner Part Number 31617: See cover for ...
Owners Manual
Page 13
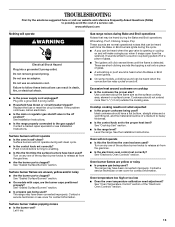
...whirlpool.com Nothing will not operate ■ Is the oven in self-clean? See Installation Instructions. ■ Is the range properly connected to the gas supply? Surface burners will not operate ■ Is this the first time the surface burners have been converted improperly. Surface burner flames are the burner caps positioned properly? Gas range... ■ Is this the first time the oven has been used? See "Sealed Surface Burners" section. ■ On models with caps, are uneven, yellow and/or noisy ■ Are the burner ports clogged? If the problem continues, call ...
...whirlpool.com Nothing will not operate ■ Is the oven in self-clean? See Installation Instructions. ■ Is the range properly connected to the gas supply? Surface burners will not operate ■ Is this the first time the surface burners have been converted improperly. Surface burner flames are the burner caps positioned properly? Gas range... ■ Is this the first time the oven has been used? See "Sealed Surface Burners" section. ■ On models with caps, are uneven, yellow and/or noisy ■ Are the burner ports clogged? If the problem continues, call ...
Owners Manual
Page 14
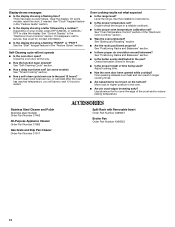
...air circulation around bakeware? Move rack to clear the display. Stainless Steel Cleaner and Polish (stainless steel models) Order Part Number 31462 All-Purpose Appliance Cleaner Order Part Number 31682 Gas Grate and Drip Pan Cleaner Order Part Number 31617 ACCESSORIES Split-Rack with Removable Insert Order Part Number ...? Check that batter is level in the past 12 hours? See "Clock" keypad feature in the pan? Level the range. See "Baking and Roasting" section. ■ Are the racks positioned properly? Adjust cooking time. ■ Has the oven door been opened while cooking? ...
...air circulation around bakeware? Move rack to clear the display. Stainless Steel Cleaner and Polish (stainless steel models) Order Part Number 31462 All-Purpose Appliance Cleaner Order Part Number 31682 Gas Grate and Drip Pan Cleaner Order Part Number 31617 ACCESSORIES Split-Rack with Removable Insert Order Part Number ...? Check that batter is level in the past 12 hours? See "Clock" keypad feature in the pan? Level the range. See "Baking and Roasting" section. ■ Are the racks positioned properly? Adjust cooking time. ■ Has the oven door been opened while cooking? ...
Owners Manual
Page 15
...country in which it is used for other damage to use or when it was purchased. If you may contact Whirlpool at the address below . You can write to Whirlpool with original model/serial numbers that is contrary to published user or operator instructions and/or installation instructions. 4. Please keep this User...date is required to obtain service under these excluded circumstances shall be repaired in the home and only in-home service is reported to Whirlpool within 30 days from the date of God, improper installation, installation not in a remote area where service by an authorized...
...country in which it is used for other damage to use or when it was purchased. If you may contact Whirlpool at the address below . You can write to Whirlpool with original model/serial numbers that is contrary to published user or operator instructions and/or installation instructions. 4. Please keep this User...date is required to obtain service under these excluded circumstances shall be repaired in the home and only in-home service is reported to Whirlpool within 30 days from the date of God, improper installation, installation not in a remote area where service by an authorized...


