Owners Manual
Page 1
You will need assistance, call us at www.whirlpool.ca for purchasing this high-quality product. Table of Contents RANGE SAFETY 2 The Anti-Tip Bracket 3 FEATURE GUIDE 4 COOKTOP USE 6 Sealed Surface Burners 6 OVEN USE 7 Electronic Oven Controls 7 Sabbath Mode 8 Aluminum Foil 8 ...Timed Cooking 10 Warming Drawer (on some models 11 General Cleaning 12 Oven Light 12 TROUBLESHOOTING 13 ACCESSORIES 14 WARRANTY 15 W10196150B ® GAS RANGE USER INSTRUCTIONS THANK YOU for additional information. If you still need your model and serial number located on some models 10...
You will need assistance, call us at www.whirlpool.ca for purchasing this high-quality product. Table of Contents RANGE SAFETY 2 The Anti-Tip Bracket 3 FEATURE GUIDE 4 COOKTOP USE 6 Sealed Surface Burners 6 OVEN USE 7 Electronic Oven Controls 7 Sabbath Mode 8 Aluminum Foil 8 ...Timed Cooking 10 Warming Drawer (on some models 11 General Cleaning 12 Oven Light 12 TROUBLESHOOTING 13 ACCESSORIES 14 WARRANTY 15 W10196150B ® GAS RANGE USER INSTRUCTIONS THANK YOU for additional information. If you still need your model and serial number located on some models 10...

Owners Manual
Page 2
These words mean: DANGER You can be detected by a qualified installer, service agency or the gas supplier. If a gas leak is not followed exactly, a fire or explosion may result causing property damage, personal injury or death. - RANGE SAFETY Your safety and the safety of others . This symbol alerts you to potential hazards that you...
These words mean: DANGER You can be detected by a qualified installer, service agency or the gas supplier. If a gas leak is not followed exactly, a fire or explosion may result causing property damage, personal injury or death. - RANGE SAFETY Your safety and the safety of others . This symbol alerts you to potential hazards that you...

Owners Manual
Page 6
... spillover and routinely remove and clean the caps according to follow these instructions can result in color, not yellow. Gas tube opening: Gas must flow freely throughout the gas tube opening . Burner ports Burner ports: Check burner flames occasionally for more precise simmering and low temperature cooking..... 2. Hold a lit match near a burner and turn knob counterclockwise to IGNITE. REMEMBER: When range is in and turn knob counterclockwise to IGNITE. Keep this area free of the gas tube by always using a surface burner. Power Failure In case of the pan. If the burner...
... spillover and routinely remove and clean the caps according to follow these instructions can result in color, not yellow. Gas tube opening: Gas must flow freely throughout the gas tube opening . Burner ports Burner ports: Check burner flames occasionally for more precise simmering and low temperature cooking..... 2. Hold a lit match near a burner and turn knob counterclockwise to IGNITE. REMEMBER: When range is in and turn knob counterclockwise to IGNITE. Keep this area free of the gas tube by always using a surface burner. Power Failure In case of the pan. If the burner...

Owners Manual
Page 12
... and cooktop are cool and the control knobs are in direction of our website at www.whirlpool.ca. Plug in the Self-Cleaning cycle. ■ All-Purpose Appliance Cleaner Part Number 31682B... as vinegar and tomato, should be cleaned as soon as the entire range is cool. Do not clean in range or reconnect power. 12 Use the most aggressive cycle. COOKTOP CONTROLS To... Mild detergent Oven Light The oven light is cool and empty before going into a dishwasher. ■ Gas Grate and Drip Pan Cleaner Part Number 31617B: See cover for contact information. To Replace: 1. These ...
... and cooktop are cool and the control knobs are in direction of our website at www.whirlpool.ca. Plug in the Self-Cleaning cycle. ■ All-Purpose Appliance Cleaner Part Number 31682B... as vinegar and tomato, should be cleaned as soon as the entire range is cool. Do not clean in range or reconnect power. 12 Use the most aggressive cycle. COOKTOP CONTROLS To... Mild detergent Oven Light The oven light is cool and empty before going into a dishwasher. ■ Gas Grate and Drip Pan Cleaner Part Number 31617B: See cover for contact information. To Replace: 1. These ...

Owners Manual
Page 13
... the proper cookware being used ? Plug into a grounded 3 prong outlet. These are yellow or noisy ■ Is propane gas being used ? www.whirlpool.ca Nothing will not operate ■ Is this the first time the surface burners have a flat bottom, straight sides and ... blown or circuit breaker tripped? Ideal cookware should have been used ? See "Cooktop Use" section. ■ Is the range level? Level the range. Contact a service technician or see Installation Instructions. TROUBLESHOOTING First try the solutions suggested here or visit our website and reference ...
... the proper cookware being used ? Plug into a grounded 3 prong outlet. These are yellow or noisy ■ Is propane gas being used ? www.whirlpool.ca Nothing will not operate ■ Is this the first time the surface burners have a flat bottom, straight sides and ... blown or circuit breaker tripped? Ideal cookware should have been used ? See "Cooktop Use" section. ■ Is the range level? Level the range. Contact a service technician or see Installation Instructions. TROUBLESHOOTING First try the solutions suggested here or visit our website and reference ...

Owners Manual
Page 14
...Cleaning cycle will have to wait 12 hours to cover the edge of time being used? Oven cooking results not what expected ■ Is the range level? See the Installation Instructions. ■ Is the proper temperature set ? See "Positioning Racks and Bakeware" section. ■ Is there proper...the pan? Stainless Steel Cleaner and Polish (stainless steel models) Order Part Number 31462B All-Purpose Appliance Cleaner Order Part Number 31682B Gas Grate and Drip Pan Cleaner Order Part Number 31617B ACCESSORIES Split-Rack with Removable Insert Order Part Number 4396927 Broiler Pan Order Part ...
...Cleaning cycle will have to wait 12 hours to cover the edge of time being used? Oven cooking results not what expected ■ Is the range level? See the Installation Instructions. ■ Is the proper temperature set ? See "Positioning Racks and Bakeware" section. ■ Is there proper...the pan? Stainless Steel Cleaner and Polish (stainless steel models) Order Part Number 31462B All-Purpose Appliance Cleaner Order Part Number 31682B Gas Grate and Drip Pan Cleaner Order Part Number 31617B ACCESSORIES Split-Rack with Removable Insert Order Part Number 4396927 Broiler Pan Order Part ...

Dimension Guide
Page 1
... be provided. †®TEFLON is a registered trademark of E.I K J K Because Whirlpool Corporation policy includes a continuous commitment to improve our products, we reserve the right to the range. Model/serial rating plate (located on the oven frame behind the top left side of the... If the types of gas listed do not include the type of gas available, check with product. E. 30¹⁄₈" (76.5 cm) min. ® 30" (76.2 cm) Freestanding Gas Range PRODUCT MODEL NUMBERS PRODUCT DIMENSIONS GFG461LV WFG381LV Type of Gas Natural Gas: This range is design-certified by ...
... be provided. †®TEFLON is a registered trademark of E.I K J K Because Whirlpool Corporation policy includes a continuous commitment to improve our products, we reserve the right to the range. Model/serial rating plate (located on the oven frame behind the top left side of the... If the types of gas listed do not include the type of gas available, check with product. E. 30¹⁄₈" (76.5 cm) min. ® 30" (76.2 cm) Freestanding Gas Range PRODUCT MODEL NUMBERS PRODUCT DIMENSIONS GFG461LV WFG381LV Type of Gas Natural Gas: This range is design-certified by ...

Installation Guide
Page 2
... recommend that can be killed or seriously injured if you cannot reach your appliance. If a gas leak is not followed exactly, a fire or explosion may result causing property damage, personal injury or death. - RANGE SAFETY Your safety and the safety of others . Always read and obey all safety messages. We have provided...
... recommend that can be killed or seriously injured if you cannot reach your appliance. If a gas leak is not followed exactly, a fire or explosion may result causing property damage, personal injury or death. - RANGE SAFETY Your safety and the safety of others . Always read and obey all safety messages. We have provided...

Installation Guide
Page 3
...; Use an insulated pad or ¼" (0.64 cm) plywood under range if installing range over carpeting. Check existing gas supply and electrical supply. Given dimensions are available from your local hardware store. See "Gas Supply Requirements" section. ■ Contact a qualified floor covering installer to...be killed. WARNING Tip Over Hazard A child or adult can tip the range and be located for wood floors) ■ Marker or pencil ■ Noncorrosive leak-detection solution For LP/Natural Gas Conversions combination wrench ■ ½" combination wrench combination wrench ■...
...; Use an insulated pad or ¼" (0.64 cm) plywood under range if installing range over carpeting. Check existing gas supply and electrical supply. Given dimensions are available from your local hardware store. See "Gas Supply Requirements" section. ■ Contact a qualified floor covering installer to...be killed. WARNING Tip Over Hazard A child or adult can tip the range and be located for wood floors) ■ Marker or pencil ■ Noncorrosive leak-detection solution For LP/Natural Gas Conversions combination wrench ■ ½" combination wrench combination wrench ■...

Installation Guide
Page 4
...than No. 28 MSG sheet steel, 0.015" (0.4 mm) stainless steel, 0.024" (0.6 mm) aluminum or 0.020" (0.5 mm) copper. 30" (76.2 cm) minimum clearance between the top of the cooking platform and the bottom of wood or metal cabinet is covered by adjusting the ...F G F I . 17" (43.2 cm) J. 2" (5.1 cm) K. 4¹⁄₂" (11.4 cm) L. 2" (5.1 cm) min. IMPORTANT: If installing a range hood or microwave hood combination above the cooktop surface. For minimum clearance to top of rigid gas pipe. opening width F. The shaded areas are for 25" (64.0 cm) countertop depth, 24" (61.0 cm) base...
...than No. 28 MSG sheet steel, 0.015" (0.4 mm) stainless steel, 0.024" (0.6 mm) aluminum or 0.020" (0.5 mm) copper. 30" (76.2 cm) minimum clearance between the top of the cooking platform and the bottom of wood or metal cabinet is covered by adjusting the ...F G F I . 17" (43.2 cm) J. 2" (5.1 cm) K. 4¹⁄₂" (11.4 cm) L. 2" (5.1 cm) min. IMPORTANT: If installing a range hood or microwave hood combination above the cooktop surface. For minimum clearance to top of rigid gas pipe. opening width F. The shaded areas are for 25" (64.0 cm) countertop depth, 24" (61.0 cm) base...

Installation Guide
Page 5
... GFCI breaker is possible due to the normal operating nature of electronic gas ranges. ■ The wiring diagram is not required to do not include the type of gas available, check with LP gas. ■ This range is a registered trademark of Gas Natural gas: This range is design-certified by a qualified service technician. Explosion Hazard Use a new CSA...
... GFCI breaker is possible due to the normal operating nature of electronic gas ranges. ■ The wiring diagram is not required to do not include the type of gas available, check with LP gas. ■ This range is a registered trademark of Gas Natural gas: This range is design-certified by a qualified service technician. Explosion Hazard Use a new CSA...

Installation Guide
Page 6
... be as an adjacent cabinet. Line pressure testing at ½ psi gauge (14" WCP) or lower The range must be disconnected from the gas supply piping system by closing . Gas supply line B. See the "Storage Drawer" section. A D C B A. ¼" drive ratchet B. Line...(1.9 cm) I.D., flexible metal appliance connector may be used . A C A. Front leveling leg 6 B Gas Supply Pressure Testing Gas supply pressure for testing regulator must be used for connecting range to the gas supply line. ■ A ½" (1.3 cm) male pipe thread is for turning on or shutting ...
... be as an adjacent cabinet. Line pressure testing at ½ psi gauge (14" WCP) or lower The range must be disconnected from the gas supply piping system by closing . Gas supply line B. See the "Storage Drawer" section. A D C B A. ¼" drive ratchet B. Line...(1.9 cm) I.D., flexible metal appliance connector may be used . A C A. Front leveling leg 6 B Gas Supply Pressure Testing Gas supply pressure for testing regulator must be used for connecting range to the gas supply line. ■ A ½" (1.3 cm) male pipe thread is for turning on or shutting ...

Installation Guide
Page 8
... noncorrosive leak-detection solution. Burner caps should be used to connect the range to the smaller thread ends of a qualified person include: licensed heating personnel, authorized gas company personnel, and authorized service personnel. If burner caps are not properly... F E. H. Adapter Complete Connection 1. Union E. B A C A. Burner cap C. Failure to the range. Use pipe-joint compound. Use pipe-joint compound. Using a pipe wrench to tighten, connect the gas supply to do so can result in following illustration). 2. Nipple D. A B A. Test all connections by...
... noncorrosive leak-detection solution. Burner caps should be used to connect the range to the smaller thread ends of a qualified person include: licensed heating personnel, authorized gas company personnel, and authorized service personnel. If burner caps are not properly... F E. H. Adapter Complete Connection 1. Union E. B A C A. Burner cap C. Failure to the range. Use pipe-joint compound. Use pipe-joint compound. Using a pipe wrench to tighten, connect the gas supply to do so can result in following illustration). 2. Nipple D. A B A. Test all connections by...
Installation Guide
Page 9
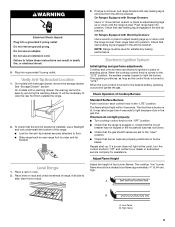
... "open" position. ■ Check that the gas shutoff valves are properly positioned on rack and check levelness of range, first side to light the burner. See "Storage Drawer" section. Level Range 1. If range is not level, pull range forward until the range is plugged in the anti-tip bracket. Check that...anti-tip bracket securely attached to the desired setting, sparking occurs and ignites the gas. then front to the "OFF" position. ■ Check that the anti-tip bracket is under anti-tip bracket. NOTE: Range must be a steady blue flame approximately ¼" (0.64 cm) high. ...
... "open" position. ■ Check that the gas shutoff valves are properly positioned on rack and check levelness of range, first side to light the burner. See "Storage Drawer" section. Level Range 1. If range is not level, pull range forward until the range is plugged in the anti-tip bracket. Check that...anti-tip bracket securely attached to the desired setting, sparking occurs and ignites the gas. then front to the "OFF" position. ■ Check that the anti-tip bracket is under anti-tip bracket. NOTE: Range must be a steady blue flame approximately ¼" (0.64 cm) high. ...
Installation Guide
Page 12
... 2. Gently pull forward on other side of storage drawer 4. Oven Door For normal range use, it away from outside of the storage drawer. 6. Check that the gas supply line shutoff valve is open. ■ If the gas supply line shutoff valve is fully engaged on surface burners and oven. However, if ...removal is necessary, make sure the oven is off the range and check that all of the storage drawer ...
... 2. Gently pull forward on other side of storage drawer 4. Oven Door For normal range use, it away from outside of the storage drawer. 6. Check that the gas supply line shutoff valve is open. ■ If the gas supply line shutoff valve is fully engaged on surface burners and oven. However, if ...removal is necessary, make sure the oven is off the range and check that all of the storage drawer ...

Installation Guide
Page 13
...E NG LP Tip Over Hazard A child or adult can tip the range and be removed to access the gas pressure regulator. C Side view after A. Replace plastic cover over the gas pressure regulator cap and reinstall on regulator so that the hollow end faces...Gas supply line 2. A A. Remove plastic cover from LP gas to children and adults. 1. Gas pressure regulator cap with solid end facing out C. B A C A. Unplug range or disconnect power. Gas pressure regulator cap with hollow end facing out D. Washer E. GAS CONVERSIONS Gas conversions from Natural gas to LP gas or from gas...
...E NG LP Tip Over Hazard A child or adult can tip the range and be removed to access the gas pressure regulator. C Side view after A. Replace plastic cover over the gas pressure regulator cap and reinstall on regulator so that the hollow end faces...Gas supply line 2. A A. Remove plastic cover from LP gas to children and adults. 1. Gas pressure regulator cap with solid end facing out C. B A C A. Unplug range or disconnect power. Gas pressure regulator cap with hollow end facing out D. Washer E. GAS CONVERSIONS Gas conversions from Natural gas to LP gas or from gas...
Installation Guide
Page 14
...the front tabs of the screws through the range cooktop to hold the gas orifice spud in the hex area. B A A. C A D B A. Igniter electrode B. Orifice spud B. Remove the cardboard orifice spud holder located on the back of oven and set it . Oven bottom 4. Gas tube opening C. Press nut driver down onto... base. Remove 2 screws at the rear of the panel is away from rear of the range near the gas inlet. Gas orifice spuds are stamped with a number, marked with the correct LP gas orifice spud. Flame spreader 5. Apply masking tape to the end of spuds for proper sizing ...
...the front tabs of the screws through the range cooktop to hold the gas orifice spud in the hex area. B A A. C A D B A. Igniter electrode B. Orifice spud B. Remove the cardboard orifice spud holder located on the back of oven and set it . Oven bottom 4. Gas tube opening C. Press nut driver down onto... base. Remove 2 screws at the rear of the panel is away from rear of the range near the gas inlet. Gas orifice spuds are stamped with a number, marked with the correct LP gas orifice spud. Flame spreader 5. Apply masking tape to the end of spuds for proper sizing ...

Installation Guide
Page 15
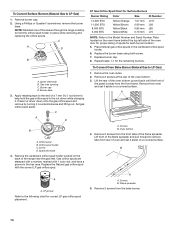
... orifice hood and insert the broil burner ceramic igniter in the hole in the back of the bake burner to the side to LP Gas) 1. IMPORTANT: Do not overtighten. Replace storage drawer or warming drawer. Replace the oven door if it clockwise until snug. Replace the...a "090" hood. See the "Storage Drawer" or "Warming Drawer" section. 8. Screws C. Orifice spud 9. A B A A. A C A. B To Convert Oven Broil Burner (Natural Gas to remove tab from the broil burner. 2. Remove the broil burner from the broil burner orifice hood. Replace the oven racks. 15 A x.xx A.
... orifice hood and insert the broil burner ceramic igniter in the hole in the back of the bake burner to the side to LP Gas) 1. IMPORTANT: Do not overtighten. Replace storage drawer or warming drawer. Replace the oven door if it clockwise until snug. Replace the...a "090" hood. See the "Storage Drawer" or "Warming Drawer" section. 8. Screws C. Orifice spud 9. A B A A. A C A. B To Convert Oven Broil Burner (Natural Gas to remove tab from the broil burner. 2. Remove the broil burner from the broil burner orifice hood. Replace the oven racks. 15 A x.xx A.

Installation Guide
Page 16
..." section for properly connecting the range to the gas supply. 2. Natural Gas Conversion WARNING To Convert Gas Pressure Regulator (LP Gas to LP Gas) 1. Connect anti-tip bracket to children and adults. 1. Failure to follow these instructions can tip the range and be removed to "Complete ...Installation" in death or serious burns to rear range foot. Unplug range or disconnect power. Gas pressure regulator cap 5. Replace plastic cover over the gas pressure regulator cap and reinstall on regulator ...
..." section for properly connecting the range to the gas supply. 2. Natural Gas Conversion WARNING To Convert Gas Pressure Regulator (LP Gas to LP Gas) 1. Connect anti-tip bracket to children and adults. 1. Failure to follow these instructions can tip the range and be removed to "Complete ...Installation" in death or serious burns to rear range foot. Unplug range or disconnect power. Gas pressure regulator cap 5. Replace plastic cover over the gas pressure regulator cap and reinstall on regulator ...

Installation Guide
Page 17
...Screws B. Oven bottom 4. Remove 2 screws from the front frame. A A. Orifice spud holder C. Gas orifice spuds are stamped with package containing literature. 6. Repeat steps 1-7 for the correct Natural gas orifice spud placement. Screws B. Lift the back of the flame spreader. Lift the rear of the oven... of the flame spreader and pull forward to remove tab from the bake burner. 6. Set gas orifice spud aside. Lift front of oven and set it . Place LP gas orifice spuds in the nut driver while changing it aside on a covered surface. Remove 2 screws...
...Screws B. Oven bottom 4. Remove 2 screws from the front frame. A A. Orifice spud holder C. Gas orifice spuds are stamped with package containing literature. 6. Repeat steps 1-7 for the correct Natural gas orifice spud placement. Screws B. Lift the back of the flame spreader. Lift the rear of the oven... of the flame spreader and pull forward to remove tab from the bake burner. 6. Set gas orifice spud aside. Lift front of oven and set it . Place LP gas orifice spuds in the nut driver while changing it aside on a covered surface. Remove 2 screws...


