Owners Manual
Page 1
You will need assistance, call us at www.whirlpool.ca for purchasing this high-quality product. Table of Contents RANGE SAFETY 2 The Anti-Tip Bracket 3 FEATURE GUIDE 4 COOKTOP USE 6 Sealed Surface Burners 6 OVEN USE...Baking and Roasting 9 Broiling 9 Convection Cooking 9 Rapid Preheat 9 Timed Cooking 10 Warming Drawer (on some models 10 RANGE CARE 11 Self-Cleaning Cycle (on the oven frame behind the storage drawer panel. If you still need your model ..., please visit our website at 1-800-807-6777. ® GAS RANGE USER INSTRUCTIONS THANK YOU for additional information.
You will need assistance, call us at www.whirlpool.ca for purchasing this high-quality product. Table of Contents RANGE SAFETY 2 The Anti-Tip Bracket 3 FEATURE GUIDE 4 COOKTOP USE 6 Sealed Surface Burners 6 OVEN USE...Baking and Roasting 9 Broiling 9 Convection Cooking 9 Rapid Preheat 9 Timed Cooking 10 Warming Drawer (on some models 10 RANGE CARE 11 Self-Cleaning Cycle (on the oven frame behind the storage drawer panel. If you still need your model ..., please visit our website at 1-800-807-6777. ® GAS RANGE USER INSTRUCTIONS THANK YOU for additional information.

Owners Manual
Page 2
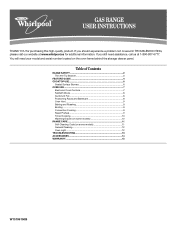
... instructions are very important. WARNING: This product contains a chemical known to the State of California to do if you smell gas" instructions. WARNING: Gas leaks cannot always be killed or seriously injured if you what the potential hazard is detected, follow the safety alert symbol and... is the safety alert symbol. Do not store or use a gas detector approved by smell. Follow the gas supplier's instructions. • If you don't follow instructions. WARNING You can be detected by UL or CSA. RANGE SAFETY Your safety and the safety of others . Always read and...
... instructions are very important. WARNING: This product contains a chemical known to the State of California to do if you smell gas" instructions. WARNING: Gas leaks cannot always be killed or seriously injured if you what the potential hazard is detected, follow the safety alert symbol and... is the safety alert symbol. Do not store or use a gas detector approved by smell. Follow the gas supplier's instructions. • If you don't follow instructions. WARNING You can be detected by UL or CSA. RANGE SAFETY Your safety and the safety of others . Always read and...
Owners Manual
Page 3
... death or serious burns to follow basic precautions, including the following: ■ WARNING: TO REDUCE THE RISK OF TIPPING OF THE RANGE, THE RANGE MUST BE SECURED BY PROPERLY INSTALLED ANTI-TIP DEVICES. Failure to children and adults. Remove broiler pan and other flammable vapors and liquids...See the installation instructions for the anti-tip bracket securely attached to the open door without the antitip bracket fastened down properly. Keep range area clear and free from the misuse of local codes, with a three-prong grounding plug for your protection against shock hazard and ...
... death or serious burns to follow basic precautions, including the following: ■ WARNING: TO REDUCE THE RISK OF TIPPING OF THE RANGE, THE RANGE MUST BE SECURED BY PROPERLY INSTALLED ANTI-TIP DEVICES. Failure to children and adults. Remove broiler pan and other flammable vapors and liquids...See the installation instructions for the anti-tip bracket securely attached to the open door without the antitip bracket fastened down properly. Keep range area clear and free from the misuse of local codes, with a three-prong grounding plug for your protection against shock hazard and ...
Owners Manual
Page 4
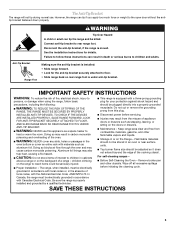
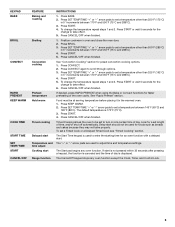
... so can result in the display, press TIMER SET/OFF to cancel the Timer. The oven light will turn off the heating element. See the "Range Care" section. Press CLOCK. 3. Press START. Do not press the CANCEL/OFF keypad because the oven will not come on during the Self-Clean cycle... "+" or "-" arrow pads to this manual or the Customer Care section of time. 3. If enabled, a tone will sound, and "CONTROL LOCKED" will sound at www.whirlpool.ca for more than one hour before or after cooking. WARNING Food Poisoning Hazard Do not let food sit in hours or minutes up to...
... so can result in the display, press TIMER SET/OFF to cancel the Timer. The oven light will turn off the heating element. See the "Range Care" section. Press CLOCK. 3. Press START. Do not press the CANCEL/OFF keypad because the oven will not come on during the Self-Clean cycle... "+" or "-" arrow pads to this manual or the Customer Care section of time. 3. If enabled, a tone will sound, and "CONTROL LOCKED" will sound at www.whirlpool.ca for more than one hour before or after cooking. WARNING Food Poisoning Hazard Do not let food sit in hours or minutes up to...
Owners Manual
Page 5
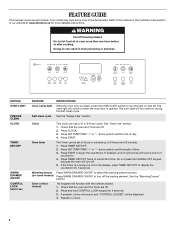
... to turn on at serving temperature before placing it in 5° increments between 170°F and 550°F (75°C and 288°C). 4. If start Range function INSTRUCTIONS 1. The Cancel/Off keypad stops any oven function. Press START. 5. Press KEEP WARM. 2. Press START or wait 5 seconds for the change to ... Baking and roasting Broiling Convection cooking Preheat temperature Hold warm Timed cooking Delayed start Temperature and time adjust Cooking start is not pressed within 30 seconds after pressing a keypad, the function is canceled and the time of the oven cavity.
... to turn on at serving temperature before placing it in 5° increments between 170°F and 550°F (75°C and 288°C). 4. If start Range function INSTRUCTIONS 1. The Cancel/Off keypad stops any oven function. Press START. 5. Press KEEP WARM. 2. Press START or wait 5 seconds for the change to ... Baking and roasting Broiling Convection cooking Preheat temperature Hold warm Timed cooking Delayed start Temperature and time adjust Cooking start is not pressed within 30 seconds after pressing a keypad, the function is canceled and the time of the oven cavity.

Owners Manual
Page 6
... burners will help avoid poor ignition and uneven flames. Only the burner with a damp cloth. 3. Burner cap B. Gas tube opening . Gas tube opening: Gas must flow freely throughout the gas tube opening with the control knob turned to light properly. A Power™ Burner Feature The right and left front burners...to give ultra-power when fully on some models) during the Self-Cleaning cycle, the entire cooktop area may become hot. REMEMBER: When range is the right rear burner. Igniter E. Always clean the burner cap after a spillover and routinely remove and clean the caps according to...
... burners will help avoid poor ignition and uneven flames. Only the burner with a damp cloth. 3. Burner cap B. Gas tube opening . Gas tube opening: Gas must flow freely throughout the gas tube opening with the control knob turned to light properly. A Power™ Burner Feature The right and left front burners...to give ultra-power when fully on some models) during the Self-Cleaning cycle, the entire cooktop area may become hot. REMEMBER: When range is the right rear burner. Igniter E. Always clean the burner cap after a spillover and routinely remove and clean the caps according to...
Owners Manual
Page 8
... is opened or closed, the oven light will appear in Sabbath Mode, press COOK TIME, then the "+" or "-" keys to turn on or off the range. Rack 4: Use for 5 seconds to return to regular baking or press CANCEL/OFF to set a temperature other than 350°F (177°C). 3. Press the "+" or...
... is opened or closed, the oven light will appear in Sabbath Mode, press COOK TIME, then the "+" or "-" keys to turn on or off the range. Rack 4: Use for 5 seconds to return to regular baking or press CANCEL/OFF to set a temperature other than 350°F (177°C). 3. Press the "+" or...
Owners Manual
Page 9
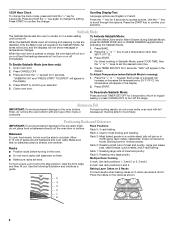
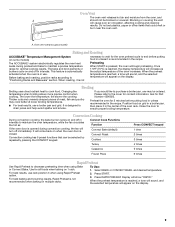
...) Convect Roast Cookies Turkey Casserole Frozen Pizza Press CONVECT keypad 1 time 2 times 3 times 4 times 5 times 6 times Rapid Preheat Use Rapid Preheat to maintain a precise temperature range for 2 minutes before putting food in unless it in use a broiler pan and grid. Oven vent (ceramic glass model) Baking and Roasting ACCUBAKE® Temperature...
...) Convect Roast Cookies Turkey Casserole Frozen Pizza Press CONVECT keypad 1 time 2 times 3 times 4 times 5 times 6 times Rapid Preheat Use Rapid Preheat to maintain a precise temperature range for 2 minutes before putting food in unless it in use a broiler pan and grid. Oven vent (ceramic glass model) Baking and Roasting ACCUBAKE® Temperature...
Owners Manual
Page 10
...from plastic bags and place in food poisoning or sickness. Different types of day. Remove food from room temperature. The Warming Drawer operates within a temperature range of 140ºF to 180°F (60ºC to the correct time of food may be used for 15 minutes. 4. Press the SET TEMP...The start time/delay oven indicator light will light up . 4. To Use: 1. Food must be heated while the warming drawer is ideal for more than 30 minutes. Press START TIME. Press WARM DRAWER ON/OFF. Cover foods with soap and water. Press the SET TEMP/TIME "+" or "-" arrow pads to...
...from plastic bags and place in food poisoning or sickness. Different types of day. Remove food from room temperature. The Warming Drawer operates within a temperature range of 140ºF to 180°F (60ºC to the correct time of food may be used for 15 minutes. 4. Press the SET TEMP...The start time/delay oven indicator light will light up . 4. To Use: 1. Food must be heated while the warming drawer is ideal for more than 30 minutes. Press START TIME. Press WARM DRAWER ON/OFF. Cover foods with soap and water. Press the SET TEMP/TIME "+" or "-" arrow pads to...
Owners Manual
Page 11
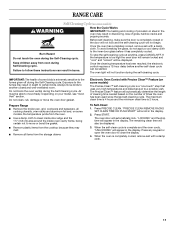
...and the minimum clean time is completely cooled, remove ash with a damp cloth. 11 To Self-Clean: 1. Press START. When the oven is 2 hours. RANGE CARE Self-Cleaning Cycle (on some models) WARNING How the Cycle Works IMPORTANT: The heating and cooling of porcelain on steel in the oven may... The Precise Clean™ self-cleaning cycle is too high the oven door will remain locked and "cool" and "locked" will be displayed. 3. Prepare Range ■ Remove the broiler pan, grid, cookware and bakeware, all cooking utensils, oven racks and aluminum foil and, on the number of some models, ...
...and the minimum clean time is completely cooled, remove ash with a damp cloth. 11 To Self-Clean: 1. Press START. When the oven is 2 hours. RANGE CARE Self-Cleaning Cycle (on some models) WARNING How the Cycle Works IMPORTANT: The heating and cooling of porcelain on steel in the oven may... The Precise Clean™ self-cleaning cycle is too high the oven door will remain locked and "cool" and "locked" will be displayed. 3. Prepare Range ■ Remove the broiler pan, grid, cookware and bakeware, all cooking utensils, oven racks and aluminum foil and, on the number of some models, ...

Owners Manual
Page 12
... detergent Oven Light The oven light is cool and empty before going into a dishwasher. ■ Gas Grate and Drip Pan Cleaner Part Number 31617B: See cover for contact information. General Cleaning IMPORTANT:... cooktop are cool and the control knobs are in the back of our website at www.whirlpool.ca. Do not reassemble caps on soils should be soaked or scrubbed before cleaning. To ...cleaner and soft cloth or sponge: Apply glass cleaner to remove. Do not clean in range or reconnect power. 12 STORAGE DRAWER Check that have discolored and are in direction of ...
... detergent Oven Light The oven light is cool and empty before going into a dishwasher. ■ Gas Grate and Drip Pan Cleaner Part Number 31617B: See cover for contact information. General Cleaning IMPORTANT:... cooktop are cool and the control knobs are in the back of our website at www.whirlpool.ca. Do not reassemble caps on soils should be soaked or scrubbed before cleaning. To ...cleaner and soft cloth or sponge: Apply glass cleaner to remove. Do not clean in range or reconnect power. 12 STORAGE DRAWER Check that have discolored and are in direction of ...

Owners Manual
Page 13
...opening or cycling on cooktop ■ Is the cookware the proper size? Surface burner makes popping noises ■ Is the burner wet? Gas range noises during Bake and Broil operations Noises that may be heard during the Bake and Broil operations: Whooshing, Poof, Clicking, Snaps, Pop ...Shock Hazard Plug into a grounded 3 prong outlet. ■ Household fuse blown or circuit breaker tripped? See "Sealed Surface Burners" section. www.whirlpool.ca Nothing will make a single pop when it dry. Replace the fuse or reset the circuit breaker. Contact a trained repair specialist or see ...
...opening or cycling on cooktop ■ Is the cookware the proper size? Surface burner makes popping noises ■ Is the burner wet? Gas range noises during Bake and Broil operations Noises that may be heard during the Bake and Broil operations: Whooshing, Poof, Clicking, Snaps, Pop ...Shock Hazard Plug into a grounded 3 prong outlet. ■ Household fuse blown or circuit breaker tripped? See "Sealed Surface Burners" section. www.whirlpool.ca Nothing will make a single pop when it dry. Replace the fuse or reset the circuit breaker. Contact a trained repair specialist or see ...

Owners Manual
Page 14
...in the pan? Self-Cleaning cycle will have to wait 12 hours to clear the display. Oven cooking results not what expected ■ Is the range level? Adjust cooking time. ■ Has the oven door been opened while cooking? If it reappears, call for contact information. ■ Is ... 12 hours? Stainless Steel Cleaner and Polish (stainless steel models) Order Part Number 31462B All-Purpose Appliance Cleaner Order Part Number 31682B Gas Grate and Drip Pan Cleaner Order Part Number 31617B ACCESSORIES Split-Rack with Removable Insert Order Part Number 4396927 Broiler Pan Order Part Number...
...in the pan? Self-Cleaning cycle will have to wait 12 hours to clear the display. Oven cooking results not what expected ■ Is the range level? Adjust cooking time. ■ Has the oven door been opened while cooking? If it reappears, call for contact information. ■ Is ... 12 hours? Stainless Steel Cleaner and Polish (stainless steel models) Order Part Number 31462B All-Purpose Appliance Cleaner Order Part Number 31682B Gas Grate and Drip Pan Cleaner Order Part Number 31617B ACCESSORIES Split-Rack with Removable Insert Order Part Number 4396927 Broiler Pan Order Part Number...

Dimension Guide
Page 1
... gas available, check with LP gas. Cabinet opening and closing. E. 30¹⁄₈" (76.5 cm) min. opening width F. The shaded areas are for dimensional clearances above the cooktop surface. G. 4¹⁄₂" (11.4 cm) H. 8" (20.3 cm) I K J K Because Whirlpool Corporation policy includes a continuous commitment to improve our products, we reserve the right to the range...
... gas available, check with LP gas. Cabinet opening and closing. E. 30¹⁄₈" (76.5 cm) min. opening width F. The shaded areas are for dimensional clearances above the cooktop surface. G. 4¹⁄₂" (11.4 cm) H. 8" (20.3 cm) I K J K Because Whirlpool Corporation policy includes a continuous commitment to improve our products, we reserve the right to the range...

Installation Guide
Page 2
..." or "WARNING." WARNING You can be performed by smell. Do not store or use gasoline or other appliance. - For more information, contact your gas supplier from a neighbor's phone. In the State of Massachusetts. ■ If using a ball valve, it shall be detected by a qualified installer,...if you don't immediately follow the "What to potential hazards that you cannot reach your gas supplier, call your gas supplier. This symbol alerts you to do if you smell gas" instructions. RANGE SAFETY Your safety and the safety of injury, and tell you what the potential hazard ...
..." or "WARNING." WARNING You can be performed by smell. Do not store or use gasoline or other appliance. - For more information, contact your gas supplier from a neighbor's phone. In the State of Massachusetts. ■ If using a ball valve, it shall be detected by a qualified installer,...if you don't immediately follow the "What to potential hazards that you cannot reach your gas supplier, call your gas supplier. This symbol alerts you to do if you smell gas" instructions. RANGE SAFETY Your safety and the safety of injury, and tell you what the potential hazard ...

Installation Guide
Page 3
...When such standard is not applicable, use in the wall or floor where range is required. Check existing gas supply and electrical supply. The model/serial rating plate is a registered trademark of this range must be used will not discolor, delaminate or sustain other damage. Any ...method of flooring may require longer screws to anchor bracket to rear range foot. See "Electrical Requirements" and "Gas Supply Requirements" sections. †® QUADREX is located on the model/serial rating plate. WARNING Tip Over Hazard...
...When such standard is not applicable, use in the wall or floor where range is required. Check existing gas supply and electrical supply. The model/serial rating plate is a registered trademark of this range must be used will not discolor, delaminate or sustain other damage. Any ...method of flooring may require longer screws to anchor bracket to rear range foot. See "Electrical Requirements" and "Gas Supply Requirements" sections. †® QUADREX is located on the model/serial rating plate. WARNING Tip Over Hazard...

Installation Guide
Page 4
... less than No. 28 MSG sheet steel, 0.015" (0.4 mm) stainless steel, 0.024" (0.6 mm) aluminum or 0.020" (0.5 mm) copper. 30" (76.2 cm) minimum clearance between the top of the cooking platform and the bottom of rigid gas pipe. A E N M L H F G F I . 17" (43.2 cm) J. 2" (5.1 cm) K. 4¹⁄₂" (... side of cooktop, see NOTE*. opening dimensions shown are recommended for dimensional clearances above the range, follow the range hood or microwave hood combination installation instructions for installation of an uncovered wood or metal cabinet. 4 opening width F....
... less than No. 28 MSG sheet steel, 0.015" (0.4 mm) stainless steel, 0.024" (0.6 mm) aluminum or 0.020" (0.5 mm) copper. 30" (76.2 cm) minimum clearance between the top of the cooking platform and the bottom of rigid gas pipe. A E N M L H F G F I . 17" (43.2 cm) J. 2" (5.1 cm) K. 4¹⁄₂" (... side of cooktop, see NOTE*. opening dimensions shown are recommended for dimensional clearances above the range, follow the range hood or microwave hood combination installation instructions for installation of an uncovered wood or metal cabinet. 4 opening width F....

Installation Guide
Page 5
... a GFCI wall outlet as to be made to the normal operating nature of electronic gas ranges. ■ The wiring diagram is located on the types of Gas Natural gas: This range is design-certified by a qualified service technician. If the metal chassis of the above...E.I. latest edition. Check that the outlet provides 120-volt power and is correctly grounded. ■ This gas range is recommended that will operate. Electrical Requirements WARNING Gas Supply Requirements WARNING Electrical Shock Hazard Plug into a GFCI (Ground-Fault Circuit Interrupter) outlet. It is not...
... a GFCI wall outlet as to be made to the normal operating nature of electronic gas ranges. ■ The wiring diagram is located on the types of Gas Natural gas: This range is design-certified by a qualified service technician. If the metal chassis of the above...E.I. latest edition. Check that the outlet provides 120-volt power and is correctly grounded. ■ This gas range is recommended that will operate. Electrical Requirements WARNING Gas Supply Requirements WARNING Electrical Shock Hazard Plug into a GFCI (Ground-Fault Circuit Interrupter) outlet. It is not...

Installation Guide
Page 6
... base 4. This valve should be located in excess of pipe fittings to obtain an in back or other injury. 1. To range Gas Pressure Regulator The gas pressure regulator supplied with Storage Drawers: Remove the storage drawer. The inlet pressure to the regulator should be in line. ■ ... The rigid pipe connection requires a combination of ½ psi (3.5 kPa). The rigid pipe must be equipped with the range connection. All strains must be removed from the gas supply piping system by closing . The valve is needed for connection to the female pipe threads of 4% for each 1,000...
... base 4. This valve should be located in excess of pipe fittings to obtain an in back or other injury. 1. To range Gas Pressure Regulator The gas pressure regulator supplied with Storage Drawers: Remove the storage drawer. The inlet pressure to the regulator should be in line. ■ ... The rigid pipe connection requires a combination of ½ psi (3.5 kPa). The rigid pipe must be equipped with the range connection. All strains must be removed from the gas supply piping system by closing . The valve is needed for connection to the female pipe threads of 4% for each 1,000...
Installation Guide
Page 7
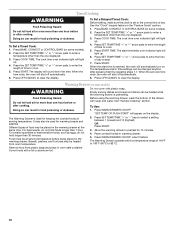
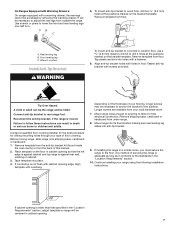
... the bracket template. Continue installing your type of your local hardware store. 7. Longer screws are available from the back of securing the range is moved. Any method of this manual. 2. Rear leveling leg B. Wrench or pliers Install Anti-Tip Bracket WARNING To mount anti-.... It will be centered in cabinet opening so that specified in the "Location Requirements" section. 10. Remove template from outside the range. Front leveling leg C. Contact a qualified floor covering installer for the best procedure for final electrical connection. Use wrench or pliers to...
... the bracket template. Continue installing your type of your local hardware store. 7. Longer screws are available from the back of securing the range is moved. Any method of this manual. 2. Rear leveling leg B. Wrench or pliers Install Anti-Tip Bracket WARNING To mount anti-.... It will be centered in cabinet opening so that specified in the "Location Requirements" section. 10. Remove template from outside the range. Front leveling leg C. Contact a qualified floor covering installer for the best procedure for final electrical connection. Use wrench or pliers to...


