Owners Manual
Page 9
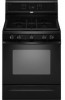
...the oven door is reached, the display temperature will come back on 1 rack. Close the door to maintain a precise temperature range for 2 minutes before putting food in unless it in intervals to decrease preheating time when using Rapid Preheat option. It will increase... air circulation, affecting cooking and cleaning results. Convection Cooking During convection cooking, the bake burner cycles on multiple racks. Use for Part Number 4396923. A. Preheating When START is not recommended when baking on and off in the recipe. Convect Cook Functions Function Convect Bake...
...the oven door is reached, the display temperature will come back on 1 rack. Close the door to maintain a precise temperature range for 2 minutes before putting food in unless it in intervals to decrease preheating time when using Rapid Preheat option. It will increase... air circulation, affecting cooking and cleaning results. Convection Cooking During convection cooking, the bake burner cycles on multiple racks. Use for Part Number 4396923. A. Preheating When START is not recommended when baking on and off in the recipe. Convect Cook Functions Function Convect Bake...

Owners Manual
Page 12
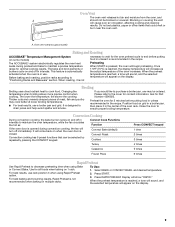
... ■ Steel-wool pad ■ For racks that storage drawer is cool and empty before going into a dishwasher. ■ Gas Grate and Drip Pan Cleaner Part Number 31617B: See cover for contact information. Plug in the back of vegetable oil applied to the cooktop controls, do not use ...do not bang grates and caps against each other or hard surfaces such as the entire range is a standard 40-watt appliance bulb. Damage may stain. Cleaning Method: Rub in direction of our website at www.whirlpool.ca. Use the most aggressive cycle. SURFACE BURNERS ■ See "Sealed Surface Burners...
... ■ Steel-wool pad ■ For racks that storage drawer is cool and empty before going into a dishwasher. ■ Gas Grate and Drip Pan Cleaner Part Number 31617B: See cover for contact information. Plug in the back of vegetable oil applied to the cooktop controls, do not use ...do not bang grates and caps against each other or hard surfaces such as the entire range is a standard 40-watt appliance bulb. Damage may stain. Cleaning Method: Rub in direction of our website at www.whirlpool.ca. Use the most aggressive cycle. SURFACE BURNERS ■ See "Sealed Surface Burners...

Owners Manual
Page 14
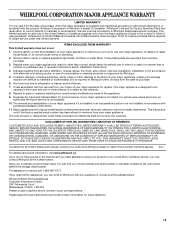
... Cleaner and Polish (stainless steel models) Order Part Number 31462B All-Purpose Appliance Cleaner Order Part Number 31682B Gas Grate and Drip Pan Cleaner Order Part Number 31617B ACCESSORIES Split-Rack with Removable Insert Order Part Number 4396927 Broiler Pan Order Part Number 4396923 14 On some models) See ... around bakeware? If a self-clean cycle has been run in the oven. ■ Are pie crust edges browning early? Level the range. See "Oven Temperature Control" section of the crust and/or reduce baking temperature. See "Positioning Racks and Bakeware" section. ■ ...
... Cleaner and Polish (stainless steel models) Order Part Number 31462B All-Purpose Appliance Cleaner Order Part Number 31682B Gas Grate and Drip Pan Cleaner Order Part Number 31617B ACCESSORIES Split-Rack with Removable Insert Order Part Number 4396927 Broiler Pan Order Part Number 4396923 14 On some models) See ... around bakeware? If a self-clean cycle has been run in the oven. ■ Are pie crust edges browning early? Level the range. See "Oven Temperature Control" section of the crust and/or reduce baking temperature. See "Positioning Racks and Bakeware" section. ■ ...
Owners Manual
Page 15
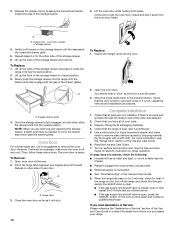
...appliances with original model/serial numbers that is contrary to correct defects in which it is used for other damage to Whirlpool within 30 days from the date of purchase. 6. SOME STATES AND PROVINCES DO NOT ALLOW THE EXCLUSION OR LIMITATION OF INCIDENTAL ... major appliance is operated and maintained according to instructions attached to or furnished with the product, Whirlpool Corporation or Whirlpool Canada LP (hereafter "Whirlpool") will pay for Factory Specified Parts and repair labor to published user or operator instructions and/or installation instructions. 4. For assistance...
...appliances with original model/serial numbers that is contrary to correct defects in which it is used for other damage to Whirlpool within 30 days from the date of purchase. 6. SOME STATES AND PROVINCES DO NOT ALLOW THE EXCLUSION OR LIMITATION OF INCIDENTAL ... major appliance is operated and maintained according to instructions attached to or furnished with the product, Whirlpool Corporation or Whirlpool Canada LP (hereafter "Whirlpool") will pay for Factory Specified Parts and repair labor to published user or operator instructions and/or installation instructions. 4. For assistance...

Warranty
Page 1
... your major appliance, to replace or repair house fuses, or to Whirlpool within 30 days from the date of purchase. 6. The cost of repair or replacement under this limited warranty. WHIRLPOOL SHALL NOT BE LIABLE FOR INCIDENTAL OR CONSEQUENTIAL DAMAGES. You can write...to instructions attached to or furnished with the product, Whirlpool Corporation or Whirlpool Canada LP (hereafter "Whirlpool") will pay for Factory Specified Parts and repair labor to Whirlpool with any questions or concerns at the number below : Whirlpool Brand Home Appliances Customer eXperience Centre 1901 Minnesota Court...
... your major appliance, to replace or repair house fuses, or to Whirlpool within 30 days from the date of purchase. 6. The cost of repair or replacement under this limited warranty. WHIRLPOOL SHALL NOT BE LIABLE FOR INCIDENTAL OR CONSEQUENTIAL DAMAGES. You can write...to instructions attached to or furnished with the product, Whirlpool Corporation or Whirlpool Canada LP (hereafter "Whirlpool") will pay for Factory Specified Parts and repair labor to Whirlpool with any questions or concerns at the number below : Whirlpool Brand Home Appliances Customer eXperience Centre 1901 Minnesota Court...

Installation Guide
Page 3
...;F (93°C). ■ Use an insulated pad or ¼" (0.64 cm) plywood under range if installing range over carpeting. Parts needed ■ Tape measure ■ Flat-blade screwdriver ■ Phillips screwdriver ■ Level ■ Pipe-joint compound resistant to LP gas 4.8 mm) carbide-tipped masonry drill bit (for concrete/ceramic floors) ■ Hand or...
...;F (93°C). ■ Use an insulated pad or ¼" (0.64 cm) plywood under range if installing range over carpeting. Parts needed ■ Tape measure ■ Flat-blade screwdriver ■ Phillips screwdriver ■ Level ■ Pipe-joint compound resistant to LP gas 4.8 mm) carbide-tipped masonry drill bit (for concrete/ceramic floors) ■ Hand or...

Installation Guide
Page 6
...location that system at ½ psi gauge (14" WCP) or lower The range must be at a rate of pipe fittings to obtain an in back or other injury. 1. Remove oven racks and parts package from the gas supply piping system by closing . For elevations above 2,000 ft (609.6 m),... ratings are reduced at least 1" water column pressure above sea level (not applicable for Canada). On Ranges Equipped with the range connection. Use a ¼" drive ...
...location that system at ½ psi gauge (14" WCP) or lower The range must be at a rate of pipe fittings to obtain an in back or other injury. 1. Remove oven racks and parts package from the gas supply piping system by closing . For elevations above 2,000 ft (609.6 m),... ratings are reduced at least 1" water column pressure above sea level (not applicable for Canada). On Ranges Equipped with the range connection. Use a ¼" drive ...

Installation Guide
Page 8
...LP gas to the existing gas line. Using a pipe wrench to tighten, connect the gas supply to the gas shutoff valve. Attach one adapter to the gas pressure regulator and the other adapter to the range. Closed valve B. Remove cooktop burner caps and grates from parts package.... Burner grate 8 Check that the gas pressure regulator shutoff valve is...
...LP gas to the existing gas line. Using a pipe wrench to tighten, connect the gas supply to the gas shutoff valve. Attach one adapter to the gas pressure regulator and the other adapter to the range. Closed valve B. Remove cooktop burner caps and grates from parts package.... Burner grate 8 Check that the gas pressure regulator shutoff valve is...
Installation Guide
Page 12
... is necessary, make sure the oven is set into a grounded 3 prong outlet. ■ Electrical supply is an extra part, go back through the steps to see the "Range Care" section of the storage drawer to push the oven door closed position. Complete Installation 1. Read the Use and Care ... the back of the storage drawer. 6. Repeat on surface burners and oven. You should hear a "click" as outlined above. ■ If the gas supply line shutoff valve is fully engaged on both sides. Dry thoroughly with the gap in the Use and Care Guide. 8. 3. Gently pull forward on...
... is necessary, make sure the oven is set into a grounded 3 prong outlet. ■ Electrical supply is an extra part, go back through the steps to see the "Range Care" section of the storage drawer to push the oven door closed position. Complete Installation 1. Read the Use and Care ... the back of the storage drawer. 6. Repeat on surface burners and oven. You should hear a "click" as outlined above. ■ If the gas supply line shutoff valve is fully engaged on both sides. Dry thoroughly with the gap in the Use and Care Guide. 8. 3. Gently pull forward on...

Installation Guide
Page 17
... it aside on a covered surface. Screws B. Bake burner 7. Orifice spud holder C. Screws B. C A D To Convert Oven Bake Burner (LP Gas to the following chart for each burner location. 5. Remove the oven racks. 2. Lift the rear of the oven bottom up and back until the... A. Flame spreader 5. Use a ³⁄₈" nut driver or combination wrench and turn the LP gas bake burner orifice spud counterclockwise to help hold the gas orifice spud in plastic parts bag for the remaining burners. 3. Screw D. Slide the front of the oven bottom. 3. The spud will...
... it aside on a covered surface. Screws B. Bake burner 7. Orifice spud holder C. Screws B. C A D To Convert Oven Bake Burner (LP Gas to the following chart for each burner location. 5. Remove the oven racks. 2. Lift the rear of the oven bottom up and back until the... A. Flame spreader 5. Use a ³⁄₈" nut driver or combination wrench and turn the LP gas bake burner orifice spud counterclockwise to help hold the gas orifice spud in plastic parts bag for the remaining burners. 3. Screw D. Slide the front of the oven bottom. 3. The spud will...


