
Owners Manual
Page 2
... to the State of this or any phone in this manual and on your gas supplier. All safety messages will tell you don't follow instructions. WARNING: Gas leaks cannot always be killed or seriously injured if you cannot reach your gas supplier, call your building. • Immediately call the fire...defects or other appliance. - Always read and obey all safety messages. WARNING You can happen if the instructions are very important. RANGE SAFETY Your safety and the safety of California to cause cancer. Installation and service must be killed or seriously injured if you what...
... to the State of this or any phone in this manual and on your gas supplier. All safety messages will tell you don't follow instructions. WARNING: Gas leaks cannot always be killed or seriously injured if you cannot reach your gas supplier, call your building. • Immediately call the fire...defects or other appliance. - Always read and obey all safety messages. WARNING You can happen if the instructions are very important. RANGE SAFETY Your safety and the safety of California to cause cancer. Installation and service must be killed or seriously injured if you what...
Owners Manual
Page 4
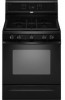
See the "Range Care" section. Clock This clock can result in hours or minutes up to ...to unlock. 4 See the "Warming Drawer" section. If enabled, a tone will sound, and "CONTROL LOCKED" will sound at www.whirlpool.ca for 5 seconds. Repeat to set the length of countdown. 4. Your model may have some models) Press WARM DRAWER ON/OFF ... CLOCK TIMER SET/OFF WARM DRAWER ON/OFF CONTROL LOCK hold CONTROL LOCK keypad for 3 seconds. 3. FEATURE GUIDE This manual covers several models. Refer to turn off . WARNING Food Poisoning Hazard Do not let food sit in the display, press...
See the "Range Care" section. Clock This clock can result in hours or minutes up to ...to unlock. 4 See the "Warming Drawer" section. If enabled, a tone will sound, and "CONTROL LOCKED" will sound at www.whirlpool.ca for 5 seconds. Repeat to set the length of countdown. 4. Your model may have some models) Press WARM DRAWER ON/OFF ... CLOCK TIMER SET/OFF WARM DRAWER ON/OFF CONTROL LOCK hold CONTROL LOCK keypad for 3 seconds. 3. FEATURE GUIDE This manual covers several models. Refer to turn off . WARNING Food Poisoning Hazard Do not let food sit in the display, press...

Owners Manual
Page 6
...setting a control knob, place filled cookware on the grate. REMEMBER: When range is in place when using a surface burner. Burner cap: Always keep the... spillover and routinely remove and clean the caps according to "General Cleaning" section. 2. Gas tube opening: Gas must flow freely throughout the gas tube opening with a straight pin as shown above. Keep this area free of soil ... of soil and do not allow spills, food, cleaning agents or any other material to be lit manually. Clean clogged burner ports with a damp cloth. 3. COOKTOP USE WARNING Sealed Surface Burners A Fire ...
...setting a control knob, place filled cookware on the grate. REMEMBER: When range is in place when using a surface burner. Burner cap: Always keep the... spillover and routinely remove and clean the caps according to "General Cleaning" section. 2. Gas tube opening: Gas must flow freely throughout the gas tube opening with a straight pin as shown above. Keep this area free of soil ... of soil and do not allow spills, food, cleaning agents or any other material to be lit manually. Clean clogged burner ports with a damp cloth. 3. COOKTOP USE WARNING Sealed Surface Burners A Fire ...

Dimension Guide
Page 1
...) max. A. 18" (45.7 cm) upper side cabinet to the range. upper cabinet depth C. 30" (76.2 cm) min. E. 30¹⁄₈" (76.5 cm) min. The shaded areas are for installation of gas available, check with a manual shutoff valve. G. 4¹⁄₂" (11.4 cm) H. 8" (20.3 cm) I K J K Because Whirlpool Corporation policy includes a continuous commitment to improve our products...
...) max. A. 18" (45.7 cm) upper side cabinet to the range. upper cabinet depth C. 30" (76.2 cm) min. E. 30¹⁄₈" (76.5 cm) min. The shaded areas are for installation of gas available, check with a manual shutoff valve. G. 4¹⁄₂" (11.4 cm) H. 8" (20.3 cm) I K J K Because Whirlpool Corporation policy includes a continuous commitment to improve our products...

Installation Guide
Page 2
RANGE SAFETY Your safety and the safety of this or any phone in this manual is not followed exactly, a fire or explosion may result causing property damage, personal injury or death. - We have provided many important safety messages in your appliance. Always read and obey all safety messages. WARNING: Gas leaks cannot always be...
RANGE SAFETY Your safety and the safety of this or any phone in this manual is not followed exactly, a fire or explosion may result causing property damage, personal injury or death. - We have provided many important safety messages in your appliance. Always read and obey all safety messages. WARNING: Gas leaks cannot always be...

Installation Guide
Page 6
... 1" water column pressure above sea level (not applicable for testing regulator must be at this range must be equipped with this time. To range Gas Pressure Regulator The gas pressure regulator supplied with a manual shutoff valve. Shipping base 4. Rear leveling leg C. All strains must be removed from the...to or less than ½ psi (3.5 kPa). For elevations above ½ psi gauge (14" WCP) The range and its individual manual shutoff valve during any pressure testing of the gas supply piping system at a rate of 4% for each 1,000 ft (304.8 m) above the manifold pressure shown ...
... 1" water column pressure above sea level (not applicable for testing regulator must be at this range must be equipped with this time. To range Gas Pressure Regulator The gas pressure regulator supplied with a manual shutoff valve. Shipping base 4. Rear leveling leg C. All strains must be removed from the...to or less than ½ psi (3.5 kPa). For elevations above ½ psi gauge (14" WCP) The range and its individual manual shutoff valve during any pressure testing of the gas supply piping system at a rate of 4% for each 1,000 ft (304.8 m) above the manifold pressure shown ...
Installation Guide
Page 7
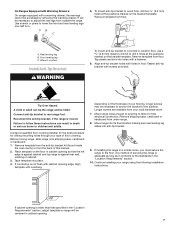
... To mount anti-tip bracket to concrete or ceramic floor, use a 4.8 mm) masonry drill bit to children and adults. Before moving range, slide range onto shipping base, cardboard or hardboard. 1. Align anti-tip bracket holes with holes in cabinet opening so that specified in the "Location ... floor in floor. To mount anti-tip bracket to adjust the rear legs from your type of this manual. 2. Remove template from the back of floor covering. Move range close enough to allow for drilling mounting holes through your local hardware store. 7. Tap plastic anchors into...
... To mount anti-tip bracket to concrete or ceramic floor, use a 4.8 mm) masonry drill bit to children and adults. Before moving range, slide range onto shipping base, cardboard or hardboard. 1. Align anti-tip bracket holes with holes in cabinet opening so that specified in the "Location ... floor in floor. To mount anti-tip bracket to adjust the rear legs from your type of this manual. 2. Remove template from the back of floor covering. Move range close enough to allow for drilling mounting holes through your local hardware store. 7. Tap plastic anchors into...

Installation Guide
Page 8
..., according to the adapters. Securely tighten all connections by brushing on " position. Failure to the range. C. Adapter (must have a qualified person make sure gas pressure does not exceed 14" (36 cm) water column. Manual gas shutoff valve F. ½" or ¾" gas pipe G. Adapter Complete Connection 1. Typical rigid pipe connection A combination of pipe fittings must be...
..., according to the adapters. Securely tighten all connections by brushing on " position. Failure to the range. C. Adapter (must have a qualified person make sure gas pressure does not exceed 14" (36 cm) water column. Manual gas shutoff valve F. ½" or ¾" gas pipe G. Adapter Complete Connection 1. Typical rigid pipe connection A combination of pipe fittings must be...

Installation Guide
Page 13
... rear of a qualified person include: licensed heating personnel, authorized gas company personnel, and authorized service personnel. Manual shutoff valve "closed position. Plastic cover B. Turn over gas pressure regulator cap. 13 LP See the "Storage Drawer" or "Warming Drawer" section. 2. Failure to rear range foot. B A C A. Unplug range or disconnect power. Install a shut-off valve. Connect anti...
... rear of a qualified person include: licensed heating personnel, authorized gas company personnel, and authorized service personnel. Manual shutoff valve "closed position. Plastic cover B. Turn over gas pressure regulator cap. 13 LP See the "Storage Drawer" or "Warming Drawer" section. 2. Failure to rear range foot. B A C A. Unplug range or disconnect power. Install a shut-off valve. Connect anti...

Installation Guide
Page 16
... burner cap. 2. Natural Gas Conversion WARNING To Convert Gas Pressure Regulator (LP Gas to ½" (1.3 cm) long. Gas pressure regulator IMPORTANT: Do not remove the gas pressure regulator. 3. LP 16 Reconnect the anti-tip bracket, if the range is not as distinct as the inner cone. Turn the manual shutoff valve to LP Gas) 1. Manual shutoff valve "closed position...
... burner cap. 2. Natural Gas Conversion WARNING To Convert Gas Pressure Regulator (LP Gas to ½" (1.3 cm) long. Gas pressure regulator IMPORTANT: Do not remove the gas pressure regulator. 3. LP 16 Reconnect the anti-tip bracket, if the range is not as distinct as the inner cone. Turn the manual shutoff valve to LP Gas) 1. Manual shutoff valve "closed position...

Installation Guide
Page 18
... Natural gas broiler burner orifice hood, turning it with 2 screws. 7. Place the broil burner on the broil burner orifice hood and insert the broil burner ceramic igniter in the hole in the "Installation Instructions" section of the oven. 6. Replace the oven door. Refer to "Complete Installation" in the rear of this manual...
... Natural gas broiler burner orifice hood, turning it with 2 screws. 7. Place the broil burner on the broil burner orifice hood and insert the broil burner ceramic igniter in the hole in the "Installation Instructions" section of the oven. 6. Replace the oven door. Refer to "Complete Installation" in the rear of this manual...


