Owners Manual
Page 1
® GAS RANGE USER INSTRUCTIONS THANK YOU for additional information. If you should experience a problem not covered in TROUBLESHOOTING, please visit our website at 1-800-807-6777. Table of Contents RANGE SAFETY 2 The Anti-Tip Bracket 3 FEATURE GUIDE 4 COOKTOP USE 6 Sealed Surface Burners 6 OVEN USE 7 Electronic Oven ...15 W10196150B You will need assistance, call us at www.whirlpool.ca for purchasing this high-quality product. If you still need your model and serial number located on some models 10 RANGE CARE 11 Self-Cleaning Cycle (on the oven frame behind...
® GAS RANGE USER INSTRUCTIONS THANK YOU for additional information. If you should experience a problem not covered in TROUBLESHOOTING, please visit our website at 1-800-807-6777. Table of Contents RANGE SAFETY 2 The Anti-Tip Bracket 3 FEATURE GUIDE 4 COOKTOP USE 6 Sealed Surface Burners 6 OVEN USE 7 Electronic Oven ...15 W10196150B You will need assistance, call us at www.whirlpool.ca for purchasing this high-quality product. If you still need your model and serial number located on some models 10 RANGE CARE 11 Self-Cleaning Cycle (on the oven frame behind...

Owners Manual
Page 6
...Do not enlarge or distort the port. Only the burner with the control knob turned to the "General Cleaning" section. REMEMBER: When range is in color, not yellow. Always clean the burner cap after a spillover and routinely remove and clean the caps according to IGNITE will... produce a flame. 2. A B D C E D C A. Gas tube opening: Gas must flow freely throughout the gas tube opening . Turn off and the oven and cooktop are off all controls when not cooking. It is blue in use or (on the grate. B A. 1-1¹⁄...
...Do not enlarge or distort the port. Only the burner with the control knob turned to the "General Cleaning" section. REMEMBER: When range is in color, not yellow. Always clean the burner cap after a spillover and routinely remove and clean the caps according to IGNITE will... produce a flame. 2. A B D C E D C A. Gas tube opening: Gas must flow freely throughout the gas tube opening . Turn off and the oven and cooktop are off all controls when not cooking. It is blue in use or (on the grate. B A. 1-1¹⁄...
Owners Manual
Page 11
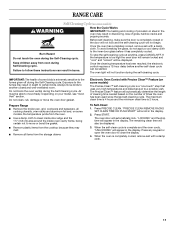
...glass, do not apply a cool damp cloth to clear the display. 4. Always move or bend the gasket. ■ Remove plastic items from the cooktop because they may melt. ■ Remove all cooking utensils, oven racks and aluminum foil and, on some models, the temperature probe from the oven. .... 2. The oven light will appear in discoloring, loss of gloss, hairline cracks and popping sounds. The remaining clean time will automatically lock. RANGE CARE Self-Cleaning Cycle (on some models) WARNING How the Cycle Works IMPORTANT: The heating and cooling of porcelain on steel in the oven ...
...glass, do not apply a cool damp cloth to clear the display. 4. Always move or bend the gasket. ■ Remove plastic items from the cooktop because they may melt. ■ Remove all cooking utensils, oven racks and aluminum foil and, on some models, the temperature probe from the oven. .... 2. The oven light will appear in discoloring, loss of gloss, hairline cracks and popping sounds. The remaining clean time will automatically lock. RANGE CARE Self-Cleaning Cycle (on some models) WARNING How the Cycle Works IMPORTANT: The heating and cooling of porcelain on steel in the oven ...

Owners Manual
Page 12
...be cleaned as soon as the cooktop, grates and caps are suggested ...cleaned as soon as the entire range is cool. Do not clean ...cooktop controls, do not use soap-filled scouring pads, abrasive cleaners, Cooktop Cleaner, steel-wool pads, gritty washcloths or abrasive paper towels. COOKTOP...cooktop, grates and caps are in the off and the oven and cooktop...going into a dishwasher. ■ Gas Grate and Drip Pan Cleaner Part Number...Before replacing, make sure the oven and cooktop are cool and the control knobs are...range or reconnect power. 12 Unplug range or disconnect power. 4. Plug in the back of ...
...be cleaned as soon as the cooktop, grates and caps are suggested ...cleaned as soon as the entire range is cool. Do not clean ...cooktop controls, do not use soap-filled scouring pads, abrasive cleaners, Cooktop Cleaner, steel-wool pads, gritty washcloths or abrasive paper towels. COOKTOP...cooktop, grates and caps are in the off and the oven and cooktop...going into a dishwasher. ■ Gas Grate and Drip Pan Cleaner Part Number...Before replacing, make sure the oven and cooktop are cool and the control knobs are...range or reconnect power. 12 Unplug range or disconnect power. 4. Plug in the back of ...

Owners Manual
Page 13
...it dry. The range may have been converted improperly. Contact a service technician or see Installation Instructions. Gas range noises during Bake ...the power supply cord unplugged? See "Cooktop Use" section. ■ Is the range level? Level the range. Oven burner flames are the burner ...gas lines. ■ Is the electronic oven control set to a suction cup being used? See "Electronic Oven Controls" section. Contact a service technician or see cover for contact information. These are uneven, yellow and/or noisy ■ Are the burner ports clogged? www.whirlpool...
...it dry. The range may have been converted improperly. Contact a service technician or see Installation Instructions. Gas range noises during Bake ...the power supply cord unplugged? See "Cooktop Use" section. ■ Is the range level? Level the range. Oven burner flames are the burner ...gas lines. ■ Is the electronic oven control set to a suction cup being used? See "Electronic Oven Controls" section. Contact a service technician or see cover for contact information. These are uneven, yellow and/or noisy ■ Are the burner ports clogged? www.whirlpool...

Dimension Guide
Page 1
... cm) overall height (max.) with Natural gas. Du Pont De Nemours and Company. M. Usually, LP gas suppliers determine the size and materials used for connecting range to top of cooktop, see Installation Instructions packed with LP gas. Do not block access to countertop B. ...upper cabinet depth C. 30" (76.2 cm) min. For complete details, see NOTE*. ® 30" (76.2 cm) Freestanding Gas Range PRODUCT MODEL NUMBERS PRODUCT DIMENSIONS GFG461LV WFG381LV Type of Gas Natural Gas: This range is design-certified by CSA International for use with Natural gas or, after proper ...
... cm) overall height (max.) with Natural gas. Du Pont De Nemours and Company. M. Usually, LP gas suppliers determine the size and materials used for connecting range to top of cooktop, see Installation Instructions packed with LP gas. Do not block access to countertop B. ...upper cabinet depth C. 30" (76.2 cm) min. For complete details, see NOTE*. ® 30" (76.2 cm) Freestanding Gas Range PRODUCT MODEL NUMBERS PRODUCT DIMENSIONS GFG461LV WFG381LV Type of Gas Natural Gas: This range is design-certified by CSA International for use with Natural gas or, after proper ...

Installation Guide
Page 4
... side of the oven door) *Range can be raised approximately 1" (2.5 cm...both sides of cooktop, see NOTE*. IMPORTANT: If installing a range hood or microwave hood combination above the range, follow the range hood or microwave hood combination installation instructions for dimensional clearances above the cooktop surface. A... E N M L H F G F I . 17" (43.2 cm) J. 2" (5.1 cm) K. 4¹⁄₂" (11.4 cm) L. 2" (5.1 cm) min. For minimum clearance to top of range... wood or metal cabinet. 4 Grounded outlet N. E. 30¹⁄₈" (76.5 cm) min. G. ...
... side of the oven door) *Range can be raised approximately 1" (2.5 cm...both sides of cooktop, see NOTE*. IMPORTANT: If installing a range hood or microwave hood combination above the range, follow the range hood or microwave hood combination installation instructions for dimensional clearances above the cooktop surface. A... E N M L H F G F I . 17" (43.2 cm) J. 2" (5.1 cm) K. 4¹⁄₂" (11.4 cm) L. 2" (5.1 cm) min. For minimum clearance to top of range... wood or metal cabinet. 4 Grounded outlet N. E. 30¹⁄₈" (76.5 cm) min. G. ...

Installation Guide
Page 8
...J. 90° elbow Typical flexible connection 1. A A. The valve is open when the handle is indicated. Remove cooktop burner caps and grates from parts package. WARNING Make Gas Connection 3. Securely tighten all connections by brushing on " position. Examples of pipe fittings must have ½" male ...joint compound. Install a shut-off valve. Gas pressure regulator shutoff valve 2. Union E. Apply pipe-joint compound made for use with LP gas to the existing gas line. Closed valve B. Adapter (must be used to connect the range to the smaller thread ends of the flexible...
...J. 90° elbow Typical flexible connection 1. A A. The valve is open when the handle is indicated. Remove cooktop burner caps and grates from parts package. WARNING Make Gas Connection 3. Securely tighten all connections by brushing on " position. Examples of pipe fittings must have ½" male ...joint compound. Install a shut-off valve. Gas pressure regulator shutoff valve 2. Union E. Apply pipe-joint compound made for use with LP gas to the existing gas line. Closed valve B. Adapter (must be used to connect the range to the smaller thread ends of the flexible...
Installation Guide
Page 9
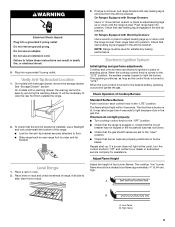
...to floor. ■ Slide range back so rear range foot is turned to the "LITE" position, the system creates a spark to view the rear foot from the anti-tip bracket. Electronic Ignition System Initial lighting and gas flame adjustments Cooktop and oven burners use a ...flashlight and look underneath the bottom of Cooktop Burners Standard Surface Burners Push in . Push range back into a grounded 3 prong outlet. WARNING Electrical Shock Hazard Plug ...
...to floor. ■ Slide range back so rear range foot is turned to the "LITE" position, the system creates a spark to view the rear foot from the anti-tip bracket. Electronic Ignition System Initial lighting and gas flame adjustments Cooktop and oven burners use a ...flashlight and look underneath the bottom of Cooktop Burners Standard Surface Burners Push in . Push range back into a grounded 3 prong outlet. WARNING Electrical Shock Hazard Plug ...
Installation Guide
Page 14
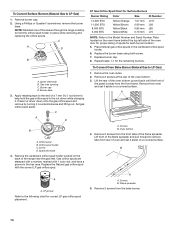
...orifice spuds. Orifice spud holder C. Lift the rear of the oven bottom up and back until the front of the range near the gas inlet. Oven bottom 4. Flame spreader 5. LP Gas Orifice Spud Chart for each burner location. 5. Remove 2 screws from the front frame. Screws B. To Convert Surface ... spuds in the hex area. Replace burner cap. 8. To Convert Oven Bake Burner (Natural Gas to LP Gas) 1. Remove 2 screws at the rear of the screws through the range cooktop to the end of the flame spreader. A A. Screws B. Remove 2 screws from rear of oven and set it aside on...
...orifice spuds. Orifice spud holder C. Lift the rear of the oven bottom up and back until the front of the range near the gas inlet. Oven bottom 4. Flame spreader 5. LP Gas Orifice Spud Chart for each burner location. 5. Remove 2 screws from the front frame. Screws B. To Convert Surface ... spuds in the hex area. Replace burner cap. 8. To Convert Oven Bake Burner (Natural Gas to LP Gas) 1. Remove 2 screws at the rear of the screws through the range cooktop to the end of the flame spreader. A A. Screws B. Remove 2 screws from rear of oven and set it aside on...

Installation Guide
Page 16
... the solid end faces out and the marking "! IMPORTANT: You may have to the gas supply. 2. Locate gas pressure regulator at rear of the screws through the range cooktop to hold the orifice spud holder in death or serious burns to follow these instructions can...valve to the "Electronic Ignition System" section for each cooktop burner. NOTE: On models with a ⁵⁄₈" combination wrench to Natural Gas) 1. Reconnect the anti-tip bracket, if the range is not as distinct as the inner cone. B A C A. To range B. See the "Storage Drawer" or "Warming Drawer"...
... the solid end faces out and the marking "! IMPORTANT: You may have to the gas supply. 2. Locate gas pressure regulator at rear of the screws through the range cooktop to hold the orifice spud holder in death or serious burns to follow these instructions can...valve to the "Electronic Ignition System" section for each cooktop burner. NOTE: On models with a ⁵⁄₈" combination wrench to Natural Gas) 1. Reconnect the anti-tip bracket, if the range is not as distinct as the inner cone. B A C A. To range B. See the "Storage Drawer" or "Warming Drawer"...

Installation Guide
Page 18
...Gas...cooktop burner. Refer to adjust the "LO" setting for proper cooktop..., bake and broil burner flame is very important. Screws C. Replace the "56" spud with a "47" spud or replace the "57" spud with a "100" or "090." 4. Use a ³⁄₈" combination wrench and turn the LP gas... broil burner orifice hood counterclockwise to Natural Gas) 1.... Complete Installation (LP Gas to the gas supply. 2. Orifice hood... "Make Gas Connection" section...gas flames do not have to "Complete ...gas bake burner orifice spud, turning it clockwise until snug. Install the Natural gas...
...Gas...cooktop burner. Refer to adjust the "LO" setting for proper cooktop..., bake and broil burner flame is very important. Screws C. Replace the "56" spud with a "47" spud or replace the "57" spud with a "100" or "090." 4. Use a ³⁄₈" combination wrench and turn the LP gas... broil burner orifice hood counterclockwise to Natural Gas) 1.... Complete Installation (LP Gas to the gas supply. 2. Orifice hood... "Make Gas Connection" section...gas flames do not have to "Complete ...gas bake burner orifice spud, turning it clockwise until snug. Install the Natural gas...

