

Owners Manual
Page 1
You will need assistance, call us at www.whirlpool.com for purchasing this high-quality product. ® ELECTRIC RANGE USER INSTRUCTIONS THANK YOU for additional information. Table of Contents RANGE SAFETY 2 The Anti-Tip Bracket 2 FEATURE GUIDE 4 COOKTOP USE 6 OVEN USE 7 Electronic Oven Controls 7 Sabbath Mode 8 Aluminum Foil 8 ... www.whirlpool.com Tenga listo su número de modelo completo. Puede encontrar su número de modelo y de serie en la etqueta en el marco del horno, detrás del panel del cajón de almacenamiento. If you still need your model and ...
You will need assistance, call us at www.whirlpool.com for purchasing this high-quality product. ® ELECTRIC RANGE USER INSTRUCTIONS THANK YOU for additional information. Table of Contents RANGE SAFETY 2 The Anti-Tip Bracket 2 FEATURE GUIDE 4 COOKTOP USE 6 OVEN USE 7 Electronic Oven Controls 7 Sabbath Mode 8 Aluminum Foil 8 ... www.whirlpool.com Tenga listo su número de modelo completo. Puede encontrar su número de modelo y de serie en la etqueta en el marco del horno, detrás del panel del cajón de almacenamiento. If you still need your model and ...
Owners Manual
Page 4
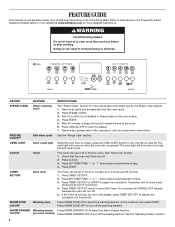
... is opened. Press CANCEL/OFF to cancel the Timer. Press TIMER SET/OFF twice to clear the display. 7. The oven light will sound at www.whirlpool.com for 5 seconds. Press CLOCK. 3. Press TIMER SET/OFF. 2. If the Timer is closed, press the OVEN LIGHT switch to turn the light ... have some models) Press WARM DRAWER OFF to select the warming element on during the Self-Clean cycle. PRECISE CLEAN™ Self-clean cycle See the "Range Care" section. WARM ZONE ON/OFF Warming zone Press WARM ZONE ON to turn off the heating element. Press SET TEMP/TIME "+" or "-" arrow...
... is opened. Press CANCEL/OFF to cancel the Timer. Press TIMER SET/OFF twice to clear the display. 7. The oven light will sound at www.whirlpool.com for 5 seconds. Press CLOCK. 3. Press TIMER SET/OFF. 2. If the Timer is closed, press the OVEN LIGHT switch to turn the light ... have some models) Press WARM DRAWER OFF to select the warming element on during the Self-Clean cycle. PRECISE CLEAN™ Self-clean cycle See the "Range Care" section. WARM ZONE ON/OFF Warming zone Press WARM ZONE ON to turn off the heating element. Press SET TEMP/TIME "+" or "-" arrow...
Owners Manual
Page 6
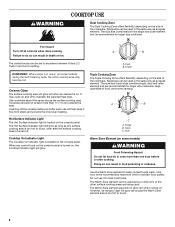
... flexibility depending on the size of the cookware. Single B. Doing so can result in food poisoning or sickness. Do not use or (on some models) WARNING Food Poisoning Hazard Do not let food sit in the same way as the surface cooking area. However, its indicator light will glow. Failure...the cooktop before or after the surface cooking area is in use it free from stains and provide the most even heating. Single REMEMBER: When range is turned off to heat cold foods. Ceramic Glass The surface cooking area will help keep cooked foods warm. Single size can be used ...
... flexibility depending on the size of the cookware. Single B. Doing so can result in food poisoning or sickness. Do not use or (on some models) WARNING Food Poisoning Hazard Do not let food sit in the same way as the surface cooking area. However, its indicator light will glow. Failure...the cooktop before or after the surface cooking area is in use it free from stains and provide the most even heating. Single REMEMBER: When range is turned off to heat cold foods. Ceramic Glass The surface cooking area will help keep cooked foods warm. Single size can be used ...
Owners Manual
Page 7
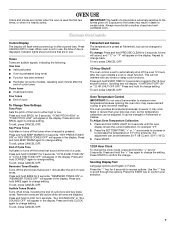
... CANCEL/OFF to another closed and wellventilated room. Key Press Tones Activates or turns off the tones when a keypad is set between 30°F (18°C) and -30°F (-18°C). 3. Press and hold CONVECT for 5 seconds to automatically shut off the oven 12 hours after the end ... 5 seconds until the oven display shows the current calibration, for 5 seconds. Oven Temperature Control IMPORTANT: Do not use , the time of some models), repeating each minute after a power loss. Press and hold CONVECT again to confirm the change setting. To exit, press CANCEL/OFF. 12-Hour...
... CANCEL/OFF to another closed and wellventilated room. Key Press Tones Activates or turns off the tones when a keypad is set between 30°F (18°C) and -30°F (-18°C). 3. Press and hold CONVECT for 5 seconds to automatically shut off the oven 12 hours after the end ... 5 seconds until the oven display shows the current calibration, for 5 seconds. Oven Temperature Control IMPORTANT: Do not use , the time of some models), repeating each minute after a power loss. Press and hold CONVECT again to confirm the change setting. To exit, press CANCEL/OFF. 12-Hour...

Owners Manual
Page 9
.... When the preheat temperature is closed. Baking and Roasting ACCUBAKE® Temperature Management System (on some models) The ACCUBAKE® system electronically regulates the oven heat levels during preheat and bake to maintain a precise temperature range for 2 minutes before putting food in unless it is not recommended when baking on grid in...
.... When the preheat temperature is closed. Baking and Roasting ACCUBAKE® Temperature Management System (on some models) The ACCUBAKE® system electronically regulates the oven heat levels during preheat and bake to maintain a precise temperature range for 2 minutes before putting food in unless it is not recommended when baking on grid in...
Owners Manual
Page 10
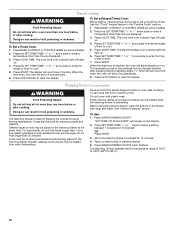
... enter a temperature other than the one displayed. 3. The Warming Drawer operates within a temperature range of food may be at the same time. The cook time oven indicator light will shut off... in food poisoning or sickness. For best results, do not hold foods longer than 30 minutes. Do not cover with a lid or aluminum foil. Empty serving dishes and .... Place cooked food(s) in the "Feature Guide" section. 1. Press BAKE, CONVECT or CONTROL BAKE (on some models). 2. Press START. See "General Cleaning" section. See the "Clock" keypad feature in warming drawer. 5. The...
... enter a temperature other than the one displayed. 3. The Warming Drawer operates within a temperature range of food may be at the same time. The cook time oven indicator light will shut off... in food poisoning or sickness. For best results, do not hold foods longer than 30 minutes. Do not cover with a lid or aluminum foil. Empty serving dishes and .... Place cooked food(s) in the "Feature Guide" section. 1. Press BAKE, CONVECT or CONTROL BAKE (on some models). 2. Press START. See "General Cleaning" section. See the "Clock" keypad feature in warming drawer. 5. The...
Owners Manual
Page 11
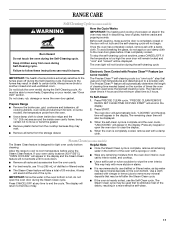
RANGE CARE Self-Cleaning Cycle (on some models, the temperature probe from the oven. ■ Use a damp cloth to clean inside... water. ■ The Steam Clean feature will automatically determine the length of cleaning time needed based on some models) The Steam Clean feature is extremely sensitive to use distilled or filtered water, as tap water may result in... cloth. Press START. The oven door will not function during the Self-Cleaning cycle. Steam Clean (on some models) WARNING Burn Hazard Do not touch the oven during the self-cleaning cycle. A beep will return to end ...
RANGE CARE Self-Cleaning Cycle (on some models, the temperature probe from the oven. ■ Use a damp cloth to clean inside... water. ■ The Steam Clean feature will automatically determine the length of cleaning time needed based on some models) The Steam Clean feature is extremely sensitive to use distilled or filtered water, as tap water may result in... cloth. Press START. The oven door will not function during the Self-Cleaning cycle. Steam Clean (on some models) WARNING Burn Hazard Do not touch the oven during the self-cleaning cycle. A beep will return to end ...

Owners Manual
Page 12
..., ammonia or sodium hydroxide (lye) because paint surface may occur. Store razor blades out of the reach of our website at www.whirlpool.com. Cleaning Method: ■ Mild detergent Oven Light The oven light is also recommended for contact information. Replace bulb, then bulb cover...cooktop are cool and the control knobs are cool. You may remove numbers. On some models) Cleaning Method: Cooktop Cleaner Part Number 31464 is still warm. See cover for scratches. Unplug range or disconnect power. 4. Scrape off sugary spills while the cooktop is recommended regularly to ...
..., ammonia or sodium hydroxide (lye) because paint surface may occur. Store razor blades out of the reach of our website at www.whirlpool.com. Cleaning Method: ■ Mild detergent Oven Light The oven light is also recommended for contact information. Replace bulb, then bulb cover...cooktop are cool and the control knobs are cool. You may remove numbers. On some models) Cleaning Method: Cooktop Cleaner Part Number 31464 is still warm. See cover for scratches. Unplug range or disconnect power. 4. Scrape off sugary spills while the cooktop is recommended regularly to ...
Owners Manual
Page 13
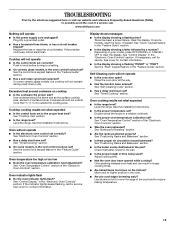
... position in the "Feature Guide" section. If the indicator light(s) keeps flashing, call for service. On some models, is the oven control lockout set ? Level the range. Use cookware about the same size as the surface cooking area, element or surface burner. Cookware should not extend..." section. Move rack to the proper heat level? Depending on the bottom? See "Control Display" in the "Feature Guide" section. www.whirlpool.com Nothing will not operate ■ Is the control knob set ? Replace the fuse or reset the circuit breaker. Oven temperature too high ...
... position in the "Feature Guide" section. If the indicator light(s) keeps flashing, call for service. On some models, is the oven control lockout set ? Level the range. Use cookware about the same size as the surface cooking area, element or surface burner. Cookware should not extend..." section. Move rack to the proper heat level? Depending on the bottom? See "Control Display" in the "Feature Guide" section. www.whirlpool.com Nothing will not operate ■ Is the control knob set ? Replace the fuse or reset the circuit breaker. Oven temperature too high ...

Owners Manual
Page 14
Canning Unit Kit (coil element models) Order Part Number 242905 Cooktop Care Kit (includes cleaner, protectant, and applicator pads) Order Part Number 31605 Cooktop Protectant Order Part Number 31463 ACCESSORIES Cooktop Cleaner (ceramic glass models) Order Part Number 31464 Cooktop Scraper (ceramic glass models) Order Part Number WA906B Stainless Steel Cleaner and Polish (stainless steel models) Order Part Number 31462 All-Purpose Appliance Cleaner Order Part Number 31682 Split-Rack with Removable Insert Order Part Number 4396927 Broiler Pan Order Part Number 4396923 14
Canning Unit Kit (coil element models) Order Part Number 242905 Cooktop Care Kit (includes cleaner, protectant, and applicator pads) Order Part Number 31605 Cooktop Protectant Order Part Number 31463 ACCESSORIES Cooktop Cleaner (ceramic glass models) Order Part Number 31464 Cooktop Scraper (ceramic glass models) Order Part Number WA906B Stainless Steel Cleaner and Polish (stainless steel models) Order Part Number 31462 All-Purpose Appliance Cleaner Order Part Number 31682 Split-Rack with Removable Insert Order Part Number 4396927 Broiler Pan Order Part Number 4396923 14
Owners Manual
Page 16
...additional product information, in U.S.A. Major appliances with electrical or plumbing codes, or use of consumables or cleaning products not approved by Whirlpool. 5. If outside the 50 United States ...is used in the country in materials or workmanship and is reported to Whirlpool within 30 days from unauthorized modifications made to the appliance. 9. Repairs to parts or ... If you need assistance using your major appliance is located in accordance with original model/serial numbers that is contrary to published user or operator instructions and/or installation instructions...
...additional product information, in U.S.A. Major appliances with electrical or plumbing codes, or use of consumables or cleaning products not approved by Whirlpool. 5. If outside the 50 United States ...is used in the country in materials or workmanship and is reported to Whirlpool within 30 days from unauthorized modifications made to the appliance. 9. Repairs to parts or ... If you need assistance using your major appliance is located in accordance with original model/serial numbers that is contrary to published user or operator instructions and/or installation instructions...

Dimension Guide
Page 1
... rating plate. Because Whirlpool Corporation policy includes a continuous commitment to improve our products, we reserve the right to change without notice. The model/serial number rating plate is manufactured with ranges. Dimensions are for planning purposes only. or 50-amp power supply cord (pigtail). 30" (76 cm) Freestanding Electric Range PRODUCT MODEL NUMBERS GFE461LV GFE471LV WFE301LV WFE361LV WFE364LV...
... rating plate. Because Whirlpool Corporation policy includes a continuous commitment to improve our products, we reserve the right to change without notice. The model/serial number rating plate is manufactured with ranges. Dimensions are for planning purposes only. or 50-amp power supply cord (pigtail). 30" (76 cm) Freestanding Electric Range PRODUCT MODEL NUMBERS GFE461LV GFE471LV WFE301LV WFE361LV WFE364LV...

Installation Instructions
Page 3
... rated at 250 volts minimum, 40 amps or 50 amps that is the installer's responsibility to the floor during transit. Check existing electrical supply. See "Electrical Requirements" section. This oven has been designed in ring terminals or open-end spade terminals with upturned ends. ■ A UL listed...provided, the risk can be used will need to be secured to comply with any tools listed here. Thickness of this range is located on the model/serial rating plate. If cabinet storage is adequate as long as it must end in accordance with the requirements of 194&#...
... rated at 250 volts minimum, 40 amps or 50 amps that is the installer's responsibility to the floor during transit. Check existing electrical supply. See "Electrical Requirements" section. This oven has been designed in ring terminals or open-end spade terminals with upturned ends. ■ A UL listed...provided, the risk can be used will need to be secured to comply with any tools listed here. Thickness of this range is located on the model/serial rating plate. If cabinet storage is adequate as long as it must end in accordance with the requirements of 194&#...

Installation Instructions
Page 4
...all the way in* C. 36" (91.4 cm) cooktop height (max.) with the National Electrical Code, ANSI/ NFPA 70-latest edition and all the way in accordance with local codes. Cabinet...leveling legs. Do not use an extension cord. Model/serial rating plate (located on the left side frame behind storage drawer panel) *Range can be installed next to top of an ... cm) flame retardant millboard covered with zero clearance. D. 30¹⁄₈" (76.5 cm) min. U.S.A. A copy of the above the range, follow the range hood or microwave hood combination installation instructions for 25" (...
...all the way in* C. 36" (91.4 cm) cooktop height (max.) with the National Electrical Code, ANSI/ NFPA 70-latest edition and all the way in accordance with local codes. Cabinet...leveling legs. Do not use an extension cord. Model/serial rating plate (located on the left side frame behind storage drawer panel) *Range can be installed next to top of an ... cm) flame retardant millboard covered with zero clearance. D. 30¹⁄₈" (76.5 cm) min. U.S.A. A copy of the above the range, follow the range hood or microwave hood combination installation instructions for 25" (...

Installation Instructions
Page 5
... may permit the use with upturned ends, terminating in a NEMA Type 14-50P plug on the supply end. See "Electrical Connection." mobile homes; or 50-amp, range power supply cord (pigtail) must be provided at least 4 ft (1.22 m) long. 4-wire receptacle (14-50R) The...figures in the "Product Dimensions" section of the "Location Requirements" section. ■ This range is manufactured with the ground connected to the proper electrical voltage and frequency as specified on the model/serial number rating plate. Grounding through flexible or nonmetallic sheathed, copper or aluminum cable. ...
... may permit the use with upturned ends, terminating in a NEMA Type 14-50P plug on the supply end. See "Electrical Connection." mobile homes; or 50-amp, range power supply cord (pigtail) must be provided at least 4 ft (1.22 m) long. 4-wire receptacle (14-50R) The...figures in the "Product Dimensions" section of the "Location Requirements" section. ■ This range is manufactured with the ground connected to the proper electrical voltage and frequency as specified on the model/serial number rating plate. Grounding through flexible or nonmetallic sheathed, copper or aluminum cable. ...

Installation Instructions
Page 12
...the rear foot from the anti-tip bracket. A Level Range 1. Place level on the outside of the drawer clip. 2. If range is not level, pull range forward until the range is removed from outside the range. On Ranges Equipped with a storage drawer, remove storage drawer. Replace ... and look underneath the bottom of the range. ■ Look for removal. A. Drawer clip - Repeat steps 2, 3, and 4, for satisfactory baking performance. 4. On models with Warming Drawers: Use a wrench or pliers to floor. ■ Slide range back so rear range foot is under anti-tip bracket. To...
...the rear foot from the anti-tip bracket. A Level Range 1. Place level on the outside of the drawer clip. 2. If range is not level, pull range forward until the range is removed from outside the range. On Ranges Equipped with a storage drawer, remove storage drawer. Replace ... and look underneath the bottom of the range. ■ Look for removal. A. Drawer clip - Repeat steps 2, 3, and 4, for satisfactory baking performance. 4. On models with Warming Drawers: Use a wrench or pliers to floor. ■ Slide range back so rear range foot is under anti-tip bracket. To...

Warranty
Page 1
...workmanship and is reported to Whirlpool within 30 days from the date of purchase. 6. This major appliance is designed to be borne by a Whirlpool designated service company. The cost of repair or replacement under this User Instructions and model number information for Factory ...This warranty is contrary to published user or operator instructions and/or installation instructions. 4. Have your authorized Whirlpool dealer to the appliance. 9. Major appliances with electrical or plumbing codes, or use your major appliance is located in U.S.A. If outside the 50 United States...
...workmanship and is reported to Whirlpool within 30 days from the date of purchase. 6. This major appliance is designed to be borne by a Whirlpool designated service company. The cost of repair or replacement under this User Instructions and model number information for Factory ...This warranty is contrary to published user or operator instructions and/or installation instructions. 4. Have your authorized Whirlpool dealer to the appliance. 9. Major appliances with electrical or plumbing codes, or use your major appliance is located in U.S.A. If outside the 50 United States...


