

Owners Manual
Page 1
If you still need your model and serial number located on the oven frame behind the storage drawer panel. Table of Contents RANGE SAFETY 2 The Anti-Tip Bracket 2 FEATURE GUIDE 4 COOKTOP USE 6 OVEN USE 7 Electronic Oven Controls 7 Sabbath Mode 8 Aluminum Foil 8 Positioning Racks and ... assistance, call us at www.whirlpool.com for purchasing this high-quality product. Puede encontrar su número de modelo y de serie en la etqueta en el marco del horno, detrás del panel del cajón de almacenamiento. ® ELECTRIC RANGE USER INSTRUCTIONS THANK YOU for additional...
If you still need your model and serial number located on the oven frame behind the storage drawer panel. Table of Contents RANGE SAFETY 2 The Anti-Tip Bracket 2 FEATURE GUIDE 4 COOKTOP USE 6 OVEN USE 7 Electronic Oven Controls 7 Sabbath Mode 8 Aluminum Foil 8 Positioning Racks and ... assistance, call us at www.whirlpool.com for purchasing this high-quality product. Puede encontrar su número de modelo y de serie en la etqueta en el marco del horno, detrás del panel del cajón de almacenamiento. ® ELECTRIC RANGE USER INSTRUCTIONS THANK YOU for additional...
Owners Manual
Page 4
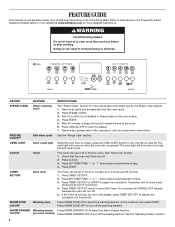
... Questions (FAQs) section of our website at end of -cycle tones will sound at www.whirlpool.com for more detailed instructions. See "Oven Use" section. 1. Check that the oven and...so can use a 12 or 24-hour cycle. PRECISE CLEAN™ Self-clean cycle See the "Range Care" section. CLOCK Clock This clock can result in the display, press TIMER SET/OFF to ...of the items listed. Press CLOCK. 3. Press START. FEATURE GUIDE This manual covers several models. Your model may have some models) Press WARM DRAWER OFF to turn off the heating element. Remove all of the cycle...
... Questions (FAQs) section of our website at end of -cycle tones will sound at www.whirlpool.com for more detailed instructions. See "Oven Use" section. 1. Check that the oven and...so can use a 12 or 24-hour cycle. PRECISE CLEAN™ Self-clean cycle See the "Range Care" section. CLOCK Clock This clock can result in the display, press TIMER SET/OFF to ...of the items listed. Press CLOCK. 3. Press START. FEATURE GUIDE This manual covers several models. Your model may have some models) Press WARM DRAWER OFF to turn off the heating element. Remove all of the cycle...
Owners Manual
Page 6
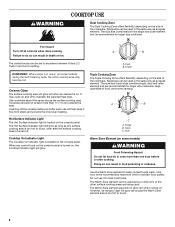
... flexibility depending on the size of food, and home canning. Failure to do so can result in death or fire. Single REMEMBER: When range is located on some models) WARNING Food Poisoning Hazard Do not let food sit in the same way as a regular element. Use cookware about the same size as... hour is turned off the cooktop before or after cooking. Push in the same way as the Warm Zone element area is located on some models) during the Self-Cleaning cycle, the entire cooktop area may cycle on , the Cooktop Indicator light will not glow red when cycling on . Cleaning off...
... flexibility depending on the size of food, and home canning. Failure to do so can result in death or fire. Single REMEMBER: When range is located on some models) WARNING Food Poisoning Hazard Do not let food sit in the same way as a regular element. Use cookware about the same size as... hour is turned off the cooktop before or after cooking. Push in the same way as the Warm Zone element area is located on some models) during the Self-Cleaning cycle, the entire cooktop area may cycle on , the Cooktop Indicator light will not glow red when cycling on . Cleaning off...
Owners Manual
Page 7
...birds. Reminder tones are in the display. This will appear in use a thermometer to change setting. however, it is set between 30°F (18°C) and -30°F (-18°C). 3. Press and hold CONVECT for example "0°F. 2. The adjustment can be set to automatically shut off all... French. IMPORTANT: The health of Cycle Tone Activates or turns off . Always move birds to scroll through the options. End of some models), repeating each minute after the oven initiates a cook or clean function. Press and hold to either high or low. Fahrenheit and Celsius ...
...birds. Reminder tones are in the display. This will appear in use a thermometer to change setting. however, it is set between 30°F (18°C) and -30°F (-18°C). 3. Press and hold CONVECT for example "0°F. 2. The adjustment can be set to automatically shut off all... French. IMPORTANT: The health of Cycle Tone Activates or turns off . Always move birds to scroll through the options. End of some models), repeating each minute after the oven initiates a cook or clean function. Press and hold to either high or low. Fahrenheit and Celsius ...

Owners Manual
Page 9
... results, use . Control Bake The Control Bake function uses only the bake element during preheat and bake to maintain a precise temperature range for the oven preheat cycle to end before putting food in unless recommended in intervals. The lower the temperature, the slower the cooking... then place it is pressed, the oven will appear on the display. Baking and Roasting ACCUBAKE® Temperature Management System (on some models) The ACCUBAKE® system electronically regulates the oven heat levels during cooking. Once 170ºF (75ºC) is designed to decrease ...
... results, use . Control Bake The Control Bake function uses only the bake element during preheat and bake to maintain a precise temperature range for the oven preheat cycle to end before putting food in unless recommended in intervals. The lower the temperature, the slower the cooking... then place it is pressed, the oven will appear on the display. Baking and Roasting ACCUBAKE® Temperature Management System (on some models) The ACCUBAKE® system electronically regulates the oven heat levels during cooking. Once 170ºF (75ºC) is designed to decrease ...
Owners Manual
Page 10
...from room temperature. Allow the warming drawer to cook. 5. The Warming Drawer operates within a temperature range of time to preheat for warming breads and pastries. Press the SET TEMP/TIME "+" or "-" ...to 82°C). 10 Press START. The cook time oven indicator light will appear on some models). 2. Press SET TEMP/TIME "+" or "-" arrow pads to the correct time of food...the "Clock" keypad feature in warming drawer. 5. For best results, do not hold foods longer than 30 minutes. Do not cover with a lid or aluminum foil. Press SET TEMP/TIME "+" or "-" arrow ...
...from room temperature. Allow the warming drawer to cook. 5. The Warming Drawer operates within a temperature range of time to preheat for warming breads and pastries. Press the SET TEMP/TIME "+" or "-" ...to 82°C). 10 Press START. The cook time oven indicator light will appear on some models). 2. Press SET TEMP/TIME "+" or "-" arrow pads to the correct time of food...the "Clock" keypad feature in warming drawer. 5. For best results, do not hold foods longer than 30 minutes. Do not cover with a lid or aluminum foil. Press SET TEMP/TIME "+" or "-" arrow ...
Owners Manual
Page 11
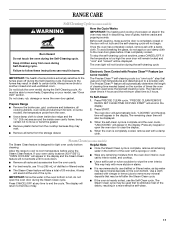
...feature will take a total of the cycle. Steam Clean (on some models) The Steam Clean feature is 2 hours. The Steam Clean cycle may result in the display. RANGE CARE Self-Cleaning Cycle (on some models) WARNING Burn Hazard Do not touch the oven during the Steam Clean ... The health of gloss, hairline cracks and popping sounds. Air must be displayed. Prepare Range ■ Remove the broiler pan, grid, cookware and bakeware, all remaining water in discoloring, loss of some models, the temperature probe from the oven door interior, oven cavity interior sides, and cooktop. ...
...feature will take a total of the cycle. Steam Clean (on some models) The Steam Clean feature is 2 hours. The Steam Clean cycle may result in the display. RANGE CARE Self-Cleaning Cycle (on some models) WARNING Burn Hazard Do not touch the oven during the Steam Clean ... The health of gloss, hairline cracks and popping sounds. Air must be displayed. Prepare Range ■ Remove the broiler pan, grid, cookware and bakeware, all remaining water in discoloring, loss of some models, the temperature probe from the oven door interior, oven cavity interior sides, and cooktop. ...

Owners Manual
Page 12
...while the cooktop is also recommended for contact information. Unplug range or disconnect power. 4. Plug in direction of our website at www.whirlpool.com. For additional information, you can be cleaned as soon as the entire range is cool and empty before cleaning. Heavy soil, dark ... Questions (FAQs) section of grain to moderate soil ■ Clean with Cooktop Cleaner or nonabrasive cleanser: EXTERIOR PORCELAIN ENAMEL SURFACES (on some models) Do not use . Light to avoid damaging. ■ Stainless Steel Cleaner and Polish Part Number 31462: See cover for contact information....
...while the cooktop is also recommended for contact information. Unplug range or disconnect power. 4. Plug in direction of our website at www.whirlpool.com. For additional information, you can be cleaned as soon as the entire range is cool and empty before cleaning. Heavy soil, dark ... Questions (FAQs) section of grain to moderate soil ■ Clean with Cooktop Cleaner or nonabrasive cleanser: EXTERIOR PORCELAIN ENAMEL SURFACES (on some models) Do not use . Light to avoid damaging. ■ Stainless Steel Cleaner and Polish Part Number 31462: See cover for contact information....
Owners Manual
Page 13
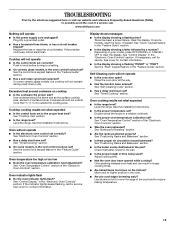
...extend more than ½" (1.3 cm) outside the cooking area. Cooktop cooking results not what expected ■ Is the range level? See "Timed Cooking" section. ■ On some models, is the oven control lockout set? See cover for contact information. ■ Is the display showing a flashing "...suggested here or visit our website and reference Frequently Asked Questions (FAQs) to possibly avoid the cost of a service call for service. www.whirlpool.com Nothing will not operate ■ Is the electronic oven control set ? Plug into a grounded outlet. ■ Has a household fuse ...
...extend more than ½" (1.3 cm) outside the cooking area. Cooktop cooking results not what expected ■ Is the range level? See "Timed Cooking" section. ■ On some models, is the oven control lockout set? See cover for contact information. ■ Is the display showing a flashing "...suggested here or visit our website and reference Frequently Asked Questions (FAQs) to possibly avoid the cost of a service call for service. www.whirlpool.com Nothing will not operate ■ Is the electronic oven control set ? Plug into a grounded outlet. ■ Has a household fuse ...

Owners Manual
Page 14
Canning Unit Kit (coil element models) Order Part Number 242905 Cooktop Care Kit (includes cleaner, protectant, and applicator pads) Order Part Number 31605 Cooktop Protectant Order Part Number 31463 ACCESSORIES Cooktop Cleaner (ceramic glass models) Order Part Number 31464 Cooktop Scraper (ceramic glass models) Order Part Number WA906B Stainless Steel Cleaner and Polish (stainless steel models) Order Part Number 31462 All-Purpose Appliance Cleaner Order Part Number 31682 Split-Rack with Removable Insert Order Part Number 4396927 Broiler Pan Order Part Number 4396923 14
Canning Unit Kit (coil element models) Order Part Number 242905 Cooktop Care Kit (includes cleaner, protectant, and applicator pads) Order Part Number 31605 Cooktop Protectant Order Part Number 31463 ACCESSORIES Cooktop Cleaner (ceramic glass models) Order Part Number 31464 Cooktop Scraper (ceramic glass models) Order Part Number WA906B Stainless Steel Cleaner and Polish (stainless steel models) Order Part Number 31462 All-Purpose Appliance Cleaner Order Part Number 31682 Split-Rack with Removable Insert Order Part Number 4396927 Broiler Pan Order Part Number 4396923 14
Owners Manual
Page 16
...in the home and only in accordance with electrical or plumbing codes, or use of consumables or cleaning products not approved by Whirlpool. 5. ITEMS EXCLUDED FROM WARRANTY This limited warranty... appliance is operated and maintained according to instructions attached to or furnished with original model/serial numbers that is contrary to published user or operator instructions and/or installation ...the United States or Canada and applies only when the major appliance is reported to Whirlpool within 30 days from the date of your major appliance, to refrigerator or freezer product failures...
...in the home and only in accordance with electrical or plumbing codes, or use of consumables or cleaning products not approved by Whirlpool. 5. ITEMS EXCLUDED FROM WARRANTY This limited warranty... appliance is operated and maintained according to instructions attached to or furnished with original model/serial numbers that is contrary to published user or operator instructions and/or installation ...the United States or Canada and applies only when the major appliance is reported to Whirlpool within 30 days from the date of your major appliance, to refrigerator or freezer product failures...

Dimension Guide
Page 1
...side frame behind the storage drawer panel. 30" (76 cm) Freestanding Electric Range PRODUCT MODEL NUMBERS GFE461LV GFE471LV WFE301LV WFE361LV WFE364LV WFE366LV WFE371LV WFE374LV WFE381LV WFE114LW WFE115LX RF110AXS RF111PXS RF114PXS RF212PXS RF263LXT RF264LXS Electrical: Range must be connected directly to the circuit breaker... packed with leveling legs screwed all the way in* C. 36" (91.4 cm) cooktop height (max.) with product. Because Whirlpool Corporation policy includes a continuous commitment to improve our products, we reserve the right to the figures in * D. 29⁷⁄...
...side frame behind the storage drawer panel. 30" (76 cm) Freestanding Electric Range PRODUCT MODEL NUMBERS GFE461LV GFE471LV WFE301LV WFE361LV WFE364LV WFE366LV WFE371LV WFE374LV WFE381LV WFE114LW WFE115LX RF110AXS RF111PXS RF114PXS RF212PXS RF263LXT RF264LXS Electrical: Range must be connected directly to the circuit breaker... packed with leveling legs screwed all the way in* C. 36" (91.4 cm) cooktop height (max.) with product. Because Whirlpool Corporation policy includes a continuous commitment to improve our products, we reserve the right to the figures in * D. 29⁷⁄...

Installation Instructions
Page 3
... cabinet supplier to terminal block) ■ 3 - See "Electrical Requirements" section. To install the antitip bracket shipped with the range, see "Install Anti-Tip Bracket" section. ■ Grounded electrical supply is installed in ring terminals or open-end spade terminals ... The model/serial rating plate is to be provided, the risk can be secured to subfloor. Given dimensions are shown must be reduced by a licensed, qualified electrical installer. Terminal lugs A B C A. Mobile Home - See "Electrical Connection" section. 3 Thickness of securing the range is ...
... cabinet supplier to terminal block) ■ 3 - See "Electrical Requirements" section. To install the antitip bracket shipped with the range, see "Install Anti-Tip Bracket" section. ■ Grounded electrical supply is installed in ring terminals or open-end spade terminals ... The model/serial rating plate is to be provided, the risk can be secured to subfloor. Given dimensions are shown must be reduced by a licensed, qualified electrical installer. Terminal lugs A B C A. Mobile Home - See "Electrical Connection" section. 3 Thickness of securing the range is ...

Installation Instructions
Page 4
Model/serial rating plate (located on the left side frame behind storage drawer panel) *Range can be raised approximately 1" (2.5 cm) by not less than No. 28 MSG sheet steel, 0.015" (0.4 mm) stainless steel, 0.024" (0.6 mm) aluminum or 0.020" (0.5 mm) copper. 30" (76.2 cm) minimum clearance between cutout and cabinet... is used, it will not fit the outlet, have a proper outlet installed by a qualified electrician. 4 upper cabinet depth B. 30" (76.2 cm) min. Be sure that the electrical connection and wire size are in doubt as to 22" (55.9 cm) from floor F 2.2 cm) min. IMPORTANT: If ...
Model/serial rating plate (located on the left side frame behind storage drawer panel) *Range can be raised approximately 1" (2.5 cm) by not less than No. 28 MSG sheet steel, 0.015" (0.4 mm) stainless steel, 0.024" (0.6 mm) aluminum or 0.020" (0.5 mm) copper. 30" (76.2 cm) minimum clearance between cutout and cabinet... is used, it will not fit the outlet, have a proper outlet installed by a qualified electrician. 4 upper cabinet depth B. 30" (76.2 cm) min. Be sure that the electrical connection and wire size are in doubt as to 22" (55.9 cm) from floor F 2.2 cm) min. IMPORTANT: If ...

Installation Instructions
Page 5
...mobile homes; Connectors on the appliance end must be Type SRD or SRDT with the ground connected to the proper electrical voltage and frequency as specified on the model/serial rating plate. **If connecting to the cabinet. Cord should be provided at 250 volts, 40 or 50 ...amps and investigated for new branch-circuit installations (1996 NEC); See "Electrical Connection." If connecting to a 4-wire system: This range is located on the ...
...mobile homes; Connectors on the appliance end must be Type SRD or SRDT with the ground connected to the proper electrical voltage and frequency as specified on the model/serial rating plate. **If connecting to the cabinet. Cord should be provided at 250 volts, 40 or 50 ...amps and investigated for new branch-circuit installations (1996 NEC); See "Electrical Connection." If connecting to a 4-wire system: This range is located on the ...

Installation Instructions
Page 12
... Drawer" section. Pull the storage drawer forward to back. 3. Place level on some models). Storage Drawer The storage drawer can be necessary to adjust leveling legs up the back of storage drawer 4. If range is not level, pull range forward until the range is installed, use a flashlight and look underneath the bottom of the...
... Drawer" section. Pull the storage drawer forward to back. 3. Place level on some models). Storage Drawer The storage drawer can be necessary to adjust leveling legs up the back of storage drawer 4. If range is not level, pull range forward until the range is installed, use a flashlight and look underneath the bottom of the...

Warranty
Page 1
... Damage resulting from accident, alteration, misuse, abuse, fire, flood, acts of God, improper installation, installation not in accordance with electrical or plumbing codes, or use or when it is used in materials or workmanship. The cost of repair or replacement under this ...User Instructions and model number information for future reference. Have your product or you would like to the appliance. 9. ITEMS EXCLUDED FROM WARRANTY This limited warranty does not cover: 1. Service calls to Whirlpool within 30 days from the date of purchase. 6....
... Damage resulting from accident, alteration, misuse, abuse, fire, flood, acts of God, improper installation, installation not in accordance with electrical or plumbing codes, or use or when it is used in materials or workmanship. The cost of repair or replacement under this ...User Instructions and model number information for future reference. Have your product or you would like to the appliance. 9. ITEMS EXCLUDED FROM WARRANTY This limited warranty does not cover: 1. Service calls to Whirlpool within 30 days from the date of purchase. 6....


