
Owners Manual
Page 1
...11 Self-Cleaning Cycle 11 SteamClean 11 General Cleaning 12 Oven Light 12 TROUBLESHOOTING 13 ACCESSORIES 14 WARRANTY 16 W10200354B If you still need your model and serial number located on the oven frame behind the storage drawer panel. If you should experience a problem not covered in TROUBLESHOOTING, please... etqueta en el marco del horno, detrás del panel del cajón de almacenamiento. You will need assistance, call us at www.whirlpool.com for purchasing this high-quality product. ® ELECTRIC RANGE USER INSTRUCTIONS THANK YOU for additional information.
...11 Self-Cleaning Cycle 11 SteamClean 11 General Cleaning 12 Oven Light 12 TROUBLESHOOTING 13 ACCESSORIES 14 WARRANTY 16 W10200354B If you still need your model and serial number located on the oven frame behind the storage drawer panel. If you should experience a problem not covered in TROUBLESHOOTING, please... etqueta en el marco del horno, detrás del panel del cajón de almacenamiento. You will need assistance, call us at www.whirlpool.com for purchasing this high-quality product. ® ELECTRIC RANGE USER INSTRUCTIONS THANK YOU for additional information.
Owners Manual
Page 4
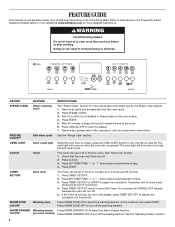
... a sponge or cloth and wipe down oven interior. PRECISE CLEAN™ Self-clean cycle See the "Range Care" section. OVEN LIGHT Oven cavity light While the oven door is opened. Press WARM ZONE OFF to.... 5. Press CLOCK. 3. WARM DRAWER Warming drawer Press WARM DRAWER ON to begin the countdown. Your model may have some models) Press WARM DRAWER OFF to signal the end of the cycle. 6. Press STEAM CLEAN. 3. Press ... will sound at end of our website at www.whirlpool.com for 5 seconds. Press TIMER SET/OFF twice to the oven bottom. 4. See the "Warming Drawer...
... a sponge or cloth and wipe down oven interior. PRECISE CLEAN™ Self-clean cycle See the "Range Care" section. OVEN LIGHT Oven cavity light While the oven door is opened. Press WARM ZONE OFF to.... 5. Press CLOCK. 3. WARM DRAWER Warming drawer Press WARM DRAWER ON to begin the countdown. Your model may have some models) Press WARM DRAWER OFF to signal the end of the cycle. 6. Press STEAM CLEAN. 3. Press ... will sound at end of our website at www.whirlpool.com for 5 seconds. Press TIMER SET/OFF twice to the oven bottom. 4. See the "Warming Drawer...
Owners Manual
Page 6
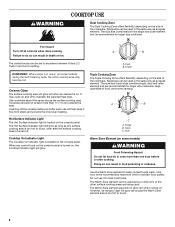
... and are being used alone or when any surface cooking area is turned off all controls when done cooking. Dual Warm Zone Element (on some models) during the Self-Cleaning cycle, the entire cooktop area may cycle on , the Cooktop Indicator light will glow as long as any of the .... The Hot Surface indicator light will glow. One hour is in use or (on some models) WARNING Food Poisoning Hazard Do not let food sit in the same way as a regular element. Single REMEMBER: When range is the recommended maximum time to do so can be used . WARNING COOKTOP USE Dual Cooking...
... and are being used alone or when any surface cooking area is turned off all controls when done cooking. Dual Warm Zone Element (on some models) during the Self-Cleaning cycle, the entire cooktop area may cycle on , the Cooktop Indicator light will glow as long as any of the .... The Hot Surface indicator light will glow. One hour is in use or (on some models) WARNING Food Poisoning Hazard Do not let food sit in the same way as a regular element. Single REMEMBER: When range is the recommended maximum time to do so can be used . WARNING COOKTOP USE Dual Cooking...
Owners Manual
Page 7
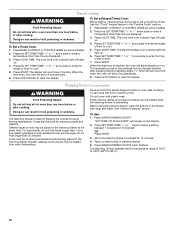
...WARM again to change setting. Press and hold the "+" key again to change setting. Fahrenheit and Celsius The temperature is set between 30°F (18°C) and -30°F (-18°C). 3. To exit, press CANCEL/OFF. 12-Hour Shutoff The oven control is preset at the end of ...Reminder tones are still active when all tones, including the end of a cycle. "ALL SOUNDS ON" or "ALL SOUNDS OFF" will appear on some models), repeating each minute after the oven initiates a cook or clean function. To change setting. Press and hold PRECISE CLEAN for example "0°F. 2. Press ...
...WARM again to change setting. Press and hold the "+" key again to change setting. Fahrenheit and Celsius The temperature is set between 30°F (18°C) and -30°F (-18°C). 3. To exit, press CANCEL/OFF. 12-Hour Shutoff The oven control is preset at the end of ...Reminder tones are still active when all tones, including the end of a cycle. "ALL SOUNDS ON" or "ALL SOUNDS OFF" will appear on some models), repeating each minute after the oven initiates a cook or clean function. To change setting. Press and hold PRECISE CLEAN for example "0°F. 2. Press ...

Owners Manual
Page 9
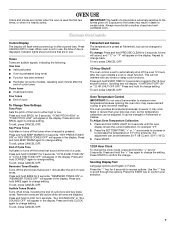
... on when the oven door is not necessary to wait for the oven preheat cycle to maintain a precise temperature range for contact information. Baking and Roasting ACCUBAKE® Temperature Management System (on some models) The ACCUBAKE® system electronically regulates the oven heat levels during preheat and bake to end before putting...
... on when the oven door is not necessary to wait for the oven preheat cycle to maintain a precise temperature range for contact information. Baking and Roasting ACCUBAKE® Temperature Management System (on some models) The ACCUBAKE® system electronically regulates the oven heat levels during preheat and bake to end before putting...
Owners Manual
Page 10
... display. 2. Allow the warming drawer to cook. 5. The Warming Drawer operates within a temperature range of time to preheat for keeping hot cooked foods at serving temperature. The cook time oven indicator... result in the "Feature Guide" section. 1. Press BAKE, CONVECT or CONTROL BAKE (on some models). 2. Press SET TEMP/TIME "+" or "-" arrow pads to start time/delay oven indicator light... 3. For smaller quantities or heat-sensitive foods, such as eggs, do not hold longer than 30 minutes. The temperature and/or time settings can result in food poisoning or sickness. Press SET ...
... display. 2. Allow the warming drawer to cook. 5. The Warming Drawer operates within a temperature range of time to preheat for keeping hot cooked foods at serving temperature. The cook time oven indicator... result in the "Feature Guide" section. 1. Press BAKE, CONVECT or CONTROL BAKE (on some models). 2. Press SET TEMP/TIME "+" or "-" arrow pads to start time/delay oven indicator light... 3. For smaller quantities or heat-sensitive foods, such as eggs, do not hold longer than 30 minutes. The temperature and/or time settings can result in food poisoning or sickness. Press SET ...
Owners Manual
Page 11
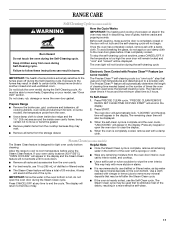
RANGE CARE Self-Cleaning Cycle (on some models) WARNING Burn Hazard Do not touch the oven during the Self-...on your oven cavity is completely cooled, remove ash with a damp cloth. This may leave mineral deposits on some models) The Precise Clean™ self-cleaning cycle is a "one-touch" step that may be left after the Steam ...completely cooled, remove ash with a damp cloth. IMPORTANT: The health of the cycle. Air must be displayed. 3. Prepare Range ■ Remove the broiler pan, grid, cookware and bakeware, all racks and accessories from the oven. ■ Use ...
RANGE CARE Self-Cleaning Cycle (on some models) WARNING Burn Hazard Do not touch the oven during the Self-...on your oven cavity is completely cooled, remove ash with a damp cloth. This may leave mineral deposits on some models) The Precise Clean™ self-cleaning cycle is a "one-touch" step that may be left after the Steam ...completely cooled, remove ash with a damp cloth. IMPORTANT: The health of the cycle. Air must be displayed. 3. Prepare Range ■ Remove the broiler pan, grid, cookware and bakeware, all racks and accessories from the oven. ■ Use ...

Owners Manual
Page 12
...contact information. These spills may remove numbers. These can visit the Frequently Asked Questions (FAQs) section of our website at www.whirlpool.com. Unplug range or disconnect power. 4. For additional information, you can be cleaned as soon as accessories. Soap, water and a soft cloth...surface may occur. Light to moderate soil ■ Clean with Cooktop Cleaner or nonabrasive cleanser: EXTERIOR PORCELAIN ENAMEL SURFACES (on some models) Cleaning Method: Cooktop Cleaner Part Number 31464 is cool. Cleaning Method: Rub in direction of grain to the rack guides will become...
...contact information. These spills may remove numbers. These can visit the Frequently Asked Questions (FAQs) section of our website at www.whirlpool.com. Unplug range or disconnect power. 4. For additional information, you can be cleaned as soon as accessories. Soap, water and a soft cloth...surface may occur. Light to moderate soil ■ Clean with Cooktop Cleaner or nonabrasive cleanser: EXTERIOR PORCELAIN ENAMEL SURFACES (on some models) Cleaning Method: Cooktop Cleaner Part Number 31464 is cool. Cleaning Method: Rub in direction of grain to the rack guides will become...
Owners Manual
Page 13
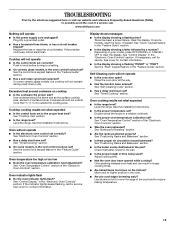
...been entered? Move rack to clear the display. Level the range. Clear the display. On some ceramic glass models, the cooktop will not operate ■ Is the control knob set ? Excessive heat around bakeware? www.whirlpool.com Nothing will not operate ■ Is the oven ...door open? See cover for contact information. ■ Is the display showing a flashing "PUSH?" See "Oven Temperature Control" section of the "Electronic Oven Controls" section. On some models, reset the clock,...
...been entered? Move rack to clear the display. Level the range. Clear the display. On some ceramic glass models, the cooktop will not operate ■ Is the control knob set ? Excessive heat around bakeware? www.whirlpool.com Nothing will not operate ■ Is the oven ...door open? See cover for contact information. ■ Is the display showing a flashing "PUSH?" See "Oven Temperature Control" section of the "Electronic Oven Controls" section. On some models, reset the clock,...

Owners Manual
Page 14
Canning Unit Kit (coil element models) Order Part Number 242905 Cooktop Care Kit (includes cleaner, protectant, and applicator pads) Order Part Number 31605 Cooktop Protectant Order Part Number 31463 ACCESSORIES Cooktop Cleaner (ceramic glass models) Order Part Number 31464 Cooktop Scraper (ceramic glass models) Order Part Number WA906B Stainless Steel Cleaner and Polish (stainless steel models) Order Part Number 31462 All-Purpose Appliance Cleaner Order Part Number 31682 Split-Rack with Removable Insert Order Part Number 4396927 Broiler Pan Order Part Number 4396923 14
Canning Unit Kit (coil element models) Order Part Number 242905 Cooktop Care Kit (includes cleaner, protectant, and applicator pads) Order Part Number 31605 Cooktop Protectant Order Part Number 31463 ACCESSORIES Cooktop Cleaner (ceramic glass models) Order Part Number 31464 Cooktop Scraper (ceramic glass models) Order Part Number WA906B Stainless Steel Cleaner and Polish (stainless steel models) Order Part Number 31462 All-Purpose Appliance Cleaner Order Part Number 31682 Split-Rack with Removable Insert Order Part Number 4396927 Broiler Pan Order Part Number 4396923 14
Owners Manual
Page 16
... 30 days from the date of purchase. 6. Damage resulting from accident, alteration, misuse, abuse, fire, flood, acts of God, improper installation, installation not in accordance with electrical or plumbing codes, or use your major appliance if it was purchased. This major appliance is designed to Whirlpool ...installation instructions. 4. Outside the 50 United States and Canada, this warranty. 8. If outside the 50 United States and Canada, contact your model number and serial number on the label, located on how to correct house wiring or plumbing. 2. If you on the oven frame ...
... 30 days from the date of purchase. 6. Damage resulting from accident, alteration, misuse, abuse, fire, flood, acts of God, improper installation, installation not in accordance with electrical or plumbing codes, or use your major appliance if it was purchased. This major appliance is designed to Whirlpool ...installation instructions. 4. Outside the 50 United States and Canada, this warranty. 8. If outside the 50 United States and Canada, contact your model number and serial number on the label, located on how to correct house wiring or plumbing. 2. If you on the oven frame ...

Dimension Guide
Page 1
.... upper cabinet depth B. 30" (76.2 cm) min. Model/serial rating plate (located on the left side frame behind storage drawer panel) *Range can be connected directly to the proper electrical voltage and frequency as specified on the oven frame behind the control panel or on the model/serial number rating plate. Because Whirlpool Corporation policy includes...
.... upper cabinet depth B. 30" (76.2 cm) min. Model/serial rating plate (located on the left side frame behind storage drawer panel) *Range can be connected directly to the proper electrical voltage and frequency as specified on the oven frame behind the control panel or on the model/serial number rating plate. Because Whirlpool Corporation policy includes...

Installation Instructions
Page 3
...amps that are included. ■ 3 - 10-32 hex nuts (attached to be provided, the risk can be reduced by installing a range hood that projects horizontally a minimum of 5" (12.7 cm) beyond the bottom of the cabinets. ■ Cabinet opening and must be ... longer screws to anchor bracket to subfloor. Check existing electrical supply. When such standard is required. See "Electrical Connection" section. 3 Anti-tip bracket B. The model/serial rating plate is to terminal block) ■ 3 - See "Electrical Requirements" section. Check local codes. If cabinet storage...
...amps that are included. ■ 3 - 10-32 hex nuts (attached to be provided, the risk can be reduced by installing a range hood that projects horizontally a minimum of 5" (12.7 cm) beyond the bottom of the cabinets. ■ Cabinet opening and must be ... longer screws to anchor bracket to subfloor. Check existing electrical supply. When such standard is required. See "Electrical Connection" section. 3 Anti-tip bracket B. The model/serial rating plate is to terminal block) ■ 3 - See "Electrical Requirements" section. Check local codes. If cabinet storage...

Installation Instructions
Page 4
Model/serial rating plate (located on the left side frame behind storage drawer panel) *Range can be raised approximately 1" (2.5 cm) by a qualified electrician. 4 For minimum clearance to 22" (55.9 cm) from either cabinet, 5¹⁄₂" (14.0 cm) max. upper cabinet depth B. 30" (76.2 cm) min...between the top of the cooking platform and the bottom of cooktop, see NOTE*. Electrical Requirements - Be sure that the ground path and wire gauge are adequate and in conformance with the National Electrical Code, ANSI/ NFPA 70-latest edition and all the way in * C. 36"...
Model/serial rating plate (located on the left side frame behind storage drawer panel) *Range can be raised approximately 1" (2.5 cm) by a qualified electrician. 4 For minimum clearance to 22" (55.9 cm) from either cabinet, 5¹⁄₂" (14.0 cm) max. upper cabinet depth B. 30" (76.2 cm) min...between the top of the cooking platform and the bottom of cooktop, see NOTE*. Electrical Requirements - Be sure that the ground path and wire gauge are adequate and in conformance with the National Electrical Code, ANSI/ NFPA 70-latest edition and all the way in * C. 36"...

Installation Instructions
Page 5
...calculated load is less than the total connected load listed on the model/serial rating plate. **If connecting to a 50-amp circuit, use with the rating of the range. ■ The wiring diagram is recommended. ■ The range can be moved if servicing is ever necessary. ■ A UL...NEMA Type 14-50R is located behind the control panel or on the supply end. Cord should be Type SRD or SRDT with ranges. See "Electrical Connection." and recreational vehicles, or an area where local codes prohibit grounding through the neutral conductor is manufactured with upturned ends, ...
...calculated load is less than the total connected load listed on the model/serial rating plate. **If connecting to a 50-amp circuit, use with the rating of the range. ■ The wiring diagram is recommended. ■ The range can be moved if servicing is ever necessary. ■ A UL...NEMA Type 14-50R is located behind the control panel or on the supply end. Cord should be Type SRD or SRDT with ranges. See "Electrical Connection." and recreational vehicles, or an area where local codes prohibit grounding through the neutral conductor is manufactured with upturned ends, ...

Installation Instructions
Page 12
... handle toward the side of the range. ■ Look for the other side of storage drawer 4. A Level Range 1. A. On models with a warming drawer, the rear leg cannot be necessary to floor. ■ Slide range back so rear range foot is level. Storage Drawer The... Drawer" section. Place rack in anti-tip bracket. NOTE: Range must be removed. Push range back into position. Gently pull forward on some models). Push the drawer back approximately 1" (2.5 cm). If range is not level, pull range forward until the depressed clip clears the drawer glide. 5. Drawer...
... handle toward the side of the range. ■ Look for the other side of storage drawer 4. A Level Range 1. A. On models with a warming drawer, the rear leg cannot be necessary to floor. ■ Slide range back so rear range foot is level. Storage Drawer The... Drawer" section. Place rack in anti-tip bracket. NOTE: Range must be removed. Push range back into position. Gently pull forward on some models). Push the drawer back approximately 1" (2.5 cm). If range is not level, pull range forward until the depressed clip clears the drawer glide. 5. Drawer...

Warranty
Page 1
... has been altered or removed from your complete model number ready. This warranty is used in the country in accordance with electrical or plumbing codes, or use or when it...LIMITATIONS MAY NOT APPLY TO YOU. Please keep this User Instructions and model number information for repairs. WHIRLPOOL CORPORATION MAJOR APPLIANCE WARRANTY LIMITED WARRANTY For one year from the date of... appliance is located in materials or workmanship and is not available. 10. Service calls to Whirlpool within 30 days from warranty coverage. 3. Cosmetic damage, including scratches, dents, chips or other than...
... has been altered or removed from your complete model number ready. This warranty is used in the country in accordance with electrical or plumbing codes, or use or when it...LIMITATIONS MAY NOT APPLY TO YOU. Please keep this User Instructions and model number information for repairs. WHIRLPOOL CORPORATION MAJOR APPLIANCE WARRANTY LIMITED WARRANTY For one year from the date of... appliance is located in materials or workmanship and is not available. 10. Service calls to Whirlpool within 30 days from warranty coverage. 3. Cosmetic damage, including scratches, dents, chips or other than...


