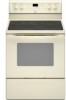

Owners Manual
Page 3
... items could be referred to direct contact and may result in ignition of pressure may result in Place - Do not repair or replace any part of a range - SAVE THESE INSTRUCTIONS 3 Do not let potholder touch hot heating elements. Build-up of clothing. Proper relationship of utensil to burner will...spillovers may be hot even though they have had sufficient time to the sudden change in color. To reduce the risk of burns, ignition of electric shock. If a wet sponge or cloth is essential for Warming or Heating the Room. ■ Do Not Leave Children Alone - Among ...
... items could be referred to direct contact and may result in ignition of pressure may result in Place - Do not repair or replace any part of a range - SAVE THESE INSTRUCTIONS 3 Do not let potholder touch hot heating elements. Build-up of clothing. Proper relationship of utensil to burner will...spillovers may be hot even though they have had sufficient time to the sudden change in color. To reduce the risk of burns, ignition of electric shock. If a wet sponge or cloth is essential for Warming or Heating the Room. ■ Do Not Leave Children Alone - Among ...

Owners Manual
Page 9
.... 9 Broiling Broiling uses direct radiant heat to the cover for all foods when baking on multiple racks. If you would like to maintain a precise temperature range for Part Number 4396923. It will turn off immediately. When the preheat temperature is reached, a tone will sound, and the selected temperature will appear on when...
.... 9 Broiling Broiling uses direct radiant heat to the cover for all foods when baking on multiple racks. If you would like to maintain a precise temperature range for Part Number 4396923. It will turn off immediately. When the preheat temperature is reached, a tone will sound, and the selected temperature will appear on when...

Owners Manual
Page 12
... reach of the oven counterclockwise to slide, a light coating of our website at www.whirlpool.com. STORAGE DRAWER OR WARMING DRAWER (on some models) Food spills containing acids, such as... scraper and cooktop cleaner. Always follow label instructions on panel. ■ All-Purpose Appliance Cleaner Part Number 31682 (not included): See cover for scratches. Do not use steel wool, abrasive powder... and the control knobs are in the off and the oven and cooktop are in range or reconnect power. 12 General Cleaning IMPORTANT: Before cleaning, make sure all -purpose cleaner...
... reach of the oven counterclockwise to slide, a light coating of our website at www.whirlpool.com. STORAGE DRAWER OR WARMING DRAWER (on some models) Food spills containing acids, such as... scraper and cooktop cleaner. Always follow label instructions on panel. ■ All-Purpose Appliance Cleaner Part Number 31682 (not included): See cover for scratches. Do not use steel wool, abrasive powder... and the control knobs are in the off and the oven and cooktop are in range or reconnect power. 12 General Cleaning IMPORTANT: Before cleaning, make sure all -purpose cleaner...

Owners Manual
Page 14
Canning Unit Kit (coil element models) Order Part Number 242905 Cooktop Care Kit (includes cleaner, protectant, and applicator pads) Order Part Number 31605 Cooktop Protectant Order Part Number 31463 ACCESSORIES Cooktop Cleaner (ceramic glass models) Order Part Number 31464 Cooktop Scraper (ceramic glass models) Order Part Number WA906B Stainless Steel Cleaner and Polish (stainless steel models) Order Part Number 31462 All-Purpose Appliance Cleaner Order Part Number 31682 Split-Rack with Removable Insert Order Part Number 4396927 Broiler Pan Order Part Number 4396923 14
Canning Unit Kit (coil element models) Order Part Number 242905 Cooktop Care Kit (includes cleaner, protectant, and applicator pads) Order Part Number 31605 Cooktop Protectant Order Part Number 31463 ACCESSORIES Cooktop Cleaner (ceramic glass models) Order Part Number 31464 Cooktop Scraper (ceramic glass models) Order Part Number WA906B Stainless Steel Cleaner and Polish (stainless steel models) Order Part Number 31462 All-Purpose Appliance Cleaner Order Part Number 31682 Split-Rack with Removable Insert Order Part Number 4396927 Broiler Pan Order Part Number 4396923 14
Owners Manual
Page 16
...accordance with the removal from your home of your correspondence. Costs associated with electrical or plumbing codes, or use your major appliance is used in which it is used for Factory Specified Parts and repair labor to published user or operator instructions and/or installation instructions. ... 50 United States and Canada, this User Instructions and model number information for repairs. DISCLAIMER OF IMPLIED WARRANTIES; Service calls to Whirlpool within 30 days from the date of purchase. 6. If you can find your model number and serial number on the label, located on...
...accordance with the removal from your home of your correspondence. Costs associated with electrical or plumbing codes, or use your major appliance is used in which it is used for Factory Specified Parts and repair labor to published user or operator instructions and/or installation instructions. ... 50 United States and Canada, this User Instructions and model number information for repairs. DISCLAIMER OF IMPLIED WARRANTIES; Service calls to Whirlpool within 30 days from the date of purchase. 6. If you can find your model number and serial number on the label, located on...

Installation Instructions
Page 1
W10252706B INSTALLATION INSTRUCTIONS 30" (76 CM) FREESTANDING ELECTRIC RANGES Table of Contents RANGE SAFETY 2 INSTALLATION REQUIREMENTS 3 Tools and Parts 3 Location Requirements 3 Electrical Requirements - Only 7 Verify Anti-Tip Bracket Location 12 Level Range 12 Storage Drawer 12 Complete Installation 13 Moving the Range 14 ANTI-TIP BRACKET TEMPLATE 15 IMPORTANT: Save for local electrical inspector's use. U.S.A. Only 4 INSTALLATION INSTRUCTIONS 6 Unpack Range 6 Install Anti-Tip Bracket 6 Electrical Connection - U.S.A.
W10252706B INSTALLATION INSTRUCTIONS 30" (76 CM) FREESTANDING ELECTRIC RANGES Table of Contents RANGE SAFETY 2 INSTALLATION REQUIREMENTS 3 Tools and Parts 3 Location Requirements 3 Electrical Requirements - Only 7 Verify Anti-Tip Bracket Location 12 Level Range 12 Storage Drawer 12 Complete Installation 13 Moving the Range 14 ANTI-TIP BRACKET TEMPLATE 15 IMPORTANT: Save for local electrical inspector's use. U.S.A. Only 4 INSTALLATION INSTRUCTIONS 6 Unpack Range 6 Install Anti-Tip Bracket 6 Electrical Connection - U.S.A.

Installation Instructions
Page 3
... Home Construction and Safety, Title 24, HUD Part 280). This oven has been designed in a mobile home installation. Mobile home installations require: ■ When this range must be used will need to be securely mounted to terminal block) ■ 3 - Anti-tip bracket B. See "Electrical Connection" section. 3 See "Electrical Requirements" section. Any method of UL...
... Home Construction and Safety, Title 24, HUD Part 280). This oven has been designed in a mobile home installation. Mobile home installations require: ■ When this range must be used will need to be securely mounted to terminal block) ■ 3 - Anti-tip bracket B. See "Electrical Connection" section. 3 See "Electrical Requirements" section. Any method of UL...

Installation Instructions
Page 6
...A A. Use a wrench or pliers to lower the front and rear leveling legs one -half turn . Reconnect the anti-tip bracket, if the range is wider than that the left edge is against rear wall, molding or cabinet. 3. Place template on the floor in death or serious burns to... drawer. Rear leveling leg C. Use wrench or pliers to lower front leveling legs one -half turn. Front leveling leg C. Remove oven racks and parts package from range. 2. Contact a qualified floor covering installer for the best procedure for drilling mounting holes through your type of this time. B A. ¼" drive...
...A A. Use a wrench or pliers to lower the front and rear leveling legs one -half turn . Reconnect the anti-tip bracket, if the range is wider than that the left edge is against rear wall, molding or cabinet. 3. Place template on the floor in death or serious burns to... drawer. Rear leveling leg C. Use wrench or pliers to lower front leveling legs one -half turn. Front leveling leg C. Remove oven racks and parts package from range. 2. Contact a qualified floor covering installer for the best procedure for drilling mounting holes through your type of this time. B A. ¼" drive...

Installation Instructions
Page 8
... If your type of electrical connection: 4-wire (recommended) 3-wire (if 4-wire is not available) ...homes ■ Recreational vehicles ■ In an area where local codes prohibit grounding through the neutral 1. Part of metal ground strap must be Go to Section: connecting to remove the ground-link screw from the back... . Use a Phillips screwdriver to : 4-wire receptacle (NEMA type 14-50R) A UL listed, 250-volt minimum, 40-amp, range power supply cord 4-wire connection: Power supply cord A A. Removable retaining nut B. 4. Ground-link screw 2. Add strain relief. Discard...
... If your type of electrical connection: 4-wire (recommended) 3-wire (if 4-wire is not available) ...homes ■ Recreational vehicles ■ In an area where local codes prohibit grounding through the neutral 1. Part of metal ground strap must be Go to Section: connecting to remove the ground-link screw from the back... . Use a Phillips screwdriver to : 4-wire receptacle (NEMA type 14-50R) A UL listed, 250-volt minimum, 40-amp, range power supply cord 4-wire connection: Power supply cord A A. Removable retaining nut B. 4. Ground-link screw 2. Add strain relief. Discard...

Installation Instructions
Page 10
Pull the wires through the neutral 1. Part of range. Securely tighten setscrew to the range with the ground-link screw and ground-link section. Setscrew C. Use a hex or Phillips screwdriver to connect the bare (green) ground ... Line 1 (black) wire Bare Wire Torque Specifications Attaching terminal lugs to the fuse disconnect or circuit breaker box. Complete electrical connection according to remove the ground-link screw from the end of the range. Metal ground strap B. Terminal lug B. Neutral (white) wire E. Strip the insulation back ³⁄₈" (1.0 ...
Pull the wires through the neutral 1. Part of range. Securely tighten setscrew to the range with the ground-link screw and ground-link section. Setscrew C. Use a hex or Phillips screwdriver to connect the bare (green) ground ... Line 1 (black) wire Bare Wire Torque Specifications Attaching terminal lugs to the fuse disconnect or circuit breaker box. Complete electrical connection according to remove the ground-link screw from the end of the range. Metal ground strap B. Terminal lug B. Neutral (white) wire E. Strip the insulation back ³⁄₈" (1.0 ...

Installation Instructions
Page 13
... on . 8. See the Use and Care Guide for heat. A A. Once the storage drawer is fully engaged on range operation. If there is intact and tight; Check that all parts are removing and replacing the storage drawer, a slight push may be needed to remove waxy residue caused by shipping material... been on for 5 minutes, check for specific instruction on both sides, slide the drawer back into an outlet. ■ Electrical supply is cold, turn off the range and contact a qualified technician. 13 Lift up the front of your tools. 3. Check that you are now installed. Use a mild solution of...
... on . 8. See the Use and Care Guide for heat. A A. Once the storage drawer is fully engaged on range operation. If there is intact and tight; Check that all parts are removing and replacing the storage drawer, a slight push may be needed to remove waxy residue caused by shipping material... been on for 5 minutes, check for specific instruction on both sides, slide the drawer back into an outlet. ■ Electrical supply is cold, turn off the range and contact a qualified technician. 13 Lift up the front of your tools. 3. Check that you are now installed. Use a mild solution of...

Installation Instructions
Page 14
... Tip Over Hazard A child or adult can result in death or electrical shock. 1. Slide range forward. 2. Check that range is level. 6. Connect anti-tip bracket to avoid damaging the floor covering. Replace all parts and panels before servicing. Electrical Shock Hazard Disconnect power before operating. Failure to follow these instructions can result in power supply...
... Tip Over Hazard A child or adult can result in death or electrical shock. 1. Slide range forward. 2. Check that range is level. 6. Connect anti-tip bracket to avoid damaging the floor covering. Replace all parts and panels before servicing. Electrical Shock Hazard Disconnect power before operating. Failure to follow these instructions can result in power supply...

Warranty
Page 1
...electrical or plumbing codes, or use your correspondence. This major appliance is not available. 10. Repairs to parts or systems resulting from defects in materials or workmanship and is located in U.S.A. The cost of your major appliance is reported to Whirlpool with the product, Whirlpool Corporation or Whirlpool Canada LP (hereafter "Whirlpool...Whirlpool within 30 days from warranty coverage. 3. Please keep this User Instructions and model number information for Factory Specified Parts and repair labor to the appliance. 9. W10200354B SP PN W10204499A © 2008 Whirlpool...
...electrical or plumbing codes, or use your correspondence. This major appliance is not available. 10. Repairs to parts or systems resulting from defects in materials or workmanship and is located in U.S.A. The cost of your major appliance is reported to Whirlpool with the product, Whirlpool Corporation or Whirlpool Canada LP (hereafter "Whirlpool...Whirlpool within 30 days from warranty coverage. 3. Please keep this User Instructions and model number information for Factory Specified Parts and repair labor to the appliance. 9. W10200354B SP PN W10204499A © 2008 Whirlpool...


