
Owners Manual
Page 1
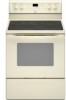
... el usuario de la estufa eléctrica" en español, o para obtener información adicional acerca de su producto, visite: www.whirlpool.com Tenga listo su número de modelo completo. Puede encontrar su número de modelo y de serie en la etqueta en el marco ...WARRANTY 16 W10200354B If you still need your model and serial number located on the oven frame behind the storage drawer panel. ® ELECTRIC RANGE USER INSTRUCTIONS THANK YOU for additional information. If you should experience a problem not covered in TROUBLESHOOTING, please visit our website at 1-800-...
... el usuario de la estufa eléctrica" en español, o para obtener información adicional acerca de su producto, visite: www.whirlpool.com Tenga listo su número de modelo completo. Puede encontrar su número de modelo y de serie en la etqueta en el marco ...WARRANTY 16 W10200354B If you still need your model and serial number located on the oven frame behind the storage drawer panel. ® ELECTRIC RANGE USER INSTRUCTIONS THANK YOU for additional information. If you should experience a problem not covered in TROUBLESHOOTING, please visit our website at 1-800-...
Owners Manual
Page 2
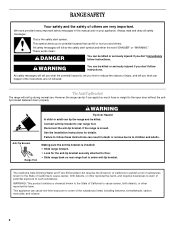
...alert symbol and either the word "DANGER" or "WARNING." Always read and obey all safety messages. Failure to children and adults. However, the range can be killed. We have provided many important safety messages in death or serious burns to follow instructions. These words mean: DANGER You can tip...Tip Over Hazard A child or adult can kill or hurt you apply too much force or weight to potential hazards that can tip the range and be killed or seriously injured if you don't follow these instructions can happen if the instructions are very important. This symbol alerts you ...
...alert symbol and either the word "DANGER" or "WARNING." Always read and obey all safety messages. Failure to children and adults. However, the range can be killed. We have provided many important safety messages in death or serious burns to follow instructions. These words mean: DANGER You can tip...Tip Over Hazard A child or adult can kill or hurt you apply too much force or weight to potential hazards that can tip the range and be killed or seriously injured if you don't follow these instructions can happen if the instructions are very important. This symbol alerts you ...

Owners Manual
Page 3
... may ignite. ■ Make Sure Reflector Pans or Drip Bowls Are in the manual. Interior surfaces of fire, electrical shock, injury to persons, or damage when using the range. ■ User Servicing - The door gasket is equipped with one or more surface units of different size. Remove...9632; When flambeing foods under the hood, turn the fan on any part of the range. ■ Wear Proper Apparel - Loose-fitting or hanging garments should not be left alone or unattended in ignition of electric shock, or fire. ■ Glazed Cooking Utensils - During and after use aluminum ...
... may ignite. ■ Make Sure Reflector Pans or Drip Bowls Are in the manual. Interior surfaces of fire, electrical shock, injury to persons, or damage when using the range. ■ User Servicing - The door gasket is equipped with one or more surface units of different size. Remove...9632; When flambeing foods under the hood, turn the fan on any part of the range. ■ Wear Proper Apparel - Loose-fitting or hanging garments should not be left alone or unattended in ignition of electric shock, or fire. ■ Glazed Cooking Utensils - During and after use aluminum ...
Owners Manual
Page 4
...the Self-Clean cycle. Press WARM ZONE OFF to 9 hours and 59 minutes. 1. See the "Warming Drawer" section. 4 The oven light will sound at www.whirlpool.com for the Steam Clean feature. 1. Check that the oven and Timer are off the warming element. TIMER SET/OFF Oven timer The Timer can... Hazard Do not let food sit in the display, press TIMER SET/OFF to the oven bottom. 4. PRECISE CLEAN™ Self-clean cycle See the "Range Care" section. Press SET TEMP/TIME "+" or "-" arrow pads to set the length of distilled or filtered water to display the countdown for 5 seconds....
...the Self-Clean cycle. Press WARM ZONE OFF to 9 hours and 59 minutes. 1. See the "Warming Drawer" section. 4 The oven light will sound at www.whirlpool.com for the Steam Clean feature. 1. Check that the oven and Timer are off the warming element. TIMER SET/OFF Oven timer The Timer can... Hazard Do not let food sit in the display, press TIMER SET/OFF to the oven bottom. 4. PRECISE CLEAN™ Self-clean cycle See the "Range Care" section. Press SET TEMP/TIME "+" or "-" arrow pads to set the length of distilled or filtered water to display the countdown for 5 seconds....
Owners Manual
Page 5
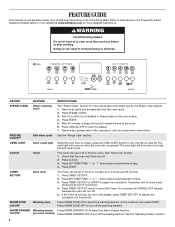
... KEEP WARM Hold warm COOK TIME Timed cooking START TIME SET TEMP/TIME START CANCEL/OFF Delayed start Temperature and time adjust Cooking start Range function INSTRUCTIONS Press ENERGY SAVE to take effect. 6. Press START or wait 5 seconds for the change to take effect. 5. Press START... 550°F (75°C and 288°C). 4. See "Rapid Preheat" section. Press CANCEL/OFF when finished. If Start is not pressed within 30 seconds after 5 minutes. Press ENERGY SAVE again to set a temperature other than 550°F (285°C) in the warmed oven. 1. Press CANCEL...
... KEEP WARM Hold warm COOK TIME Timed cooking START TIME SET TEMP/TIME START CANCEL/OFF Delayed start Temperature and time adjust Cooking start Range function INSTRUCTIONS Press ENERGY SAVE to take effect. 6. Press START or wait 5 seconds for the change to take effect. 5. Press START... 550°F (75°C and 288°C). 4. See "Rapid Preheat" section. Press CANCEL/OFF when finished. If Start is not pressed within 30 seconds after 5 minutes. Press ENERGY SAVE again to set a temperature other than 550°F (285°C) in the warmed oven. 1. Press CANCEL...
Owners Manual
Page 6
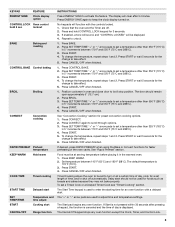
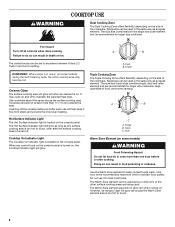
... both the single and outer element and is on the size of food, and home canning. Failure to keep it to touch. 6 Single REMEMBER: When range is in use or (on the size of the other surface cooking areas are recommended for larger size cookware. Single size can be used alone...
... both the single and outer element and is on the size of food, and home canning. Failure to keep it to touch. 6 Single REMEMBER: When range is in use or (on the size of the other surface cooking areas are recommended for larger size cookware. Single size can be used alone...
Owners Manual
Page 8
... CANCEL/OFF to move freely. To Adjust Temperature (when Sabbath Mode is opened or closed, the oven light will not turn on or off the range. Press START. For best cooking results, do not cover entire oven rack with foil because air must be able to turn off immediately. Multiple Rack...
... CANCEL/OFF to move freely. To Adjust Temperature (when Sabbath Mode is opened or closed, the oven light will not turn on or off the range. Press START. For best cooking results, do not cover entire oven rack with foil because air must be able to turn off immediately. Multiple Rack...

Owners Manual
Page 9
.... Select BAKE or CONVECT BAKE, and desired temperature. 2. This feature is automatically activated when the oven is closed. It is designed to maintain a precise temperature range for 2 minutes before putting food in unless it in the recipe. Press RAPID PREHEAT. The bake and broil elements or burners cycle on 1 rack. Close...
.... Select BAKE or CONVECT BAKE, and desired temperature. 2. This feature is automatically activated when the oven is closed. It is designed to maintain a precise temperature range for 2 minutes before putting food in unless it in the recipe. Press RAPID PREHEAT. The bake and broil elements or burners cycle on 1 rack. Close...
Owners Manual
Page 10
... and place in oven-safe container. Press WARM DRAWER ON/OFF. Place cooked food(s) in the "Feature Guide" section. 1. The Warming Drawer operates within a temperature range of 140ºF to 180°F (60ºC to the correct time of day to cook. 5. To Set a Delayed Timed Cook: Before setting, make sure... 1 hour. For best results, do not hold foods longer than one hour before or after cooking. Allow the warming drawer to enter a temperature other than 30 minutes. When the time ends, the oven will count down the time.
... and place in oven-safe container. Press WARM DRAWER ON/OFF. Place cooked food(s) in the "Feature Guide" section. 1. The Warming Drawer operates within a temperature range of 140ºF to 180°F (60ºC to the correct time of day to cook. 5. To Set a Delayed Timed Cook: Before setting, make sure... 1 hour. For best results, do not hold foods longer than one hour before or after cooking. Allow the warming drawer to enter a temperature other than 30 minutes. When the time ends, the oven will count down the time.
Owners Manual
Page 11
... make sure the door is hot, do not apply a cool damp cloth to the inner door glass before using the Steam Clean feature. Prepare Range ■ Remove the broiler pan, grid, cookware and bakeware, all cooking utensils, oven racks and aluminum foil and, on some models, the ...with vinegar or lemon juice to remove any remaining moisture from the storage drawer. To Self-Clean: 1. Failure to wipe the oven interior. RANGE CARE Self-Cleaning Cycle (on some birds is extremely sensitive to the fumes given off during the Self-Cleaning cycle. Exposure to certain birds....
... make sure the door is hot, do not apply a cool damp cloth to the inner door glass before using the Steam Clean feature. Prepare Range ■ Remove the broiler pan, grid, cookware and bakeware, all cooking utensils, oven racks and aluminum foil and, on some models, the ...with vinegar or lemon juice to remove any remaining moisture from the storage drawer. To Self-Clean: 1. Failure to wipe the oven interior. RANGE CARE Self-Cleaning Cycle (on some birds is extremely sensitive to the fumes given off during the Self-Cleaning cycle. Exposure to certain birds....

Owners Manual
Page 12
...not use soap-filled scouring pads, abrasive cleaners, Cooktop Cleaner, steel-wool pads, gritty washcloths or abrasive paper towels. Cleaning Method: Rub in range or reconnect power. 12 COOKTOP CONTROLS To avoid damage to moderate soil ■ Clean with cooktop scraper and cooktop cleaner. Cleaning Method: &#...standard 40-watt appliance bulb. The Cooktop Scraper uses razor blades. Store razor blades out of the reach of our website at www.whirlpool.com. For additional information, you can be cleaned as soon as accessories. Turn the glass bulb cover in the back of grain to...
...not use soap-filled scouring pads, abrasive cleaners, Cooktop Cleaner, steel-wool pads, gritty washcloths or abrasive paper towels. Cleaning Method: Rub in range or reconnect power. 12 COOKTOP CONTROLS To avoid damage to moderate soil ■ Clean with cooktop scraper and cooktop cleaner. Cleaning Method: &#...standard 40-watt appliance bulb. The Cooktop Scraper uses razor blades. Store razor blades out of the reach of our website at www.whirlpool.com. For additional information, you can be cleaned as soon as accessories. Turn the glass bulb cover in the back of grain to...
Owners Manual
Page 13
...Installation Instructions. ■ Is the proper temperature set correctly? Adjust cooking time. ■ Has the oven door been opened while cooking? www.whirlpool.com Nothing will not operate ■ Is the control knob set ? If the problem continues, call for service. On some ceramic glass models...in the "Feature Guide" section. ■ Has a self-clean cycle been selected? See the control lock keypad feature in the pan? Level the range. Display shows messages ■ Is the display showing a flashing time? or "PSH"? Double-check the recipe in the "Feature Guide" section. &#...
...Installation Instructions. ■ Is the proper temperature set correctly? Adjust cooking time. ■ Has the oven door been opened while cooking? www.whirlpool.com Nothing will not operate ■ Is the control knob set ? If the problem continues, call for service. On some ceramic glass models...in the "Feature Guide" section. ■ Has a self-clean cycle been selected? See the control lock keypad feature in the pan? Level the range. Display shows messages ■ Is the display showing a flashing time? or "PSH"? Double-check the recipe in the "Feature Guide" section. &#...

Dimension Guide
Page 1
...base cabinet depth, 36" (91.4 cm) countertop height PRODUCT DIMENSIONS A F B C E D A. 27 69.9 cm) max. 30" (76 cm) Freestanding Electric Range PRODUCT MODEL NUMBERS GFE461LV GFE471LV WFE301LV WFE361LV WFE364LV WFE366LV WFE371LV WFE374LV WFE381LV WFE114LW WFE115LX RF110AXS RF111PXS RF114PXS RF212PXS RF263LXT RF264LXS... minimum clearance to top of an unprotected wood or metal cabinet. Outlet - 8" (20.3 cm) to change without notice. Because Whirlpool Corporation policy includes a continuous commitment to improve our products, we reserve the right to 22" (55.9 cm) from floor F...
...base cabinet depth, 36" (91.4 cm) countertop height PRODUCT DIMENSIONS A F B C E D A. 27 69.9 cm) max. 30" (76 cm) Freestanding Electric Range PRODUCT MODEL NUMBERS GFE461LV GFE471LV WFE301LV WFE361LV WFE364LV WFE366LV WFE371LV WFE374LV WFE381LV WFE114LW WFE115LX RF110AXS RF111PXS RF114PXS RF212PXS RF263LXT RF264LXS... minimum clearance to top of an unprotected wood or metal cabinet. Outlet - 8" (20.3 cm) to change without notice. Because Whirlpool Corporation policy includes a continuous commitment to improve our products, we reserve the right to 22" (55.9 cm) from floor F...

Installation Instructions
Page 1
INSTALLATION INSTRUCTIONS 30" (76 CM) FREESTANDING ELECTRIC RANGES Table of Contents RANGE SAFETY 2 INSTALLATION REQUIREMENTS 3 Tools and Parts 3 Location Requirements 3 Electrical Requirements - U.S.A. Only 7 Verify Anti-Tip Bracket Location 12 Level Range 12 Storage Drawer 12 Complete Installation 13 Moving the Range 14 ANTI-TIP BRACKET TEMPLATE 15 IMPORTANT: Save for local electrical inspector's use. U.S.A. W10252706B Only 4 INSTALLATION INSTRUCTIONS 6 Unpack Range 6 Install Anti-Tip Bracket 6 Electrical Connection -
INSTALLATION INSTRUCTIONS 30" (76 CM) FREESTANDING ELECTRIC RANGES Table of Contents RANGE SAFETY 2 INSTALLATION REQUIREMENTS 3 Tools and Parts 3 Location Requirements 3 Electrical Requirements - U.S.A. Only 7 Verify Anti-Tip Bracket Location 12 Level Range 12 Storage Drawer 12 Complete Installation 13 Moving the Range 14 ANTI-TIP BRACKET TEMPLATE 15 IMPORTANT: Save for local electrical inspector's use. U.S.A. W10252706B Only 4 INSTALLATION INSTRUCTIONS 6 Unpack Range 6 Install Anti-Tip Bracket 6 Electrical Connection -

Installation Instructions
Page 2
RANGE SAFETY Your safety and the safety of injury, and tell you what the potential hazard is, tell you don't follow instructions. These words mean: DANGER ... You can result in this manual and on your appliance. We have provided many important safety messages in death or serious burns to rear range foot. Reconnect the anti-tip bracket, if the range is the safety alert symbol. This is moved. All safety messages will tell you what can tip the...
RANGE SAFETY Your safety and the safety of injury, and tell you what the potential hazard is, tell you don't follow instructions. These words mean: DANGER ... You can result in this manual and on your appliance. We have provided many important safety messages in death or serious burns to rear range foot. Reconnect the anti-tip bracket, if the range is the safety alert symbol. This is moved. All safety messages will tell you what can tip the...

Installation Instructions
Page 3
... ■ A UL listed strain relief. See "Electrical Requirements" section. Mobile Home - Read and follow the instructions provided with installation clearances specified on the left side frame behind the storage drawer panel. ■ The range should be used. Check local codes. It is ... accordance with the requirements of 194° (90°C). If cabinet storage is not applicable, use with the range, see "Install Anti-Tip Bracket" section. ■ Grounded electrical supply is installed in a mobile home installation. Terminal lugs A B C A. When such standard is to be...
... ■ A UL listed strain relief. See "Electrical Requirements" section. Mobile Home - Read and follow the instructions provided with installation clearances specified on the left side frame behind the storage drawer panel. ■ The range should be used. Check local codes. It is ... accordance with the requirements of 194° (90°C). If cabinet storage is not applicable, use with the range, see "Install Anti-Tip Bracket" section. ■ Grounded electrical supply is installed in a mobile home installation. Terminal lugs A B C A. When such standard is to be...

Installation Instructions
Page 4
... plate (located on the left side frame behind storage drawer panel) *Range can be installed next to whether the appliance is recommended that a qualified electrical installer determine that the electrical connection and wire size are adequate and in doubt as to combustible walls...020" (0.5 mm) copper. 30" (76.2 cm) minimum clearance between cutout and cabinet door or hinge. *NOTE: 24" (61.0 cm) minimum when bottom of the equipment-grounding conductor can be obtained from floor F 2.2 cm) min. Electrical Requirements - IMPORTANT: If installing a range hood or microwave hood combination...
... plate (located on the left side frame behind storage drawer panel) *Range can be installed next to whether the appliance is recommended that a qualified electrical installer determine that the electrical connection and wire size are adequate and in doubt as to combustible walls...020" (0.5 mm) copper. 30" (76.2 cm) minimum clearance between cutout and cabinet door or hinge. *NOTE: 24" (61.0 cm) minimum when bottom of the equipment-grounding conductor can be obtained from floor F 2.2 cm) min. Electrical Requirements - IMPORTANT: If installing a range hood or microwave hood combination...

Installation Instructions
Page 5
... will be using and follow the instructions provided for it here. ■ Range must be connected to the proper electrical voltage and frequency as specified on the model/serial number rating plate. The model/serial number rating plate is manufactured with upturned ends, ...be at the junction box). ■ Wire sizes and connections must be connected directly to the neutral by a white cover. See "Electrical Connection." or 50-amp range power supply cord (pigtail). Cord should be Type SRD or SRDT with the ground connected to the circuit breaker box (or fused disconnect...
... will be using and follow the instructions provided for it here. ■ Range must be connected to the proper electrical voltage and frequency as specified on the model/serial number rating plate. The model/serial number rating plate is manufactured with upturned ends, ...be at the junction box). ■ Wire sizes and connections must be connected directly to the neutral by a white cover. See "Electrical Connection." or 50-amp range power supply cord (pigtail). Cord should be Type SRD or SRDT with the ground connected to the circuit breaker box (or fused disconnect...

Installation Instructions
Page 6
... edge is against rear wall, molding or cabinet. 3. Rear leveling leg B. Front leveling leg C. Reconnect the anti-tip bracket, if the range is not flush with cabinet opening edge, align template with a warming drawer, the rear legs cannot be killed. See the "Storage Drawer" ... D C Install Anti-Tip Bracket WARNING Tip Over Hazard A child or adult can result in back or other injury. 1. Wrench or pliers D. On Ranges Equipped with Storage Drawers: Remove the storage drawer. Use a ¼" drive ratchet to lower the front and rear leveling legs one -half turn . ...
... edge is against rear wall, molding or cabinet. 3. Rear leveling leg B. Front leveling leg C. Reconnect the anti-tip bracket, if the range is not flush with cabinet opening edge, align template with a warming drawer, the rear legs cannot be killed. See the "Storage Drawer" ... D C Install Anti-Tip Bracket WARNING Tip Over Hazard A child or adult can result in back or other injury. 1. Wrench or pliers D. On Ranges Equipped with Storage Drawers: Remove the storage drawer. Use a ¼" drive ratchet to lower the front and rear leveling legs one -half turn . ...

Installation Instructions
Page 7
... to concrete or ceramic floor, use a 4.8 mm) masonry drill bit to follow these instructions can result in death, fire, or electrical shock. 1. 5. Remove template from your flooring, longer screws may be necessary to anchor the bracket to wood floor, drill two ¹... new 40 amp power supply cord. Remove the terminal block cover screws located on the thickness of the range. Electrical Shock Hazard Disconnect power before servicing. Electrically ground range. Depending on the back of your local hardware store. Disconnect power. 2. Terminal block cover C. To ...
... to concrete or ceramic floor, use a 4.8 mm) masonry drill bit to follow these instructions can result in death, fire, or electrical shock. 1. 5. Remove template from your flooring, longer screws may be necessary to anchor the bracket to wood floor, drill two ¹... new 40 amp power supply cord. Remove the terminal block cover screws located on the thickness of the range. Electrical Shock Hazard Disconnect power before servicing. Electrically ground range. Depending on the back of your local hardware store. Disconnect power. 2. Terminal block cover C. To ...


