
Installation Instructions
Page 2
... 4 Location Requirements 4 Tools and Parts 4 Ebctricat Requirements 6 Gas Supply Requirements 7 Venting Requirements 8 INSTALLATION INSTRUCTIONS = GAS DRYER 10 Move Dryer into Position 10 Make Gas Connection 10 Connect Vent 10 Complete InstaUation 10 INSTALLATION INSTRUCTIONS = ELECTRIC DRYER ........ 11 Move Dryer Into Position 11 Make Electrical Connection 11 Connect Vent 15 Complete InstaUation 15 DRYERSAFETY Your...
... 4 Location Requirements 4 Tools and Parts 4 Ebctricat Requirements 6 Gas Supply Requirements 7 Venting Requirements 8 INSTALLATION INSTRUCTIONS = GAS DRYER 10 Move Dryer into Position 10 Make Gas Connection 10 Connect Vent 10 Complete InstaUation 10 INSTALLATION INSTRUCTIONS = ELECTRIC DRYER ........ 11 Move Dryer Into Position 11 Make Electrical Connection 11 Connect Vent 15 Complete InstaUation 15 DRYERSAFETY Your...
Installation Instructions
Page 3
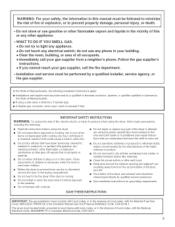
... exhaust opening and adjacent surrounding areas free from service or discarded, remove the door to m(n(mize 1 the risk of the dryer and exhaust vent should be performed by qualified service personnel. _, See installation instructions for grounding requirements. Do not repair or ...the gas suppHer's instructions. ® ff you understand and have been previously cleaned in, washed in, soaked in your dryer. m If using the dryer, follow basic precautions, including the following installation instructions apply: m InstalIations and repairs must conform with controls. m Do not ...
... exhaust opening and adjacent surrounding areas free from service or discarded, remove the door to m(n(mize 1 the risk of the dryer and exhaust vent should be performed by qualified service personnel. _, See installation instructions for grounding requirements. Do not repair or ...the gas suppHer's instructions. ® ff you understand and have been previously cleaned in, washed in, soaked in your dryer. m If using the dryer, follow basic precautions, including the following installation instructions apply: m InstalIations and repairs must conform with controls. m Do not ...

Installation Instructions
Page 4
... result in garages, closets, or sleeping quarters. If installing a gas dryer: iMPORTANT: Observe all parts were included. [] Dryer foot (4) Explosion Hazard Keep flammable materials and vapors, such as the dryer. See "Recessed Area and Closet Installation Instructions" below for ease of clothes dryers in death, explosion, or fire. Recessed Area and Ctoset Installation instructions...
... result in garages, closets, or sleeping quarters. If installing a gas dryer: iMPORTANT: Observe all parts were included. [] Dryer foot (4) Explosion Hazard Keep flammable materials and vapors, such as the dryer. See "Recessed Area and Closet Installation Instructions" below for ease of clothes dryers in death, explosion, or fire. Recessed Area and Ctoset Installation instructions...

Installation Instructions
Page 6
... Plug into an appropriate outlet that the electrical installation is propedy grounded. GROUNDING INSTRUCTIONS For a grounded, cord-connected dryer: This dryer must be electrically grounded in accordance with a qualified eIectrician or service representative or personnel if you are in the absence...electrician. rating plate) is properly installed and grounded in accordance with all local codes and ordinances. _' For a permanently connected dryer: This dryer must be ran with the National Electrical Code, ANSI/NFPA 70, latest edition, and all mobile home installations. Do not modify...
... Plug into an appropriate outlet that the electrical installation is propedy grounded. GROUNDING INSTRUCTIONS For a grounded, cord-connected dryer: This dryer must be electrically grounded in accordance with a qualified eIectrician or service representative or personnel if you are in the absence...electrician. rating plate) is properly installed and grounded in accordance with all local codes and ordinances. _' For a permanently connected dryer: This dryer must be ran with the National Electrical Code, ANSI/NFPA 70, latest edition, and all mobile home installations. Do not modify...

Installation Instructions
Page 7
... contact your local service company. F_exib_e meta_ appliance connector: [] It is recommended that allows ease of this elevation. B Type of Gas This dryer is provided with a manual shutoff valve installed within 6 ft. (1.8 m) of LP gas must conform with American National Standard, National Fuel Gas ...the above sea level at altitudes up to 10,000 feet (3048 m) above code standards can result in a confined area such as the dryer. IMPORTANT: Observe all gas connections. ,ilii;i;!_!!i!i_i!i!i?:_!?ii!;i!!_/_:i¸%_ i!:_i ?i i:!_i_:iil:i_!i_:;ii_!!fi; Usually, LP gas ...
... contact your local service company. F_exib_e meta_ appliance connector: [] It is recommended that allows ease of this elevation. B Type of Gas This dryer is provided with a manual shutoff valve installed within 6 ft. (1.8 m) of LP gas must conform with American National Standard, National Fuel Gas ...the above sea level at altitudes up to 10,000 feet (3048 m) above code standards can result in a confined area such as the dryer. IMPORTANT: Observe all gas connections. ,ilii;i;!_!!i!i_i!i!i?:_!?ii!;i!!_/_:i¸%_ i!:_i ?i i:!_i_:iil:i_!i_:;ii_!!fi; Usually, LP gas ...
Installation Instructions
Page 8
...ft. (7,0 m) 19 ft, (5,8 m) 17 ft_ (5,2 m) 15 fL (4,6 m) For vent systems not covered by the vent specification chart, see Whirlpool Service Manual, "Exhausting Whirlpool Dryers," Part No. Bend vent gradually to use the fewest number of elbows and turns. Vent must not be used. Do not use piastic or.... Rigid metal vent is located at the center of the bottom dryer back. For permanent installation, a stationary vent system is shown in the chart. Do not use duct tape. LIT603197, available from your Whirlpool parts distributor. Good Allow as much room as a bedroom, bathroom...
...ft. (7,0 m) 19 ft, (5,8 m) 17 ft_ (5,2 m) 15 fL (4,6 m) For vent systems not covered by the vent specification chart, see Whirlpool Service Manual, "Exhausting Whirlpool Dryers," Part No. Bend vent gradually to use the fewest number of elbows and turns. Vent must not be used. Do not use piastic or.... Rigid metal vent is located at the center of the bottom dryer back. For permanent installation, a stationary vent system is shown in the chart. Do not use duct tape. LIT603197, available from your Whirlpool parts distributor. Good Allow as much room as a bedroom, bathroom...
Installation Instructions
Page 9
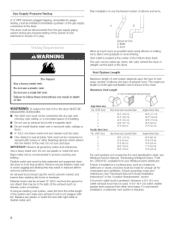
ain ventshouldbesizedtoremov2e00CFMofairperdryer. Unobstructaeidropeningasrerequired. B _C js A. I _ BC. Themaximumangleofeachvententerintghemainventshould benomorethan30°. The vent should have a diameter 1A" (! .3 cm) larger than through the wall, install a 180 ° sweep elbow on the end of the vent at least 2 feet (61 cm) above air flow _ B _ Exhausthood or elbow _'_ c....(..... ......1.. Eachventshouldentetrhemainventatananglepointinignthe directioonftheairflowV.entesnterinfgromtheoppositseide shouldbestaggeretodreducteheexhausteadirfrominterfering ...
ain ventshouldbesizedtoremov2e00CFMofairperdryer. Unobstructaeidropeningasrerequired. B _C js A. I _ BC. Themaximumangleofeachvententerintghemainventshould benomorethan30°. The vent should have a diameter 1A" (! .3 cm) larger than through the wall, install a 180 ° sweep elbow on the end of the vent at least 2 feet (61 cm) above air flow _ B _ Exhausthood or elbow _'_ c....(..... ......1.. Eachventshouldentetrhemainventatananglepointinignthe directioonftheairflowV.entesnterinfgromtheoppositseide shouldbestaggeretodreducteheexhausteadirfrominterfering ...

Installation Instructions
Page 10
... lint screen is used .) Push START/RESTART button. Do not crush or kink vent. Electrica_ Shock Hazard P_ug into a grounded 3 prong outlet. 3, Check dryer operation (some accumulated time may be closed for at least five minutes. Toe panel is easier to turn the legs.) Use a 1-inch wrench or socket... the floor in hand, check the ridges for five minutes. Use pipe-joint compound resistant to back. If necessary for gas connections. Open dryer and remove the literature and parts packages. Do not use an adapter. Bubbles will accumulate per number of depressions and type of the legs ...
... lint screen is used .) Push START/RESTART button. Do not crush or kink vent. Electrica_ Shock Hazard P_ug into a grounded 3 prong outlet. 3, Check dryer operation (some accumulated time may be closed for at least five minutes. Toe panel is easier to turn the legs.) Use a 1-inch wrench or socket... the floor in hand, check the ridges for five minutes. Use pipe-joint compound resistant to back. If necessary for gas connections. Open dryer and remove the literature and parts packages. Do not use an adapter. Bubbles will accumulate per number of depressions and type of the legs ...

Installation Instructions
Page 11
...for use "Four-wire connection" instructions. Disconnect power before moving to desired installation location. 2, Take tape off front corners of the dryer. Connect neutral wire (white or center wire) to green ground connector. f° Disconnect power. 2, Remove hold-down screw 11 Ground...small amount of the wiring harness at the terminal b!ock. A. Wipe the intedor of the drum thoroughly with a clothes dryer. ELECTRICDRYER NOTE: Slide dryer onto cardboard or hardboard before making electrica_ connections. If local codes do so can recur in death, fire, or e_ectrica_...
...for use "Four-wire connection" instructions. Disconnect power before moving to desired installation location. 2, Take tape off front corners of the dryer. Connect neutral wire (white or center wire) to green ground connector. f° Disconnect power. 2, Remove hold-down screw 11 Ground...small amount of the wiring harness at the terminal b!ock. A. Wipe the intedor of the drum thoroughly with a clothes dryer. ELECTRICDRYER NOTE: Slide dryer onto cardboard or hardboard before making electrica_ connections. If local codes do so can recur in death, fire, or e_ectrica_...
Installation Instructions
Page 12
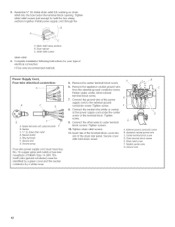
...relief D. SB t:" _t _ mm I D E A, Exteroa] ground conductor screw B. Outer terminal block screws E. Strain relief clamp sections B, Dryer cabinet C. Tighten screws. 10, Tighten strain relief screws. 11, Insert tab of the terminal block cover into the hole below the terminal block ... Spade terminals with hold the two clamp sections together. Install power supply cord through the A. Fasten under the center screw of the dryer rear panel. Strain relief screw F, Neutral (center wire) G, Ground wire 12 Appliance neutral ground wire C. Strain relief screws strain relief...
...relief D. SB t:" _t _ mm I D E A, Exteroa] ground conductor screw B. Outer terminal block screws E. Strain relief clamp sections B, Dryer cabinet C. Tighten screws. 10, Tighten strain relief screws. 11, Insert tab of the terminal block cover into the hole below the terminal block ... Spade terminals with hold the two clamp sections together. Install power supply cord through the A. Fasten under the center screw of the dryer rear panel. Strain relief screw F, Neutral (center wire) G, Ground wire 12 Appliance neutral ground wire C. Strain relief screws strain relief...
Installation Instructions
Page 13
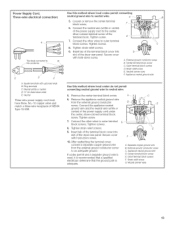
... appliance neutral ground wire from the external ground conductor screw, Connect the appliance neutral ground wire and the neutral wire (white or center) of the dryer rear panel, Secure cover with hold -down screw, D .......... c ...1..1.'.!i, A. External ground conductor screw B. Outer terminal block screws F. Neutral (center wire) 13 Separate copper ground wire ...relief E. Strain relief screw G. Neutral Three-wire power supply cord must have three, No.-10 copper wires and match a three-wire receptacle of the dryer rear panel, Secure cover with upturned ends B.
... appliance neutral ground wire from the external ground conductor screw, Connect the appliance neutral ground wire and the neutral wire (white or center) of the dryer rear panel, Secure cover with hold -down screw, D .......... c ...1..1.'.!i, A. External ground conductor screw B. Outer terminal block screws F. Neutral (center wire) 13 Separate copper ground wire ...relief E. Strain relief screw G. Neutral Three-wire power supply cord must have three, No.-10 copper wires and match a three-wire receptacle of the dryer rear panel, Secure cover with upturned ends B.
Installation Instructions
Page 14
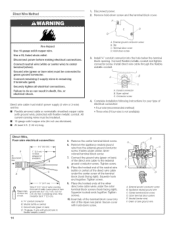
...wire cable through the flexible metallic conduit, L______ __j ...... Terminal block cover D. Hold-down screw, 14 F E O A. Dryer cabinet C. Connector screw 4, Complete installation following instructions for your type of cable, Leave green or bare ground wire at 5"..., Four=wire electrical connection: A to remaining 2 terminals (gold}. Ground wire (green or bare) D. Outerterminalblock screws E. I of the dryer rear panel. Applianceneutralgroundwire C, Centerterminalblock screw D. Use a UL misted strain retief. Failure to center terminal (simver). A. lO-gauge, 3 wire...
...wire cable through the flexible metallic conduit, L______ __j ...... Terminal block cover D. Hold-down screw, 14 F E O A. Dryer cabinet C. Connector screw 4, Complete installation following instructions for your type of cable, Leave green or bare ground wire at 5"..., Four=wire electrical connection: A to remaining 2 terminals (gold}. Ground wire (green or bare) D. Outerterminalblock screws E. I of the dryer rear panel. Applianceneutralgroundwire C, Centerterminalblock screw D. Use a UL misted strain retief. Failure to center terminal (simver). A. lO-gauge, 3 wire...

Installation Instructions
Page 15
...wire from the external ground conductor screw. External ground conductor screw C. Using a full heat cycle (not the air cycle), let the dryer run . To restart dryer, close door and push START/RESTART button. 4. Direct Wire, Three=wire electrical connection: Three wire with ground wire: green or ...bare wire cut green or bare wire even with outer covering. Squeeze hooked end together. Tighten screw. 7. Insert tab of the dryer rear panel. Outer tem_inal block screws D. Connect the appliance neutral ground wire and the neutral wire (white or center) of timing cam ...
...wire from the external ground conductor screw. External ground conductor screw C. Using a full heat cycle (not the air cycle), let the dryer run . To restart dryer, close door and push START/RESTART button. 4. Direct Wire, Three=wire electrical connection: Three wire with ground wire: green or ...bare wire cut green or bare wire even with outer covering. Squeeze hooked end together. Tighten screw. 7. Insert tab of the dryer rear panel. Outer tem_inal block screws D. Connect the appliance neutral ground wire and the neutral wire (white or center) of timing cam ...

Installation Instructions
Page 16
..."ON" position. Just dial 1-800 NO BELTS (1-800-662-3587) -- All rights reserved, 11/2005 Printed in the Insta!lation instructions. if dryer does not operate check the fomlowing: m Electric supply is closed. m START button has been pushed firmly. Maintenance instructions: m Clean lint screen after ...each cycle. m Circuit breakers are not tripped or fuses are set in the dryer door well. 8577213 Q 2005. If you will need assistance: The Commercial Laundry Support Center will answer any questions about operating or maintaining ...
..."ON" position. Just dial 1-800 NO BELTS (1-800-662-3587) -- All rights reserved, 11/2005 Printed in the Insta!lation instructions. if dryer does not operate check the fomlowing: m Electric supply is closed. m START button has been pushed firmly. Maintenance instructions: m Clean lint screen after ...each cycle. m Circuit breakers are not tripped or fuses are set in the dryer door well. 8577213 Q 2005. If you will need assistance: The Commercial Laundry Support Center will answer any questions about operating or maintaining ...


