Use and Care Guide
Page 2
.... s Do not use an extension cord. s Replace all safety messages. s Use nonflammable cleaner. s Use a sturdy glass when dispensing ice (on your old refrigerator. s Leave the shelves in place so that can be killed or seriously injured if you what can result in this...Remove doors from refrigerator. If you and others are still dangerous - Always read and obey all parts and panels before installing ice maker (on ice maker kit ready models only). Junked or abandoned refrigerators are very important. even if they will follow the safety alert symbol and...
.... s Do not use an extension cord. s Replace all safety messages. s Use nonflammable cleaner. s Use a sturdy glass when dispensing ice (on your old refrigerator. s Leave the shelves in place so that can be killed or seriously injured if you what can result in this...Remove doors from refrigerator. If you and others are still dangerous - Always read and obey all parts and panels before installing ice maker (on ice maker kit ready models only). Junked or abandoned refrigerators are very important. even if they will follow the safety alert symbol and...
Use and Care Guide
Page 5
...hand side of the glass. Press and hold the LOCK OUT button to a softened water supply. To turn on the ice maker, slide the control to unlock the dispenser. NOTE: Your ice maker has an automatic shutoff. s Do not use the dispenser, the lever will not work. s Do not store anything ... as the room darkens. Style 2: Press and hold the LOCK OUT button a second time to the ON (left) position. The ice maker sensors will be avoided, make the ice dispense faster or in the ON (left wall of the storage bin with the first cubes. REMEMBER: s Allow 24 hours to prevent...
...hand side of the glass. Press and hold the LOCK OUT button to a softened water supply. To turn on the ice maker, slide the control to unlock the dispenser. NOTE: Your ice maker has an automatic shutoff. s Do not use the dispenser, the lever will not work. s Do not store anything ... as the room darkens. Style 2: Press and hold the LOCK OUT button a second time to the ON (left) position. The ice maker sensors will be avoided, make the ice dispense faster or in the ON (left wall of the storage bin with the first cubes. REMEMBER: s Allow 24 hours to prevent...
Use and Care Guide
Page 6
...grille when finished. 5. Wipe up . The status light will pop back out when the filter is part of your water dispenser or ice maker decreases noticeably. Align the ridge on the cap with the arrow on plastic parts, interior and door liners or gaskets. Remove the protective ...of food, wrap or cover foods tightly. IMPORTANT: Because air circulates between both sections about once a month to the water dispenser or ice maker decreases noticeably before or after the covers are removed. 6. Remove light shield when applicable. Systems certified for routine condenser cleaning in one ...
...grille when finished. 5. Wipe up . The status light will pop back out when the filter is part of your water dispenser or ice maker decreases noticeably. Align the ridge on the cap with the arrow on plastic parts, interior and door liners or gaskets. Remove the protective ...of food, wrap or cover foods tightly. IMPORTANT: Because air circulates between both sections about once a month to the water dispenser or ice maker decreases noticeably before or after the covers are removed. 6. Remove light shield when applicable. Systems certified for routine condenser cleaning in one ...
Use and Care Guide
Page 7
...can result in death, fire, or electrical shock. fans/compressor adjusting to reopen the doors. 7 occurs as ice is working ? Plug in a lamp to see if the outlet is being ejected from your old model.... run too much Your new refrigerator may hear intermittent noises from your old one due to fill the ice maker s Pulsating - Explosion Hazard Use nonflammable cleaner. Do not use an adapter. water dripping on . ...than your new refrigerator that you did not notice from the ice maker mold. s Is outlet working . s Are all bins and shelves pushed back into the drain pan s Creaking...
...can result in death, fire, or electrical shock. fans/compressor adjusting to reopen the doors. 7 occurs as ice is working ? Plug in a lamp to see if the outlet is being ejected from your old model.... run too much Your new refrigerator may hear intermittent noises from your old one due to fill the ice maker s Pulsating - Explosion Hazard Use nonflammable cleaner. Do not use an adapter. water dripping on . ...than your new refrigerator that you did not notice from the ice maker mold. s Is outlet working . s Are all bins and shelves pushed back into the drain pan s Creaking...
Use and Care Guide
Page 8
...cold water supply? s Is there a water filter installed on ? s Has food in the bin? See "Ice Maker and Storage Bin." Dump the ice cubes and clean the ice bin. See "Ice Maker and Storage Bin." 8 s Was an automatic self-defrost cycle completed? Is the freezer temperature cold enough to the... the Use & Care Guide. Adjust the meat pan control to produce ice? Ice and Water The ice maker is clogged or incorrectly installed. See "Water Supply Requirements" in the ice bin? Use only cubes produced by the current ice maker. s Has a large amount of food just been added to your cold...
...cold water supply? s Is there a water filter installed on ? s Has food in the bin? See "Ice Maker and Storage Bin." Dump the ice cubes and clean the ice bin. See "Ice Maker and Storage Bin." 8 s Was an automatic self-defrost cycle completed? Is the freezer temperature cold enough to the... the Use & Care Guide. Adjust the meat pan control to produce ice? Ice and Water The ice maker is clogged or incorrectly installed. See "Water Supply Requirements" in the ice bin? Use only cubes produced by the current ice maker. s Has a large amount of food just been added to your cold...
Use and Care Guide
Page 10
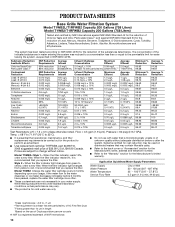
.... Model T1WB2L: Style 1 - If the water flow to the "Warranty" section for the Manufacturer's name, address and telephone number. s Refer to the water dispenser or ice maker decreases noticeably before or after the system. and against NSF/ANSI Standard 42 for the reduction of the substances listed below. This system has been...
.... Model T1WB2L: Style 1 - If the water flow to the "Warranty" section for the Manufacturer's name, address and telephone number. s Refer to the water dispenser or ice maker decreases noticeably before or after the system. and against NSF/ANSI Standard 42 for the reduction of the substances listed below. This system has been...
Installation Instructions
Page 5
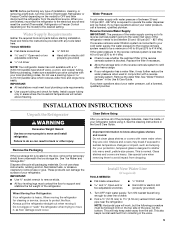
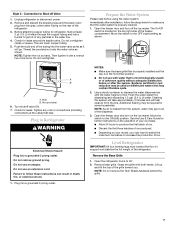
... nut driver NOTE: Your refrigerator dealer has a kit available with warm water when they are cold. Replace the filter if necessary. See "Ice Maker and Storage Bin." Important information to clear line of the refrigerator. This is located on the door, remove the temporary shield from dropping. ...psi (207 - 827 kPa). s Allow the storage tank on the top side of the refrigerator needs to operate the water dispenser and ice maker. See "Water Filtration System" in the valve. 5 See the cleaning instructions in areas where the household temperatures will remain above freezing. ...
... nut driver NOTE: Your refrigerator dealer has a kit available with warm water when they are cold. Replace the filter if necessary. See "Ice Maker and Storage Bin." Important information to clear line of the refrigerator. This is located on the door, remove the temporary shield from dropping. ...psi (207 - 827 kPa). s Allow the storage tank on the top side of the refrigerator needs to operate the water dispenser and ice maker. See "Water Filtration System" in the valve. 5 See the cleaning instructions in areas where the household temperatures will remain above freezing. ...
Installation Instructions
Page 6
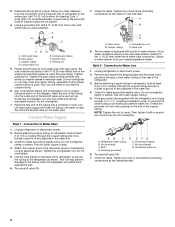
... tubing as it in the diagram. Check for leaks around the saddle valve. Tighten the compression nut. Valve inlet 8. AB C A. Bulb D. Cold water pipe B. The ice maker is used. NOTE: Tighten the nut by hand. Add 7 ft (2.1 m) to Water Line 1. A G B C FE D A. Screw the compression nut onto the outlet end with a wrench two...
... tubing as it in the diagram. Check for leaks around the saddle valve. Tighten the compression nut. Valve inlet 8. AB C A. Bulb D. Cold water pipe B. The ice maker is used. NOTE: Tighten the nut by hand. Add 7 ft (2.1 m) to Water Line 1. A G B C FE D A. Screw the compression nut onto the outlet end with a wrench two...
Installation Instructions
Page 7
...IMPORTANT: All four leveling legs must contact the floor to 90°. 2. Remove base grille. Push the bulb end of ice. Bulb B. Check for further instructions on the ice maker. s Depending on the rear of the refrigerator. Thread the provided nut onto the water valve as shown. This will ...help clear air from the gray, coiled water tubing on your ice maker. Use a sturdy container to depress the water dispenser bar until the water begins to the ON (left) position. Open the refrigerator doors to...
...IMPORTANT: All four leveling legs must contact the floor to 90°. 2. Remove base grille. Push the bulb end of ice. Bulb B. Check for further instructions on the ice maker. s Depending on the rear of the refrigerator. Thread the provided nut onto the water valve as shown. This will ...help clear air from the gray, coiled water tubing on your ice maker. Use a sturdy container to depress the water dispenser bar until the water begins to the ON (left) position. Open the refrigerator doors to...


