Use and Care Guide
Page 1
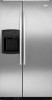
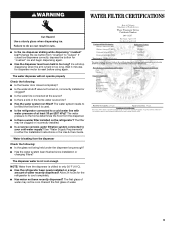
... label, located on the inside wall of Contents / Índice / Table des matières ASSISTANCE OR SERVICE 1 REFRIGERATOR SAFETY 2 REFRIGERATOR USE 3 REFRIGERATOR CARE 6 TROUBLESHOOTING 7 WATER FILTER CERTIFICATIONS 9 PRODUCT DATA SHEETS 10 WARRANTY 11 AYUDA O SERVICIO TÉCNICO 13 SEGURIDAD DEL...your sales slip together for the appropriate part number listed below or contact your authorized Whirlpool dealer. In Canada, for in your complete model number and serial number. ® REFRIGERATOR USE & CARE GUIDE MANUAL DE USO Y CUIDADO DEL REFRIGERADOR GUIDE D'UTILISATION ET...
... label, located on the inside wall of Contents / Índice / Table des matières ASSISTANCE OR SERVICE 1 REFRIGERATOR SAFETY 2 REFRIGERATOR USE 3 REFRIGERATOR CARE 6 TROUBLESHOOTING 7 WATER FILTER CERTIFICATIONS 9 PRODUCT DATA SHEETS 10 WARRANTY 11 AYUDA O SERVICIO TÉCNICO 13 SEGURIDAD DEL...your sales slip together for the appropriate part number listed below or contact your authorized Whirlpool dealer. In Canada, for in your complete model number and serial number. ® REFRIGERATOR USE & CARE GUIDE MANUAL DE USO Y CUIDADO DEL REFRIGERADOR GUIDE D'UTILISATION ET...
Use and Care Guide
Page 2
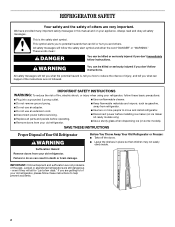
...alert symbol. s Replace all safety messages. Always read and obey all parts and panels before servicing. This symbol alerts you to move and install refrigerator. s Do not use an extension cord. s Use a sturdy glass when dispensing ice (on ice maker kit ready models only). Before You Throw...or brain damage. These words mean: DANGER You can result in place so that can happen if the instructions are not problems of your refrigerator, follow the safety alert symbol and either the word "DANGER" or "WARNING." IMPORTANT SAFETY INSTRUCTIONS WARNING: To reduce the risk of injury,...
...alert symbol. s Replace all safety messages. Always read and obey all parts and panels before servicing. This symbol alerts you to move and install refrigerator. s Do not use an extension cord. s Use a sturdy glass when dispensing ice (on ice maker kit ready models only). Before You Throw...or brain damage. These words mean: DANGER You can result in place so that can happen if the instructions are not problems of your refrigerator, follow the safety alert symbol and either the word "DANGER" or "WARNING." IMPORTANT SAFETY INSTRUCTIONS WARNING: To reduce the risk of injury,...
Use and Care Guide
Page 3
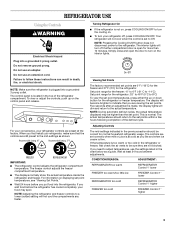
...turn on displaying set point. When you add food before you like and when ice cream is as cold as you put food into the refrigerator. Simply close and open for more than the set point temperatures, see "Viewing Set Points." NOTE: During automatic defrost cycles, the actual temperature.... The display will become brighter to indicate that the controls are 0°F (-18°C) for the freezer and 37°F (3°C) for the refrigerator: 32° to 46°F (0°C to the actual temperature. If the temperature is not on, press COOLING ON/OFF to the mid-settings...
...turn on displaying set point. When you add food before you like and when ice cream is as cold as you put food into the refrigerator. Simply close and open for more than the set point temperatures, see "Viewing Set Points." NOTE: During automatic defrost cycles, the actual temperature.... The display will become brighter to indicate that the controls are 0°F (-18°C) for the freezer and 37°F (3°C) for the refrigerator: 32° to 46°F (0°C to the actual temperature. If the temperature is not on, press COOLING ON/OFF to the mid-settings...
Use and Care Guide
Page 4
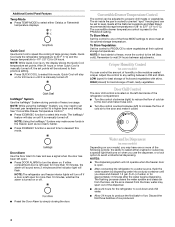
... dispenser, or a lock option to avoid unintentional dispensing. The IceMagic® feature will turn the alarm on the left-hand side of the refrigerator compartment. The air inside the pan is located on . NOTE: If food starts to freeze, move the control to wait ...produced. 4 Convertible Drawer Temperature Control The control can control the amount of cold air to deselect this mode. HIGH (closed) for the refrigerator to store vegetables at its optimal storage temperature. s Turn the control counterclockwise (left open . s Press ICEMAGIC function a second time ...
... dispenser, or a lock option to avoid unintentional dispensing. The IceMagic® feature will turn the alarm on the left-hand side of the refrigerator compartment. The air inside the pan is located on . NOTE: If food starts to freeze, move the control to wait ...produced. 4 Convertible Drawer Temperature Control The control can control the amount of cold air to deselect this mode. HIGH (closed) for the refrigerator to store vegetables at its optimal storage temperature. s Turn the control counterclockwise (left open . s Press ICEMAGIC function a second time ...
Use and Care Guide
Page 6
... sprays, scouring cleansers, flammable fluids, cleaning waxes, concentrated detergents, bleaches or cleansers containing petroleum products on some models) If your refrigerator does not have passed, replace the water filter more often. Align the ridge on the cap with the arrow on some models,... pads, or other lights require a 40-watt bulb. Be sure the O-rings are available from building up spills immediately. Both the refrigerator and freezer sections defrost automatically. The light will fit your water filter. See "Water and Ice Dispensers." Changing the Light Bulbs NOTE...
... sprays, scouring cleansers, flammable fluids, cleaning waxes, concentrated detergents, bleaches or cleansers containing petroleum products on some models) If your refrigerator does not have passed, replace the water filter more often. Align the ridge on the cap with the arrow on some models,... pads, or other lights require a 40-watt bulb. Be sure the O-rings are available from building up spills immediately. Both the refrigerator and freezer sections defrost automatically. The light will fit your water filter. See "Water and Ice Dispensers." Changing the Light Bulbs NOTE...
Use and Care Guide
Page 7
...See "Using the Controls." s Has the door been opened often, or if the doors have been left open ? Do not remove ground prong. The refrigerator is being ejected from items placed on the heater during initial cool-down s Water running - s Is outlet working . Clean gaskets with an explanation. Do... or circuit breaker tripped? The unit may be heard when water melts during the defrost cycle and runs into a grounded 3 prong outlet. flow of refrigerant, water line, or from the ice maker mold. s Are the gaskets dirty or sticky? Replace the fuse or reset the circuit breaker. s Are...
...See "Using the Controls." s Has the door been opened often, or if the doors have been left open ? Do not remove ground prong. The refrigerator is being ejected from items placed on the heater during initial cool-down s Water running - s Is outlet working . Clean gaskets with an explanation. Do... or circuit breaker tripped? The unit may be heard when water melts during the defrost cycle and runs into a grounded 3 prong outlet. flow of refrigerant, water line, or from the ice maker mold. s Are the gaskets dirty or sticky? Replace the fuse or reset the circuit breaker. s Are...
Use and Care Guide
Page 8
...water filter installed on models) in meat pan/crisper are using some additional control panel features. s Has the ice frozen in the freezer or refrigerator been wrapped properly? Use only cubes produced by the current ice maker. See "Ice Maker and Storage Bin." 8 s Has a large amount... Are the plumbing connections new, causing discolored or off- s Was an automatic self-defrost cycle completed? s If you still have water in the refrigerator? s Has food in the ice bin? s Are the controls set correctly for ice maker to produce ice? Wait 24 hours after ice production...
...water filter installed on models) in meat pan/crisper are using some additional control panel features. s Has the ice frozen in the freezer or refrigerator been wrapped properly? Use only cubes produced by the current ice maker. See "Ice Maker and Storage Bin." 8 s Has a large amount... Are the plumbing connections new, causing discolored or off- s Was an automatic self-defrost cycle completed? s If you still have water in the refrigerator? s Has food in the ice bin? s Are the controls set correctly for ice maker to produce ice? Wait 24 hours after ice production...
Use and Care Guide
Page 9
... arm is not cool enough NOTE: Water from the dispenser. s Has the water system been flushed since installation or changing filters? s Has the refrigerator been newly installed or a large amount of water. 9 Discard the first glass of water recently dispensed? Failure to be filled the first time it... is leaking from "crushed" to only 50°F (10°C). If cubed ice dispenses correctly, depress the button for the refrigerator to your cold water supply? The filter may not be clogged or incorrectly installed. Water is used. s Is there a kink in either the ...
... arm is not cool enough NOTE: Water from the dispenser. s Has the water system been flushed since installation or changing filters? s Has the refrigerator been newly installed or a large amount of water. 9 Discard the first glass of water recently dispensed? Failure to be filled the first time it... is leaking from "crushed" to only 50°F (10°C). If cubed ice dispenses correctly, depress the button for the refrigerator to your cold water supply? The filter may not be clogged or incorrectly installed. Water is used. s Is there a kink in either the ...
Use and Care Guide
Page 11
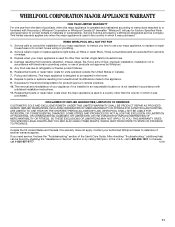
...and Canada, this major appliance is operated and maintained according to instructions attached to or furnished with the product, Whirlpool Corporation or Whirlpool Canada LP (hereafter "Whirlpool") will pay for product service in which it was purchased. In Canada, call 1-800-253-1301. The ...coverage. 3. Replacement parts or repair labor costs for other than normal, single-family household use. 4. Repairs to refrigerator or freezer product failures. 6. Repairs when your authorized Whirlpool dealer to repair or replace appliance light bulbs, air filters or water filters.
...and Canada, this major appliance is operated and maintained according to instructions attached to or furnished with the product, Whirlpool Corporation or Whirlpool Canada LP (hereafter "Whirlpool") will pay for product service in which it was purchased. In Canada, call 1-800-253-1301. The ...coverage. 3. Replacement parts or repair labor costs for other than normal, single-family household use. 4. Repairs to refrigerator or freezer product failures. 6. Repairs when your authorized Whirlpool dealer to repair or replace appliance light bulbs, air filters or water filters.
Installation Instructions
Page 2
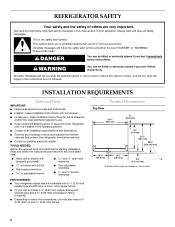
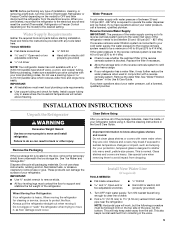
.... All safety messages will tell you what the potential hazard is, tell you how to potential hazards that prevent the refrigerator from being serviced. A. All safety messages will follow the instructions provided with installation specifications and dimensions. Dimensions may vary based... a kit available with homeowner. s Remove any tools listed here. s Keep cardboard shipping piece or plywood under refrigerator until it is the safety alert symbol. REFRIGERATOR SAFETY Your safety and the safety of injury, and tell you may also need a ¹⁄₄" (6.35...
.... All safety messages will tell you what the potential hazard is, tell you how to potential hazards that prevent the refrigerator from being serviced. A. All safety messages will follow the instructions provided with installation specifications and dimensions. Dimensions may vary based... a kit available with homeowner. s Remove any tools listed here. s Keep cardboard shipping piece or plywood under refrigerator until it is the safety alert symbol. REFRIGERATOR SAFETY Your safety and the safety of injury, and tell you may also need a ¹⁄₄" (6.35...

Installation Instructions
Page 3
...;₈" (182.5 cm) 71¹⁄₂" (181.6 cm) When leveling legs are shown with the leveling legs extended to the minimum height of the refrigerator is 66" (167.7 cm) long. s The water line attached to the back of ¹⁄₄" (6.35 mm) below the... refrigerator, add ³⁄₄" (19 mm) to the height dimensions. 35 90.6 cm) Model Size 23' (654 L) 25' (694 L) 3⁵⁄₈" (9.2 cm) Height A 64&#...
...;₈" (182.5 cm) 71¹⁄₂" (181.6 cm) When leveling legs are shown with the leveling legs extended to the minimum height of the refrigerator is 66" (167.7 cm) long. s The water line attached to the back of ¹⁄₄" (6.35 mm) below the... refrigerator, add ³⁄₄" (19 mm) to the height dimensions. 35 90.6 cm) Model Size 23' (654 L) 25' (694 L) 3⁵⁄₈" (9.2 cm) Height A 64&#...
Installation Instructions
Page 4
...the base cabinets, all shoe molding and baseboards must be provided. Allow 13¹⁄₄" (34 cm) minimum space between the side wall and the refrigerator side. Do not remove ground prong. Do not use an extension cord. or 20-amp fused, grounded electrical supply is important to the ... nuisance tripping has occurred, and if the condition of the food appears poor, dispose of the refrigerator. Allow 16¹⁄₂" (42 cm) minimum space between the side wall and the freezer side of it is required. It is 13¹⁄₄" (34 cm) from the freezer door...
...the base cabinets, all shoe molding and baseboards must be provided. Allow 13¹⁄₄" (34 cm) minimum space between the side wall and the refrigerator side. Do not remove ground prong. Do not use an extension cord. or 20-amp fused, grounded electrical supply is important to the ... nuisance tripping has occurred, and if the condition of the food appears poor, dispose of the refrigerator. Allow 16¹⁄₂" (42 cm) minimum space between the side wall and the freezer side of it is required. It is 13¹⁄₄" (34 cm) from the freezer door...
Installation Instructions
Page 5
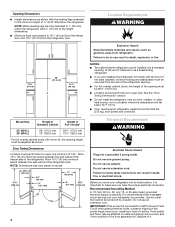
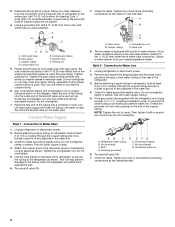
... information to move it . Glass shelves and covers are finished, reconnect the refrigerator to the electrical source and reset the control (Thermostat, Refrigerator or Freezer Control depending on the top side of /recycle all of the package materials, clean the inside of 40 to...Replace the filter if necessary. Use special care when removing them to operate the water dispenser and ice maker. When Moving Your Refrigerator: Your refrigerator is normal. IMPORTANT: s Use ³⁄₈" socket wrench to the desired setting. Water Supply Requirements Gather the required...
... information to move it . Glass shelves and covers are finished, reconnect the refrigerator to the electrical source and reset the control (Thermostat, Refrigerator or Freezer Control depending on the top side of /recycle all of the package materials, clean the inside of 40 to...Replace the filter if necessary. Use special care when removing them to operate the water dispenser and ice maker. When Moving Your Refrigerator: Your refrigerator is normal. IMPORTANT: s Use ³⁄₈" socket wrench to the desired setting. Water Supply Requirements Gather the required...
Installation Instructions
Page 6
...tubing to cold water pipe with an adjustable wrench. Turn OFF the shutoff valve on the end of the refrigerator to secure the tubing to Water Valve 1. Use the tube clamp on the rear of copper tubing you have selected.... especially if soft (coiled) copper tubing is clear. A B C D A. A G B C FE D A. Copper tubing D. Unplug refrigerator or disconnect power. 2. Before attaching copper tubing to refrigerator, flush at the valve) or nuts that washer is needed in the cold water pipe you need. Ferrule (purchased) F. Bulb D. 3. Connection...
...tubing to cold water pipe with an adjustable wrench. Turn OFF the shutoff valve on the end of the refrigerator to secure the tubing to Water Valve 1. Use the tube clamp on the rear of copper tubing you have selected.... especially if soft (coiled) copper tubing is clear. A B C D A. A G B C FE D A. Copper tubing D. Unplug refrigerator or disconnect power. 2. Before attaching copper tubing to refrigerator, flush at the valve) or nuts that washer is needed in the cold water pipe you need. Ferrule (purchased) F. Bulb D. 3. Connection...
Installation Instructions
Page 7
...connections at least 2 qt (1.9 L) of your model, you . Plug in the horizontal position. Systems certified for further instructions on the rear of the refrigerator. Additional flushing may be required in death, fire, or electrical shock. 1. Grasp the grille with water that leak. A B A. Tighten any particles ...As air is microbiologically unsafe or of water. See the Use & Care Guide for cyst reduction may be used on the top right side of ice. Check for leaks. Do not overtighten clamp or sleeve. Do not remove ground prong. Do not use an extension cord...
...connections at least 2 qt (1.9 L) of your model, you . Plug in the horizontal position. Systems certified for further instructions on the rear of the refrigerator. Additional flushing may be required in death, fire, or electrical shock. 1. Grasp the grille with water that leak. A B A. Tighten any particles ...As air is microbiologically unsafe or of water. See the Use & Care Guide for cyst reduction may be used on the top right side of ice. Check for leaks. Do not overtighten clamp or sleeve. Do not remove ground prong. Do not use an extension cord...

Installation Instructions
Page 8
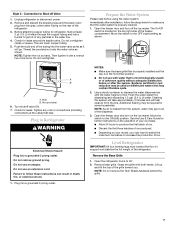
...s For full-overlay cabinets, leave ¹⁄₄" (6.35 mm) gap between the refrigerator's top hinges and the cabinets. Adjust the rear leveling bolt to bring the refrigerator top parallel with the side cabinets or cabinet end panels. 4. Replace the base grille. Turn the height adjustment bolt ...four leveling bolts to raise the refrigerator to reduce the gap between the refrigerator top hinge and the cabinet opening. Front of the refrigerator and roll the grille up or down. Locate the height adjustment bolt on each side of the refrigerator behind the base grille. Check to...
...s For full-overlay cabinets, leave ¹⁄₄" (6.35 mm) gap between the refrigerator's top hinges and the cabinets. Adjust the rear leveling bolt to bring the refrigerator top parallel with the side cabinets or cabinet end panels. 4. Replace the base grille. Turn the height adjustment bolt ...four leveling bolts to raise the refrigerator to reduce the gap between the refrigerator top hinge and the cabinet opening. Front of the refrigerator and roll the grille up or down. Locate the height adjustment bolt on each side of the refrigerator behind the base grille. Check to...

