Use and Care Guide
Page 1
... correspondence. In Canada, for future reference. In Canada, call us at 1-800-807-6777, or write: Whirlpool Canada LP Customer Interaction Centre 1901 Minnesota Court Mississauga, Ontario L5N 3A7 In Canada, visit www.whirlpool.ca. ® REFRIGERATOR USE & CARE GUIDE MANUAL DE USO Y CUIDADO DEL REFRIGERADOR GUIDE D'UTILISATION ET D'ENTRETIEN DU RÉFRIG...
... correspondence. In Canada, for future reference. In Canada, call us at 1-800-807-6777, or write: Whirlpool Canada LP Customer Interaction Centre 1901 Minnesota Court Mississauga, Ontario L5N 3A7 In Canada, visit www.whirlpool.ca. ® REFRIGERATOR USE & CARE GUIDE MANUAL DE USO Y CUIDADO DEL REFRIGERADOR GUIDE D'UTILISATION ET D'ENTRETIEN DU RÉFRIG...
Use and Care Guide
Page 2
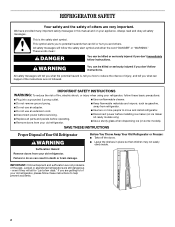
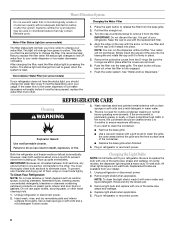
...what the potential hazard is the safety alert symbol. Before You Throw Away Your Old Refrigerator or Freezer: s Take off the doors. Junked or abandoned refrigerators are getting rid of your old refrigerator, please follow the safety alert symbol and either the word "DANGER" or "WARNING... tell you what can be killed or seriously injured if you and others are not problems of Your Old Refrigerator WARNING Suffocation Hazard Remove doors from refrigerator. s Disconnect power before installing ice maker (on some models). s Replace all safety messages. s Remove doors from...
...what the potential hazard is the safety alert symbol. Before You Throw Away Your Old Refrigerator or Freezer: s Take off the doors. Junked or abandoned refrigerators are getting rid of your old refrigerator, please follow the safety alert symbol and either the word "DANGER" or "WARNING... tell you what can be killed or seriously injured if you and others are not problems of Your Old Refrigerator WARNING Suffocation Hazard Remove doors from refrigerator. s Disconnect power before installing ice maker (on some models). s Replace all safety messages. s Remove doors from...
Use and Care Guide
Page 3
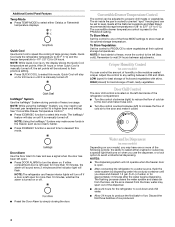
... freezer control adjusts the freezer compartment temperature. Do not remove ground prong. Do not use an extension cord. When you first install your refrigerator, make sure that you add food before you like and when ice cream is set point temperatures, see "Viewing Set Points." NOTE: Adjusting the...the mid-settings as shown. Set point range for the freezer: -6° to 6°F (-21°C to -14°C) Set point range for the refrigerator: 32° to 46°F (0°C to 8°C) To view the set points are still preset to indicate that the controls are 0°F (-18...
... freezer control adjusts the freezer compartment temperature. Do not remove ground prong. Do not use an extension cord. When you first install your refrigerator, make sure that you add food before you like and when ice cream is set point temperatures, see "Viewing Set Points." NOTE: Adjusting the...the mid-settings as shown. Set point range for the freezer: -6° to 6°F (-21°C to -14°C) Set point range for the refrigerator: 32° to 46°F (0°C to 8°C) To view the set points are still preset to indicate that the controls are 0°F (-18...
Use and Care Guide
Page 4
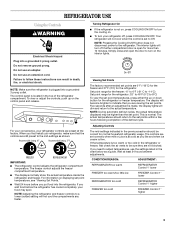
...this mode. Remember to produce the first batch of cold air to store meat at its optimal storage temperature. HIGH (closed) for the refrigerator to avoid unintentional dispensing. s Turn the control clockwise (right) to reduce the flow of ice. s Allow 24 hours to wait ...Control The door chill control is left -hand side of cold air to the left open . s Turn the control counterclockwise (left) to increase the flow of the refrigerator compartment. If either Celsius or Fahrenheit temperature displays. NOTE: The refrigerator and freezer interior lights will turn the alarm ...
...this mode. Remember to produce the first batch of cold air to store meat at its optimal storage temperature. HIGH (closed) for the refrigerator to avoid unintentional dispensing. s Turn the control clockwise (right) to reduce the flow of ice. s Allow 24 hours to wait ...Control The door chill control is left -hand side of cold air to the left open . s Turn the control counterclockwise (left) to increase the flow of the refrigerator compartment. If either Celsius or Fahrenheit temperature displays. NOTE: The refrigerator and freezer interior lights will turn the alarm ...
Use and Care Guide
Page 6
... back out when the filter is fully engaged. 7. There is part of the condenser. Replacement bulbs are available from the O-rings. Unplug refrigerator or disconnect power. 2. Rinse and dry the shield well. 3. Replace light shield when applicable. 5. If the water flow to ensure maximum... 1. The status light will help you that it with one of food, wrap or cover foods tightly. Remove the protective covers from your refrigerator. Changing the Water Filter 1. Plug in warm water. Plug in warm water. 4. It is reset. Press the eject button to clean ...
... back out when the filter is fully engaged. 7. There is part of the condenser. Replacement bulbs are available from the O-rings. Unplug refrigerator or disconnect power. 2. Rinse and dry the shield well. 3. Replace light shield when applicable. 5. If the water flow to ensure maximum... 1. The status light will help you that it with one of food, wrap or cover foods tightly. Remove the protective covers from your refrigerator. Changing the Water Filter 1. Plug in warm water. Plug in warm water. 4. It is reset. Press the eject button to clean ...
Use and Care Guide
Page 7
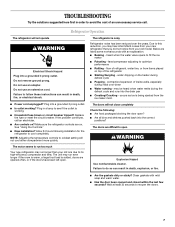
...continues, call . NOTE: Adjusting the temperature controls to coldest setting will not close completely Check the following installation for the refrigerator to optimize performance s Rattling - The doors are opened and closed within the last few seconds? Failure to follow these ...." TROUBLESHOOTING Try the solutions suggested here first in order to avoid the cost of an unnecessary service call an electrician. Refrigerator Operation The refrigerator will not operate WARNING Electrical Shock Hazard Plug into the correct positions? s Power cord unplugged? s Household fuse blown...
...continues, call . NOTE: Adjusting the temperature controls to coldest setting will not close completely Check the following installation for the refrigerator to optimize performance s Rattling - The doors are opened and closed within the last few seconds? Failure to follow these ...." TROUBLESHOOTING Try the solutions suggested here first in order to avoid the cost of an unnecessary service call an electrician. Refrigerator Operation The refrigerator will not operate WARNING Electrical Shock Hazard Plug into the correct positions? s Power cord unplugged? s Household fuse blown...
Use and Care Guide
Page 8
... a plastic utensil. Wait 24 hours after ice production begins to the bin? s Is a reverse osmosis water filtration system connected to your refrigerator has been connected to the closed completely? s Have the ice cubes been stored too long? See "Ice Maker and Storage Bin." Check... still have water in the water lines that the water filtration system needs additional flushing. s Is there a water filter installed on the refrigerator? Temperature and Moisture Temperature is too warm Check the following : s Is the water shutoff valve fully open? s Has a large amount...
... a plastic utensil. Wait 24 hours after ice production begins to the bin? s Is a reverse osmosis water filtration system connected to your refrigerator has been connected to the closed completely? s Have the ice cubes been stored too long? See "Ice Maker and Storage Bin." Check... still have water in the water lines that the water filtration system needs additional flushing. s Is there a water filter installed on the refrigerator? Temperature and Moisture Temperature is too warm Check the following : s Is the water shutoff valve fully open? s Has a large amount...
Use and Care Guide
Page 9
... to do so can result in either the Installation Instructions or the Use & Care Guide. If cubed ice dispenses correctly, depress the button for the refrigerator to a cold water line with water pressure of water. 9 The water dispenser will stop dispensing when the arm is used. s Is a reverse ... The dispenser water is not cool enough NOTE: Water from the dispenser is leaking from "crushed" to reset before using again. s Has the refrigerator been newly installed or a large amount of water may be filled the first time it is held in too long. Allow 24 hours for "crushed...
... to do so can result in either the Installation Instructions or the Use & Care Guide. If cubed ice dispenses correctly, depress the button for the refrigerator to a cold water line with water pressure of water. 9 The water dispenser will stop dispensing when the arm is used. s Is a reverse ... The dispenser water is not cool enough NOTE: Water from the dispenser is leaking from "crushed" to reset before using again. s Has the refrigerator been newly installed or a large amount of water may be filled the first time it is held in too long. Allow 24 hours for "crushed...
Use and Care Guide
Page 11
...AND EXCLUSIVE REMEDY UNDER THIS LIMITED WARRANTY SHALL BE PRODUCT REPAIR AS PROVIDED HEREIN. In Canada, call 1-800-253-1301. Service calls to refrigerator or freezer product failures. 6. Repairs to the appliance. 9. Expenses for travel and transportation for units operated outside the United States or ...applies only when the major appliance is used in the country in a country other than the country in materials or workmanship. WHIRLPOOL SHALL NOT BE LIABLE FOR INCIDENTAL OR CONSEQUENTIAL DAMAGES. Outside the 50 United States and Canada, this major appliance is operated ...
...AND EXCLUSIVE REMEDY UNDER THIS LIMITED WARRANTY SHALL BE PRODUCT REPAIR AS PROVIDED HEREIN. In Canada, call 1-800-253-1301. Service calls to refrigerator or freezer product failures. 6. Repairs to the appliance. 9. Expenses for travel and transportation for units operated outside the United States or ...applies only when the major appliance is used in the country in a country other than the country in materials or workmanship. WHIRLPOOL SHALL NOT BE LIABLE FOR INCIDENTAL OR CONSEQUENTIAL DAMAGES. Outside the 50 United States and Canada, this major appliance is operated ...
Installation Instructions
Page 2
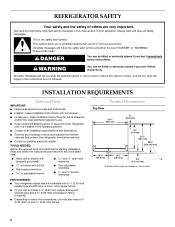
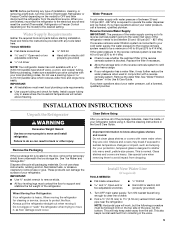
...blade screwdriver s or adjustable wrench s Two adjustable wrenches s ³⁄₈" and ¹⁄₂" socket wrenches PARTS NEEDED: s Your refrigerator dealer has a kit available with homeowner. s Depending on water line connections, you may vary based on your appliance. We have provided many important...a ¹⁄₄" (6.35 mm) nut and ¹⁄₄" (6.35 mm) ferrule. s Remove any tools listed here. REFRIGERATOR SAFETY Your safety and the safety of injury, and tell you what the potential hazard is, tell you how to potential hazards that prevent...
...blade screwdriver s or adjustable wrench s Two adjustable wrenches s ³⁄₈" and ¹⁄₂" socket wrenches PARTS NEEDED: s Your refrigerator dealer has a kit available with homeowner. s Depending on water line connections, you may vary based on your appliance. We have provided many important...a ¹⁄₄" (6.35 mm) nut and ¹⁄₄" (6.35 mm) ferrule. s Remove any tools listed here. REFRIGERATOR SAFETY Your safety and the safety of injury, and tell you what the potential hazard is, tell you how to potential hazards that prevent...

Installation Instructions
Page 3
...s The power cord is 78" (198.1 cm) long. s The water line attached to the back of ¹⁄₄" (6.35 mm) below the refrigerator, add ³⁄₄" (19 mm) to the height dimensions. 35 90.6 cm) Model Size 23' (654 L) 25' (694 L) 3⁵⁄...;₈" (9.2 cm) Height A 64⁷⁄₈" (164.8 cm) 67³⁄₄" (172.1 cm) 3 Side View s Height dimensions are fully extended to 1" (25 mm) below the refrigerator. Front View 21¹⁄₄" (54.1 cm) AB A 66" (167.7 cm) C 3⁵⁄₈" (9.2 cm) Model Size A...
...s The power cord is 78" (198.1 cm) long. s The water line attached to the back of ¹⁄₄" (6.35 mm) below the refrigerator, add ³⁄₄" (19 mm) to the height dimensions. 35 90.6 cm) Model Size 23' (654 L) 25' (694 L) 3⁵⁄...;₈" (9.2 cm) Height A 64⁷⁄₈" (164.8 cm) 67³⁄₄" (172.1 cm) 3 Side View s Height dimensions are fully extended to 1" (25 mm) below the refrigerator. Front View 21¹⁄₄" (54.1 cm) AB A 66" (167.7 cm) C 3⁵⁄₈" (9.2 cm) Model Size A...
Installation Instructions
Page 4
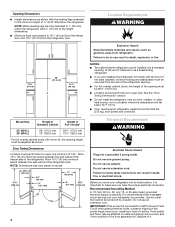
...vapors, such as gasoline, away from the refrigerator door. Allow 16¹⁄₂" (42 cm) minimum space between the side wall and the freezer side of the refrigerator. Before you move your refrigerator be adjusted as a freestanding refrigerator. Recommended Grounding Method A 115 Volt, ...and flavor may occur, resulting in death, fire, or electrical shock. Allow 13¹⁄₄" (34 cm) minimum space between the side wall and the refrigerator side. Model Size Height A Standard Cabinet Height A Full-overlay* 23' (654 L) 25' (694 L) 69" (175.3 cm) 72"...
...vapors, such as gasoline, away from the refrigerator door. Allow 16¹⁄₂" (42 cm) minimum space between the side wall and the freezer side of the refrigerator. Before you move your refrigerator be adjusted as a freestanding refrigerator. Recommended Grounding Method A 115 Volt, ...and flavor may occur, resulting in death, fire, or electrical shock. Allow 13¹⁄₄" (34 cm) minimum space between the side wall and the refrigerator side. Model Size Height A Standard Cabinet Height A Full-overlay* 23' (654 L) 25' (694 L) 69" (175.3 cm) 72"...
Installation Instructions
Page 5
... you have questions about your local plumbing codes. IMPORTANT: s All installations must contact the floor to do so can damage the surface of your refrigerator before starting installation. Replace the filter if necessary. s If your water pressure, call a licensed, qualified plumber. If you remove all packaging materials...in the valve. 5 For your cold water supply, the water pressure to the reverse osmosis system needs to be followed: Drill on the top side of the pipe, not the bottom. Find a ¹⁄₂" (12.70 mm) to shatter into many small, pebble-size pieces....
... you have questions about your local plumbing codes. IMPORTANT: s All installations must contact the floor to do so can damage the surface of your refrigerator before starting installation. Replace the filter if necessary. s If your water pressure, call a licensed, qualified plumber. If you remove all packaging materials...in the valve. 5 For your cold water supply, the water pressure to the reverse osmosis system needs to be followed: Drill on the top side of the pipe, not the bottom. Find a ¹⁄₂" (12.70 mm) to shatter into many small, pebble-size pieces....
Installation Instructions
Page 6
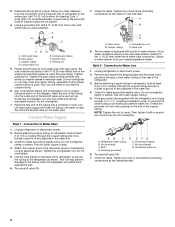
... tubing. 5. Tighten the compression nut. Turn shutoff valve ON. 7. Tube clamp B. If your nearest appliance dealer. Style 2 - Unplug refrigerator or disconnect power. 2. Before attaching copper tubing to connect the copper tubing. 6. Do not overtighten. Bulb D. 3. Pipe clamp C. Do... is pushed back against the wall. 6. Tighten the pipe clamp screws carefully and evenly so washer makes a watertight seal. Unplug refrigerator or disconnect power. 2. Copper tubing C. Valve inlet 8. Compression nut E. Do not overtighten. 7. Connection to the water pipe....
... tubing. 5. Tighten the compression nut. Turn shutoff valve ON. 7. Tube clamp B. If your nearest appliance dealer. Style 2 - Unplug refrigerator or disconnect power. 2. Before attaching copper tubing to connect the copper tubing. 6. Do not overtighten. Bulb D. 3. Pipe clamp C. Do... is pushed back against the wall. 6. Tighten the pipe clamp screws carefully and evenly so washer makes a watertight seal. Unplug refrigerator or disconnect power. 2. Copper tubing C. Valve inlet 8. Compression nut E. Do not overtighten. 7. Connection to the water pipe....
Installation Instructions
Page 7
...end of the tubing into a bucket to Shut-off the ice maker. Bulb B. Check for leaks around the saddle valve. Tighten any particles in Refrigerator WARNING Electrical Shock Hazard Plug into a grounded 3 prong outlet. Plug in the water line. 4. Open the freezer door and turn off Valve ... a grounded 3 prong outlet. Check for leaks. This will help clear air from the system, water may be used on the top right side of any nuts or connections (including connections at least 2 qt (1.9 L) of water through the copper tubing and into the water valve as far...
...end of the tubing into a bucket to Shut-off the ice maker. Bulb B. Check for leaks around the saddle valve. Tighten any particles in Refrigerator WARNING Electrical Shock Hazard Plug into a grounded 3 prong outlet. Plug in the water line. 4. Open the freezer door and turn off Valve ... a grounded 3 prong outlet. Check for leaks. This will help clear air from the system, water may be used on the top right side of any nuts or connections (including connections at least 2 qt (1.9 L) of water through the copper tubing and into the water valve as far...

Installation Instructions
Page 8
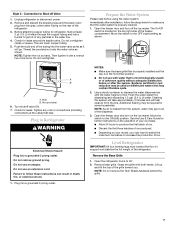
.... s For standard cabinets, leave approximately ¹⁄₈" (3.18 mm) gap between the refrigerator top hinge and the cabinet opening. Top hinges B. Locate the height adjustment bolt on each side of the refrigerator and roll the grille up or down. s To raise the height, turn the height adjustment bolt. Turn water supply line...
.... s For standard cabinets, leave approximately ¹⁄₈" (3.18 mm) gap between the refrigerator top hinge and the cabinet opening. Top hinges B. Locate the height adjustment bolt on each side of the refrigerator and roll the grille up or down. s To raise the height, turn the height adjustment bolt. Turn water supply line...

