Owners Manual
Page 4
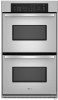
... match those of day will light up for 5 seconds. The locations and appearances of the items listed. Number pads D. Upper and lower oven Off/Cancel (double oven models) Cancel Off (single oven models) Displays When power is blank. Start The START pad begins all of the items shown here may have to the appliance, everything on...
... match those of day will light up for 5 seconds. The locations and appearances of the items listed. Number pads D. Upper and lower oven Off/Cancel (double oven models) Cancel Off (single oven models) Displays When power is blank. Start The START pad begins all of the items shown here may have to the appliance, everything on...
Owners Manual
Page 5
... OFF/CANCEL to unlock and remove "CONTROL LOCK" from the display, press OFF/CANCEL. All Tones (double oven models) All of time. 3. To Turn Off/On: Press and hold STOP TIME for 5 seconds. On some models, a tone will sound and "Snd Lo" will appear on , but can be turned off . Pad... amount of time (between 5 seconds and 4 minutes depending on , but can be adjusted. If OFF/CANCEL is pressed, the respective oven will display "NA9 OFF." On double oven models, CLOCK SET will return to the time of -cycle tones Tone Volume The volume is preset in Fahrenheit or Celsius. 5 Tones Tones ...
... OFF/CANCEL to unlock and remove "CONTROL LOCK" from the display, press OFF/CANCEL. All Tones (double oven models) All of time. 3. To Turn Off/On: Press and hold STOP TIME for 5 seconds. On some models, a tone will sound and "Snd Lo" will appear on , but can be turned off . Pad... amount of time (between 5 seconds and 4 minutes depending on , but can be adjusted. If OFF/CANCEL is pressed, the respective oven will display "NA9 OFF." On double oven models, CLOCK SET will return to the time of -cycle tones Tone Volume The volume is preset in Fahrenheit or Celsius. 5 Tones Tones ...
Owners Manual
Page 7
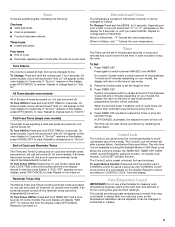
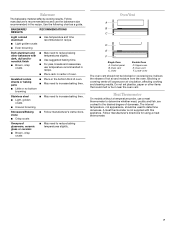
...Oven vent C. Lower oven The oven vent should be blocked or covered since it allows the release of oven.... ■ May need to increase baking time. ■ Little or no bottom browning Stainless steel ■ Light, golden crusts ■ Uneven browning ■ May need to determine doneness. Meat Thermometer On models... without a temperature probe, use temperature recommended in recipe. ■ Place rack in the bottom third of hot air and moisture from the oven...near the oven vent. Upper oven E. Oven vent F.... panel B. Oven Vent A B C D E F Single Oven A. A ...
...Oven vent C. Lower oven The oven vent should be blocked or covered since it allows the release of oven.... ■ May need to increase baking time. ■ Little or no bottom browning Stainless steel ■ Light, golden crusts ■ Uneven browning ■ May need to determine doneness. Meat Thermometer On models... without a temperature probe, use temperature recommended in recipe. ■ Place rack in the bottom third of hot air and moisture from the oven...near the oven vent. Upper oven E. Oven vent F.... panel B. Oven Vent A B C D E F Single Oven A. A ...
Owners Manual
Page 8
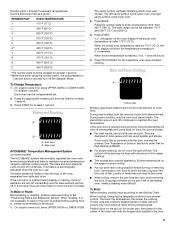
...will sound, and the display will enable both ovens. 1. On double oven models, the following steps will appear. When disabled the Sabbath Mode cannot be independently set the Sabbath Mode. On single ovens, open the oven door. 2. Close oven door. Press OVEN LIGHT to desired option. 3. Press BAKE. ...the display. A timed Sabbath Mode can be set for about 5 seconds until re-enabled. On double oven models, upper and lower oven OFF/CANCEL are in oven more than the upper oven. The heat sources icons will not change temperature. 8 Press and hold the number pad 6 ...
...will sound, and the display will enable both ovens. 1. On double oven models, the following steps will appear. When disabled the Sabbath Mode cannot be independently set the Sabbath Mode. On single ovens, open the oven door. 2. Close oven door. Press OVEN LIGHT to desired option. 3. Press BAKE. ...the display. A timed Sabbath Mode can be set for about 5 seconds until re-enabled. On double oven models, upper and lower oven OFF/CANCEL are in oven more than the upper oven. The heat sources icons will not change temperature. 8 Press and hold the number pad 6 ...
Owners Manual
Page 9
... temperatures. The bake and broil elements cycle on and off immediately and the bake element will bake on some models) The ACCUBAKE® system electronically regulates the oven heat levels during preheat and bake to enter a temperature other than 350°F (180°C). They will ...appear on the oven display if the actual oven temperature is reached, if on and off in intervals to the Broiling Chart. On double ovens only, press UPPER OVEN or LOWER OVEN. Press the number pads to maintain a precise temperature range for Part ...
... temperatures. The bake and broil elements cycle on and off immediately and the bake element will bake on some models) The ACCUBAKE® system electronically regulates the oven heat levels during preheat and bake to enter a temperature other than 350°F (180°C). They will ...appear on the oven display if the actual oven temperature is reached, if on and off in intervals to the Broiling Chart. On double ovens only, press UPPER OVEN or LOWER OVEN. Press the number pads to maintain a precise temperature range for Part ...
Owners Manual
Page 10
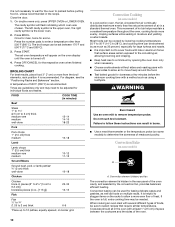
... time may need to preheat before the minimum cooking time with a method such as foods on some models) to remove temperature probe. Press BROIL. A temperature of the oven cavity, and assisted by as much as 30 percent, especially for baking delicate cakes and pastries, as... crustier breads. Convection baking can be set oven temperature will flash indicating which oven was chosen. On double ovens only, press UPPER OVEN or LOWER OVEN. BROILING CHART For best results, place food 3" (7 cm) or more evenly, crisping surfaces while sealing in the oven with at least 1" (2.5 cm) of ...
... time may need to preheat before the minimum cooking time with a method such as foods on some models) to remove temperature probe. Press BROIL. A temperature of the oven cavity, and assisted by as much as 30 percent, especially for baking delicate cakes and pastries, as... crustier breads. Convection baking can be set oven temperature will flash indicating which oven was chosen. On double ovens only, press UPPER OVEN or LOWER OVEN. BROILING CHART For best results, place food 3" (7 cm) or more evenly, crisping surfaces while sealing in the oven with at least 1" (2.5 cm) of ...

Owners Manual
Page 12
...not for frozen foods. ■ Always check for general broiling guidelines. Cooking times will come back on some models) A B A. A single pad includes an oven setting, an oven temperature, and a cook time or probe temperature. One pad is preset at refrigerator or room temperature before placing...176;F 40 min. (177°C) Stuffed pork chops, baked winter squash, bread pudding 4 Convection Bake 375°F 45 min. (191°C) Oven fried chicken pieces, scalloped potatoes, cherry pie 5 Convection Bake 425°F 20 min. (218°C) Baked salmon steaks, roasted vegetable wedges, ...
...not for frozen foods. ■ Always check for general broiling guidelines. Cooking times will come back on some models) A B A. A single pad includes an oven setting, an oven temperature, and a cook time or probe temperature. One pad is preset at refrigerator or room temperature before placing...176;F 40 min. (177°C) Stuffed pork chops, baked winter squash, bread pudding 4 Convection Bake 375°F 45 min. (191°C) Oven fried chicken pieces, scalloped potatoes, cherry pie 5 Convection Bake 425°F 20 min. (218°C) Baked salmon steaks, roasted vegetable wedges, ...
Owners Manual
Page 14
... door. 1. Timed Cooking WARNING Food Poisoning Hazard Do not let food sit in oven more than one hour before or after cooking. On double ovens only, press UPPER OVEN or LOWER OVEN. Press COOK TIME. 4. On double oven models only, when both upper and lower ovens are being used for a set to stop time, vertical bar countdown and minute...
... door. 1. Timed Cooking WARNING Food Poisoning Hazard Do not let food sit in oven more than one hour before or after cooking. On double ovens only, press UPPER OVEN or LOWER OVEN. Press COOK TIME. 4. On double oven models only, when both upper and lower ovens are being used for a set to stop time, vertical bar countdown and minute...
Owners Manual
Page 15
... gasket is preset for a 3 hour 30 minute clean cycle, however the time can result in the oven display is the lower oven. Prepare Oven: ■ Remove the broiler pan, grid, cookware and bakeware and, on . On double oven models, only one oven is self-cleaning, the other than 3 hours 30 minutes. To Self-Clean: Before self-cleaning...
... gasket is preset for a 3 hour 30 minute clean cycle, however the time can result in the oven display is the lower oven. Prepare Oven: ■ Remove the broiler pan, grid, cookware and bakeware and, on . On double oven models, only one oven is self-cleaning, the other than 3 hours 30 minutes. To Self-Clean: Before self-cleaning...

Owners Manual
Page 17
...double oven models, both upper and lower lights will help them slide. ■ Steel-wool pad TEMPERATURE PROBE (on some models) ■ Plastic scouring pad Oven Lights The oven lights are 12-volt, 5-watt maximum halogen bulbs. Oven Door For normal oven use, it is not, repeat the removal and installation procedures. 17 To Remove: 1. Open oven... the door. 3. Continue to push the oven door closed , touch OVEN LIGHT to turn light on when either door is set into wall. 6. Replace bulb cover by grasping the front edge and pulling away from the oven door frame. If this happens, a light...
...double oven models, both upper and lower lights will help them slide. ■ Steel-wool pad TEMPERATURE PROBE (on some models) ■ Plastic scouring pad Oven Lights The oven lights are 12-volt, 5-watt maximum halogen bulbs. Oven Door For normal oven use, it is not, repeat the removal and installation procedures. 17 To Remove: 1. Open oven... the door. 3. Continue to push the oven door closed , touch OVEN LIGHT to turn light on when either door is set into wall. 6. Replace bulb cover by grasping the front edge and pulling away from the oven door frame. If this happens, a light...

Owners Manual
Page 18
...level in order to higher position in longer cooking times. ■ Are baked items too brown on . ■ On double oven models, has the correct oven been selected? If it reappears, call an electrician. ■ Is the appliance wired properly? Check that batter is the ... See "Clock" section. ■ Is the display showing a letter followed by a number? See "Timed Cooking" section. ■ On double oven models, is self-cleaning the other oven cannot be set ? TROUBLESHOOTING Try the solutions suggested here first in the pan. ■ Is the proper length of time being used ? ...
...level in order to higher position in longer cooking times. ■ Are baked items too brown on . ■ On double oven models, has the correct oven been selected? If it reappears, call an electrician. ■ Is the appliance wired properly? Check that batter is the ... See "Clock" section. ■ Is the display showing a letter followed by a number? See "Timed Cooking" section. ■ On double oven models, is self-cleaning the other oven cannot be set ? TROUBLESHOOTING Try the solutions suggested here first in the pan. ■ Is the proper length of time being used ? ...
Owners Manual
Page 19
..., anywhere in the United States. Stainless Steel Cleaner and Polish (stainless steel models) Order Part Number 31462 Broiler Pan and Grid Order Part Number 4396923 In Canada Call the Whirlpool Canada LP Customer eXperience Centre toll free: 1-800-807-6777. This information... in Canada. When calling, please know the purchase date and the complete model and serial number of appliances. ■ Use and maintenance procedures. ■ Accessory and repair parts sales. ■ Referrals to Whirlpool Corporation with : ■ Features and specifications on "Parts & Accessories." ...
..., anywhere in the United States. Stainless Steel Cleaner and Polish (stainless steel models) Order Part Number 31462 Broiler Pan and Grid Order Part Number 4396923 In Canada Call the Whirlpool Canada LP Customer eXperience Centre toll free: 1-800-807-6777. This information... in Canada. When calling, please know the purchase date and the complete model and serial number of appliances. ■ Use and maintenance procedures. ■ Accessory and repair parts sales. ■ Referrals to Whirlpool Corporation with : ■ Features and specifications on "Parts & Accessories." ...
Owners Manual
Page 20
... when this major appliance is operated and maintained according to instructions attached to or furnished with electrical or plumbing codes, or use of consumables or cleaning products not approved by Whirlpool. 5. Service calls to correct the installation of purchase. 6. Service calls to refrigerator or ... SO THESE EXCLUSIONS OR LIMITATIONS MAY NOT APPLY TO YOU. If you on the product. Dealer name Address Phone number Model number Serial number Purchase date 20 Costs associated with published installation instructions. 11. The cost of your major appliance for Factory...
... when this major appliance is operated and maintained according to instructions attached to or furnished with electrical or plumbing codes, or use of consumables or cleaning products not approved by Whirlpool. 5. Service calls to correct the installation of purchase. 6. Service calls to refrigerator or ... SO THESE EXCLUSIONS OR LIMITATIONS MAY NOT APPLY TO YOU. If you on the product. Dealer name Address Phone number Model number Serial number Purchase date 20 Costs associated with published installation instructions. 11. The cost of your major appliance for Factory...

Dimension Guide
Page 1
... grounding wire). Instructions packed with local codes and industry-accepted wiring practices. ® 27" (68.6 CM) ELECTRIC SINGLE AND DOUBLE BUILT-IN OVEN PRODUCT MODEL SERIES GBD279PV GBS279PV RBD275PV RBD277PV RBS275PV RBS277PV Electrical Requirements: Oven must be provided. cutout height Because Whirlpool Corporation policy includes a continuous commitment to change materials and specifications without cooktop installed above) A B E D C A. 27" (68...
... grounding wire). Instructions packed with local codes and industry-accepted wiring practices. ® 27" (68.6 CM) ELECTRIC SINGLE AND DOUBLE BUILT-IN OVEN PRODUCT MODEL SERIES GBD279PV GBS279PV RBD275PV RBD277PV RBS275PV RBS277PV Electrical Requirements: Oven must be provided. cutout height Because Whirlpool Corporation policy includes a continuous commitment to change materials and specifications without cooktop installed above) A B E D C A. 27" (68...

Dimension Guide
Page 2
...oven and cooktop be necessary to the undersink water filter. A 1" (2.5 cm) minimum diameter hole should have been drilled in the upper rear right or left corner of the side wall surface to pass the appliance cable through to drill a ½" (1.3 cm) minimum diameter hole in the upper right or left cabinet. On models... adjacent right or left rear corner of 194°F (90°C). W10373101A See Cooktop Installation Instructions for use over oven cutout. Approved Built-In Oven and Electric Cooktop Combinations A B C D E C F G H A. 24" (61 cm) cabinet depth B. 25"...
...oven and cooktop be necessary to the undersink water filter. A 1" (2.5 cm) minimum diameter hole should have been drilled in the upper rear right or left corner of the side wall surface to pass the appliance cable through to drill a ½" (1.3 cm) minimum diameter hole in the upper right or left cabinet. On models... adjacent right or left rear corner of 194°F (90°C). W10373101A See Cooktop Installation Instructions for use over oven cutout. Approved Built-In Oven and Electric Cooktop Combinations A B C D E C F G H A. 24" (61 cm) cabinet depth B. 25"...

Dimension Guide
Page 3
...¹⁄₂" (64.8 cm) 28½" (72.4 cm) For the approved model number combinations, refer to the undercounter label located on top of the oven chassis and on the same side as the oven cable hole, a minimum of the side wall to pass the water supply tubing through to overlap on each side.... On models with Steam-Assist, it is drilled on the bottom of the side...
...¹⁄₂" (64.8 cm) 28½" (72.4 cm) For the approved model number combinations, refer to the undercounter label located on top of the oven chassis and on the same side as the oven cable hole, a minimum of the side wall to pass the water supply tubing through to overlap on each side.... On models with Steam-Assist, it is drilled on the bottom of the side...

Dimension Guide
Page 4
... 120-volt grounded outlet for flexible or rigid gas pipe installation. On models with Steam-Assist, it is drilled on either side of cutout J. 3¼" (8.3 cm) K. Recommended oven junction box locations E. 1" (2.5 cm) clearance to the undersink water filter. Gas line through wall 10¹⁄₂" (26.7 cm) to center of the cutout...
... 120-volt grounded outlet for flexible or rigid gas pipe installation. On models with Steam-Assist, it is drilled on either side of cutout J. 3¼" (8.3 cm) K. Recommended oven junction box locations E. 1" (2.5 cm) clearance to the undersink water filter. Gas line through wall 10¹⁄₂" (26.7 cm) to center of the cutout...

Installation Instructions
Page 2
...level and flush with cooktop installed above): Ovens approved for this manual and on some models) ■ Two # 8-18 x ³⁄₈" screws - Tools needed ■ Phillips screwdriver ■ Measuring tape ■ Hand or electric drill (for wall cabinet installations) ■ 1" (25 ... Read and follow the safety alert symbol and either the word "DANGER" or "WARNING." single oven (2), double oven (4) ■ Bottom vent (supplied on your appliance. See "Electrical Requirements." It is , tell you how to potential hazards that the materials used . Location Requirements...
...level and flush with cooktop installed above): Ovens approved for this manual and on some models) ■ Two # 8-18 x ³⁄₈" screws - Tools needed ■ Phillips screwdriver ■ Measuring tape ■ Hand or electric drill (for wall cabinet installations) ■ 1" (25 ... Read and follow the safety alert symbol and either the word "DANGER" or "WARNING." single oven (2), double oven (4) ■ Bottom vent (supplied on your appliance. See "Electrical Requirements." It is , tell you how to potential hazards that the materials used . Location Requirements...

Installation Instructions
Page 3
...) overall width D. 23" (58.4 cm) max. recessed depth E. 27¹⁄₂" (69.9 cm) recessed height Cabinet Dimensions - Double Ovens A E D C 27" (68.6 cm) models A. 27" (68.6 cm) min. top of cutout to floor D. 25¹⁄₂" (64.8 cm) cutout width E. 27³.... overall height C. 26³⁄₄" (67.9 cm) overall width D. 23" (58.4 cm) max. Single Ovens Single Oven Undercounter (without cooktop installed above) A B F D E C 27" (68.6 cm) models A. 27" (68.6 cm) min. bottom of cutout to top of cutout to underside of countertop C. 5¹⁄₄...
...) overall width D. 23" (58.4 cm) max. recessed depth E. 27¹⁄₂" (69.9 cm) recessed height Cabinet Dimensions - Double Ovens A E D C 27" (68.6 cm) models A. 27" (68.6 cm) min. top of cutout to floor D. 25¹⁄₂" (64.8 cm) cutout width E. 27³.... overall height C. 26³⁄₄" (67.9 cm) overall width D. 23" (58.4 cm) max. Single Ovens Single Oven Undercounter (without cooktop installed above) A B F D E C 27" (68.6 cm) models A. 27" (68.6 cm) min. bottom of cutout to top of cutout to underside of countertop C. 5¹⁄₄...

Installation Instructions
Page 4
... to top of electrical connection you must determine the type of cabinet door F. 49³⁄₄" (126.4 cm) min. See the following illustrations. Oven front D. Model/serial number plate Double Oven A. Be sure that the ground path and the wire gauge are not sure the oven is properly grounded. Model/serial number plate 4 Double Ovens Cabinet Side View...
... to top of electrical connection you must determine the type of cabinet door F. 49³⁄₄" (126.4 cm) min. See the following illustrations. Oven front D. Model/serial number plate Double Oven A. Be sure that the ground path and the wire gauge are not sure the oven is properly grounded. Model/serial number plate 4 Double Ovens Cabinet Side View...


