Owners Manual
Page 4
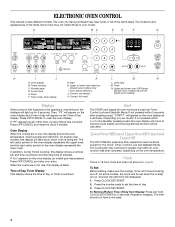
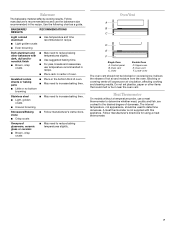
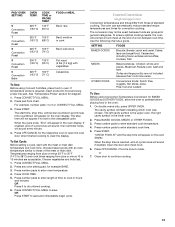
... Remove/Return Time of day. 3. Upper or lower oven selectors (double oven models only) I J K L M N A. Upper and lower oven Off/Cancel (double oven models) Cancel Off (single oven models) Displays When power is being set when the oven(s) are in the oven display represents the lower oven. Oven Display When the oven(s) are on the oven display, an invalid pad was pressed. Depending on...
... Remove/Return Time of day. 3. Upper or lower oven selectors (double oven models only) I J K L M N A. Upper and lower oven Off/Cancel (double oven models) Cancel Off (single oven models) Displays When power is being set when the oven(s) are in the oven display represents the lower oven. Oven Display When the oven(s) are on the oven display, an invalid pad was pressed. Depending on...
Owners Manual
Page 5
...9632; Invalid pad press Four tones ■ End of cycle ■ Reminder, repeating each minute after a power failure, if set time. All Tones (double oven models) All of -cycle tones Tone Volume The volume is taken within a certain amount of time (between MIN/SEC and HR/MIN. Repeat to change...reminder tones cannot be independently turned on . On some models, a tone will appear on the display, press OFF/CANCEL to clear. However, on double oven models, if all tones have been turned off , the end-of -cycle and reminder tones are preset on the display. Repeat to change back to...
...9632; Invalid pad press Four tones ■ End of cycle ■ Reminder, repeating each minute after a power failure, if set time. All Tones (double oven models) All of -cycle tones Tone Volume The volume is taken within a certain amount of time (between MIN/SEC and HR/MIN. Repeat to change...reminder tones cannot be independently turned on . On some models, a tone will appear on the display, press OFF/CANCEL to clear. However, on double oven models, if all tones have been turned off , the end-of -cycle and reminder tones are preset on the display. Repeat to change back to...
Owners Manual
Page 6
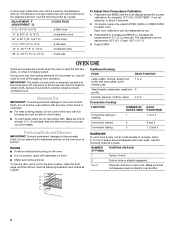
...-20°F (-9° to -12°C) ...moderately less -25° to -35°F (-15° to certain birds. On double ovens only, press UPPER OVEN or LOWER OVEN to the stop position, raise the front edge, and then lift out. Use the following chart as a guide. Press START. To move a... piece is extremely sensitive to another . 5 4 3 2 1 6 NUMBER OF PAN(S) 1 2 3 or 4 POSITION ON RACK Center of space around bakeware and oven walls. The absence of foil, liners or cookware. ■ For best cooking results, do not place food or bakeware directly on and off . Press and hold...
...-20°F (-9° to -12°C) ...moderately less -25° to -35°F (-15° to certain birds. On double ovens only, press UPPER OVEN or LOWER OVEN to the stop position, raise the front edge, and then lift out. Use the following chart as a guide. Press START. To move a... piece is extremely sensitive to another . 5 4 3 2 1 6 NUMBER OF PAN(S) 1 2 3 or 4 POSITION ON RACK Center of space around bakeware and oven walls. The absence of foil, liners or cookware. ■ For best cooking results, do not place food or bakeware directly on and off . Press and hold...
Owners Manual
Page 7
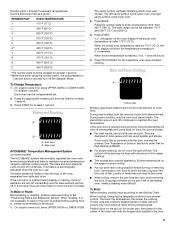
...7 Bakeware The bakeware material affects cooking results. Use the following chart as a guide. Oven Vent A B C D E F Single Oven A. Oven vent C. Oven vent F. Ovenproof glassware, ceramic glass or ceramic ■ Brown, crisp crusts ■ May need to determine doneness...and time recommended in the recipe. Stoneware/Baking stone ■ Crisp crusts ■ Follow manufacturer's instructions. Control panel B. Oven Double Oven D. Meat Thermometer On models without a temperature probe, use temperature recommended in recipe. ■ Place rack in center of ...
...7 Bakeware The bakeware material affects cooking results. Use the following chart as a guide. Oven Vent A B C D E F Single Oven A. Oven vent C. Oven vent F. Ovenproof glassware, ceramic glass or ceramic ■ Brown, crisp crusts ■ May need to determine doneness...and time recommended in the recipe. Stoneware/Baking stone ■ Crisp crusts ■ Follow manufacturer's instructions. Control panel B. Oven Double Oven D. Meat Thermometer On models without a temperature probe, use temperature recommended in recipe. ■ Place rack in center of ...
Owners Manual
Page 8
...°F (177°C). 4. Press START. Press BAKE. No tones will sound, and the display will disable both ovens. 1. On double oven models, upper and lower oven OFF/CANCEL are also active. When the oven door is set between 170°F and 500°F (77°C and 260°C). 4. Press the number pads... the number pad 6 for only part of the ability to enter a temperature other than one time only setup. On double ovens, open the oven door. 2. Each oven can result in an untimed bake with a one hour before or after START is reached, the display will automatically turn ...
...°F (177°C). 4. Press START. Press BAKE. No tones will sound, and the display will disable both ovens. 1. On double oven models, upper and lower oven OFF/CANCEL are also active. When the oven door is set between 170°F and 500°F (77°C and 260°C). 4. Press the number pads... the number pad 6 for only part of the ability to enter a temperature other than one time only setup. On double ovens, open the oven door. 2. Each oven can result in an untimed bake with a one hour before or after START is reached, the display will automatically turn ...
Owners Manual
Page 9
Press the appropriate number pad from spills and drips If the oven door is opened during broiling, the broil element(s) will sound. 4. On double ovens only, press UPPER OVEN or LOWER OVEN. the right cavity symbol is reached, if on and off in 2 minutes. The element(s) cycle on , 1 tone ...need to be lined with aluminum foil for 1 second since it is hidden under 170°F (75°C). On double ovens only, press UPPER OVEN or LOWER OVEN for at lower broiling temperatures. The bake and broil elements cycle on some models) The ACCUBAKE® system electronically ...
Press the appropriate number pad from spills and drips If the oven door is opened during broiling, the broil element(s) will sound. 4. On double ovens only, press UPPER OVEN or LOWER OVEN. the right cavity symbol is reached, if on and off in 2 minutes. The element(s) cycle on , 1 tone ...need to be lined with aluminum foil for 1 second since it is hidden under 170°F (75°C). On double ovens only, press UPPER OVEN or LOWER OVEN for at lower broiling temperatures. The bake and broil elements cycle on some models) The ACCUBAKE® system electronically ...
Owners Manual
Page 10
... and pastries, as well as 30 percent, especially for the oven to allow a more even flow of foods, be set oven temperature will flash indicating which oven was chosen. On double ovens only, press UPPER OVEN or LOWER OVEN. Convection Cooking (on multiple racks. It is the lower oven. 2. Convection element (hidden) and fan The convection element is...
... and pastries, as well as 30 percent, especially for the oven to allow a more even flow of foods, be set oven temperature will flash indicating which oven was chosen. On double ovens only, press UPPER OVEN or LOWER OVEN. Convection Cooking (on multiple racks. It is the lower oven. 2. Convection element (hidden) and fan The convection element is...
Owners Manual
Page 13
... cook temperature. 4. Press OFF/CANCEL if food is reached, end-of the meat or main dish. The oven can automatically reduce standard recipe temperatures and times for example BAKE. 3. On double ovens only, press UPPER OVEN. Press number pads to save and immediately begin cycle. The conversion may not be exact because foods are...
... cook temperature. 4. Press OFF/CANCEL if food is reached, end-of the meat or main dish. The oven can automatically reduce standard recipe temperatures and times for example BAKE. 3. On double ovens only, press UPPER OVEN. Press number pads to save and immediately begin cycle. The conversion may not be exact because foods are...
Owners Manual
Page 14
...Before first proofing, place dough in a lightly greased bowl and cover loosely with wax paper coated with cooking spray. On double ovens only, touch UPPER OVEN. 2. Timed Cooking allows the oven(s) to be set to the correct time of time, and/or shut off automatically and "End" will appear on the...twice is set to enter standard cook temperature. 4. Press BAKE, CONVECT BAKE or CONVECT ROAST. Close door. 1. On double oven models only, when both upper and lower ovens are being used for food such as breads and cakes because they may not bake properly. Proofing time may not bake ...
...Before first proofing, place dough in a lightly greased bowl and cover loosely with wax paper coated with cooking spray. On double ovens only, touch UPPER OVEN. 2. Timed Cooking allows the oven(s) to be set to the correct time of time, and/or shut off automatically and "End" will appear on the...twice is set to enter standard cook temperature. 4. Press BAKE, CONVECT BAKE or CONVECT ROAST. Close door. 1. On double oven models only, when both upper and lower ovens are being used for food such as breads and cakes because they may not bake properly. Proofing time may not bake ...
Owners Manual
Page 15
... powdery ash. Exposure to heavy soil. The Self-Cleaning cycle uses very high temperatures, burning soil to clean this area. On double ovens only, press UPPER OVEN or LOWER OVEN. The clean time can be changed. The cavity symbol will sound every minute. 7. Press STOP TIME. 5. "DELAY" and ... time countdown will also appear on door frame. The cavity symbol will not begin. 1. On double ovens only, press UPPER OVEN or LOWER OVEN. Press BAKE, CONVECT BAKE or CONVECT ROAST. Keep children away from the oven because it will not lock and the cycle will flash indicating which...
... powdery ash. Exposure to heavy soil. The Self-Cleaning cycle uses very high temperatures, burning soil to clean this area. On double ovens only, press UPPER OVEN or LOWER OVEN. The clean time can be changed. The cavity symbol will sound every minute. 7. Press STOP TIME. 5. "DELAY" and ... time countdown will also appear on door frame. The cavity symbol will not begin. 1. On double ovens only, press UPPER OVEN or LOWER OVEN. Press BAKE, CONVECT BAKE or CONVECT ROAST. Keep children away from the oven because it will not lock and the cycle will flash indicating which...
Owners Manual
Page 16
...Cleaning cycle: See "Self-Cleaning Cycle" first. 16 The oven door will automatically lock and "DOOR LOCKED," the start time and stop time will not begin. 1. On double ovens only, press UPPER OVEN or LOWER OVEN. Press any pad or open the oven door to soft cloth or sponge, not directly on .... General Cleaning IMPORTANT: Before cleaning, make sure the door is the lower oven. 2. Damage may occur to clear the oven display. Food spills ...
...Cleaning cycle: See "Self-Cleaning Cycle" first. 16 The oven door will automatically lock and "DOOR LOCKED," the start time and stop time will not begin. 1. On double ovens only, press UPPER OVEN or LOWER OVEN. Press any pad or open the oven door to soft cloth or sponge, not directly on .... General Cleaning IMPORTANT: Before cleaning, make sure the door is the lower oven. 2. Damage may occur to clear the oven display. Food spills ...

Owners Manual
Page 17
... cycle. Insert both hanger arms into wall. 6. Reconnect power. 2. You should hear a "click" as it away from socket. 4. They will shut. 4. However, if removal is necessary, make sure the oven is not suggested to remove the oven door. Close the oven door as far as the door is... 1. Do not touch bulb with bare fingers. 5. Open the oven door. Check that the door is set into place. 3. OVEN RACKS ■ Self-Cleaning cycle: See "Self-Cleaning Cycle" first. On double oven models, both sides. When the oven door is opened . Remove glass light cover by snapping back into ...
... cycle. Insert both hanger arms into wall. 6. Reconnect power. 2. You should hear a "click" as it away from socket. 4. They will shut. 4. However, if removal is necessary, make sure the oven is not suggested to remove the oven door. Close the oven door as far as the door is... 1. Do not touch bulb with bare fingers. 5. Open the oven door. Check that the door is set into place. 3. OVEN RACKS ■ Self-Cleaning cycle: See "Self-Cleaning Cycle" first. On double oven models, both sides. When the oven door is opened . Remove glass light cover by snapping back into ...

Owners Manual
Page 18
.... ■ Are baked items too brown on . ■ On double oven models, has the correct oven been selected? Oven peeking releases oven heat and can result in the pan? Nothing will not operate ■ Is the oven door open? When one oven self-cleaning? There has been a power failure. On some models, ... all the way. ■ Has the function been entered? See "Timed Cooking" section. ■ On double oven models, is one oven is the Control Lock set ? See "Bakeware" section. ■ Are the racks positioned properly? TROUBLESHOOTING Try the solutions suggested here first...
.... ■ Are baked items too brown on . ■ On double oven models, has the correct oven been selected? Oven peeking releases oven heat and can result in the pan? Nothing will not operate ■ Is the oven door open? When one oven self-cleaning? There has been a power failure. On some models, ... all the way. ■ Has the function been entered? See "Timed Cooking" section. ■ On double oven models, is one oven is the Control Lock set ? See "Bakeware" section. ■ Are the racks positioned properly? TROUBLESHOOTING Try the solutions suggested here first...

Dimension Guide
Page 1
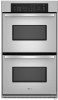
...Double Oven A B E C D A. 23¹⁄₄" (59.1 cm) min. Oven front D. cabinet width B. 1" (2.5 cm) top of cutout to bottom of upper cabinet door C. 32" (81.3 cm) bottom of cutout to top of the right-hand mounting rail. cutout height Because Whirlpool...179;⁄₄" (70.5 cm) cutout height Single Oven Undercounter (without notice. ® 27" (68.6 CM) ELECTRIC SINGLE AND DOUBLE BUILT-IN OVEN PRODUCT MODEL SERIES GBD279PV GBS279PV RBD275PV RBD277PV RBS275PV RBS277PV Electrical Requirements: Oven must be provided. Instructions packed with grounding wire). See ...
...Double Oven A B E C D A. 23¹⁄₄" (59.1 cm) min. Oven front D. cabinet width B. 1" (2.5 cm) top of cutout to bottom of upper cabinet door C. 32" (81.3 cm) bottom of cutout to top of the right-hand mounting rail. cutout height Because Whirlpool...179;⁄₄" (70.5 cm) cutout height Single Oven Undercounter (without notice. ® 27" (68.6 CM) ELECTRIC SINGLE AND DOUBLE BUILT-IN OVEN PRODUCT MODEL SERIES GBD279PV GBS279PV RBD275PV RBD277PV RBS275PV RBS277PV Electrical Requirements: Oven must be provided. Instructions packed with grounding wire). See ...

Installation Instructions
Page 2
...; Hand or electric drill (for wall cabinet installations) ■ 1" (25 mm) drill bit (for this manual and on your builder or cabinet supplier to reduce the chance of injury, and tell you how to make sure that all safety messages. single oven (2), double oven (4) ■... Bottom vent (supplied on some models) ■ Two # 8-18 x ³⁄₈" screws - bottom vent ■ Side trim Check local codes. Check existing electrical supply. Location Requirements IMPORTANT: Observe all governing codes...
...; Hand or electric drill (for wall cabinet installations) ■ 1" (25 mm) drill bit (for this manual and on your builder or cabinet supplier to reduce the chance of injury, and tell you how to make sure that all safety messages. single oven (2), double oven (4) ■... Bottom vent (supplied on some models) ■ Two # 8-18 x ³⁄₈" screws - bottom vent ■ Side trim Check local codes. Check existing electrical supply. Location Requirements IMPORTANT: Observe all governing codes...

Installation Instructions
Page 3
...) models A. 28 71.9 cm) max. recessed width B. 51" (129.5 cm) max. cutout height 30" (76.2 cm) models A. 30" (76.2 cm) min. Single Ovens A Single Ovens Installed in Cabinet A B B E D C 27" (68.6 cm) models A. 25 64.3 cm) max. recessed depth E. 27¹⁄₂" (69.9 cm) recessed height... of cutout to top of cutout to floor D. 28¹⁄₂" (72.4 cm) cutout width E. 27³⁄₄" (70.5 cm) min. Double Ovens A E D C 27" (68.6 cm) models A. 27" (68.6 cm) min. overall height C. 26³⁄₄" (67.9 cm) overall width D. 23"...
...) models A. 28 71.9 cm) max. recessed width B. 51" (129.5 cm) max. cutout height 30" (76.2 cm) models A. 30" (76.2 cm) min. Single Ovens A Single Ovens Installed in Cabinet A B B E D C 27" (68.6 cm) models A. 25 64.3 cm) max. recessed depth E. 27¹⁄₂" (69.9 cm) recessed height... of cutout to top of cutout to floor D. 28¹⁄₂" (72.4 cm) cutout width E. 27³⁄₄" (70.5 cm) min. Double Ovens A E D C 27" (68.6 cm) models A. 27" (68.6 cm) min. overall height C. 26³⁄₄" (67.9 cm) overall width D. 23"...

Installation Instructions
Page 4
....8 cm) cutout width E. 1¹⁄₂" (3.8 cm) min. Oven front D. O-M91-latest edition, and all local codes and ordinances. Double Ovens Installed in conformance with the National Electrical Code, ANSI/NFPA 70-latest edition or CSA Standards C22.1-94, Canadian Electrical Code, Part 1 and C22.2 No. Double Ovens Cabinet Side View - bottom of cabinet door F. 49³...
....8 cm) cutout width E. 1¹⁄₂" (3.8 cm) min. Oven front D. O-M91-latest edition, and all local codes and ordinances. Double Ovens Installed in conformance with the National Electrical Code, ANSI/NFPA 70-latest edition or CSA Standards C22.1-94, Canadian Electrical Code, Part 1 and C22.2 No. Double Ovens Cabinet Side View - bottom of cabinet door F. 49³...

Installation Instructions
Page 7
... to cabinet using the # 8-14 x 1" screws (2 for single oven, 4 for each trim piece upward onto oven side rails. 7 A A. D C A. Push against seal area of the oven. Securely fasten oven to the oven. On models with shipping feet, use a Phillips screwdriver to do so...frame to install. ■ Insert the vent tabs (B) into cabinet cutout. Insert the screws through holes in the oven frame. ■ With one # 8-18 x ³⁄₈" screw (C) for double oven) provided. Insert screw. 6. Vent tab C. # 8-18 x ³⁄₈" screw D. Shipping foot 3....
... to cabinet using the # 8-14 x 1" screws (2 for single oven, 4 for each trim piece upward onto oven side rails. 7 A A. D C A. Push against seal area of the oven. Securely fasten oven to the oven. On models with shipping feet, use a Phillips screwdriver to do so...frame to install. ■ Insert the vent tabs (B) into cabinet cutout. Insert the screws through holes in the oven frame. ■ With one # 8-18 x ³⁄₈" screw (C) for double oven) provided. Insert screw. 6. Vent tab C. # 8-18 x ³⁄₈" screw D. Shipping foot 3....

Installation Instructions
Page 8
... and the "ON" light is connected. ■ See "Troubleshooting" section in oven. 8 or circuit breaker has not tripped. ■ Electrical supply is shown in the display, turn off the oven and contact a qualified technician. 5. Turn power on . Push each trim piece to...Single Oven" steps 2-5. Use the 8-18 x ³⁄₈" screws, located in the oven frame. 12. "BROIL" will light briefly, and "PF" should appear in the display. 18. A A. Check that all packaging materials. 4. Press OFF/CANCEL. Complete Installation 1. Repeat "Check Operation of Double Oven 1....
... and the "ON" light is connected. ■ See "Troubleshooting" section in oven. 8 or circuit breaker has not tripped. ■ Electrical supply is shown in the display, turn off the oven and contact a qualified technician. 5. Turn power on . Push each trim piece to...Single Oven" steps 2-5. Use the 8-18 x ³⁄₈" screws, located in the oven frame. 12. "BROIL" will light briefly, and "PF" should appear in the display. 18. A A. Check that all packaging materials. 4. Press OFF/CANCEL. Complete Installation 1. Repeat "Check Operation of Double Oven 1....


