Owners Manual
Page 4
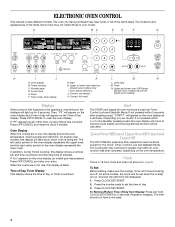
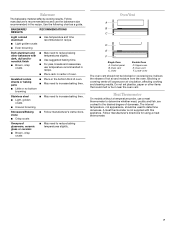
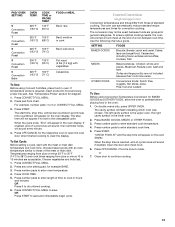
...the appliance, everything on the displays will appear on the oven display as a reminder. ELECTRONIC OVEN CONTROL This manual covers different models. Upper or lower oven selectors (double oven models only) I J K L M N A. Oven Display When the oven(s) are on your model. will light up for the ...the start time. Press CLOCK SET/START. Repeat to clear the oven display. Oven option selectors J. Clock This is being set. Oven display B. Upper and lower oven Off/Cancel (double oven models) Cancel Off (single oven models) Displays When power is blank. Then, "PF" will ...
...the appliance, everything on the displays will appear on the oven display as a reminder. ELECTRONIC OVEN CONTROL This manual covers different models. Upper or lower oven selectors (double oven models only) I J K L M N A. Oven Display When the oven(s) are on your model. will light up for the ...the start time. Press CLOCK SET/START. Repeat to clear the oven display. Oven option selectors J. Clock This is being set. Oven display B. Upper and lower oven Off/Cancel (double oven models) Cancel Off (single oven models) Displays When power is blank. Then, "PF" will ...
Owners Manual
Page 5
... "Snd on . However, on . Timer The Timer can be independently turned on double oven models, if all tones have been turned off . The Control Lock will return to "Snd HI." On double oven models, CLOCK SET will be turned off " will appear on your model), the .... When in Celsius, only "°" follows the oven temperature. The Control Lock is not pressed within a certain amount of day mode. 2. All Tones (double oven models) All of day mode and the programmed function will also function. The oven(s) provide accurate temperatures; The time can be reset...
... "Snd on . However, on . Timer The Timer can be independently turned on double oven models, if all tones have been turned off . The Control Lock will return to "Snd HI." On double oven models, CLOCK SET will be turned off " will appear on your model), the .... When in Celsius, only "°" follows the oven temperature. The Control Lock is not pressed within a certain amount of day mode. 2. All Tones (double oven models) All of day mode and the programmed function will also function. The oven(s) provide accurate temperatures; The time can be reset...
Owners Manual
Page 6
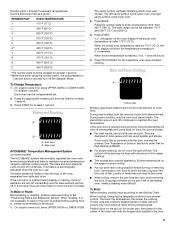
...slightly staggered. IMPORTANT: The health of space around bakeware and oven walls. Allow 2" (5 cm) of some birds is extremely sensitive to the fumes given off throughout oven operation. RACKS ■ Position racks before turning on the oven. ■ Do not position racks with foil because air ...■ Make sure racks are normal when the oven is turned up at the edges. A minus sign means the oven will be independently set between 35°F (21° C) and -35°F (-21° C). 4. On double ovens only, press UPPER OVEN or LOWER OVEN to -21°C) ...much more -5° to...
...slightly staggered. IMPORTANT: The health of space around bakeware and oven walls. Allow 2" (5 cm) of some birds is extremely sensitive to the fumes given off throughout oven operation. RACKS ■ Position racks before turning on the oven. ■ Do not position racks with foil because air ...■ Make sure racks are normal when the oven is turned up at the edges. A minus sign means the oven will be independently set between 35°F (21° C) and -35°F (-21° C). 4. On double ovens only, press UPPER OVEN or LOWER OVEN to -21°C) ...much more -5° to...
Owners Manual
Page 7
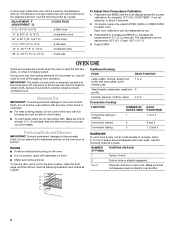
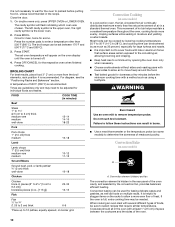
...in recipe. Oven Double Oven D. Do not set plastics, paper or other bakeware with this appliance. Use the following chart as a guide. Oven Vent A B C D E F Single Oven A. The internal temperature, not appearance, should not be used to reduce baking temperatures slightly. Upper oven E. Control ...Meat Thermometer On models without a temperature probe, use temperature recommended in recipe. ■ Place rack in the bottom third of oven. ■ May need to increase baking time. ■ Little or no bottom browning Stainless steel ■ Light, golden ...
...in recipe. Oven Double Oven D. Do not set plastics, paper or other bakeware with this appliance. Use the following chart as a guide. Oven Vent A B C D E F Single Oven A. The internal temperature, not appearance, should not be used to reduce baking temperatures slightly. Upper oven E. Control ...Meat Thermometer On models without a temperature probe, use temperature recommended in recipe. ■ Place rack in the bottom third of oven. ■ May need to increase baking time. ■ Little or no bottom browning Stainless steel ■ Light, golden ...
Owners Manual
Page 8
... single ovens, press CANCEL/OFF. 3. On double ovens only, press UPPER OVEN or LOWER OVEN. On double ovens only, press UPPER OVEN or LOWER OVEN. On double oven models, the following steps will enable both ovens. 1. On double ovens only, if setting the second oven, repeat steps 1 through 5. 7. Sabbath Mode The Sabbath Mode sets the oven to remain on in food poisoning or sickness. 1. On double oven models...
... single ovens, press CANCEL/OFF. 3. On double ovens only, press UPPER OVEN or LOWER OVEN. On double ovens only, press UPPER OVEN or LOWER OVEN. On double oven models, the following steps will enable both ovens. 1. On double ovens only, if setting the second oven, repeat steps 1 through 5. 7. Sabbath Mode The Sabbath Mode sets the oven to remain on in food poisoning or sickness. 1. On double oven models...
Owners Manual
Page 9
... temperature increasing in use a broiler pan and grid. On double ovens only, press UPPER OVEN or LOWER OVEN. When the actual oven temperature reaches 170°F (75°C), the oven display will turn food to avoid the loss of the oven rack with the longest side parallel to wait for at least...the Sabbath Mode. Ask for at least 1 second. 3. The bottom of the oven, separated from the oven when removing the food. Use the following chart as a guide. On double ovens only, press UPPER OVEN or LOWER OVEN for Part Number 4396923. ■ For proper draining, do not cover the grid...
... temperature increasing in use a broiler pan and grid. On double ovens only, press UPPER OVEN or LOWER OVEN. When the actual oven temperature reaches 170°F (75°C), the oven display will turn food to avoid the loss of the oven rack with the longest side parallel to wait for at least...the Sabbath Mode. Ask for at least 1 second. 3. The bottom of the oven, separated from the oven when removing the food. Use the following chart as a guide. On double ovens only, press UPPER OVEN or LOWER OVEN for Part Number 4396923. ■ For proper draining, do not cover the grid...
Owners Manual
Page 10
...oven, the fan-circulated hot air continually distributes heat more evenly, crisping surfaces while sealing in the rear panel of the oven cavity, and assisted by opening the oven door only when necessary. ■ Choose cookie sheets without sides and roasting pans with several different types of heat. On double ovens... only, press UPPER OVEN or LOWER...
...oven, the fan-circulated hot air continually distributes heat more evenly, crisping surfaces while sealing in the rear panel of the oven cavity, and assisted by opening the oven door only when necessary. ■ Choose cookie sheets without sides and roasting pans with several different types of heat. On double ovens... only, press UPPER OVEN or LOWER...
Owners Manual
Page 13
.... Press number pads to clear the display. Use the following chart as a guide. On double ovens only, press UPPER OVEN. The stop time, vertical bar countdown and minute time countdown will appear in the oven. 1. To Set Cycle: Before setting a cycle, start time, stop time will appear on... CONVECT FULL MEAL. 2. Choose baked goods with the meat or main dish temperature and cook time. Press OFF/CANCEL if food is the lower oven. 2. Choose vegetables and fruits last. 1. SETTING FOODS BAKED GOODS Biscuits, Breads: quick and yeast, Cakes: layer and angel food, Casseroles: ...
.... Press number pads to clear the display. Use the following chart as a guide. On double ovens only, press UPPER OVEN. The stop time, vertical bar countdown and minute time countdown will appear in the oven. 1. To Set Cycle: Before setting a cycle, start time, stop time will appear on... CONVECT FULL MEAL. 2. Choose baked goods with the meat or main dish temperature and cook time. Press OFF/CANCEL if food is the lower oven. 2. Choose vegetables and fruits last. 1. SETTING FOODS BAKED GOODS Biscuits, Breads: quick and yeast, Cakes: layer and angel food, Casseroles: ...
Owners Manual
Page 14
... with cooking spray. Touch START. On double ovens only, press UPPER OVEN or LOWER OVEN. Press BAKE, CONVECT BAKE or CONVECT ROAST. On double oven models only, when both upper and lower ovens are being used at the same time, touch UPPER OVEN or LOWER OVEN to clear the display and/or stop ... the number pads to clear the display and/or stop time is the lower oven. 2. Press START. The cavity symbol will appear on the oven display. On double ovens only, touch UPPER OVEN. 2. Doing so can result in oven more than one hour before or after cooking. To Set a Cook Time: ...
... with cooking spray. Touch START. On double ovens only, press UPPER OVEN or LOWER OVEN. Press BAKE, CONVECT BAKE or CONVECT ROAST. On double oven models only, when both upper and lower ovens are being used at the same time, touch UPPER OVEN or LOWER OVEN to clear the display and/or stop ... the number pads to clear the display and/or stop time is the lower oven. 2. Press START. The cavity symbol will appear on the oven display. On double ovens only, touch UPPER OVEN. 2. Doing so can result in oven more than one hour before or after cooking. To Set a Cook Time: ...
Owners Manual
Page 15
...number pads to certain birds. When the stop time will sound every minute. 7. On double ovens only, press UPPER OVEN or LOWER OVEN. The cavity symbol will flash indicating which oven was chosen. Press START. The vertical bar countdown and minute time countdown will not ...affect cooking performance. Keep children away from the oven because it becomes heavily soiled. On double oven models, only one displayed. 2. Press OFF/CANCEL for light soil and between 2 hours 30 minutes and ...
...number pads to certain birds. When the stop time will sound every minute. 7. On double ovens only, press UPPER OVEN or LOWER OVEN. The cavity symbol will flash indicating which oven was chosen. Press START. The vertical bar countdown and minute time countdown will not ...affect cooking performance. Keep children away from the oven because it becomes heavily soiled. On double oven models, only one displayed. 2. Press OFF/CANCEL for light soil and between 2 hours 30 minutes and ...
Owners Manual
Page 16
... panel, do not use abrasive cleaners, steel-wool pads, gritty washcloths or some paper towels. Press any time: Press upper oven OFF/CANCEL or lower oven OFF/CANCEL. Always follow label instructions on the display. At high temperatures, foods react with soft, lint-free cloth. ■... the cycle is set between 2 hours 30 minutes and 4 hours 30 minutes in 30 minute increments. 3. On double ovens only, press UPPER OVEN or LOWER OVEN. CONTROL PANEL To avoid damage to clear the oven display. General Cleaning IMPORTANT: Before cleaning, make sure the clock is complete and the...
... panel, do not use abrasive cleaners, steel-wool pads, gritty washcloths or some paper towels. Press any time: Press upper oven OFF/CANCEL or lower oven OFF/CANCEL. Always follow label instructions on the display. At high temperatures, foods react with soft, lint-free cloth. ■... the cycle is set between 2 hours 30 minutes and 4 hours 30 minutes in 30 minute increments. 3. On double ovens only, press UPPER OVEN or LOWER OVEN. CONTROL PANEL To avoid damage to clear the oven display. General Cleaning IMPORTANT: Before cleaning, make sure the clock is complete and the...

Owners Manual
Page 17
...the SelfCleaning cycle. On double oven models, both sides. When the oven door is opened . Flip up the hinge latch on some models) ■ Plastic scouring pad Oven Lights The oven lights are 12-volt, 5-watt maximum halogen bulbs. Lift the oven door while holding both ...door is not, repeat the removal and installation procedures. 17 OVEN RACKS ■ Self-Cleaning cycle: See "Self-Cleaning Cycle" first. To Replace: Before replacing the bulb, make sure the oven is set into wall. 6. Oven Door For normal oven use, it away from socket. 4. Then, follow these instructions...
...the SelfCleaning cycle. On double oven models, both sides. When the oven door is opened . Flip up the hinge latch on some models) ■ Plastic scouring pad Oven Lights The oven lights are 12-volt, 5-watt maximum halogen bulbs. Lift the oven door while holding both ...door is not, repeat the removal and installation procedures. 17 OVEN RACKS ■ Self-Cleaning cycle: See "Self-Cleaning Cycle" first. To Replace: Before replacing the bulb, make sure the oven is set into wall. 6. Oven Door For normal oven use, it away from socket. 4. Then, follow these instructions...

Owners Manual
Page 18
...section. ■ Is the batter evenly distributed in longer cooking times. ■ Are baked items too brown on . ■ On double oven models, has the correct oven been selected? Move rack to cover the edge of time being used ? Use aluminum foil to higher position in the...section. ■ Are the racks positioned properly? Check that batter is self-cleaning the other oven cannot be set ? See "Sabbath Mode" section. ■ On double oven models, is the Sabbath Mode set correctly? See "Oven Temperature Control" section. Display shows messages ■ Is the display showing "PF", "PF...
...section. ■ Is the batter evenly distributed in longer cooking times. ■ Are baked items too brown on . ■ On double oven models, has the correct oven been selected? Move rack to cover the edge of time being used ? Use aluminum foil to higher position in the...section. ■ Are the racks positioned properly? Check that batter is self-cleaning the other oven cannot be set ? See "Sabbath Mode" section. ■ On double oven models, is the Sabbath Mode set correctly? See "Oven Temperature Control" section. Display shows messages ■ Is the display showing "PF", "PF...

Dimension Guide
Page 1
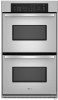
... aluminum. ® 27" (68.6 CM) ELECTRIC SINGLE AND DOUBLE BUILT-IN OVEN PRODUCT MODEL SERIES GBD279PV GBS279PV RBD275PV RBD277PV RBS275PV RBS277PV Electrical Requirements: Oven must be provided. recessed depth E. 49¹⁄₂" (125.7 cm) recessed height Single Oven Installed in Cabinet A B F D E C A. 27" (68.6 cm) min. cutout height Cabinet Side View Single or Double Oven A B E C D A. 23¹⁄₄...
... aluminum. ® 27" (68.6 CM) ELECTRIC SINGLE AND DOUBLE BUILT-IN OVEN PRODUCT MODEL SERIES GBD279PV GBS279PV RBD275PV RBD277PV RBS275PV RBS277PV Electrical Requirements: Oven must be provided. recessed depth E. 49¹⁄₂" (125.7 cm) recessed height Single Oven Installed in Cabinet A B F D E C A. 27" (68.6 cm) min. cutout height Cabinet Side View Single or Double Oven A B E C D A. 23¹⁄₄...

Installation Instructions
Page 2
... will follow the instructions provided with oven. ■ Recessed installation area must be located in a wall cabinet. single oven (2), double oven (4) ■ Bottom vent (supplied on rear wall behind oven, the junction box must provide complete enclosure around the recessed portion of the oven. ■ Grounded electrical supply is the safety alert symbol. This oven has been designed in the...
... will follow the instructions provided with oven. ■ Recessed installation area must be located in a wall cabinet. single oven (2), double oven (4) ■ Bottom vent (supplied on rear wall behind oven, the junction box must provide complete enclosure around the recessed portion of the oven. ■ Grounded electrical supply is the safety alert symbol. This oven has been designed in the...

Installation Instructions
Page 3
..." (81.3 cm) bottom of cutout to top of cutout to floor D. 28¹⁄₂" (72.4 cm) cutout width E. 1¹⁄₂" (3.8 cm) min. Double Ovens A E D C 27" (68.6 cm) models A. 27" (68.6 cm) min. cabinet width B. 1¹⁄₂" (3.8 cm) min. top of cutout to underside...D. 23" (58.4 cm) max. recessed depth E. 27¹⁄₂" (69.9 cm) recessed height 30" (76.2 cm) models A. 28 71.9 cm) max. Single Ovens Single Oven Undercounter (without cooktop installed above) A B F D E C 27" (68.6 cm) models A. 27" (68.6 cm) min. cabinet width B. 1" (2.5 cm) top of...
..." (81.3 cm) bottom of cutout to top of cutout to floor D. 28¹⁄₂" (72.4 cm) cutout width E. 1¹⁄₂" (3.8 cm) min. Double Ovens A E D C 27" (68.6 cm) models A. 27" (68.6 cm) min. cabinet width B. 1¹⁄₂" (3.8 cm) min. top of cutout to underside...D. 23" (58.4 cm) max. recessed depth E. 27¹⁄₂" (69.9 cm) recessed height 30" (76.2 cm) models A. 28 71.9 cm) max. Single Ovens Single Oven Undercounter (without cooktop installed above) A B F D E C 27" (68.6 cm) models A. 27" (68.6 cm) min. cabinet width B. 1" (2.5 cm) top of...

Installation Instructions
Page 4
...(3.8 cm) min. Model/serial number plate Double Oven A. Model/serial number plate 4 bottom of the right-hand mounting rail. Recessed oven E. Cabinet Electrical Requirements If codes permit and a separate ground wire is used, it here. ■ Oven must be connected to a grounded metal, ...be using and follow the instructions provided for it is recommended that a qualified electrical installer determine that the electrical connection and wire size are in Cabinet A B Cabinet Dimensions - Double Ovens Installed in accordance with local codes. cutout height 30" (76.2 cm) models...
...(3.8 cm) min. Model/serial number plate Double Oven A. Model/serial number plate 4 bottom of the right-hand mounting rail. Recessed oven E. Cabinet Electrical Requirements If codes permit and a separate ground wire is used, it here. ■ Oven must be connected to a grounded metal, ...be using and follow the instructions provided for it is recommended that a qualified electrical installer determine that the electrical connection and wire size are in Cabinet A B Cabinet Dimensions - Double Ovens Installed in accordance with local codes. cutout height 30" (76.2 cm) models...

Installation Instructions
Page 7
... to do so can result in back or other injury. 1. Push oven completely into cabinet and center oven into cabinet. Mounting rail B. Shipping foot 3. Insert the screws through holes in the oven frame. ■ With one # 8-18 x ³⁄₈" screw (C) for double oven) provided. Oven frame slot B. B Failure to grip. A. See the following instructions to...
... to do so can result in back or other injury. 1. Push oven completely into cabinet and center oven into cabinet. Mounting rail B. Shipping foot 3. Insert the screws through holes in the oven frame. ■ With one # 8-18 x ³⁄₈" screw (C) for double oven) provided. Oven frame slot B. B Failure to grip. A. See the following instructions to...

Installation Instructions
Page 8
... connected. ■ See "Troubleshooting" section in the oven frame. 12. Check Operation of Double Oven 1. or circuit breaker has not tripped. ■ Electrical supply is free to select the oven you are now installed. If you purchased your oven. Press OFF/CANCEL. Press UPPER OVEN or LOWER OVEN, to open the oven door. Use the 8-18 x ³⁄₈...
... connected. ■ See "Troubleshooting" section in the oven frame. 12. Check Operation of Double Oven 1. or circuit breaker has not tripped. ■ Electrical supply is free to select the oven you are now installed. If you purchased your oven. Press OFF/CANCEL. Press UPPER OVEN or LOWER OVEN, to open the oven door. Use the 8-18 x ³⁄₈...


