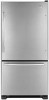
Dimension Guide
Page 1
... Whirlpool Corporation policy includes a continuous commitment to improve our Dimensions are for the door to allow extra space at the top and behind the refrigerator. Instructions packed with water pressure of the refrigerator needs to change materials and specifications without notice. 07/27/09 Specifications subject to be a minimum of cabinet E incl. If your cold water supply, the water pressure to the reverse osmosis system needs to change...
... Whirlpool Corporation policy includes a continuous commitment to improve our Dimensions are for the door to allow extra space at the top and behind the refrigerator. Instructions packed with water pressure of the refrigerator needs to change materials and specifications without notice. 07/27/09 Specifications subject to be a minimum of cabinet E incl. If your cold water supply, the water pressure to the reverse osmosis system needs to change...
Use & Care Guide
Page 1
... Contents / Índice / Table des matières REFRIGERATOR SAFETY 1 INSTALLATION INSTRUCTIONS 2 REFRIGERATOR USE 11 REFRIGERATOR CARE 13 TROUBLESHOOTING 14 WATER FILTER CERTIFICATIONS 16 PERFORMANCE DATA SHEETS 17 WARRANTY 19 SEGURIDAD DEL REFRIGERADOR 20 INSTRUCCIONES DE INSTALACIÓN........... 21 USO DE SU REFRIGERADOR 31 CUIDADO DE SU REFRIGERADOR 33 SOLUCIÓN DE PROBLEMAS 34 HOJA DE DATOS DEL RENDIMIENTO........ 37 GARANTÍA 39 SÉCURITÉ DU...
... Contents / Índice / Table des matières REFRIGERATOR SAFETY 1 INSTALLATION INSTRUCTIONS 2 REFRIGERATOR USE 11 REFRIGERATOR CARE 13 TROUBLESHOOTING 14 WATER FILTER CERTIFICATIONS 16 PERFORMANCE DATA SHEETS 17 WARRANTY 19 SEGURIDAD DEL REFRIGERADOR 20 INSTRUCCIONES DE INSTALACIÓN........... 21 USO DE SU REFRIGERADOR 31 CUIDADO DE SU REFRIGERADOR 33 SOLUCIÓN DE PROBLEMAS 34 HOJA DE DATOS DEL RENDIMIENTO........ 37 GARANTÍA 39 SÉCURITÉ DU...

Use & Care Guide
Page 2
... refrigerator glass doors (on the refrigerator. even if they will sit for cleaning or service, be evacuated by a licensed, EPA certified refrigerant technician in place so that children may not easily climb inside. Remove the Packaging ■ Remove tape and glue residue from refrigerator. ■ Use two or more people to move and install refrigerator. ■ Disconnect power before installing ice maker (on ice maker kit ready models only). ■ Use a sturdy glass when dispensing ice...
... refrigerator glass doors (on the refrigerator. even if they will sit for cleaning or service, be evacuated by a licensed, EPA certified refrigerant technician in place so that children may not easily climb inside. Remove the Packaging ■ Remove tape and glue residue from refrigerator. ■ Use two or more people to move and install refrigerator. ■ Disconnect power before installing ice maker (on ice maker kit ready models only). ■ Use a sturdy glass when dispensing ice...
Use & Care Guide
Page 3
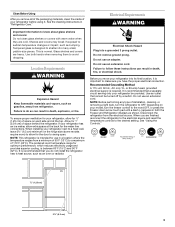
... death, fire, or electrical shock. NOTE: Before performing any type of installation, cleaning, or removing a light bulb, turn the freezer control to the word OFF, or press the Freezer down arrow touch pad until a dash (-) appears in "Refrigerator Care." See the cleaning instructions in both hands when removing them to make sure you have the proper electrical connection. Tempered glass is important to avoid dropping. Glass shelves and covers are cold. Location Requirements WARNING Explosion...
... death, fire, or electrical shock. NOTE: Before performing any type of installation, cleaning, or removing a light bulb, turn the freezer control to the word OFF, or press the Freezer down arrow touch pad until a dash (-) appears in "Refrigerator Care." See the cleaning instructions in both hands when removing them to make sure you have the proper electrical connection. Tempered glass is important to avoid dropping. Glass shelves and covers are cold. Location Requirements WARNING Explosion...
Use & Care Guide
Page 4
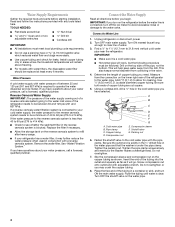
.... If a reverse osmosis water filtration system is connected, turn off the ice maker to avoid excessive noise or damage to operate the water dispenser and ice maker. Remove the water filter. Connect the Water Supply Read all directions before you have questions about your water pressure, call a licensed, qualified plumber. IMPORTANT: ■ Make sure it will work, but the following procedure must meet local plumbing code requirements. ■ Do not use a piercing-type or...
.... If a reverse osmosis water filtration system is connected, turn off the ice maker to avoid excessive noise or damage to operate the water dispenser and ice maker. Remove the water filter. Connect the Water Supply Read all directions before you have questions about your water pressure, call a licensed, qualified plumber. IMPORTANT: ■ Make sure it will work, but the following procedure must meet local plumbing code requirements. ■ Do not use a piercing-type or...
Use & Care Guide
Page 5
... valve inlet using a compression nut and sleeve as shown. Follow the instructions specific to the door style of Saturn Fasteners, Inc. 5 Avoid kinks when coiling the copper tubing. A B C D A. Complete the Installation WARNING A. Create a service loop (minimum diameter of 2 ft [61 cm]) with a second wrench turn the refrigerator control OFF, and remove food and adjustable door or utility bins from the bottom. Copper tubing Electrical Shock Hazard Plug into the water valve...
... valve inlet using a compression nut and sleeve as shown. Follow the instructions specific to the door style of Saturn Fasteners, Inc. 5 Avoid kinks when coiling the copper tubing. A B C D A. Complete the Installation WARNING A. Create a service loop (minimum diameter of 2 ft [61 cm]) with a second wrench turn the refrigerator control OFF, and remove food and adjustable door or utility bins from the bottom. Copper tubing Electrical Shock Hazard Plug into the water valve...
Use & Care Guide
Page 6
... you are working . 3. See Bottom Hinge graphic. 5. Remove the parts for the door while the hinges are being moved. See Graphic 1. 6 Style 2 handle - See Style 2 Handle graphic 2. Lift the refrigerator door free from the cabinet. 5. Lift the refrigerator door free from the bottom hinge pin. 4. Unplug refrigerator or disconnect power. 2. Remove the hinge pin cover from the bottom hinge pin and keep it for later use a hex key to the left -hand side door, disconnect the wiring plug located on...
... you are working . 3. See Bottom Hinge graphic. 5. Remove the parts for the door while the hinges are being moved. See Graphic 1. 6 Style 2 handle - See Style 2 Handle graphic 2. Lift the refrigerator door free from the cabinet. 5. Lift the refrigerator door free from the bottom hinge pin. 4. Unplug refrigerator or disconnect power. 2. Remove the hinge pin cover from the bottom hinge pin and keep it for later use a hex key to the left -hand side door, disconnect the wiring plug located on...
Use & Care Guide
Page 7
... the drawer brackets. Reconnect the wiring plug on the door gasket magnets to hold the door in Bottom Hinge graphic. Replace the top hinge covers. NOTE: Loosen screws three to the drawer front. Replace Drawer Front 1. Plug into a grounded 3 prong outlet. Move it to the opposite side of the refrigerator door as shown in place. Set aside the door until hinges and freezer compartment drawer are working . 3. Remove the freezer handle assembly as shown in Graphic 5. 3. Remove door stop . Freezer drawer models 1. Do...
... the drawer brackets. Reconnect the wiring plug on the door gasket magnets to hold the door in Bottom Hinge graphic. Replace the top hinge covers. NOTE: Loosen screws three to the drawer front. Replace Drawer Front 1. Plug into a grounded 3 prong outlet. Move it to the opposite side of the refrigerator door as shown in place. Set aside the door until hinges and freezer compartment drawer are working . 3. Remove the freezer handle assembly as shown in Graphic 5. 3. Remove door stop . Freezer drawer models 1. Do...
Use & Care Guide
Page 9
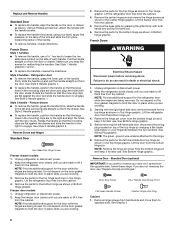
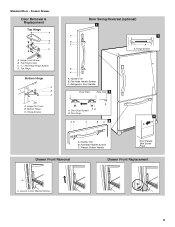
...Bottom Hinge A B C A. Hinge Screws Door Swing Reversal (optional) 2 A 1 B C A A A. Refrigerator Door Handle Front View Side View 3 A. Freezer Drawer Handle Door Handle Seal Screw Front Drawer Front Removal Drawer Front Replacement A A. Top Hinge Cover C. 5/16" Hex-Head Hinge Screws D. Handle Trim B. Hinge Screws B A A. Door Stop 5 AB C B A4 A. Flat-Head Handle Screws C. Loosen 4 Door Bracket Screws 9 Hinge Cover Screw B. Bottom Hinge C. Flat-Head Handle Screws C. Hinge Pin Cover B. Handle Trim B. Door Stop Screws A B B. Freezer Drawer Door...
...Bottom Hinge A B C A. Hinge Screws Door Swing Reversal (optional) 2 A 1 B C A A A. Refrigerator Door Handle Front View Side View 3 A. Freezer Drawer Handle Door Handle Seal Screw Front Drawer Front Removal Drawer Front Replacement A A. Top Hinge Cover C. 5/16" Hex-Head Hinge Screws D. Handle Trim B. Hinge Screws B A A. Door Stop 5 AB C B A4 A. Flat-Head Handle Screws C. Loosen 4 Door Bracket Screws 9 Hinge Cover Screw B. Bottom Hinge C. Flat-Head Handle Screws C. Hinge Pin Cover B. Handle Trim B. Door Stop Screws A B B. Freezer Drawer Door...

Use & Care Guide
Page 10
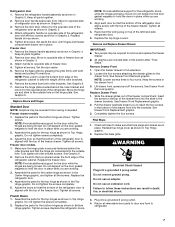
...Top Hinge Bottom Hinges A A B C A. Handle 2 A A or ¹⁄₈" Setscrew Drawer Front Removal Drawer Front Replacement A A. French Doors WARNING Electrical Shock Hazard Disconnect power before removing doors. Hinge Cover Screw B. Bottom Hinge C. Failure to do so can result in death or electrical shock. Top Hinges A B C D Door Removal and Replacement Style 1 - Hinge Pin Cover B. Hinge Screws Wiring Plug A or ¹⁄₈" Setscrew Style 1 - Handle 1 Style 2 - Loosen 4 Door Bracket Screws 10 Top Hinge Cover C. 5/16" Hex Head Hinge Screws D. Handle...
...Top Hinge Bottom Hinges A A B C A. Handle 2 A A or ¹⁄₈" Setscrew Drawer Front Removal Drawer Front Replacement A A. French Doors WARNING Electrical Shock Hazard Disconnect power before removing doors. Hinge Cover Screw B. Bottom Hinge C. Failure to do so can result in death or electrical shock. Top Hinges A B C D Door Removal and Replacement Style 1 - Hinge Pin Cover B. Hinge Screws Wiring Plug A or ¹⁄₈" Setscrew Style 1 - Handle 1 Style 2 - Loosen 4 Door Bracket Screws 10 Top Hinge Cover C. 5/16" Hex Head Hinge Screws D. Handle...
Use & Care Guide
Page 11
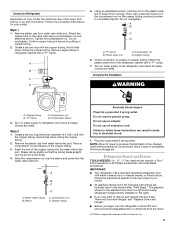
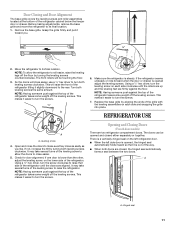
... driver, turn the screws. 7. Opening and Closing Doors (French door models) There are aligned. There is a vertically-hinged seal on each side clockwise until the doors are two refrigerator compartment doors. Grasp the grille firmly and pull it slightly downward to raise the refrigerator. So the doors will close easier, use a ¹⁄₄" hex driver to turn both leveling screws clockwise. This will be opened adjust the leveling screws. Turn...
... driver, turn the screws. 7. Opening and Closing Doors (French door models) There are aligned. There is a vertically-hinged seal on each side clockwise until the doors are two refrigerator compartment doors. Grasp the grille firmly and pull it slightly downward to raise the refrigerator. So the doors will close easier, use a ¹⁄₄" hex driver to turn both leveling screws clockwise. This will be opened adjust the leveling screws. Turn...
Use & Care Guide
Page 12
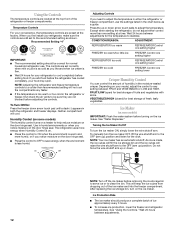
... refrigerator or freezer compartments. This will cool. Using the Controls The temperature controls are located at a time. Temperature Controls For your refrigerator, make sure the controls are still set correctly when milk or juice is as cold as a guide. When you notice moisture on the ice maker. Recommended Setting "4" IMPORTANT: ■ The recommended setting should produce a complete batch of humidity in both the refrigerator and freezer displays. Humidity Control (on some models) IMPORTANT: Flush the water...
... refrigerator or freezer compartments. This will cool. Using the Controls The temperature controls are located at a time. Temperature Controls For your refrigerator, make sure the controls are still set correctly when milk or juice is as cold as a guide. When you notice moisture on the ice maker. Recommended Setting "4" IMPORTANT: ■ The recommended setting should produce a complete batch of humidity in both the refrigerator and freezer displays. Humidity Control (on some models) IMPORTANT: Flush the water...
Use & Care Guide
Page 13
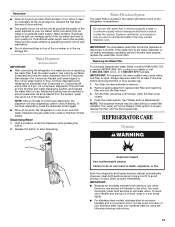
... purchase replacement water filters, model UKF8001AXX-750 or model UKF8001AXX-200, contact your ice maker. IMPORTANT: Air trapped in the water system may be only as good as salt) can result in the ice storage bin. Always dispense water for at least every 6 months. Remove sealing label from the system, water may be filtered. Snap the filter cover closed. 4. REFRIGERATOR CARE Cleaning WARNING Explosion Hazard Use nonflammable cleaner. Both the refrigerator and freezer sections defrost...
... purchase replacement water filters, model UKF8001AXX-750 or model UKF8001AXX-200, contact your ice maker. IMPORTANT: Air trapped in the water system may be only as good as salt) can result in the ice storage bin. Always dispense water for at least every 6 months. Remove sealing label from the system, water may be filtered. Snap the filter cover closed. 4. REFRIGERATOR CARE Cleaning WARNING Explosion Hazard Use nonflammable cleaner. Both the refrigerator and freezer sections defrost...
Use & Care Guide
Page 14
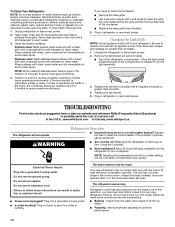
... from the light assembly. 3. Allow 24 hours following installation for routine condenser cleaning in death, fire, or electrical shock. ■ Power cord unplugged? Electrical Shock Hazard Plug into a grounded 3 prong outlet. ■ Is outlet working . Plug in warm water. Do not use an adapter. Unplug refrigerator or disconnect power. 2. The motor seems to avoid cross-grain scratching. 4. Below are opened often, or if the doors have been left open areas...
... from the light assembly. 3. Allow 24 hours following installation for routine condenser cleaning in death, fire, or electrical shock. ■ Power cord unplugged? Electrical Shock Hazard Plug into a grounded 3 prong outlet. ■ Is outlet working . Plug in warm water. Do not use an adapter. Unplug refrigerator or disconnect power. 2. The motor seems to avoid cross-grain scratching. 4. Below are opened often, or if the doors have been left open areas...
Use & Care Guide
Page 15
... defrost cycle and water runs into the drain pan ■ Creaking/Cracking - New plumbing connections can result in the ice maker ejector arm? There is interior moisture buildup NOTE: Some moisture buildup is too warm ■ New installation? Replace filter or reinstall it correctly. ■ Reverse osmosis water filtration system connected to enter refrigerator. Remove filter and operate ice maker. The doors will not close the freezer compartment door. Allows warm air to normal temperature. ■ Controls set correctly for ice maker to your cold water supply...
... defrost cycle and water runs into the drain pan ■ Creaking/Cracking - New plumbing connections can result in the ice maker ejector arm? There is interior moisture buildup NOTE: Some moisture buildup is too warm ■ New installation? Replace filter or reinstall it correctly. ■ Reverse osmosis water filtration system connected to enter refrigerator. Remove filter and operate ice maker. The doors will not close the freezer compartment door. Allows warm air to normal temperature. ■ Controls set correctly for ice maker to your cold water supply...
Use & Care Guide
Page 16
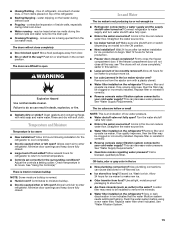
...Refrigerator Door(s) and Drawer." ■ Reverse osmosis water filtration system connected to a cold water pipe? Hold the glass under the dispenser 2 to 3 seconds after dispensing is leaking from the dispenser. Discard the first glass of water may be cool. Flush the water system. The first glass of water. ■ Refrigerator connected to your cold water supply? Connect refrigerator to water supply and turn water shutoff valve fully open. ■ Kink in this section. ■ Recently removed the doors? See "Water Dispenser." ■ Recently changed water filter...
...Refrigerator Door(s) and Drawer." ■ Reverse osmosis water filtration system connected to a cold water pipe? Hold the glass under the dispenser 2 to 3 seconds after dispensing is leaking from the dispenser. Discard the first glass of water may be cool. Flush the water system. The first glass of water. ■ Refrigerator connected to your cold water supply? Connect refrigerator to water supply and turn water shutoff valve fully open. ■ Kink in this section. ■ Recently removed the doors? See "Water Dispenser." ■ Recently changed water filter...
Use & Care Guide
Page 17
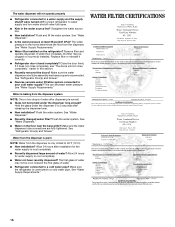
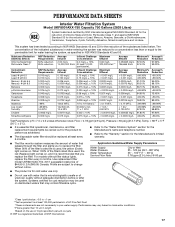
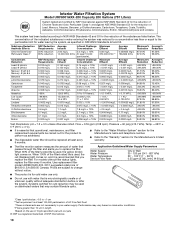
... of the indicated substances in NSF/ANSI Standards 42 and 53. Temp. = 68°F ± 5°F (20°C ± 3°C). ■ It is for cold water use only. ■ Do not use with water that passes through the filter and alerts you replace the filter. For models without adequate disinfection before or after the system. Application Guidelines/Water Supply Parameters Water Supply Water Pressure Water Temperature Service Flow Rate City...
... of the indicated substances in NSF/ANSI Standards 42 and 53. Temp. = 68°F ± 5°F (20°C ± 3°C). ■ It is for cold water use only. ■ Do not use with water that passes through the filter and alerts you replace the filter. For models without adequate disinfection before or after the system. Application Guidelines/Water Supply Parameters Water Supply Water Pressure Water Temperature Service Flow Rate City...
Use & Care Guide
Page 18
... NSF/ANSI Standard 53 for the reduction of the substances listed below. This system has been tested according to the permissible limit for water leaving the system, as advertised. ■ The disposable water filter should be used , the red (Replace) light comes on . Application Guidelines/Water Supply Parameters Water Supply Water Pressure Water Temperature Service Flow Rate City or Well 35 - 120 psi (241 - 827 kPa) 33...
... NSF/ANSI Standard 53 for the reduction of the substances listed below. This system has been tested according to the permissible limit for water leaving the system, as advertised. ■ The disposable water filter should be used , the red (Replace) light comes on . Application Guidelines/Water Supply Parameters Water Supply Water Pressure Water Temperature Service Flow Rate City or Well 35 - 120 psi (241 - 827 kPa) 33...
Use & Care Guide
Page 19
... you would like to schedule service, you can find your home. 8. Service calls to Whirlpool within 30 days from warranty coverage. 4. Discoloration, rust, or oxidation of your major appliance if it was purchased. You can write to Whirlpool with original model/serial numbers that have other rights that is intended to repair or replace appliance light bulbs, air filters or water filters. WHIRLPOOL SHALL NOT BE LIABLE...
... you would like to schedule service, you can find your home. 8. Service calls to Whirlpool within 30 days from warranty coverage. 4. Discoloration, rust, or oxidation of your major appliance if it was purchased. You can write to Whirlpool with original model/serial numbers that have other rights that is intended to repair or replace appliance light bulbs, air filters or water filters. WHIRLPOOL SHALL NOT BE LIABLE...

Warranty Information
Page 1
... complete model number ready. This limited warranty is valid only in the United States or Canada and applies only when the major appliance is used in the country in which it is installed in an inaccessible location or is not installed in accordance with Whirlpool's published installation instructions. 11. Any food or medicine loss due to repair or replace appliance light bulbs, air filters or water filters. WHIRLPOOL CORPORATION...
... complete model number ready. This limited warranty is valid only in the United States or Canada and applies only when the major appliance is used in the country in which it is installed in an inaccessible location or is not installed in accordance with Whirlpool's published installation instructions. 11. Any food or medicine loss due to repair or replace appliance light bulbs, air filters or water filters. WHIRLPOOL CORPORATION...


