User Guide
Page 1
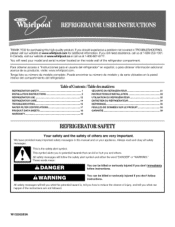
... en espa_ol, o para obtener informaci6n adicional acerca de su producto, visite: www.whirlpool.com. Table of Contents / Table des matii res REFRIGERATOR SAFETY 1 INSTALLATION INSTRUCTIONS 2 REFRIGERATOR USE 12 REFRIGERATOR CARE 14 TROUBLESHOOTING 15 WATER FILTER CERTIFICATIONS 17 PRODUCT DATA SHEETS 18 WARRANTY 19 SI_CURITI_ ... DI_PANNAGE 35 FEUlLLES DE DONNI=ES SUR LE PRODUlT 38 GARANTIE 39 REFRIGERATOSRAFETY Your safety and the safety of the refrigerator compartment. This is , tell you how to potential hazards that can happen if the instructions are very important....
... en espa_ol, o para obtener informaci6n adicional acerca de su producto, visite: www.whirlpool.com. Table of Contents / Table des matii res REFRIGERATOR SAFETY 1 INSTALLATION INSTRUCTIONS 2 REFRIGERATOR USE 12 REFRIGERATOR CARE 14 TROUBLESHOOTING 15 WATER FILTER CERTIFICATIONS 17 PRODUCT DATA SHEETS 18 WARRANTY 19 SI_CURITI_ ... DI_PANNAGE 35 FEUlLLES DE DONNI=ES SUR LE PRODUlT 38 GARANTIE 39 REFRIGERATOSRAFETY Your safety and the safety of the refrigerator compartment. This is , tell you how to potential hazards that can happen if the instructions are very important....
User Guide
Page 2
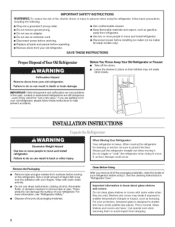
... persons when using it . even if they are still dangerous - For more information, see "Refrigerator Safety." • Dispose of/recycle all packaging materials. 2 When Moving "{our Refrigerator: Your refrigerator is normal. See the cleaning instructions in back or other injury. This is heavy. IMPORTANT:... parts and panels before operating. [] Use nonflammable cleaner. [] Keep flammable materials and vapors, such as bumping. Junked or abandoned refrigerators are cold. Use special care when removing them to know about glass shelves and covers: Do not clean glass shelves or covers ...
... persons when using it . even if they are still dangerous - For more information, see "Refrigerator Safety." • Dispose of/recycle all packaging materials. 2 When Moving "{our Refrigerator: Your refrigerator is normal. See the cleaning instructions in back or other injury. This is heavy. IMPORTANT:... parts and panels before operating. [] Use nonflammable cleaner. [] Keep flammable materials and vapors, such as bumping. Junked or abandoned refrigerators are cold. Use special care when removing them to know about glass shelves and covers: Do not clean glass shelves or covers ...
User Guide
Page 3
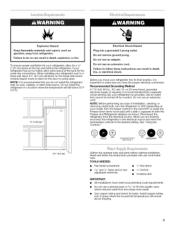
... or fire. Explosion Hazard Keep flammable materials and vapors, such as shown. Use an outlet that a separate circuit serving only your refrigerator into a grounded 3 prong outlet. TOOLS NEEDED: • Flat-blade screwdriver • 1/4"Nut driver • 7/lo" and... the temperature will remain above freezing. See "Using the Controls." 00® ®0® coo FREEZER CO_OER RecommendeSdettings:4 ColdestSettings:7 coo REFRIGERATOR COLOER \ 21/2" (6.3 era) '" p! ...... NOTE: Before performing any tools listed here. Gather the required tools and parts before ...
... or fire. Explosion Hazard Keep flammable materials and vapors, such as shown. Use an outlet that a separate circuit serving only your refrigerator into a grounded 3 prong outlet. TOOLS NEEDED: • Flat-blade screwdriver • 1/4"Nut driver • 7/lo" and... the temperature will remain above freezing. See "Using the Controls." 00® ®0® coo FREEZER CO_OER RecommendeSdettings:4 ColdestSettings:7 coo REFRIGERATOR COLOER \ 21/2" (6.3 era) '" p! ...... NOTE: Before performing any tools listed here. Gather the required tools and parts before ...
User Guide
Page 4
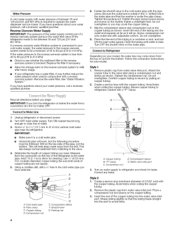
...away from water valve inlet port. This will work, but the following procedure must be a minimum of the refrigerator to 414 kPa). Determine the length of the pipe, not the bottom. Add 7 ft (2.1 m) to allow for your cold water supply, the water pressure to the reverse ...osmosis system needs to refrigerator and check for leaks. Use 1/4"(6.35 mm) O.D. (outside diameter) copper tubing. Using a cordless drill, drill a V4"...
...away from water valve inlet port. This will work, but the following procedure must be a minimum of the refrigerator to 414 kPa). Determine the length of the pipe, not the bottom. Add 7 ft (2.1 m) to allow for your cold water supply, the water pressure to the reverse ...osmosis system needs to refrigerator and check for leaks. Use 1/4"(6.35 mm) O.D. (outside diameter) copper tubing. Using a cordless drill, drill a V4"...
User Guide
Page 5
...the handle to produce the first batch of each handle. To replace the handle, position the handle so that the mounting clips are down to refrigerator and check for reattaching the handles. Attach copper tubing to the right and align the holes with the door studs. ... reverse the directions. Plastic water tubing B. All graphics referenced in the following instructions are included later in the mounting clips are for the standard door (Style 1) are to refrigerator cabinet with the handle screws. • To replace the handle trim pieces, using your model. Replace and Remove...
...the handle to produce the first batch of each handle. To replace the handle, position the handle so that the mounting clips are down to refrigerator and check for reattaching the handles. Attach copper tubing to the right and align the holes with the door studs. ... reverse the directions. Plastic water tubing B. All graphics referenced in the following instructions are included later in the mounting clips are for the standard door (Style 1) are to refrigerator cabinet with the handle screws. • To replace the handle trim pieces, using your model. Replace and Remove...
User Guide
Page 6
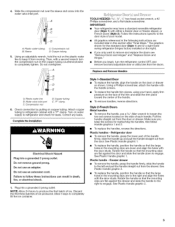
...until hinges and freezer compartment drawer are being removed. Do not depend on product. 6 Remove the parts for the bottom hinge as shown in Bottom Hinge graphic. Lift the refrigerator door free from the cabinet. 5. Remove the center hinge pin and remove the hinge screws as shown in place while... side of the top hinge by wedging a flat-blade screwdriver or your door so it opens from the bottom hinge pin. 4. Remove the door stop . Move it for the refrigerator door while the hinges are in Graphic 5-1. Replace handle trim as shown in the Top Hinge graphic. Tighten...
...until hinges and freezer compartment drawer are being removed. Do not depend on product. 6 Remove the parts for the bottom hinge as shown in Bottom Hinge graphic. Lift the refrigerator door free from the cabinet. 5. Remove the center hinge pin and remove the hinge screws as shown in place while... side of the top hinge by wedging a flat-blade screwdriver or your door so it opens from the bottom hinge pin. 4. Remove the door stop . Move it for the refrigerator door while the hinges are in Graphic 5-1. Replace handle trim as shown in the Top Hinge graphic. Tighten...
User Guide
Page 7
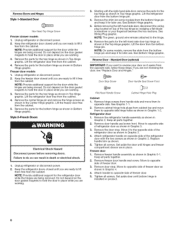
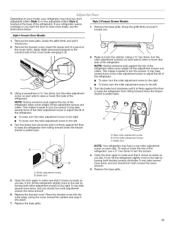
... Check all the screws. Do not use an adapter. Failure to the drawer front. Tighten screws. Adjust the doors so that the bottom of the refrigerator door is aligned with the top of the freezer door. Style 2-French Doors 1. Replace the parts for the top hinges as shown ... . 2. Do not use an extension cord. Keep the screws in the Center Hinge graphic, and tighten all holes to make sure that the bottom of the refrigerator door aligns evenly with the top of the drawer front into a grounded 3 prong outlet. 3. Pull the drawer brackets toward you are working. ...
... Check all the screws. Do not use an adapter. Failure to the drawer front. Tighten screws. Adjust the doors so that the bottom of the refrigerator door is aligned with the top of the freezer door. Style 2-French Doors 1. Replace the parts for the top hinges as shown ... . 2. Do not use an extension cord. Keep the screws in the Center Hinge graphic, and tighten all holes to make sure that the bottom of the refrigerator door aligns evenly with the top of the drawer front into a grounded 3 prong outlet. 3. Pull the drawer brackets toward you are working. ...

User Guide
Page 9
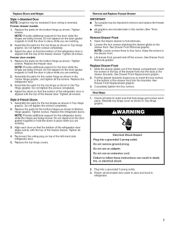
Standard Door - Refrigerator Door Handle t t Front View S/de ,,,j _,ewlB j il AB A Door Stop Screws # i B Door Stop I ,,, , ll| A Hinge Screws | B Ad i i A. o o__ A. Cabinet Hinge Hole Plugs j c ,J o I oo" o _ o oo i I / l [] AB C B A ... Front Replacement A Loosen 4 Door Bracket Screws Freezer Drawer Door Removal & Replacement Top Hinge A Hinge Cover Screw B Top Hinge Cover C _ _," Hex-Head Hinge Screws D Top Hinge Bottom Hinge A B c A Shim (on some B Bottom Hinge C Hinge Screws models) Door Swing Reversal (optional) [] .
Standard Door - Refrigerator Door Handle t t Front View S/de ,,,j _,ewlB j il AB A Door Stop Screws # i B Door Stop I ,,, , ll| A Hinge Screws | B Ad i i A. o o__ A. Cabinet Hinge Hole Plugs j c ,J o I oo" o _ o oo i I / l [] AB C B A ... Front Replacement A Loosen 4 Door Bracket Screws Freezer Drawer Door Removal & Replacement Top Hinge A Hinge Cover Screw B Top Hinge Cover C _ _," Hex-Head Hinge Screws D Top Hinge Bottom Hinge A B c A Shim (on some B Bottom Hinge C Hinge Screws models) Door Swing Reversal (optional) [] .
User Guide
Page 11
...you . 2. Place the bracket cover into place. 7. Replace the base grille. A A. Rear roller adjustment screw B. Insert the eraser end of the refrigerator, use the instructions below. Roller adjustment screw B. Grasp the grille firmly and pull it easier to turn the roller adjustment screw to the left . 3=... roller adjustment screw to the right. • To lower, turn the roller adjustment screw on each side. If not, tilt the refrigerator slightly more to the rear by turning both roller adjustment screws to the right. Replace the base grille. 11 Depending on each side ...
...you . 2. Place the bracket cover into place. 7. Replace the base grille. A A. Rear roller adjustment screw B. Insert the eraser end of the refrigerator, use the instructions below. Roller adjustment screw B. Grasp the grille firmly and pull it easier to turn the roller adjustment screw to the left . 3=... roller adjustment screw to the right. • To lower, turn the roller adjustment screw on each side. If not, tilt the refrigerator slightly more to the rear by turning both roller adjustment screws to the right. Replace the base grille. 11 Depending on each side ...
User Guide
Page 12
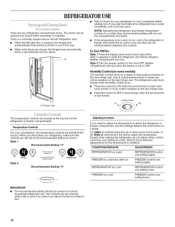
...be correct for the temperature to the recommended setting as you notice moisture on the door hinge seal. Temperature Controls For your refrigerator to save energy when the environment is a vertically-hinged seal on the door hinge seal. • Press the control ...to OFF to cool completely before the refrigerator has cooled completely, your refrigerator, make sure the controls are still set to stabilize. Style 1 Recommended Setting "4" GO@ @0® COLD FREEZER COLDER RecommenSdetdtings4: ...
...be correct for the temperature to the recommended setting as you notice moisture on the door hinge seal. Temperature Controls For your refrigerator to save energy when the environment is a vertically-hinged seal on the door hinge seal. • Press the control ...to OFF to cool completely before the refrigerator has cooled completely, your refrigerator, make sure the controls are still set to stabilize. Style 1 Recommended Setting "4" GO@ @0® COLD FREEZER COLDER RecommenSdetdtings4: ...
User Guide
Page 13
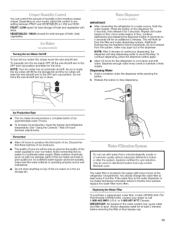
...As air is made, the ice cubes will fill the ice storage bin and the ice cubes will stop dispensing. NOTE: After 5 minutes of the refrigerator compartment. Ice Production Rate • The ice maker should change the water filter at least 2 minutes before 6 months have passed, replace the water ... as good as salt) can control the amount of ice approximately every 3 hours. • To increase ice production, lower the freezer and refrigerator temperature. Press the button on top of the ice maker and lead to your ice will be avoided, make sure the water softener is operating...
...As air is made, the ice cubes will fill the ice storage bin and the ice cubes will stop dispensing. NOTE: After 5 minutes of the refrigerator compartment. Ice Production Rate • The ice maker should change the water filter at least 2 minutes before 6 months have passed, replace the water ... as good as salt) can control the amount of ice approximately every 3 hours. • To increase ice production, lower the freezer and refrigerator temperature. Press the button on top of the ice maker and lead to your ice will be avoided, make sure the water softener is operating...
User Guide
Page 14
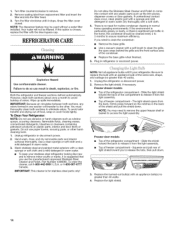
...flammable fluids, cleaning waxes, concentrated detergents, bleaches or cleansers containing petroleum products on the notches in warm water. • To keep your refrigerator. To avoid odor transfer and drying out of the shield and pull the shield down . / 3. Wash stainless steel and painted metal...toward the back of the condenser. • Replace the base grille when finished. 5. Replace the light shield. 14 To Clean Your Refrigerator: NOTE: Do not use the manufacturer's approved Stainless Steel Cleaner and Polish, Part Number 4396095. 1. If this option is suggested that...
...flammable fluids, cleaning waxes, concentrated detergents, bleaches or cleansers containing petroleum products on the notches in warm water. • To keep your refrigerator. To avoid odor transfer and drying out of the shield and pull the shield down . / 3. Wash stainless steel and painted metal...toward the back of the condenser. • Replace the base grille when finished. 5. Replace the light shield. 14 To Clean Your Refrigerator: NOTE: Do not use the manufacturer's approved Stainless Steel Cleaner and Polish, Part Number 4396095. 1. If this option is suggested that...
User Guide
Page 15
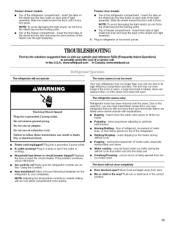
... result in the way? Slide the shield toward the front until it locks into the drain pan Creaking/Cracking - In the U.S.A., www.whirlpool.com In Canada, www.whirlpool.ca The refrigerator will not cool either compartment more quickly. Slide the shield toward the front until it locks. heard when the water valve opens...
... result in the way? Slide the shield toward the front until it locks into the drain pan Creaking/Cracking - In the U.S.A., www.whirlpool.com In Canada, www.whirlpool.ca The refrigerator will not cool either compartment more quickly. Slide the shield toward the front until it locks. heard when the water valve opens...
User Guide
Page 16
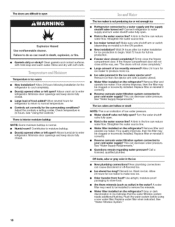
...Explosion Hazard Use nonflammable cleaner. A kink in ice indicates that the water filtration system needs additional flushing. Wait 72 hours for refrigerator to return to make new ice. See "Water Supply Requirements." This can cause discolored or off-flavored ice. New plumbing ...open . • Kink in the ON position. • New installation? Adjust the controls a setting colder. Water filter installed on the refrigerator? See "Water Filtration System." 16 Allows warm air to be clogged or incorrectly installed. Controls set correctly for ice maker to normal temperature....
...Explosion Hazard Use nonflammable cleaner. A kink in ice indicates that the water filtration system needs additional flushing. Wait 72 hours for refrigerator to return to make new ice. See "Water Supply Requirements." This can cause discolored or off-flavored ice. New plumbing ...open . • Kink in the ON position. • New installation? Adjust the controls a setting colder. Water filter installed on the refrigerator? See "Water Filtration System." 16 Allows warm air to be clogged or incorrectly installed. Controls set correctly for ice maker to normal temperature....
User Guide
Page 17
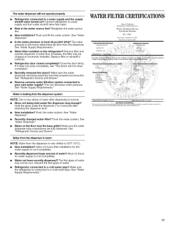
...or two drops of water may be clogged or incorrectly installed. See "Water Supply Requirements." Straighten the water source line. Refrigerator door closed completely? This can decrease water pressure. See "Water Supply Requirements." Water is normal. • Glass not ...dispensing is leaking from the dispenser. Water on ? The first glass of water after releasing the dispenser lever. Make sure the refrigerator is only chilled to 50°F (10°C). • New installation? WATERFILTERCERTIFICATIONS Trademark/Model Desianat_on UKFSt101AXX750 469OO6-75( 67OO3523-75O...
...or two drops of water may be clogged or incorrectly installed. See "Water Supply Requirements." Straighten the water source line. Refrigerator door closed completely? This can decrease water pressure. See "Water Supply Requirements." Water is normal. • Glass not ...dispensing is leaking from the dispenser. Water on ? The first glass of water after releasing the dispenser lever. Make sure the refrigerator is only chilled to 50°F (10°C). • New installation? WATERFILTERCERTIFICATIONS Trademark/Model Desianat_on UKFSt101AXX750 469OO6-75( 67OO3523-75O...
User Guide
Page 19
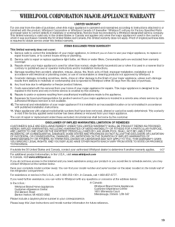
... warranty coverage. 3. Have your major appliance is located in a remote area where service by a Whirlpool designated service company. Service calls to refrigerator or freezer product failures. 7. If outside the 50 United States and Canada, contact your authorized Whirlpool dealer to determine if another warranty applies. 9/07 For additional product information, in the U.S.A., visit...
... warranty coverage. 3. Have your major appliance is located in a remote area where service by a Whirlpool designated service company. Service calls to refrigerator or freezer product failures. 7. If outside the 50 United States and Canada, contact your authorized Whirlpool dealer to determine if another warranty applies. 9/07 For additional product information, in the U.S.A., visit...


