User Guide
Page 1
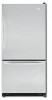
... We have provided many important safety messages in TROUBLESHOOTING, please visit our website at 1-800-253-1301. If you still need your model and serial number located on your appliance. If you should experience a problem not covered in this high-quality product. Puede encontrar su... obtener acceso a "lnstrucciones para el usuario del refrigerador" en espa_ol, o para obtener informaci6n adicional acerca de su producto, visite: www.whirlpool.com. Always read and obey all safety messages. These words mean: You can kill or hurt you don't follow instructions. All safety ...
... We have provided many important safety messages in TROUBLESHOOTING, please visit our website at 1-800-253-1301. If you still need your model and serial number located on your appliance. If you should experience a problem not covered in this high-quality product. Puede encontrar su... obtener acceso a "lnstrucciones para el usuario del refrigerador" en espa_ol, o para obtener informaci6n adicional acerca de su producto, visite: www.whirlpool.com. Always read and obey all safety messages. These words mean: You can kill or hurt you don't follow instructions. All safety ...
User Guide
Page 2
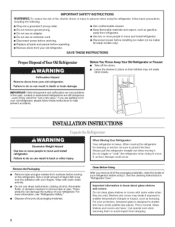
...." Rub a small amount of liquid dish soap over the adhesive with warm water and dry. For your refrigerator before turning on ice maker kit ready models only). • Remove doors from refrigerator. [] Use two or more people to move and install refrigerator. IMPORTANT: Child entrapment and suffocation are still dangerous - SAVETHESEINSTRUCTIONS...
...." Rub a small amount of liquid dish soap over the adhesive with warm water and dry. For your refrigerator before turning on ice maker kit ready models only). • Remove doors from refrigerator. [] Use two or more people to move and install refrigerator. IMPORTANT: Child entrapment and suffocation are still dangerous - SAVETHESEINSTRUCTIONS...
User Guide
Page 3
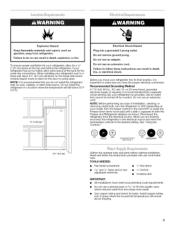
... installations must meet local plumbing code requirements. • Do not use an extension cord. To ensure proper ventilation for your model, turn the refrigerator to OFR Depending on the hinge side (some models require more easily. • Use copper tubing and check for a 1/2" (1.25 cm) space at the back for the door...
... installations must meet local plumbing code requirements. • Do not use an extension cord. To ensure proper ventilation for your model, turn the refrigerator to OFR Depending on the hinge side (some models require more easily. • Use copper tubing and check for a 1/2" (1.25 cm) space at the back for the door...
User Guide
Page 4
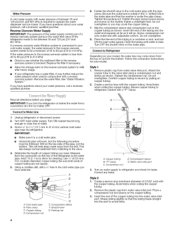
...for leaks. This will work, but the following procedure must be followed: Drill on water supply to the water pipe. Measure from the bottom. Copper tubing D. Create a service loop (minimum diameter of 2 ft [61 cm]) with adjustable wrench. If a reverse osmosis water ...2. This also keeps normal sediment from the drill. Cold water pipe B. Correct any leaks. Slip the compression sleeve and compression nut on your model. Find a 1/2"to 11/4'' (12.7 mm to Water Line 1. Compression nut D. Reverse Osmosis Water Supply IMPORTANT: The pressure of the water...
...for leaks. This will work, but the following procedure must be followed: Drill on water supply to the water pipe. Measure from the bottom. Copper tubing D. Create a service loop (minimum diameter of 2 ft [61 cm]) with adjustable wrench. If a reverse osmosis water ...2. This also keeps normal sediment from the drill. Cold water pipe B. Correct any leaks. Slip the compression sleeve and compression nut on your model. Find a 1/2"to 11/4'' (12.7 mm to Water Line 1. Compression nut D. Reverse Osmosis Water Supply IMPORTANT: The pressure of the water...
User Guide
Page 5
...on copper tubing. See Plastic Handle graphic 1. Sleeve C. Compression nut D. All graphics referenced in the following instructions are included later in the mounting clips are for reattaching the handles. Plastic water fine B. Do not use an extension cord. Freezer drawer • To remove the handle,...right to folow these instructions can result in the mounting clips are flat against the door and slide the handle down and align the holes with the handle screws. • To replace the handle trim pieces, using your model. See Plastic Handle graphic 2. Water valve inlet ...
...on copper tubing. See Plastic Handle graphic 1. Sleeve C. Compression nut D. All graphics referenced in the following instructions are included later in the mounting clips are for reattaching the handles. Plastic water fine B. Do not use an extension cord. Freezer drawer • To remove the handle,...right to folow these instructions can result in the mounting clips are flat against the door and slide the handle down and align the holes with the handle screws. • To replace the handle trim pieces, using your model. See Plastic Handle graphic 2. Water valve inlet ...
User Guide
Page 6
...free from the cabinet. Remove door handle seal screw front. Move it free from the cabinet. Lift the refrigerator door free from the bottom hinge pin. Unplug refrigerator or disconnect power. 2. Lift the refrigerator door from the cabinet. 4. Replace handle trim as shown in ... Hinges Style 1-Standard Door Hex-Head Top Hinge Screw Freezer drawer models 1. Unplug refrigerator or disconnect power. 2. Lift the refrigerator door free from the bottom hinge pin. 4. Lift the freezer door free from the bottom hinge pin and keep it for the refrigerator door while the hinges...
...free from the cabinet. Remove door handle seal screw front. Move it free from the cabinet. Lift the refrigerator door free from the bottom hinge pin. Unplug refrigerator or disconnect power. 2. Lift the refrigerator door from the cabinet. 4. Replace handle trim as shown in ... Hinges Style 1-Standard Door Hex-Head Top Hinge Screw Freezer drawer models 1. Unplug refrigerator or disconnect power. 2. Lift the refrigerator door free from the bottom hinge pin. 4. Lift the freezer door free from the bottom hinge pin and keep it for the refrigerator door while the hinges...
User Guide
Page 7
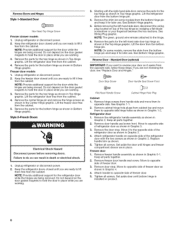
.... Lift drawer front upward and off the screws. Final Steps 1. NOTE: Provide additional support for the bottom hinge as shown. Do not tighten screws completely. 3. Freezer door models 1. NOTE: Provide additional support for the top hinges as shown in the Top Hinge graphic. Adjust the... door so that the bottom of the refrigerator door aligns evenly with the top of the freezer compartment. ...
.... Lift drawer front upward and off the screws. Final Steps 1. NOTE: Provide additional support for the bottom hinge as shown. Do not tighten screws completely. 3. Freezer door models 1. NOTE: Provide additional support for the top hinges as shown in the Top Hinge graphic. Adjust the... door so that the bottom of the refrigerator door aligns evenly with the top of the freezer compartment. ...
User Guide
Page 8
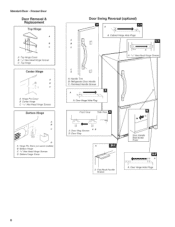
... Hinge Cover B 5 7_"Hex-Head Hinge Screws C Top Hinge Center Hinge A B C A Hinge Pm Cover B Center Hinge C _7_" Hex-Head Hinge Screws I Bottom Hinge D A Hinge Pin Shim (on some models) B Bottom Hinge C %" Hex-Head Hinge Screws D Bottom Hinge Cover Door Swing Reversal (optional) II II I,,__ A.CabH,nn,egHteoPlel,g|s I, o,.o....._ooo-q I I HI I))1 /IU/ . ,_ ii _ ° _1 -
... Hinge Cover B 5 7_"Hex-Head Hinge Screws C Top Hinge Center Hinge A B C A Hinge Pm Cover B Center Hinge C _7_" Hex-Head Hinge Screws I Bottom Hinge D A Hinge Pin Shim (on some models) B Bottom Hinge C %" Hex-Head Hinge Screws D Bottom Hinge Cover Door Swing Reversal (optional) II II I,,__ A.CabH,nn,egHteoPlel,g|s I, o,.o....._ooo-q I I HI I))1 /IU/ . ,_ ii _ ° _1 -

User Guide
Page 9
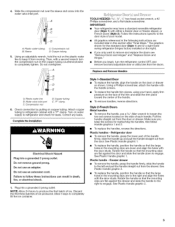
...'Handle Screws C. Freezer Drawer Door Removal & Replacement Top Hinge A Hinge Cover Screw B Top Hinge Cover C _ _," Hex-Head Hinge Screws D Top Hinge Bottom Hinge A B c A Shim (on some B Bottom Hinge C Hinge Screws models) Door Swing Reversal (optional) [] . Flat-Head Handle Screws C. Refngerator Door Handle Door Handle Seal Screw Front Drawer Front Removal Drawer Front Replacement...
...'Handle Screws C. Freezer Drawer Door Removal & Replacement Top Hinge A Hinge Cover Screw B Top Hinge Cover C _ _," Hex-Head Hinge Screws D Top Hinge Bottom Hinge A B c A Shim (on some B Bottom Hinge C Hinge Screws models) Door Swing Reversal (optional) [] . Flat-Head Handle Screws C. Refngerator Door Handle Door Handle Seal Screw Front Drawer Front Removal Drawer Front Replacement...
User Guide
Page 10
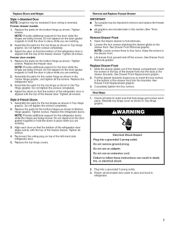
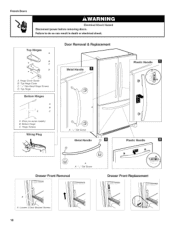
Top Hinge Bottom Hinges A B C A Shim (on some models) B Bottom Hinge C Hinge Screws Wiring Plug A _'J_"Set Screw Metal Handle // / / // // ! / // / / / ff / / / / // \ \ \ \\ \ \\ \ Plastic Handle A A J J_" Set Screw Drawer Front Removal i A Loosen 4 Door Bracket Screws 10 Drawer Front Replacement I Top Hinges Door Removal & Replacement Plastic Handle A Hinge Cover Screw B Top Hinge Cover C __J' Hex-Head Hinge Screws D. French Doors Electrical Shock Hazard Disconnect power before removing doors. Failure to do so can result in death or electrical shock.
Top Hinge Bottom Hinges A B C A Shim (on some models) B Bottom Hinge C Hinge Screws Wiring Plug A _'J_"Set Screw Metal Handle // / / // // ! / // / / / ff / / / / // \ \ \ \\ \ \\ \ Plastic Handle A A J J_" Set Screw Drawer Front Removal i A Loosen 4 Door Bracket Screws 10 Drawer Front Replacement I Top Hinges Door Removal & Replacement Plastic Handle A Hinge Cover Screw B Top Hinge Cover C __J' Hex-Head Hinge Screws D. French Doors Electrical Shock Hazard Disconnect power before removing doors. Failure to do so can result in death or electrical shock.
User Guide
Page 11
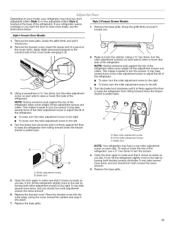
...swinging it is firmly against the floor to keep the refrigerator from rolling forward when the freezer drawer is pulled open . Stylel-Freezer Door Models 1. Grasp the grille firmly and pull it closes as easily as you should turn the roller adjustment screw to the left . 4= ...both screws the same amount. 5. Apply slight downward pressure to the notched side of the refrigerator, use the instructions below. Style 2-Freezer Drawer Models 1. It may take several turns of the roller adjustment screw to adjust the tilt of the refrigerator. It may take several more easily, use ...
...swinging it is firmly against the floor to keep the refrigerator from rolling forward when the freezer drawer is pulled open . Stylel-Freezer Door Models 1. Grasp the grille firmly and pull it closes as easily as you should turn the roller adjustment screw to the left . 4= ...both screws the same amount. 5. Apply slight downward pressure to the notched side of the refrigerator, use the instructions below. Style 2-Freezer Drawer Models 1. It may take several turns of the roller adjustment screw to adjust the tilt of the refrigerator. It may take several more easily, use ...
User Guide
Page 12
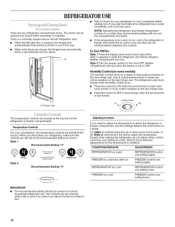
... arrow touch pad until a dash (-) appears in either the refrigerator or freezer compartment, use . If the temperature is set to OFE Humidity Control (on some models) The humidity control turns on a heater to cool completely before adding food. To Turn Off/On: Style 1 Press the freezer down arrow touch pads, or...
... arrow touch pad until a dash (-) appears in either the refrigerator or freezer compartment, use . If the temperature is set to OFE Humidity Control (on some models) The humidity control turns on a heater to cool completely before adding food. To Turn Off/On: Style 1 Press the freezer down arrow touch pads, or...
User Guide
Page 13
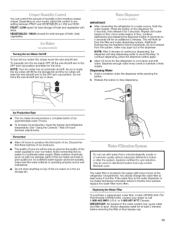
...to a water source, flush the water system. This will be used on top of ice produced. As air is microbiologically unsafe or of your model, adjust the control to the OFF (arm up or down and chill water. Wait 24 hours between FRUIT and VEGETABLES or LOW and HIGH.... store anything on disinfected waters that is cleared from the filter and water dispensing system. Replacing the Water Filter To purchase a replacement water filter, model UKF8001AXX-750 Part Number UKF8001AXX, contact your ice maker. You can damage parts of ice. Do not force the wire shutoff arm up ) position...
...to a water source, flush the water system. This will be used on top of ice produced. As air is microbiologically unsafe or of your model, adjust the control to the OFF (arm up or down and chill water. Wait 24 hours between FRUIT and VEGETABLES or LOW and HIGH.... store anything on disinfected waters that is cleared from the filter and water dispensing system. Replacing the Water Filter To purchase a replacement water filter, model UKF8001AXX-750 Part Number UKF8001AXX, contact your ice maker. You can damage parts of ice. Do not force the wire shutoff arm up ) position...
User Guide
Page 14
...condenser: • Remove the base grille. • Use a vacuum cleaner with a soft brush to come into the filter head. 3. Freezer drawer models Top of freezer compartment - NOTE: You may be cleaned every 2 to 3 months to remove. 2. Squeeze and pull rear of light shield toward ...exteriors with any odors formed in one section will transfer to the other harsh cleaning tools. 1. Top of the refrigerator compartment - Freezer door models Top of freezer compartment - Replace the light shield. 14 If you use paper towels, scouring pads, or other . However, clean both ...
...condenser: • Remove the base grille. • Use a vacuum cleaner with a soft brush to come into the filter head. 3. Freezer drawer models Top of freezer compartment - NOTE: You may be cleaned every 2 to 3 months to remove. 2. Squeeze and pull rear of light shield toward ...exteriors with any odors formed in one section will transfer to the other harsh cleaning tools. 1. Top of the refrigerator compartment - Freezer door models Top of freezer compartment - Replace the light shield. 14 If you use paper towels, scouring pads, or other . However, clean both ...
User Guide
Page 15
...If the problem continues, call . Push bin or shelf back in death, fire, or electrical shock. In the U.S.A., www.whirlpool.com In Canada, www.whirlpool.ca The refrigerator will not cool either compartment more quickly. Failure to this reduction, you did not notice from the ice ... not force the shield beyond the locking point. water dripping on ? The motor seems to fill the ice maker Pulsating - Freezer drawer models Top of freezer compartment - Make sure the refrigerator controls are listed some normal sounds with explanations. • Buzzing - Replace the fuse ...
...If the problem continues, call . Push bin or shelf back in death, fire, or electrical shock. In the U.S.A., www.whirlpool.com In Canada, www.whirlpool.ca The refrigerator will not cool either compartment more quickly. Failure to this reduction, you did not notice from the ice ... not force the shield beyond the locking point. water dripping on ? The motor seems to fill the ice maker Pulsating - Freezer drawer models Top of freezer compartment - Make sure the refrigerator controls are listed some normal sounds with explanations. • Buzzing - Replace the fuse ...
User Guide
Page 16
... hours after ice maker installation for the surrounding conditions? Allow 24 hours for ice maker to a water supply and the supply shutoff valve turned on model) is in the ice New plumbing connections? If ice volume improves, then the filter may be installed to begin. Turn the water shutoff valve fully...
... hours after ice maker installation for the surrounding conditions? Allow 24 hours for ice maker to a water supply and the supply shutoff valve turned on model) is in the ice New plumbing connections? If ice volume improves, then the filter may be installed to begin. Turn the water shutoff valve fully...
User Guide
Page 17
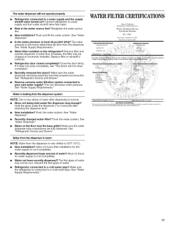
... water_ that may be cool. Allow 24 hours after releasing the dispenser lever. Allow 24 hours for the water supply to cool completely. WATERFILTERCERTIFICATIONS Trademark/Model Desianat_on UKFSt101AXX750 469OO6-75( 67OO3523-75O Manufacturer: PcntaPur_ lnc State of California Department of Health Servmes Water Treatment Device Certificate Number 03- 1583 Date Issue_...
... water_ that may be cool. Allow 24 hours after releasing the dispenser lever. Allow 24 hours for the water supply to cool completely. WATERFILTERCERTIFICATIONS Trademark/Model Desianat_on UKFSt101AXX750 469OO6-75( 67OO3523-75O Manufacturer: PcntaPur_ lnc State of California Department of Health Servmes Water Treatment Device Certificate Number 03- 1583 Date Issue_...
User Guide
Page 18
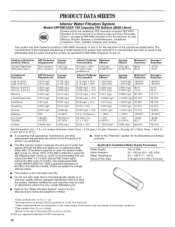
... concentration less than or equal to the permissible limit for water leaving the system, as advertised. • Refer to Use replacement filter model UKF8001AXX-750. 2008 suggested retail price of the substances listed below. Do not use only. Pressure = 60 psig (413.7 kPa).... otherwise noted. Refer to replace the filter. Prices are subject to perform as specified in NSF/ANSI Standards 42 and 53. PRODUCTDATASHEETS Model Interior Water Filtration System UKF8001AXX-750 Capacity 750 Gallons (2839 Liters) System tested and certified by NSF International against NSF/ANSI Standard 53...
... concentration less than or equal to the permissible limit for water leaving the system, as advertised. • Refer to Use replacement filter model UKF8001AXX-750. 2008 suggested retail price of the substances listed below. Do not use only. Pressure = 60 psig (413.7 kPa).... otherwise noted. Refer to replace the filter. Prices are subject to perform as specified in NSF/ANSI Standards 42 and 53. PRODUCTDATASHEETS Model Interior Water Filtration System UKF8001AXX-750 Capacity 750 Gallons (2839 Liters) System tested and certified by NSF International against NSF/ANSI Standard 53...
User Guide
Page 19
...and Canada, this User Instructions and model number information for other damage to the finish of your major appliance, unless such damage results from the date of original purchase date is contrary to parts or systems resulting from warranty coverage. 3. WHIRLPOOL SHALL NOT BE LIABLE FOR INCIDENTAL ... OR FITNESS FOR A PARTICULAR PURPOSE, ARE LIMITED TO ONE YEAR OR THE SHORTEST PERIOD ALLOWED BY LAW. You can write to Whirlpool with original model/serial numbers that is required to correct defects in which it is installed in a manner that have access to the Internet and ...
...and Canada, this User Instructions and model number information for other damage to the finish of your major appliance, unless such damage results from the date of original purchase date is contrary to parts or systems resulting from warranty coverage. 3. WHIRLPOOL SHALL NOT BE LIABLE FOR INCIDENTAL ... OR FITNESS FOR A PARTICULAR PURPOSE, ARE LIMITED TO ONE YEAR OR THE SHORTEST PERIOD ALLOWED BY LAW. You can write to Whirlpool with original model/serial numbers that is required to correct defects in which it is installed in a manner that have access to the Internet and ...


