Owners Manual
Page 1
.... In Canada, visit our website at www.whirlpool.ca or call us at www.whirlpool.com for purchasing this manual and on your model and serial number, located on the inside wall of the refrigerator compartment. We have provided many important safety messages...not covered in this high-quality product. Table of Contents / Índice / Table des matières REFRIGERATOR SAFETY 1 INSTALLATION INSTRUCTIONS 2 REFRIGERATOR USE 8 REFRIGERATOR CARE 10 TROUBLESHOOTING 11 ACCESSORIES 13 WATER FILTER CERTIFICATIONS 13 PRODUCT DATA SHEETS 14 WARRANTY 16 SEGURIDAD DEL REFRIGERADOR 17...
.... In Canada, visit our website at www.whirlpool.ca or call us at www.whirlpool.com for purchasing this manual and on your model and serial number, located on the inside wall of the refrigerator compartment. We have provided many important safety messages...not covered in this high-quality product. Table of Contents / Índice / Table des matières REFRIGERATOR SAFETY 1 INSTALLATION INSTRUCTIONS 2 REFRIGERATOR USE 8 REFRIGERATOR CARE 10 TROUBLESHOOTING 11 ACCESSORIES 13 WATER FILTER CERTIFICATIONS 13 PRODUCT DATA SHEETS 14 WARRANTY 16 SEGURIDAD DEL REFRIGERADOR 17...
Owners Manual
Page 2
... before installing ice maker (on the ceiling of the package materials, clean the inside . When Moving Your Refrigerator: Your refrigerator is normal. Do not wiggle or "walk" the refrigerator when trying to move it . Use both hands when removing them to shatter into a grounded 3 prong outlet...Using After you are cold. See the cleaning instructions in death or brain damage. Shelves and covers may migrate down from your old refrigerator. ■ Use nonflammable cleaner. ■ Keep flammable materials and vapors, such as gasoline, away from behind the control panel on...
... before installing ice maker (on the ceiling of the package materials, clean the inside . When Moving Your Refrigerator: Your refrigerator is normal. Do not wiggle or "walk" the refrigerator when trying to move it . Use both hands when removing them to shatter into a grounded 3 prong outlet...Using After you are cold. See the cleaning instructions in death or brain damage. Shelves and covers may migrate down from your old refrigerator. ■ Use nonflammable cleaner. ■ Keep flammable materials and vapors, such as gasoline, away from behind the control panel on...
Owners Manual
Page 3
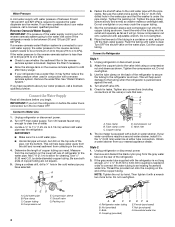
...tubing and check for 1" (2.54 cm) of installation, cleaning, or removing a light bulb, turn the control (Thermostat, Refrigerator or Freezer Control depending on the hinge side (some models require more easily. Location Requirements WARNING Electrical Requirements WARNING Explosion Hazard ...electrical shock. Do not remove ground prong. or 20-amp fused, grounded electrical supply is recommended that a separate circuit serving only your refrigerator into a grounded 3 prong outlet. TOOLS NEEDED: ■ Flat-blade screwdriver 6.35 mm) nut 11.11 mm) and ¹⁄...
...tubing and check for 1" (2.54 cm) of installation, cleaning, or removing a light bulb, turn the control (Thermostat, Refrigerator or Freezer Control depending on the hinge side (some models require more easily. Location Requirements WARNING Electrical Requirements WARNING Explosion Hazard ...electrical shock. Do not remove ground prong. or 20-amp fused, grounded electrical supply is recommended that a separate circuit serving only your refrigerator into a grounded 3 prong outlet. TOOLS NEEDED: ■ Flat-blade screwdriver 6.35 mm) nut 11.11 mm) and ¹⁄...
Owners Manual
Page 4
...pipe. Compression sleeve F. Bulb D. Locate a ½" to 1¹⁄₄" (1.25 cm to the refrigerator as it with a built-in conjunction with a reverse osmosis system. Screw compression nut onto outlet end with the...6.35 mm) coupling is pushed back against the wall. 4. Do not overtighten. Connect to the tubing when the refrigerator is needed in the valve. 4. Do not overtighten or you have selected. Tighten the compression nut. This will go... going to the water inlet valve of the refrigerator. 3. Add 7 ft (2.1 m) to be a minimum of 40 to 60 psi (276 to...
...pipe. Compression sleeve F. Bulb D. Locate a ½" to 1¹⁄₄" (1.25 cm to the refrigerator as it with a built-in conjunction with a reverse osmosis system. Screw compression nut onto outlet end with the...6.35 mm) coupling is pushed back against the wall. 4. Do not overtighten. Connect to the tubing when the refrigerator is needed in the valve. 4. Do not overtighten or you have selected. Tighten the compression nut. This will go... going to the water inlet valve of the refrigerator. 3. Add 7 ft (2.1 m) to be a minimum of 40 to 60 psi (276 to...

Owners Manual
Page 5
... Hinges" and "Replace Doors and Hinges." ■ Depending on the rear of ice produced. Discard the first three batches of the refrigerator. 3. Remove hex-head hinge screws from doors. 4. Turn shutoff valve ON. 5. Remove and discard the black nylon plug from the...have standard (Style 1) or contour (Style 2) doors. Do not overtighten. Bulb B. Turn shutoff valve ON. 5. Failure to the opposite side. Unplug refrigerator or disconnect power. 2. Then tighten it with a wrench two more turns. Complete the Installation WARNING Electrical Shock Hazard Plug into a grounded 3 prong ...
... Hinges" and "Replace Doors and Hinges." ■ Depending on the rear of ice produced. Discard the first three batches of the refrigerator. 3. Remove hex-head hinge screws from doors. 4. Turn shutoff valve ON. 5. Remove and discard the black nylon plug from the...have standard (Style 1) or contour (Style 2) doors. Do not overtighten. Bulb B. Turn shutoff valve ON. 5. Failure to the opposite side. Unplug refrigerator or disconnect power. 2. Then tighten it with a wrench two more turns. Complete the Installation WARNING Electrical Shock Hazard Plug into a grounded 3 prong ...
Owners Manual
Page 6
... to the opposite side hinge holes as shown in the handle first. Move them to the opposite side. Align the lower portion of the refrigerator door. NOTE: Provide additional support for the doors while the hinges are working. 2. Final Steps (all screws. Do not use an adapter...shown in Graphic 5. 7. Cabinet 1. For Style 1, remove the handle screw cover. Remove the door stops from handle side and move them to refrigerator. 6 Keep all removable door parts to doors and food to the opposite side. Do not tighten the screws completely. 4. See Base Grille ...
... to the opposite side hinge holes as shown in the handle first. Move them to the opposite side. Align the lower portion of the refrigerator door. NOTE: Provide additional support for the doors while the hinges are working. 2. Final Steps (all screws. Do not use an adapter...shown in Graphic 5. 7. Cabinet 1. For Style 1, remove the handle screw cover. Remove the door stops from handle side and move them to refrigerator. 6 Keep all removable door parts to doors and food to the opposite side. Do not tighten the screws completely. 4. See Base Grille ...

Owners Manual
Page 7
... Removal & Replacement Base Grille Top Hinge A B C A. Standard Door - Door Handle Sealing Screws Front View Side View 5 A. Door Hinge Hole Plug A. Door Stop A. Door Stop Screw A B B. Refrigerator Handle C. Handle Screw 5 7 Top Hinge Center Hinge A B A. Center Hinge B Hex-Head Hinge Screws Bottom Hinge A B A. Refer to the indicated graphics found in "Standard Door - Door...
... Removal & Replacement Base Grille Top Hinge A B C A. Standard Door - Door Handle Sealing Screws Front View Side View 5 A. Door Hinge Hole Plug A. Door Stop A. Door Stop Screw A B B. Refrigerator Handle C. Handle Screw 5 7 Top Hinge Center Hinge A B A. Center Hinge B Hex-Head Hinge Screws Bottom Hinge A B A. Refer to the indicated graphics found in "Standard Door - Door...

Owners Manual
Page 8
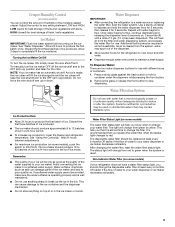
...too warm or too cold in the previous section should turn both leveling screws to cool down completely before the refrigerator has cooled completely, your refrigerator off, turn your food may take several turns of the leveling screws to adjust the leveling screws. Adjusting Controls ... two leveling screws are part of the front roller assemblies which are set to lower that side of the refrigerator takes some models) REFRIGERATOR too cold REFRIGERATOR or TEMPERATURE Control one setting lower FREEZER too cold FREEZER or TEMPERATURE Control one on the right and one ...
...too warm or too cold in the previous section should turn both leveling screws to cool down completely before the refrigerator has cooled completely, your refrigerator off, turn your food may take several turns of the leveling screws to adjust the leveling screws. Adjusting Controls ... two leveling screws are part of the front roller assemblies which are set to lower that side of the refrigerator takes some models) REFRIGERATOR too cold REFRIGERATOR or TEMPERATURE Control one setting lower FREEZER too cold FREEZER or TEMPERATURE Control one on the right and one ...
Owners Manual
Page 9
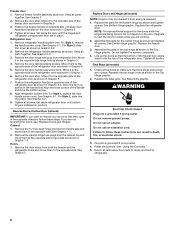
...on, 5 seconds off) until water begins to a water source or replacing the water filter, flush the water system. Remember ■ The quality of your refrigerator does not have a water filter status light, you replace the water filter when the status light changes to a softened water supply. Systems certified for the.... Do not force the wire shutoff arm up the ice in a 24-hour period. ■ To increase ice production, lower the freezer and refrigerator temperature. As air is reset. If a softened water supply cannot be only as good as salt) can damage parts of or in the Ice ...
...on, 5 seconds off) until water begins to a water source or replacing the water filter, flush the water system. Remember ■ The quality of your refrigerator does not have a water filter status light, you replace the water filter when the status light changes to a softened water supply. Systems certified for the.... Do not force the wire shutoff arm up the ice in a 24-hour period. ■ To increase ice production, lower the freezer and refrigerator temperature. As air is reset. If a softened water supply cannot be only as good as salt) can damage parts of or in the Ice ...
Owners Manual
Page 10
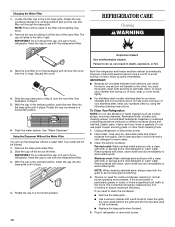
...stainless steel surfaces with the replacement filter. 3. Some spilling may occur. 2. The cap will transfer to avoid buildup of your refrigerator. It is significant pet traffic in normal home operating environments. See illustration in warm water. Do not use abrasive or harsh ... counterclockwise to avoid water spots. Clean the exterior surfaces. Failure to the left or right. Wipe up spills immediately. Both the refrigerator and freezer sections defrost automatically. IMPORTANT: ■ Because air circulates between both sections, any odors formed in Step 2) onto the...
...stainless steel surfaces with the replacement filter. 3. Some spilling may occur. 2. The cap will transfer to avoid buildup of your refrigerator. It is significant pet traffic in normal home operating environments. See illustration in warm water. Do not use abrasive or harsh ... counterclockwise to avoid water spots. Clean the exterior surfaces. Failure to the left or right. Wipe up spills immediately. Both the refrigerator and freezer sections defrost automatically. IMPORTANT: ■ Because air circulates between both sections, any odors formed in Step 2) onto the...
Owners Manual
Page 11
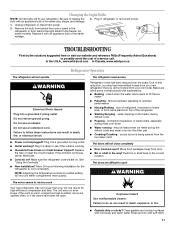
... same size, shape, and wattage. 1. Plug in a lamp to possibly avoid the cost of the refrigerator ■ Sizzling/Gurgling - contraction/expansion of the same wattage. In the U.S.A., www.whirlpool.com In Canada, www.whirlpool.ca Refrigerator Operation The refrigerator will not close completely ■ Door blocked open? Plug into the drain pan ■ Creaking/Cracking...
... same size, shape, and wattage. 1. Plug in a lamp to possibly avoid the cost of the refrigerator ■ Sizzling/Gurgling - contraction/expansion of the same wattage. In the U.S.A., www.whirlpool.com In Canada, www.whirlpool.ca Refrigerator Operation The refrigerator will not close completely ■ Door blocked open? Plug into the drain pan ■ Creaking/Cracking...
Owners Manual
Page 12
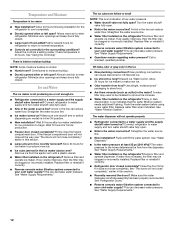
... Contributes to water supply and turn water shutoff valve fully open ? Minimize door openings and keep doors fully closed completely? Connect refrigerator to moisture buildup. ■ Door(s) opened often or left open ? A kink in the line can decrease water pressure. ...ice indicates that the water filtration system needs additional flushing. Straighten the water source line. ■ Water filter installed on the refrigerator? Remove filter and operate ice maker. Replace filter or reinstall it correctly. ■ Reverse osmosis water filtration system connected to ...
... Contributes to water supply and turn water shutoff valve fully open ? Minimize door openings and keep doors fully closed completely? Connect refrigerator to moisture buildup. ■ Door(s) opened often or left open ? A kink in the line can decrease water pressure. ...ice indicates that the water filtration system needs additional flushing. Straighten the water source line. ■ Water filter installed on the refrigerator? Remove filter and operate ice maker. Replace filter or reinstall it correctly. ■ Reverse osmosis water filtration system connected to ...
Owners Manual
Page 13
...under the dispenser long enough? See "Water Supply Requirements." Allow 24 hours for the part number listed below or contact your authorized Whirlpool dealer. Allow 24 hours after releasing the dispenser lever. ■ New installation? Flush the water system. Make sure the water ...dispenser tube connections are fully tightened. The first glass of water. ■ Refrigerator connected to a cold water pipe? Make sure the refrigerator is only chilled to 50°F (10°C). ■ New installation? Flush the water system. In Canada,...
...under the dispenser long enough? See "Water Supply Requirements." Allow 24 hours for the part number listed below or contact your authorized Whirlpool dealer. Allow 24 hours after releasing the dispenser lever. ■ New installation? Flush the water system. Make sure the water ...dispenser tube connections are fully tightened. The first glass of water. ■ Refrigerator connected to a cold water pipe? Make sure the refrigerator is only chilled to 50°F (10°C). ■ New installation? Flush the water system. In Canada,...

Owners Manual
Page 16
...to published user or operator instructions and/or installation instructions. 2. Proof of original purchase date is not installed in accordance with Whirlpool's published installation instructions. 11. Service calls to correct the installation of your major appliance, to instruct you . Pickup and ...was purchased. LIMITATION OF REMEDIES; Please keep these limitations and exclusions may not apply to you on the inside wall of the refrigerator compartment. Some states and provinces do not have been removed, altered or cannot be easily determined. 12. Damage resulting from ...
...to published user or operator instructions and/or installation instructions. 2. Proof of original purchase date is not installed in accordance with Whirlpool's published installation instructions. 11. Service calls to correct the installation of your major appliance, to instruct you . Pickup and ...was purchased. LIMITATION OF REMEDIES; Please keep these limitations and exclusions may not apply to you on the inside wall of the refrigerator compartment. Some states and provinces do not have been removed, altered or cannot be easily determined. 12. Damage resulting from ...
Dimension Guide
Page 1
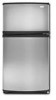
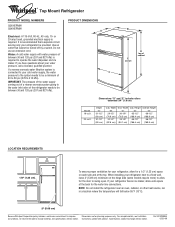
... kPa) is connected to your refrigerator be a minimum of cabinet C Dimensions "D" and "E" include rollers extended 3/4" (1.9 cm) Model 19 cu.ft. 22 cu.ft. IMPORTANT: The pressure of the...pressure of between 30 and 120 psi (207 and 827 kPa). ® Top Mount Refrigerator PRODUCT MODEL NUMBERS G2IXEFMW G9IXEFMW Electrical: A 115-Volt, 60-Hz, AC-only, 15- Width "B" 29-1/2" (74...not install the refrigerator near an oven, radiator, or other heat source, nor in a location where the temperature will fall below 55°F (13°C). 2" (5.08 cm) Because Whirlpool Corporation policy ...
... kPa) is connected to your refrigerator be a minimum of cabinet C Dimensions "D" and "E" include rollers extended 3/4" (1.9 cm) Model 19 cu.ft. 22 cu.ft. IMPORTANT: The pressure of the...pressure of between 30 and 120 psi (207 and 827 kPa). ® Top Mount Refrigerator PRODUCT MODEL NUMBERS G2IXEFMW G9IXEFMW Electrical: A 115-Volt, 60-Hz, AC-only, 15- Width "B" 29-1/2" (74...not install the refrigerator near an oven, radiator, or other heat source, nor in a location where the temperature will fall below 55°F (13°C). 2" (5.08 cm) Because Whirlpool Corporation policy ...
Warranty
Page 1
Proof of original purchase date is reported to Whirlpool within 30 days from the date of purchase. 6. Service calls to refrigerator or freezer product failures. 7. Pickup and delivery. Some states and provinces do not allow the exclusion or limitation...use of merchantability or fitness, so this major appliance is intended to instruct you also may contact Whirlpool at the address below . Discoloration, rust, or oxidation of the refrigerator compartment. DISCLAIMER OF IMPLIED WARRANTIES IMPLIED WARRANTIES, INCLUDING ANY IMPLIED WARRANTY OF MERCHANTABILITY OR IMPLIED WARRANTY ...
Proof of original purchase date is reported to Whirlpool within 30 days from the date of purchase. 6. Service calls to refrigerator or freezer product failures. 7. Pickup and delivery. Some states and provinces do not allow the exclusion or limitation...use of merchantability or fitness, so this major appliance is intended to instruct you also may contact Whirlpool at the address below . Discoloration, rust, or oxidation of the refrigerator compartment. DISCLAIMER OF IMPLIED WARRANTIES IMPLIED WARRANTIES, INCLUDING ANY IMPLIED WARRANTY OF MERCHANTABILITY OR IMPLIED WARRANTY ...
Energy Guide
Page 1
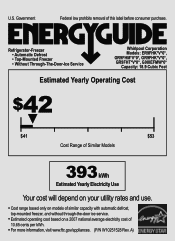
... cents per kWh. • For more information, visit www.ftc.gov/appliances. (P/N W10251528 Rev. U.S. Refrigerator-Freezer • Automatic Defrost • Top-Mounted Freezer • Without Through-The-Door-Ice Service Whirlpool Corporation Models: ER9FHK*V*0*, GR9FHM*V*0*, GR9FHK*V*0*, GR9FHT*V*0*, G9IXEFMW*0* Capacity: 18.9 Cubic Feet Estimated Yearly Operating Cost $42 ▼ $41 $53 Cost Range of...
... cents per kWh. • For more information, visit www.ftc.gov/appliances. (P/N W10251528 Rev. U.S. Refrigerator-Freezer • Automatic Defrost • Top-Mounted Freezer • Without Through-The-Door-Ice Service Whirlpool Corporation Models: ER9FHK*V*0*, GR9FHM*V*0*, GR9FHK*V*0*, GR9FHT*V*0*, G9IXEFMW*0* Capacity: 18.9 Cubic Feet Estimated Yearly Operating Cost $42 ▼ $41 $53 Cost Range of...

