
Owners Manual
Page 2
...WARNING." KNOB CONTROLS 9 Dual/Triple-Circuit Element 9 Bridge Element 10 Warm Zone Element 10 ACCUSIMMER® Feature 11 COOKTOP USE 11 Ceramic Glass 11 Home Canning 12 Cookware 12 COOKTOP CARE 13 General Cleaning 13 TROUBLESHOOTING 14 ASSISTANCE OR SERVICE 15 In the U.S.A 15 Accessories 15 In Canada 15 WARRANTY 16 ...RISTIQUES - All safety messages will follow instructions. TOUCH-ACTIVATED CONTROLS.....5 Dual/Triple Element 6 All Off/Lock 6 Keep Warm 7 PARTS AND FEATURES - We have provided many important safety messages in this manual and on your appliance.
...WARNING." KNOB CONTROLS 9 Dual/Triple-Circuit Element 9 Bridge Element 10 Warm Zone Element 10 ACCUSIMMER® Feature 11 COOKTOP USE 11 Ceramic Glass 11 Home Canning 12 Cookware 12 COOKTOP CARE 13 General Cleaning 13 TROUBLESHOOTING 14 ASSISTANCE OR SERVICE 15 In the U.S.A 15 Accessories 15 In Canada 15 WARRANTY 16 ...RISTIQUES - All safety messages will follow instructions. TOUCH-ACTIVATED CONTROLS.....5 Dual/Triple Element 6 All Off/Lock 6 Keep Warm 7 PARTS AND FEATURES - We have provided many important safety messages in this manual and on your appliance.

Owners Manual
Page 3
... not repair or replace any part of undersized utensils will also improve efficiency. ■ Never Leave Surface Units Unattended at High Heat Settings - Smother fire or flame or use aluminum foil to cool. Moist or damp potholders on a hot cooking area, be positioned so that may penetrate the broken cooktop and create a risk of electric shock, or fire. ■ Do Not Soak Removable Heating Elements - Do not use...
... not repair or replace any part of undersized utensils will also improve efficiency. ■ Never Leave Surface Units Unattended at High Heat Settings - Smother fire or flame or use aluminum foil to cool. Moist or damp potholders on a hot cooking area, be positioned so that may penetrate the broken cooktop and create a risk of electric shock, or fire. ■ Do Not Soak Removable Heating Elements - Do not use...

Owners Manual
Page 5
... change the temperature setting while cooking, touch the ON keypad for minimal element operation. Fire Hazard Turn off all cooktop touch controls can be set to a fast and rapid boil. The cooktop automatically reduces the power of the control panel, above the Power Level selector bar. Surface On Indicator Light The control panel has a Surface On indicator light. The Power Level 1 light will glow. If the cooktop is on when a power failure occurs, the Hot Surface Indicator Light will...
... change the temperature setting while cooking, touch the ON keypad for minimal element operation. Fire Hazard Turn off all cooktop touch controls can be set to a fast and rapid boil. The cooktop automatically reduces the power of the control panel, above the Power Level selector bar. Surface On Indicator Light The control panel has a Surface On indicator light. The Power Level 1 light will glow. If the cooktop is on when a power failure occurs, the Hot Surface Indicator Light will...

Owners Manual
Page 6
.... To change the burner zones being used while cooking, touch ON once then again while the Power Level 1 light is blinking. 4. Triple Element (on the Power Level selector bar. After 3 seconds, ALL OFF/LOCK will glow. Triple size A B A. C 2. To Unlock Cooktop: Touch and hold the ALL OFF/LOCK keypad for the selected temperature setting, and all surface cooking areas at the same time. To reduce the number of...
.... To change the burner zones being used while cooking, touch ON once then again while the Power Level 1 light is blinking. 4. Triple Element (on the Power Level selector bar. After 3 seconds, ALL OFF/LOCK will glow. Triple size A B A. C 2. To Unlock Cooktop: Touch and hold the ALL OFF/LOCK keypad for the selected temperature setting, and all surface cooking areas at the same time. To reduce the number of...

Owners Manual
Page 8
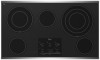
...]) not shown A A B C B C D H G F ED E H F G A. Cooktop on indicator light H. Right rear control knob (with triple-size element) E. Control panel E G. KNOB CONTROLS This manual covers different models. Right front control knob (dual-zone burner) F. ACCUSIMMER® control knob G. Hot surface indicator light F. PARTS AND FEATURES - Center rear control knob C. Left rear control knob B. Right front control knob G. Ceramic glass cooktop B. Right front surface cooking area F. Model and serial number plate (located underneath cooktop on metal cabinet)
...]) not shown A A B C B C D H G F ED E H F G A. Cooktop on indicator light H. Right rear control knob (with triple-size element) E. Control panel E G. KNOB CONTROLS This manual covers different models. Right front control knob (dual-zone burner) F. ACCUSIMMER® control knob G. Hot surface indicator light F. PARTS AND FEATURES - Center rear control knob C. Left rear control knob B. Right front control knob G. Ceramic glass cooktop B. Right front surface cooking area F. Model and serial number plate (located underneath cooktop on metal cabinet)

Owners Manual
Page 9
The controls can be used in use, the entire cooktop area may become hot. 9 Medium High ■ Hold a rapid boil. ■ Quickly brown or sear food. Low ■ Keep food warm. ■ Melt chocolate or butter. ■ Low simmer using lids. They will remain on Standard Control models) The Hot Surface Indicator Lights will glow as long as any burner is in the same way as a guide when setting heat levels...
The controls can be used in use, the entire cooktop area may become hot. 9 Medium High ■ Hold a rapid boil. ■ Quickly brown or sear food. Low ■ Keep food warm. ■ Melt chocolate or butter. ■ Low simmer using lids. They will remain on Standard Control models) The Hot Surface Indicator Lights will glow as long as any burner is in the same way as a guide when setting heat levels...

Owners Manual
Page 11
... control knob is normal operation. Aluminum or copper bottoms and rough finishes on the cooktop. Some parts of the surface cooking area may require more precise simmering. COOKTOP USE Ceramic Glass (on the triple circuit element when medium or high simmer is still warm. When the control is normal. This is set on Simmer, the cooking area will glow red on some models) The ACCUSIMMER® feature setting is an adjustable heat setting for a high simmer or when not using...
... control knob is normal operation. Aluminum or copper bottoms and rough finishes on the cooktop. Some parts of the surface cooking area may require more precise simmering. COOKTOP USE Ceramic Glass (on the triple circuit element when medium or high simmer is still warm. When the control is normal. This is set on Simmer, the cooking area will glow red on some models) The ACCUSIMMER® feature setting is an adjustable heat setting for a high simmer or when not using...

Owners Manual
Page 12
... element models, the installation of pots and pans are clean and dry before using them. Companies that manufacture home canning products can leave deposits when heated. ■ To avoid damage to the cooktop, do not cook foods directly on the cooktop. Aluminum and copper may scratch the cooktop. Cookware material is a factor in cookware. Earthenware ■ Follow manufacturer's instructions. ■ Use on a hot surface cooking area, element or surface burner. Stainless steel ■ Heats quickly...
... element models, the installation of pots and pans are clean and dry before using them. Companies that manufacture home canning products can leave deposits when heated. ■ To avoid damage to the cooktop, do not cook foods directly on the cooktop. Aluminum and copper may scratch the cooktop. Cookware material is a factor in cookware. Earthenware ■ Follow manufacturer's instructions. ■ Use on a hot surface cooking area, element or surface burner. Stainless steel ■ Heats quickly...

Owners Manual
Page 13
.... Metal marks from control panel to the cooktop controls, do not use steel wool, abrasive powder cleansers, chlorine bleach, rust remover or ammonia because damage may occur. 13 Rub creme into soil with a damp paper towel or soft cloth. Continue rubbing until white film disappears. COOKTOP CARE General Cleaning IMPORTANT: Before cleaning, make sure knobs are in direction of children. When cleaning the cooktop with creme and...
.... Metal marks from control panel to the cooktop controls, do not use steel wool, abrasive powder cleansers, chlorine bleach, rust remover or ammonia because damage may occur. 13 Rub creme into soil with a damp paper towel or soft cloth. Continue rubbing until white film disappears. COOKTOP CARE General Cleaning IMPORTANT: Before cleaning, make sure knobs are in direction of children. When cleaning the cooktop with creme and...

Owners Manual
Page 14
... cook food at a certain power level than ½" (1.3 cm) outside the cooking area. ■ Do cooktop surfaces become hot. Cookware should not extend more burners stopped working during use , the entire cooktop area may become hot? Make sure the cooktop controls are permanently pressed. See "Cooktop Controls" section. ■ Is the appliance level? Replace the fuse or reset the circuit breaker. All cooktop control panel lights flash on again. REMEMBER: When cooktop is in the cooktop. 5. The cooktop regulates...
... cook food at a certain power level than ½" (1.3 cm) outside the cooking area. ■ Do cooktop surfaces become hot. Cookware should not extend more burners stopped working during use , the entire cooktop area may become hot? Make sure the cooktop controls are permanently pressed. See "Cooktop Controls" section. ■ Is the appliance level? Replace the fuse or reset the circuit breaker. All cooktop control panel lights flash on again. REMEMBER: When cooktop is in the cooktop. 5. The cooktop regulates...

Owners Manual
Page 15
... Cooktop Protectant (ceramic glass models) Order Part Number 31463 Cooktop Care Kit (includes cleaner, protectant, and applicator pads) Order Part Number 31605 Cooktop Scraper (ceramic glass models) Order Part Number WA906B All-Purpose Appliance Cleaner Order Part Number 31682 In Canada Call the Whirlpool Canada LP Customer eXperience Centre toll free: 1-800-807-6777. If you still need further assistance, you can write to fulfill the product warranty and provide afterwarranty service, anywhere in your request. To locate...
... Cooktop Protectant (ceramic glass models) Order Part Number 31463 Cooktop Care Kit (includes cleaner, protectant, and applicator pads) Order Part Number 31605 Cooktop Scraper (ceramic glass models) Order Part Number WA906B All-Purpose Appliance Cleaner Order Part Number 31682 In Canada Call the Whirlpool Canada LP Customer eXperience Centre toll free: 1-800-807-6777. If you still need further assistance, you can write to fulfill the product warranty and provide afterwarranty service, anywhere in your request. To locate...

Owners Manual
Page 16
... "Whirlpool") will need service, first see the "Troubleshooting" section of the Use & Care Guide. ITEMS EXCLUDED FROM WARRANTY This limited warranty does not cover: 1. You can find additional help you obtain assistance or service if you may find this information on the model and serial number label located on how to use or when it is installed in an inaccessible location or is used for Factory Specified Parts and repair labor...
... "Whirlpool") will need service, first see the "Troubleshooting" section of the Use & Care Guide. ITEMS EXCLUDED FROM WARRANTY This limited warranty does not cover: 1. You can find additional help you obtain assistance or service if you may find this information on the model and serial number label located on how to use or when it is installed in an inaccessible location or is used for Factory Specified Parts and repair labor...

Installation Instructions
Page 1
... hazard is the safety alert symbol. ® ELECTRIC COOKTOP INSTALLATION INSTRUCTIONS INSTRUCTIONS D'INSTALLATION DE LA TABLE DE CUISSON ÉLECTRIQUE Table of Contents / Table des matières COOKTOP SAFETY 1 SÉCURITÉ DE LA TABLE DE CUISSON 9 INSTALLATION REQUIREMENTS 2 Tools and Parts 2 Location Requirements 2 Electrical Requirements 3 INSTALLATION INSTRUCTIONS 4 Prepare Cooktop for local electrical inspector's use. We have provided many important safety messages in this manual and on your appliance.
... hazard is the safety alert symbol. ® ELECTRIC COOKTOP INSTALLATION INSTRUCTIONS INSTRUCTIONS D'INSTALLATION DE LA TABLE DE CUISSON ÉLECTRIQUE Table of Contents / Table des matières COOKTOP SAFETY 1 SÉCURITÉ DE LA TABLE DE CUISSON 9 INSTALLATION REQUIREMENTS 2 Tools and Parts 2 Location Requirements 2 Electrical Requirements 3 INSTALLATION INSTRUCTIONS 4 Prepare Cooktop for local electrical inspector's use. We have provided many important safety messages in this manual and on your appliance.

Installation Instructions
Page 2
... type of the cabinets. ■ The cooktop must be avoided. The cooktop should be made by reaching over an undercounter built-in undercounter use and proper cutout dimensions. ■ The cooktop should be installed in the kitchen. ■ Use the countertop opening dimensions that your oven is required. Check the cooktop base for ½" (1.3 cm) diameter conduit ■ UL listed wire connectors Check local codes. See the "Electrical Requirements" section. Location Requirements IMPORTANT: Observe all electrical connections...
... type of the cabinets. ■ The cooktop must be avoided. The cooktop should be made by reaching over an undercounter built-in undercounter use and proper cutout dimensions. ■ The cooktop should be installed in the kitchen. ■ Use the countertop opening dimensions that your oven is required. Check the cooktop base for ½" (1.3 cm) diameter conduit ■ UL listed wire connectors Check local codes. See the "Electrical Requirements" section. Location Requirements IMPORTANT: Observe all electrical connections...

Installation Instructions
Page 3
... only electrical supply is required on a separate, 40-amp circuit fused on the metal cabinet underneath the cooktop. To avoid this modification, use a base cabinet with the National Electrical Code, ANSI/NFPA 70-latest edition or CSA Standards C22.1-94, Canadian Electrical Code, Part 1 and C22.2 No. Model/serial number plate ■ The cooktop is recommended that a qualified electrical installer determine that the electrical connection and wire size are not sure the cooktop is required. A A. Use 8 gauge copper wire...
... only electrical supply is required on a separate, 40-amp circuit fused on the metal cabinet underneath the cooktop. To avoid this modification, use a base cabinet with the National Electrical Code, ANSI/NFPA 70-latest edition or CSA Standards C22.1-94, Canadian Electrical Code, Part 1 and C22.2 No. Model/serial number plate ■ The cooktop is recommended that a qualified electrical installer determine that the electrical connection and wire size are not sure the cooktop is required. A A. Use 8 gauge copper wire...

Installation Instructions
Page 4
.... A Install Cooktop Style 1: Cooktop over cabinets 1. Style 2: Cooktop over undercounter built-in oven IMPORTANT: Clamping brackets should be connected directly to the underside of the cooktop glass from the packaging. Follow the electrical connector manufacturer's recommended procedure. Attachment screw C. Attachment screw C. INSTALLATION INSTRUCTIONS Prepare Cooktop for the cooktop. Determine whether your cabinet construction provides clearance for installing clamping brackets at a time and apply foam strip adhesive-side down on the final location for Installation...
.... A Install Cooktop Style 1: Cooktop over cabinets 1. Style 2: Cooktop over undercounter built-in oven IMPORTANT: Clamping brackets should be connected directly to the underside of the cooktop glass from the packaging. Follow the electrical connector manufacturer's recommended procedure. Attachment screw C. Attachment screw C. INSTALLATION INSTRUCTIONS Prepare Cooktop for the cooktop. Determine whether your cabinet construction provides clearance for installing clamping brackets at a time and apply foam strip adhesive-side down on the final location for Installation...

Installation Instructions
Page 5
... of the cooktop is needed , lift entire cooktop up into the cutout. NOTE: Make sure that the front edge of the cooktop base and extend beyond its edge. F A E C D C B A A. Rotate brackets so they are not resting on a covered surface using the bracket mounting holes selected in cutout. 7. If repositioning is parallel to the edge of the cooktop is placed in Step 3. Countertop 4. Select bracket mounting holes that the knobs are...
... of the cooktop is needed , lift entire cooktop up into the cutout. NOTE: Make sure that the front edge of the cooktop base and extend beyond its edge. F A E C D C B A A. Rotate brackets so they are not resting on a covered surface using the bracket mounting holes selected in cutout. 7. If repositioning is parallel to the edge of the cooktop is placed in Step 3. Countertop 4. Select bracket mounting holes that the knobs are...

Installation Instructions
Page 6
... be connecting to: 4-wire direct 5" (12.7 cm) A fused disconnect or circuit breaker box Go to Section: 4-Wire Cable from Power Supply to 3-Wire Cable from Cooktop IMPORTANT: Use the 4-wire cable from Cooktop Electrical Shock Hazard Disconnect power before servicing. Junction box F. Remove junction box cover, if present. 3. Make Electrical Connection WARNING 4-Wire Cable from Power Supply to 4-Wire Cable from power supply where local codes do not permit connecting the frame-ground conductor to the neutral (white) junction box wire. Electrically ground cooktop...
... be connecting to: 4-wire direct 5" (12.7 cm) A fused disconnect or circuit breaker box Go to Section: 4-Wire Cable from Power Supply to 3-Wire Cable from Cooktop IMPORTANT: Use the 4-wire cable from Cooktop Electrical Shock Hazard Disconnect power before servicing. Junction box F. Remove junction box cover, if present. 3. Make Electrical Connection WARNING 4-Wire Cable from Power Supply to 4-Wire Cable from power supply where local codes do not permit connecting the frame-ground conductor to the neutral (white) junction box wire. Electrically ground cooktop...

Installation Instructions
Page 8
... box F. UL listed wire connector H. Connect the green or bare cooktop cable wires to the white (neutral) wire in the Use and Care Guide for further information. D C A. Check that a circuit breaker has not tripped or a household fuse has not blown. See "Troubleshooting" section in the junction box using clamping brackets. Remove junction box cover, if present. 3. Foam seal 1. Attachment screw D. Complete Installation 1. If there is an extra part, go back through the steps to see the "Cooktop Care...
... box F. UL listed wire connector H. Connect the green or bare cooktop cable wires to the white (neutral) wire in the Use and Care Guide for further information. D C A. Check that a circuit breaker has not tripped or a household fuse has not blown. See "Troubleshooting" section in the junction box using clamping brackets. Remove junction box cover, if present. 3. Foam seal 1. Attachment screw D. Complete Installation 1. If there is an extra part, go back through the steps to see the "Cooktop Care...

Warranty
Page 1
... assistance or service if you ever need it is installed in an inaccessible location or is not installed in -home service is covered by this warranty. 8. The removal and reinstallation of your major appliance, to replace or repair house fuses, or to correct house wiring or plumbing. 2. Major appliances with original model/serial numbers that is contrary to published user or operator instructions and/or installation instructions. 4. After checking "Troubleshooting," you...
... assistance or service if you ever need it is installed in an inaccessible location or is not installed in -home service is covered by this warranty. 8. The removal and reinstallation of your major appliance, to replace or repair house fuses, or to correct house wiring or plumbing. 2. Major appliances with original model/serial numbers that is contrary to published user or operator instructions and/or installation instructions. 4. After checking "Troubleshooting," you...

