

Owners Manual
Page 3
...surface units or areas near surface units. ■ Do Not Use Water on a hot cooking area, be seriously injured. ■ Proper Installation - Absence of these liners may be worn while using the cooktop, follow basic precautions, including the following: ■ CAUTION: Do not ...Utensil Handles Should Be Turned Inward and Not Extend Over Adjacent Surface Units - Boilover causes smoking and greasy spillovers that it is properly installed and grounded by a qualified technician. ■ Never Use Your Cooktop for cooktop service without breaking due to the sudden change in color...
...surface units or areas near surface units. ■ Do Not Use Water on a hot cooking area, be seriously injured. ■ Proper Installation - Absence of these liners may be worn while using the cooktop, follow basic precautions, including the following: ■ CAUTION: Do not ...Utensil Handles Should Be Turned Inward and Not Extend Over Adjacent Surface Units - Boilover causes smoking and greasy spillovers that it is properly installed and grounded by a qualified technician. ■ Never Use Your Cooktop for cooktop service without breaking due to the sudden change in color...

Owners Manual
Page 12
...tasks. On electric cooktops, canners should not extend more than ½" (1.3 cm) outside the area. If a kit is not installed, the life of the coil element will take on how to -heavy thickness. Porcelain enamel-onsteel or cast iron ■ See stainless.... B A C A. See "Assistance or Service" for long periods, alternate the use only flat-bottomed canners. ■ On coil element models, the installation of cooking. ■ Medium or heavy thickness is recommended. Ceramic or Ceramic glass ■ Follow manufacturer's instructions. ■ Heats slowly, but unevenly. ...
...tasks. On electric cooktops, canners should not extend more than ½" (1.3 cm) outside the area. If a kit is not installed, the life of the coil element will take on how to -heavy thickness. Porcelain enamel-onsteel or cast iron ■ See stainless.... B A C A. See "Assistance or Service" for long periods, alternate the use only flat-bottomed canners. ■ On coil element models, the installation of cooking. ■ Medium or heavy thickness is recommended. Ceramic or Ceramic glass ■ Follow manufacturer's instructions. ■ Heats slowly, but unevenly. ...

Owners Manual
Page 14
... cooking results not what expected ■ Is the proper cookware being used? See "Cooktop Controls" section. ■ Is the appliance level? See the Installation Instructions. ■ Does it appear to take longer to cook food at a certain power level than ½" (1.3 cm) outside the cooking area. ...? Cooktop has flashing lights ■ Are the lights on the cooktop flashing on cooktop ■ Is the cookware the proper size? See Installation Instructions. Wipe debris from the control panel surface. ■ Has one or more keys are OFF. 2. Use cookware about the same size...
... cooking results not what expected ■ Is the proper cookware being used? See "Cooktop Controls" section. ■ Is the appliance level? See the Installation Instructions. ■ Does it appear to take longer to cook food at a certain power level than ½" (1.3 cm) outside the cooking area. ...? Cooktop has flashing lights ■ Are the lights on the cooktop flashing on cooktop ■ Is the cookware the proper size? See Installation Instructions. Wipe debris from the control panel surface. ■ Has one or more keys are OFF. 2. Use cookware about the same size...

Owners Manual
Page 15
.... In the U.S.A. Our consultants provide assistance with : ■ Features and specifications on our full line of appliances. ■ Installation information. ■ Use and maintenance procedures. ■ Accessory and repair parts sales. ■ Specialized customer assistance (Spanish speaking,... hearing impaired, limited vision, etc.). ■ Referrals to your telephone directory Yellow Pages. Whirlpool Canada LP designated service technicians are trained to fulfill the product warranty and provide afterwarranty service, anywhere in your area...
.... In the U.S.A. Our consultants provide assistance with : ■ Features and specifications on our full line of appliances. ■ Installation information. ■ Use and maintenance procedures. ■ Accessory and repair parts sales. ■ Specialized customer assistance (Spanish speaking,... hearing impaired, limited vision, etc.). ■ Referrals to your telephone directory Yellow Pages. Whirlpool Canada LP designated service technicians are trained to fulfill the product warranty and provide afterwarranty service, anywhere in your area...

Owners Manual
Page 16
... when your major appliance if it was purchased. The removal and reinstallation of purchase or installation date for other damage to the finish of your authorized Whirlpool dealer to repair or replace appliance light bulbs, air filters or water filters. DISCLAIMER OF...AS PROVIDED HEREIN. Damage resulting from accident, alteration, misuse, abuse, fire, flood, acts of God, improper installation, installation not in a remote area where service by Whirlpool. 5. IMPLIED WARRANTIES, INCLUDING WARRANTIES OF MERCHANTABILITY OR FITNESS FOR A PARTICULAR PURPOSE, ARE LIMITED TO ONE YEAR...
... when your major appliance if it was purchased. The removal and reinstallation of purchase or installation date for other damage to the finish of your authorized Whirlpool dealer to repair or replace appliance light bulbs, air filters or water filters. DISCLAIMER OF...AS PROVIDED HEREIN. Damage resulting from accident, alteration, misuse, abuse, fire, flood, acts of God, improper installation, installation not in a remote area where service by Whirlpool. 5. IMPLIED WARRANTIES, INCLUDING WARRANTIES OF MERCHANTABILITY OR FITNESS FOR A PARTICULAR PURPOSE, ARE LIMITED TO ONE YEAR...

Installation Instructions
Page 1
...WARNING You can kill or hurt you don't follow instructions. IMPORTANT : À conserver pour consultation par l'inspecteur local des installations électriques. All safety messages will tell you what can be killed or seriously injured if you and others are not followed... messages in this manual and on your appliance. Always read and obey all safety messages. W10346695A ® ELECTRIC COOKTOP INSTALLATION INSTRUCTIONS INSTRUCTIONS D'INSTALLATION DE LA TABLE DE CUISSON ÉLECTRIQUE Table of Contents / Table des matières COOKTOP SAFETY 1 SÉCURIT...
...WARNING You can kill or hurt you don't follow instructions. IMPORTANT : À conserver pour consultation par l'inspecteur local des installations électriques. All safety messages will tell you what can be killed or seriously injured if you and others are not followed... messages in this manual and on your appliance. Always read and obey all safety messages. W10346695A ® ELECTRIC COOKTOP INSTALLATION INSTRUCTIONS INSTRUCTIONS D'INSTALLATION DE LA TABLE DE CUISSON ÉLECTRIQUE Table of Contents / Table des matières COOKTOP SAFETY 1 SÉCURIT...

Installation Instructions
Page 2
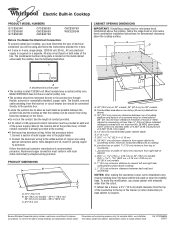
... ■ Foam strip roll ■ Clamping brackets (2) ■ 2½" (6.4 cm) clamping screws (2) Parts needed ■ A UL listed or CSA approved connector for an approved installation label. Product Dimensions B A C A. 21¾" (55.2 cm) B. 30" (76.2 cm) models - 30 78.4 cm) 36" (91.4 cm) models - 36 ... Requirements IMPORTANT: Observe all electrical connections be located for convenient use and proper cutout dimensions. ■ The cooktop should be installed in a level countertop. ■ Ovens approved for built-in undercounter use in oven. If you do not find this ...
... ■ Foam strip roll ■ Clamping brackets (2) ■ 2½" (6.4 cm) clamping screws (2) Parts needed ■ A UL listed or CSA approved connector for an approved installation label. Product Dimensions B A C A. 21¾" (55.2 cm) B. 30" (76.2 cm) models - 30 78.4 cm) 36" (91.4 cm) models - 36 ... Requirements IMPORTANT: Observe all electrical connections be located for convenient use and proper cutout dimensions. ■ The cooktop should be installed in a level countertop. ■ Ovens approved for built-in undercounter use in oven. If you do not find this ...

Installation Instructions
Page 3
..., MA 02269 CSA International 8501 East Pleasant Valley Road Cleveland, OH 44131-5575 Before You Make the Electrical Connection: To properly install your cooktop, you must determine the type of electrical connection you are in accordance with local codes. Junction box or outlet: ...the cooktop base. O-M91-latest edition, and all local codes and ordinances. See the following illustration. Cabinet Dimensions IMPORTANT: If installing a range hood or microwave hood combination above the cooktop, follow the instructions provided for dimensional clearances above code standards can result in...
..., MA 02269 CSA International 8501 East Pleasant Valley Road Cleveland, OH 44131-5575 Before You Make the Electrical Connection: To properly install your cooktop, you must determine the type of electrical connection you are in accordance with local codes. Junction box or outlet: ...the cooktop base. O-M91-latest edition, and all local codes and ordinances. See the following illustration. Cabinet Dimensions IMPORTANT: If installing a range hood or microwave hood combination above the cooktop, follow the instructions provided for dimensional clearances above code standards can result in...

Installation Instructions
Page 4
... the cooktop so that the cooktop can be moved if servicing becomes necessary in oven IMPORTANT: Clamping brackets should not be installed before or after the cooktop is parallel to avoid scratching the countertop. Avoid drilling into the cutout. Determine whether your cabinet... the option you choose. 4 Attachment screw C. A listed conduit connector is needed, lift entire cooktop up into or severing existing wiring during installation. 1. Remove foam strip roll from the packaging. Cooktop A. ■ The cooktop should be provided at each end of the power supply cable...
... the cooktop so that the cooktop can be moved if servicing becomes necessary in oven IMPORTANT: Clamping brackets should not be installed before or after the cooktop is parallel to avoid scratching the countertop. Avoid drilling into the cutout. Determine whether your cabinet... the option you choose. 4 Attachment screw C. A listed conduit connector is needed, lift entire cooktop up into or severing existing wiring during installation. 1. Remove foam strip roll from the packaging. Cooktop A. ■ The cooktop should be provided at each end of the power supply cable...

Installation Instructions
Page 5
...the bracket to extend far enough out from the bottom of clamping screws) E. 2½" (6.4 cm) clamping screw (to be installed in cutout. Installing Brackets After Placing Cooktop in Cutout 1. Edge of cooktop base. 6. Bracket mounting holes D. Rotate brackets so they are not resting... bracket locations from the cooktop for illustration of the countertop. Attachment screw 4. If repositioning is parallel to Countertop" section for the installation of 2½" (6.4 cm) clamping screws. Loosen the screws and rotate the brackets so that will allow the bracket to Countertop")...
...the bracket to extend far enough out from the bottom of clamping screws) E. 2½" (6.4 cm) clamping screw (to be installed in cutout. Installing Brackets After Placing Cooktop in Cutout 1. Edge of cooktop base. 6. Bracket mounting holes D. Rotate brackets so they are not resting... bracket locations from the cooktop for illustration of the countertop. Attachment screw 4. If repositioning is parallel to Countertop" section for the installation of 2½" (6.4 cm) clamping screws. Loosen the screws and rotate the brackets so that will allow the bracket to Countertop")...

Installation Instructions
Page 6
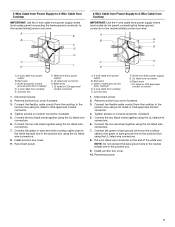
... cover, if present. 3. Red wires I A. 4-wire cable from cooktop E. Connect the green or bare ground wire from Cooktop Electrical Shock Hazard Disconnect power before servicing. Install junction box cover. 10. Electrically ground cooktop. Disconnect power. 2.
... cover, if present. 3. Red wires I A. 4-wire cable from cooktop E. Connect the green or bare ground wire from Cooktop Electrical Shock Hazard Disconnect power before servicing. Install junction box cover. 10. Electrically ground cooktop. Disconnect power. 2.
Installation Instructions
Page 7
... wire. Red wires C. Green or bare ground wire (from cooktop) D. 3-wire cable from power supply B. Tighten screws on conduit connector, if present. 5. Install junction box cover. 10. Red wires C. Install junction box cover. 9. UL listed or CSA approved conduit connector 1. 3-Wire Cable from Power Supply to 4-Wire Cable from Cooktop IMPORTANT: Use...
... wire. Red wires C. Green or bare ground wire (from cooktop) D. 3-wire cable from power supply B. Tighten screws on conduit connector, if present. 5. Install junction box cover. 10. Red wires C. Install junction box cover. 9. UL listed or CSA approved conduit connector 1. 3-Wire Cable from Power Supply to 4-Wire Cable from Cooktop IMPORTANT: Use...

Installation Instructions
Page 8
...wires together using the UL listed wire connectors. 6. Reconnect power. Glass cooktop B. Clamping bracket (extends far enough beyond cooktop base to allow installation of the Use and Care Guide. 5. Place the 2½" (6.4 cm) clamping screws into the outermost hole in the junction box using... the UL listed wire connectors. 8. Check that you are now installed. If there is an extra part, go back through the steps to the junction box using clamping brackets. Check that all packaging materials. 4....
...wires together using the UL listed wire connectors. 6. Reconnect power. Glass cooktop B. Clamping bracket (extends far enough beyond cooktop base to allow installation of the Use and Care Guide. 5. Place the 2½" (6.4 cm) clamping screws into the outermost hole in the junction box using... the UL listed wire connectors. 8. Check that you are now installed. If there is an extra part, go back through the steps to the junction box using clamping brackets. Check that all packaging materials. 4....

Warranty
Page 1
... numbers that is contrary to published user or operator instructions and/or installation instructions. 4. This warranty is void if the factory applied serial number has been altered or removed from your authorized Whirlpool dealer to determine if another warranty applies. LIMITATION OF REMEDIES CUSTOMER'S ...your home of your sales slip together for repairs. Proof of original purchase date is not installed in a manner that have been removed, altered or cannot be borne by calling Whirlpool. This major appliance is designed to be provided by this warranty. 8. The removal and ...
... numbers that is contrary to published user or operator instructions and/or installation instructions. 4. This warranty is void if the factory applied serial number has been altered or removed from your authorized Whirlpool dealer to determine if another warranty applies. LIMITATION OF REMEDIES CUSTOMER'S ...your home of your sales slip together for repairs. Proof of original purchase date is not installed in a manner that have been removed, altered or cannot be borne by calling Whirlpool. This major appliance is designed to be provided by this warranty. 8. The removal and ...
Dimension Guide
Page 1
...to improve Dimensions are for dimensional clearances above the cooktop, follow the procedure below: 1. For complete details, see Installation our products, we reserve the right to the junction box. Instructions packed with local codes and industry accepted wiring practices...Make the Electrical Connection: To properly install your cooktop, you will be provided at the cooktop. CABINET OPENING DIMENSIONS IMPORTANT: If installing a range hood or microwave hood combination above the cooktop surface. Because Whirlpool Corporation policy includes a continuous commitment ...
...to improve Dimensions are for dimensional clearances above the cooktop, follow the procedure below: 1. For complete details, see Installation our products, we reserve the right to the junction box. Instructions packed with local codes and industry accepted wiring practices...Make the Electrical Connection: To properly install your cooktop, you will be provided at the cooktop. CABINET OPENING DIMENSIONS IMPORTANT: If installing a range hood or microwave hood combination above the cooktop surface. Because Whirlpool Corporation policy includes a continuous commitment ...

