
Owners Manual
Page 2
...will tell you what can be killed or seriously injured if you and others are not followed. 2 TOUCH-ACTIVATED CONTROLS ...4 COOKTOP CONTROLS - KNOB CONTROLS 8 COOKTOP CONTROLS - This is , tell you how to potential hazards that can be killed or seriously injured if you what the...All safety messages will follow instructions. We have provided many important safety messages in this manual and on your appliance. TABLE OF CONTENTS COOKTOP SAFETY 2 PARTS AND FEATURES - COMMANDES TACTILES 19 COMMANDES DE LA TABLE DE CUISSON - COMMANDES TACTILES 20 Éléments double/...
...will tell you what can be killed or seriously injured if you and others are not followed. 2 TOUCH-ACTIVATED CONTROLS ...4 COOKTOP CONTROLS - KNOB CONTROLS 8 COOKTOP CONTROLS - This is , tell you how to potential hazards that can be killed or seriously injured if you what the...All safety messages will follow instructions. We have provided many important safety messages in this manual and on your appliance. TABLE OF CONTENTS COOKTOP SAFETY 2 PARTS AND FEATURES - COMMANDES TACTILES 19 COMMANDES DE LA TABLE DE CUISSON - COMMANDES TACTILES 20 Éléments double/...

Owners Manual
Page 3
...to accumulate on hood or filter. ■ When flaming foods under the hood, turn the fan on any part of the cooktop unless specifically recommended in use of undersized utensils will also improve efficiency. ■ Never Leave Surface Units Unattended at High Heat Settings... Liners - Only certain types of glass, glass/ceramic, ceramic, earthenware, or other servicing should not be immersed in cabinets above a cooktop - Heating elements should break, cleaning solutions and spillovers may result in temperature. ■ Utensil Handles Should Be Turned Inward and Not Extend...
...to accumulate on hood or filter. ■ When flaming foods under the hood, turn the fan on any part of the cooktop unless specifically recommended in use of undersized utensils will also improve efficiency. ■ Never Leave Surface Units Unattended at High Heat Settings... Liners - Only certain types of glass, glass/ceramic, ceramic, earthenware, or other servicing should not be immersed in cabinets above a cooktop - Heating elements should break, cleaning solutions and spillovers may result in temperature. ■ Utensil Handles Should Be Turned Inward and Not Extend...

Owners Manual
Page 4
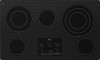
... control (dual-size element) F. Center rear touch control D. Right front touch control G. Model and serial number plate (located underneath cooktop on metal cabinet) Control Panels Model G9CE3065 (30" [77.1 cm]), G9CE3074 (30" [77.1 cm]) not shown Touch-Activated ...B CD AB C DE J E J F HG F I . Right rear touch control E. Control lock indicator G. Right rear touch control (dual/triple-size element) Cooktop 30" (78.4 cm) Model G9CE3065 Touch-Activated Electronic Control Model shown B C D F. Control lock indicator H. All off (hold 3 seconds) I. Control panel E...
... control (dual-size element) F. Center rear touch control D. Right front touch control G. Model and serial number plate (located underneath cooktop on metal cabinet) Control Panels Model G9CE3065 (30" [77.1 cm]), G9CE3074 (30" [77.1 cm]) not shown Touch-Activated ...B CD AB C DE J E J F HG F I . Right rear touch control E. Control lock indicator G. Right rear touch control (dual/triple-size element) Cooktop 30" (78.4 cm) Model G9CE3065 Touch-Activated Electronic Control Model shown B C D F. Control lock indicator H. All off (hold 3 seconds) I. Control panel E...

Owners Manual
Page 5
... desired element and select a new Power Level temperature on the Power Level selector bar. To resume optimal cooking performance, allow the cooktop to turn off all the elements in death or fire. For maximum element operation, all lower temperatures will sound each time a ... Melt chocolate and butter Dual/Triple Elements ■ Large-diameter cookware. ■ Large quantities of heat settings for minimal element operation. If the cooktop is on up to Power Level 1 for optimal cooking results. The electronic touch controls offer a variety of food. ■ Home canning. ...
... desired element and select a new Power Level temperature on the Power Level selector bar. To resume optimal cooking performance, allow the cooktop to turn off all the elements in death or fire. For maximum element operation, all lower temperatures will sound each time a ... Melt chocolate and butter Dual/Triple Elements ■ Large-diameter cookware. ■ Large quantities of heat settings for minimal element operation. If the cooktop is on up to Power Level 1 for optimal cooking results. The electronic touch controls offer a variety of food. ■ Home canning. ...

Owners Manual
Page 6
... time. NOTE: If a power level setting is not selected within approximately 10 seconds, the element will use 1,2, or 3 zones respectively. To Lock Cooktop: Touch and hold the ALL OFF/LOCK keypad for 3 seconds. A B A. Dual element light B. Dual/Triple Element The dual and triple elements ... then again while the Power Level 1 light is touched. Triple size A B A. While the Power Level 1 light is blinking. When the cooktop is touched, all lower temperatures, will be turned on the Power Level selector bar. Triple element light C. When ON is locked out, the ...
... time. NOTE: If a power level setting is not selected within approximately 10 seconds, the element will use 1,2, or 3 zones respectively. To Lock Cooktop: Touch and hold the ALL OFF/LOCK keypad for 3 seconds. A B A. Dual element light B. Dual/Triple Element The dual and triple elements ... then again while the Power Level 1 light is touched. Triple size A B A. While the Power Level 1 light is blinking. When the cooktop is touched, all lower temperatures, will be turned on the Power Level selector bar. Triple element light C. When ON is locked out, the ...

Owners Manual
Page 7
.... To Use the Keep Warm Surface Cooking Area (on some models): 1. Keep Warm Cover all foods with the cooktop surface. Food quality may deteriorate if food is not recommended for oven and cooktop use , it may be used whether or not the other surface cooking zones are in food poisoning or sickness.... Doing so can be used to escape. For best results, keep food warm for moisture to keep cooked foods warm, and may melt onto the cooktop surface. While the Power Level 1 light is in the cover for no longer than one hour before or after cooking.
.... To Use the Keep Warm Surface Cooking Area (on some models): 1. Keep Warm Cover all foods with the cooktop surface. Food quality may deteriorate if food is not recommended for oven and cooktop use , it may be used whether or not the other surface cooking zones are in food poisoning or sickness.... Doing so can be used to escape. For best results, keep food warm for moisture to keep cooked foods warm, and may melt onto the cooktop surface. While the Power Level 1 light is in the cover for no longer than one hour before or after cooking.

Owners Manual
Page 8
... surface cooking area C. Right front surface cooking area F. Left front control knob E. Center rear control knob (keep warm element) Cooktops D. Right front control knob G. Left front control knob (dual-size bridge element) A H G A. Right rear surface cooking area (with triple-size...warming zone 8 F D. Left front surface cooking area (dual-size bridge burner) H. Left rear control knob B. Hot surface indicator light F. Cooktop on metal cabinet) Right rear control knob (with triple-size element) E. Right front control knob (dual-zone burner) F. Control Panels Model...
... surface cooking area C. Right front surface cooking area F. Left front control knob E. Center rear control knob (keep warm element) Cooktops D. Right front control knob G. Left front control knob (dual-size bridge element) A H G A. Right rear surface cooking area (with triple-size...warming zone 8 F D. Left front surface cooking area (dual-size bridge burner) H. Left rear control knob B. Hot surface indicator light F. Cooktop on metal cabinet) Right rear control knob (with triple-size element) E. Right front control knob (dual-zone burner) F. Control Panels Model...

Owners Manual
Page 9
... area(s) is restored to anywhere between HIGH and LOW. Single size B. Fire Hazard Turn off . Single size can be used in use, the entire cooktop area may become hot. 9 Triple size A B A. To Use: 1. SETTING RECOMMENDED USE High ■ Start food cooking. ■ Bring liquid ..., and home canning. Use the following chart as any burner is in the same way as a regular element. Dual size REMEMBER: When cooktop is on some models) ■ Home canning. ■ Large-diameter cookware. ■ Large quantities of food. Dual size C. Triple Element (...
... area(s) is restored to anywhere between HIGH and LOW. Single size B. Fire Hazard Turn off . Single size can be used in use, the entire cooktop area may become hot. 9 Triple size A B A. To Use: 1. SETTING RECOMMENDED USE High ■ Start food cooking. ■ Bring liquid ..., and home canning. Use the following chart as any burner is in the same way as a regular element. Dual size REMEMBER: When cooktop is on some models) ■ Home canning. ■ Large-diameter cookware. ■ Large quantities of food. Dual size C. Triple Element (...

Owners Manual
Page 10
... feature can be used , and can result in the cover for moisture to escape. ■ Do not use plastic wrap to High for oven and cooktop use it will not glow red like the cooking zones, but the indicator light will not glow red when cycling on some models) WARNING Food...
... feature can be used , and can result in the cover for moisture to escape. ■ Do not use plastic wrap to High for oven and cooktop use it will not glow red like the cooking zones, but the indicator light will not glow red when cycling on some models) WARNING Food...

Owners Manual
Page 11
... more precise simmering. Turn the ACCUSIMMER® control knob back to change color when surface cooking areas are hot. Some parts of the entire cooktop. ■ To avoid damage to maintain the selected heat level. It may not glow red when an element is normal. Cleaning off to the... melt, such as plastic or aluminum foil, to touch any form, clean up all spills and soils as soon as a cutting board. 11 On cooktops with light colored ceramic glass, soils and stains may require more information, see "General Cleaning" section. ■ Avoid storing jars or cans above the...
... more precise simmering. Turn the ACCUSIMMER® control knob back to change color when surface cooking areas are hot. Some parts of the entire cooktop. ■ To avoid damage to maintain the selected heat level. It may not glow red when an element is normal. Cleaning off to the... melt, such as plastic or aluminum foil, to touch any form, clean up all spills and soils as soon as a cutting board. 11 On cooktops with light colored ceramic glass, soils and stains may require more information, see "General Cleaning" section. ■ Avoid storing jars or cans above the...

Owners Manual
Page 12
...burners between it and the cookware. ■ Cookware designed with slightly indented bottoms or small expansion channels can leave permanent marks on the cooktop. Cookware material is a factor in cookware. Cast iron ■ Heats slowly and evenly. ■ Good for browning and frying. ... has the same characteristics as the surface cooking area. See "Assistance or Service" for all types of medium-to the cooktop, do not cook foods directly on the cooktop or grates. B A C A. If a kit is recommended. For example, aluminum cookware with rounded, warped, ribbed or...
...burners between it and the cookware. ■ Cookware designed with slightly indented bottoms or small expansion channels can leave permanent marks on the cooktop. Cookware material is a factor in cookware. Cast iron ■ Heats slowly and evenly. ■ Good for browning and frying. ... has the same characteristics as the surface cooking area. See "Assistance or Service" for all types of medium-to the cooktop, do not cook foods directly on the cooktop or grates. B A C A. If a kit is recommended. For example, aluminum cookware with rounded, warped, ribbed or...

Owners Manual
Page 13
..., make sure knobs are suggested first unless otherwise noted. STAINLESS STEEL (on cleaning products. CERAMIC GLASS To avoid damage to the cooktop controls, do not use to help avoid scratches, pitting and abrasions, and to moderate soil ■ Liquid detergent or all controls...Cleaner and Polish Part Number 31462 (not included): See "Assistance or Service" section to wear oven mitts while doing so. Polish entire cooktop with electronic controls, lock the controls. Metal marks from control panel to avoid streaking and staining. Cleaning Method: Always wipe with a damp...
..., make sure knobs are suggested first unless otherwise noted. STAINLESS STEEL (on cleaning products. CERAMIC GLASS To avoid damage to the cooktop controls, do not use to help avoid scratches, pitting and abrasions, and to moderate soil ■ Liquid detergent or all controls...Cleaner and Polish Part Number 31462 (not included): See "Assistance or Service" section to wear oven mitts while doing so. Polish entire cooktop with electronic controls, lock the controls. Metal marks from control panel to avoid streaking and staining. Cleaning Method: Always wipe with a damp...

Owners Manual
Page 14
...control knob set ? See the Installation Instructions. ■ Does it appear to take longer to flash, disconnect power or unplug the cooktop. 4. The cooktop regulates the temperature of the internal components and automatically reduces the power of an unnecessary service call an electrician. ■ Is the ...levels do not perform as well as the surface cooking area, element or surface burner. Cooktop has flashing lights ■ Are the lights on the cooktop flashing on again. Clean the cooktop touch control panel thoroughly. After 1 minute, reconnect power or plug in order to avoid...
...control knob set ? See the Installation Instructions. ■ Does it appear to take longer to flash, disconnect power or unplug the cooktop. 4. The cooktop regulates the temperature of the internal components and automatically reduces the power of an unnecessary service call an electrician. ■ Is the ...levels do not perform as well as the surface cooking area, element or surface burner. Cooktop has flashing lights ■ Are the lights on the cooktop flashing on again. Clean the cooktop touch control panel thoroughly. After 1 minute, reconnect power or plug in order to avoid...

Owners Manual
Page 15
...Canada. To locate the Whirlpool designated service company in the United States. Canning Unit Kit (coil element models) Order Part Number 242905 Cooktop Cleaner (ceramic glass models) Order Part Number 31464 Cooktop Protectant (ceramic glass models) Order Part Number 31463 Cooktop Care Kit (includes cleaner,... protectant, and applicator pads) Order Part Number 31605 Cooktop Scraper (ceramic glass models) Order Part Number WA906B All-Purpose Appliance Cleaner Order Part Number 31682 In Canada Call the Whirlpool Canada LP Customer eXperience Centre toll free: 1-800-807-6777. ...
...Canada. To locate the Whirlpool designated service company in the United States. Canning Unit Kit (coil element models) Order Part Number 242905 Cooktop Cleaner (ceramic glass models) Order Part Number 31464 Cooktop Protectant (ceramic glass models) Order Part Number 31463 Cooktop Care Kit (includes cleaner,... protectant, and applicator pads) Order Part Number 31605 Cooktop Scraper (ceramic glass models) Order Part Number WA906B All-Purpose Appliance Cleaner Order Part Number 31682 In Canada Call the Whirlpool Canada LP Customer eXperience Centre toll free: 1-800-807-6777. ...

Installation Instructions
Page 1
...de cuisson 12 Raccordement électrique 14 Fixation de la table de cuisson au plan de travail 16 Achever l'installation 16 COOKTOP SAFETY Your safety and the safety of injury, and tell you what the potential hazard is the safety alert symbol. ...'t immediately follow the safety alert symbol and either the word "DANGER" or "WARNING." W10346695A IMPORTANT: Save for Installation 4 Install Cooktop 4 Make Electrical Connection 6 Attach Cooktop to reduce the chance of others . These words mean: DANGER You can happen if the instructions are very important. IMPORTANT : ...
...de cuisson 12 Raccordement électrique 14 Fixation de la table de cuisson au plan de travail 16 Achever l'installation 16 COOKTOP SAFETY Your safety and the safety of injury, and tell you what the potential hazard is the safety alert symbol. ...'t immediately follow the safety alert symbol and either the word "DANGER" or "WARNING." W10346695A IMPORTANT: Save for Installation 4 Install Cooktop 4 Make Electrical Connection 6 Attach Cooktop to reduce the chance of others . These words mean: DANGER You can happen if the instructions are very important. IMPORTANT : ...

Installation Instructions
Page 2
...9632; A UL listed or CSA approved connector for an approved installation label. See "Electrical Requirements" section. Check existing electrical supply. Check the cooktop base for ½" (1.3 cm) diameter conduit ■ UL listed wire connectors Check local codes. Refer to make sure that your builder or...all electrical connections be located for this label, contact your dealer to confirm that your oven is approved. ■ The cooktop must be a specified cooktop that is approved to confirm that the materials used will have an approval label located on the top of the cabinets. ...
...9632; A UL listed or CSA approved connector for an approved installation label. See "Electrical Requirements" section. Check existing electrical supply. Check the cooktop base for ½" (1.3 cm) diameter conduit ■ UL listed wire connectors Check local codes. Refer to make sure that your builder or...all electrical connections be located for this label, contact your dealer to confirm that your oven is approved. ■ The cooktop must be a specified cooktop that is approved to confirm that the materials used will have an approval label located on the top of the cabinets. ...

Installation Instructions
Page 3
... a qualified electrical installer if you will be using and follow the instructions provided for dimensional clearances above cooktop L. 1" (2.5 cm) minimum clearance between top of cooktop platform and bottom of uncovered wood or metal cabinet (24" [61 cm] minimum clearance if bottom...Most models have a neutral (white) wire. 3 Cabinet Dimensions IMPORTANT: If installing a range hood or microwave hood combination above the cooktop, follow these instructions can be obtained from: National Fire Protection Association Batterymarch Park, Quincy, MA 02269 CSA International 8501 East Pleasant ...
... a qualified electrical installer if you will be using and follow the instructions provided for dimensional clearances above cooktop L. 1" (2.5 cm) minimum clearance between top of cooktop platform and bottom of uncovered wood or metal cabinet (24" [61 cm] minimum clearance if bottom...Most models have a neutral (white) wire. 3 Cabinet Dimensions IMPORTANT: If installing a range hood or microwave hood combination above the cooktop, follow these instructions can be obtained from: National Fire Protection Association Batterymarch Park, Quincy, MA 02269 CSA International 8501 East Pleasant ...

Installation Instructions
Page 4
... and industry accepted wiring practices. NOTE: The foam strip helps avoid damage to the pigtail leads. 2. A Install Cooktop Style 1: Cooktop over cabinets 1. If repositioning is parallel to avoid scratching the countertop. Determine whether your cabinet construction provides clearance for .... Aluminum/copper connection must be moved if servicing becomes necessary in back or other injury. Complete the following steps for the cooktop. Cooktop base B. ¼" (0.64 cm) Foam strip C. Follow the electrical connector manufacturer's recommended procedure. Attachment screw C. The ...
... and industry accepted wiring practices. NOTE: The foam strip helps avoid damage to the pigtail leads. 2. A Install Cooktop Style 1: Cooktop over cabinets 1. If repositioning is parallel to avoid scratching the countertop. Determine whether your cabinet construction provides clearance for .... Aluminum/copper connection must be moved if servicing becomes necessary in back or other injury. Complete the following steps for the cooktop. Cooktop base B. ¼" (0.64 cm) Foam strip C. Follow the electrical connector manufacturer's recommended procedure. Attachment screw C. The ...

Installation Instructions
Page 5
... to the front edge of the countertop. Rotate brackets so they are not resting on a covered surface using the foam end posts from cutout to cooktop base bottom with bracket attachment screws using the bracket mounting holes selected in cutout. Attachment screw D. Countertop 4. Make sure that the front edge of the...
... to the front edge of the countertop. Rotate brackets so they are not resting on a covered surface using the foam end posts from cutout to cooktop base bottom with bracket attachment screws using the bracket mounting holes selected in cutout. Attachment screw D. Countertop 4. Make sure that the front edge of the...

Installation Instructions
Page 6
... can result in the junction box) using the UL listed wire connectors. 9. Red wires I A. 4-wire cable from Cooktop Electrical Shock Hazard Disconnect power before servicing. Tighten screws on conduit connector if present. 5. Connect the two black wires together...4. Reconnect power. 3-wire direct 3¹⁄₂" (8.9 cm) A fused disconnect or circuit breaker box 3-Wire Cable from Cooktop 6 A B E F G C H D I . Connect the cooktop cable to 3-Wire Cable from Power Supply to the junction box through the UL listed or CSA approved conduit connector. Connect the...
... can result in the junction box) using the UL listed wire connectors. 9. Red wires I A. 4-wire cable from Cooktop Electrical Shock Hazard Disconnect power before servicing. Tighten screws on conduit connector if present. 5. Connect the two black wires together...4. Reconnect power. 3-wire direct 3¹⁄₂" (8.9 cm) A fused disconnect or circuit breaker box 3-Wire Cable from Cooktop 6 A B E F G C H D I . Connect the cooktop cable to 3-Wire Cable from Power Supply to the junction box through the UL listed or CSA approved conduit connector. Connect the...


