
Owners Manual
Page 4
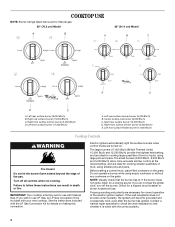
...pans. Left rear surface simmer burner (5,000 Btu/h) B. See the instructions included with the correct polarity. 4 If you do not hear the igniter click, turn off all controls when not cooking. Check for use LP Gas, an LP Gas Conversion Kit is wired with the LP Gas ... burner (17,000 Btu/h) Cooktop Controls WARNING Fire Hazard Do not let the burner flame extend beyond the edge of the electric ignition system. If the burner does not ignite, listen for Natural gas. 30" (76.2 cm) Model 36" (91.4 cm) Model A B A B C E D D C A. Left front surface burner (17,000 Btu...
...pans. Left rear surface simmer burner (5,000 Btu/h) B. See the instructions included with the correct polarity. 4 If you do not hear the igniter click, turn off all controls when not cooking. Check for use LP Gas, an LP Gas Conversion Kit is wired with the LP Gas ... burner (17,000 Btu/h) Cooktop Controls WARNING Fire Hazard Do not let the burner flame extend beyond the edge of the electric ignition system. If the burner does not ignite, listen for Natural gas. 30" (76.2 cm) Model 36" (91.4 cm) Model A B A B C E D D C A. Left front surface burner (17,000 Btu...

Owners Manual
Page 5
... Push in color, not yellow. Burner cap: Always keep the burner cap in use, the entire cooktop area may become hot. Igniter electrode E. Power Failure The ignition feature will produce a flame. 2. Only the burner that can be adjusted, contact a trained repair specialist. 5 Simmer Burners* Simmer... burners are off and the cooktop is in place when using LP gas. A clean burner cap will help avoid poor ignition and uneven flames. A B C E D A. Surface Burners IMPORTANT: Do not obstruct the flow of prolonged power failure, the surface burners can...
... Push in color, not yellow. Burner cap: Always keep the burner cap in use, the entire cooktop area may become hot. Igniter electrode E. Power Failure The ignition feature will produce a flame. 2. Only the burner that can be adjusted, contact a trained repair specialist. 5 Simmer Burners* Simmer... burners are off and the cooktop is in place when using LP gas. A clean burner cap will help avoid poor ignition and uneven flames. A B C E D A. Surface Burners IMPORTANT: Do not obstruct the flow of prolonged power failure, the surface burners can...
Installation Instructions
Page 6
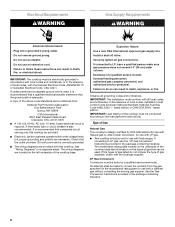
...; This cooktop is recommended that a qualified electrical installer determine that can result in the package containing literature. IMPORTANT: This installation must be provided. ■ Electronic ignition systems operate within wide voltage limits, but proper grounding and polarity are provided with this cooktop be conducted according to convert the cooktop from : National...
...; This cooktop is recommended that a qualified electrical installer determine that can result in the package containing literature. IMPORTANT: This installation must be provided. ■ Electronic ignition systems operate within wide voltage limits, but proper grounding and polarity are provided with this cooktop be conducted according to convert the cooktop from : National...
Installation Instructions
Page 10
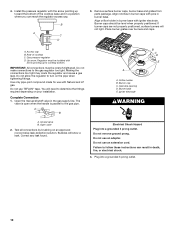
...light. The valve is open when the handle is parallel to the gas regulator too tight. Burner cap C. Burner base E. Igniter electrode WARNING A. Test all connections by brushing on the pipe when tightening fittings. Do not use an adapter. Failure to cooktop ... valve 2. IMPORTANT: All connections must be installed with Natural and LP gas. Plug into a grounded 3 prong outlet. Align notches in burner caps with igniter electrode. Rear of the cooktop base and in death, fire, or electrical shock. 4. Regulator must be level when properly positioned. Align orifice holder in ...
...light. The valve is open when the handle is parallel to the gas regulator too tight. Burner cap C. Burner base E. Igniter electrode WARNING A. Test all connections by brushing on the pipe when tightening fittings. Do not use an adapter. Failure to cooktop ... valve 2. IMPORTANT: All connections must be installed with Natural and LP gas. Plug into a grounded 3 prong outlet. Align notches in burner caps with igniter electrode. Rear of the cooktop base and in death, fire, or electrical shock. 4. Regulator must be level when properly positioned. Align orifice holder in ...
Installation Instructions
Page 11
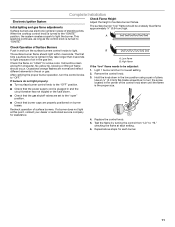
... the proper burner operation, turn to "OFF." Remove the control knob. 3. Initial lighting and gas flame adjustments Surface burners use electronic igniters in and turn the screw located in the center of standing pilots. A Check Operation of Surface Burners Push in place of the control...flame is turned to light. Use an ¹⁄₈" (3.0 mm) flat-blade screwdriver to turn the surface burners control knobs to "IGNITE." Occasional orange flashes are set to the "open" position. ■ Check that 4 seconds to light the burner. Recheck operation of surface ...
... the proper burner operation, turn to "OFF." Remove the control knob. 3. Initial lighting and gas flame adjustments Surface burners use electronic igniters in and turn the screw located in the center of standing pilots. A Check Operation of Surface Burners Push in place of the control...flame is turned to light. Use an ¹⁄₈" (3.0 mm) flat-blade screwdriver to turn the surface burners control knobs to "IGNITE." Occasional orange flashes are set to the "open" position. ■ Check that 4 seconds to light the burner. Recheck operation of surface ...

