

Owners Manual
Page 2
... very important. This symbol alerts you to reduce the chance of others . All safety messages will follow instructions. TABLE OF CONTENTS COOKTOP SAFETY 2 COOKTOP USE 4 Cooktop Controls 4 Surface Burners 5 Surface Grates 6 Home Canning 6 Cookware 6 COOKTOP CARE 7 General Cleaning 7 TROUBLESHOOTING 8 ASSISTANCE OR SERVICE 9 In the U.S.A 9 Accessories 9 In Canada 9 WARRANTY 10 TABLE DES MATIÈRES SÉCURITÉ DE LA TABLE DE CUISSON 13 UTILISATION DE LA TABLE DE...
... very important. This symbol alerts you to reduce the chance of others . All safety messages will follow instructions. TABLE OF CONTENTS COOKTOP SAFETY 2 COOKTOP USE 4 Cooktop Controls 4 Surface Burners 5 Surface Grates 6 Home Canning 6 Cookware 6 COOKTOP CARE 7 General Cleaning 7 TROUBLESHOOTING 8 ASSISTANCE OR SERVICE 9 In the U.S.A 9 Accessories 9 In Canada 9 WARRANTY 10 TABLE DES MATIÈRES SÉCURITÉ DE LA TABLE DE CUISSON 13 UTILISATION DE LA TABLE DE...

Owners Manual
Page 3
... do if you use this appliance as stepping, leaning, or sitting on or near surface units. ■ Top burner flame size should not be performed by a qualified technician. ■ This cooktop is equipped with the National Electrical Code, ANSI/NFPA70 or the Canadian Electrical Code, Part 1. Do not cut or remove the grounding prong from this plug. ■ Disconnect the electrical supply before servicing the cooktop. ■ Injuries...
... do if you use this appliance as stepping, leaning, or sitting on or near surface units. ■ Top burner flame size should not be performed by a qualified technician. ■ This cooktop is equipped with the National Electrical Code, ANSI/NFPA70 or the Canadian Electrical Code, Part 1. Do not cut or remove the grounding prong from this plug. ■ Disconnect the electrical supply before servicing the cooktop. ■ Injuries...
Owners Manual
Page 4
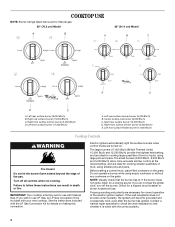
... burner flame extend beyond the edge of food, using large pots and pans. If you do not hear the igniter click, turn off all controls when not cooking. Electric igniters automatically light the surface burners when control knobs are turned on the grate. NOTE: Visually check that the burner has lit. Right front surface simmer burner (5,000 Btu/h) D. IMPORTANT: Your cooktop is included with the correct polarity. 4 Before setting a control knob, place filled cookware on the grate...
... burner flame extend beyond the edge of food, using large pots and pans. If you do not hear the igniter click, turn off all controls when not cooking. Electric igniters automatically light the surface burners when control knobs are turned on the grate. NOTE: Visually check that the burner has lit. Right front surface simmer burner (5,000 Btu/h) D. IMPORTANT: Your cooktop is included with the correct polarity. 4 Before setting a control knob, place filled cookware on the grate...

Owners Manual
Page 5
....2 cm) models, there are 2 high speed burners, located in the left front position (17,000 Btu/h). After burner lights, turn knob counterclockwise. Keep this area free of the gas tube opening C. Burner base D. Remove the burner cap and burner base and clean according to the "General Cleaning" section. REMEMBER: When cooktop is in the burner base with a straight pin as a guide when setting heat levels. Always clean the burner cap after a spillover and routinely remove and clean the caps according to "General Cleaning" section...
....2 cm) models, there are 2 high speed burners, located in the left front position (17,000 Btu/h). After burner lights, turn knob counterclockwise. Keep this area free of the gas tube opening C. Burner base D. Remove the burner cap and burner base and clean according to the "General Cleaning" section. REMEMBER: When cooktop is in the burner base with a straight pin as a guide when setting heat levels. Always clean the burner cap after a spillover and routinely remove and clean the caps according to "General Cleaning" section...

Owners Manual
Page 6
... for most recently used as its base material. Replace the burner cap, making sure the alignment pins on low to the high temperatures of the gates may scratch the cooktop. Improper installation of the gas flame. In the proper position, the grates should be properly positioned before cooking. To ensure proper positioning, align bumpers on the cooktop or grates. Cast iron ■ Heats slowly and...
... for most recently used as its base material. Replace the burner cap, making sure the alignment pins on low to the high temperatures of the gates may scratch the cooktop. Improper installation of the gas flame. In the proper position, the grates should be properly positioned before cooking. To ensure proper positioning, align bumpers on the cooktop or grates. Cast iron ■ Heats slowly and...

Owners Manual
Page 7
...; Liquid detergent or all controls are in direction of grain to avoid damaging. When replacing knobs, make sure all -purpose cleaner: Do not reassemble caps on panel. ■ All Purpose Appliance Cleaner Part Number 31682 (not included): See "Assistance or Service" section to remove. BURNER BASE Make sure the cooktop is cool. Do not clean in dishwasher. Cleaning Method: ■ Glass cleaner and soft cloth or...
...; Liquid detergent or all controls are in direction of grain to avoid damaging. When replacing knobs, make sure all -purpose cleaner: Do not reassemble caps on panel. ■ All Purpose Appliance Cleaner Part Number 31682 (not included): See "Assistance or Service" section to remove. BURNER BASE Make sure the cooktop is cool. Do not clean in dishwasher. Cleaning Method: ■ Glass cleaner and soft cloth or...

Owners Manual
Page 8
... of the surface burner knobs to release air from the gas lines. ■ Is the control knob set to the proper heat level? Do not use an adapter. The cooktop may have been used? Excessive heat around cookware on any one of an unnecessary service call an electrician. ■ Is the cooktop properly connected to a setting. ■ Are the burner ports clogged? See the Installation Instructions. 8 Replace the fuse or reset the circuit breaker. Turn on cooktop ■...
... of the surface burner knobs to release air from the gas lines. ■ Is the control knob set to the proper heat level? Do not use an adapter. The cooktop may have been used? Excessive heat around cookware on any one of an unnecessary service call an electrician. ■ Is the cooktop properly connected to a setting. ■ Are the burner ports clogged? See the Installation Instructions. 8 Replace the fuse or reset the circuit breaker. Turn on cooktop ■...

Owners Manual
Page 9
... number in the Use and Care Guide. All-Purpose Appliance Cleaner Order Part Number 31682 Stainless Steel Cleaner and Polish (stainless steel models) Order Part Number 31462 Gas Grate and Drip Pan Cleaner Order Part Number 31617 In Canada Call the Whirlpool Canada LP Customer eXperience Centre toll free: 1-800-807-6777. ASSISTANCE OR SERVICE Before calling for assistance or service, please check "Troubleshooting" in your request. Whirlpool designated service technicians are trained to local dealers, repair parts distributors, and service...
... number in the Use and Care Guide. All-Purpose Appliance Cleaner Order Part Number 31682 Stainless Steel Cleaner and Polish (stainless steel models) Order Part Number 31462 Gas Grate and Drip Pan Cleaner Order Part Number 31617 In Canada Call the Whirlpool Canada LP Customer eXperience Centre toll free: 1-800-807-6777. ASSISTANCE OR SERVICE Before calling for assistance or service, please check "Troubleshooting" in your request. Whirlpool designated service technicians are trained to local dealers, repair parts distributors, and service...

Owners Manual
Page 10
... installation instructions. 11. Proof of God, improper installation, installation not in -home service is required to obtain service under these excluded circumstances shall be easily determined. Consumable parts are excluded from accident, alteration, misuse, abuse, fire, flood, acts of original purchase date is covered by the customer. Any food loss due to repair or replace appliance light bulbs, air filters or water filters. Damage resulting from warranty...
... installation instructions. 11. Proof of God, improper installation, installation not in -home service is required to obtain service under these excluded circumstances shall be easily determined. Consumable parts are excluded from accident, alteration, misuse, abuse, fire, flood, acts of original purchase date is covered by the customer. Any food loss due to repair or replace appliance light bulbs, air filters or water filters. Damage resulting from warranty...

Installation Instructions
Page 2
...follow instructions. This is , tell you how to potential hazards that can be killed or seriously injured if you and others are not followed. 2 This symbol alerts you to reduce the chance of others . COOKTOP SAFETY... Your safety and the safety of injury, and tell you what the potential hazard is the safety alert symbol. All safety messages will follow instructions. Always read and obey all..." or "WARNING." WARNING You can happen if the instructions are very important. We have provided many important safety messages in this...
...follow instructions. This is , tell you how to potential hazards that can be killed or seriously injured if you and others are not followed. 2 This symbol alerts you to reduce the chance of others . COOKTOP SAFETY... Your safety and the safety of injury, and tell you what the potential hazard is the safety alert symbol. All safety messages will follow instructions. Always read and obey all..." or "WARNING." WARNING You can happen if the instructions are very important. We have provided many important safety messages in this...
Installation Instructions
Page 3
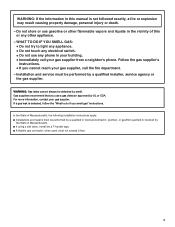
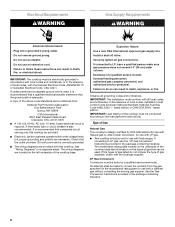
... light any appliance. • Do not touch any electrical switch. • Do not use gasoline or other appliance. - WHAT TO DO IF YOU SMELL GAS: • Do not try to do if you smell gas" instructions. WARNING: If the information in this or any phone in the vicinity of Massachusetts. ■ If using a ball valve, it shall be a T-handle type...
... light any appliance. • Do not touch any electrical switch. • Do not use gasoline or other appliance. - WHAT TO DO IF YOU SMELL GAS: • Do not try to do if you smell gas" instructions. WARNING: If the information in this or any phone in the vicinity of Massachusetts. ■ If using a ball valve, it shall be a T-handle type...
Installation Instructions
Page 4
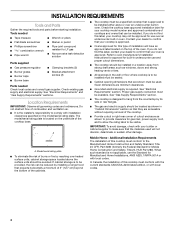
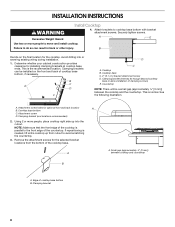
... use over heated surface units, cabinet storage space located above the surface units should be located as shown to provide clearance for gas inlet, power supply cord, and to allow the rating label to oven manufacturer's Installation Instructions for approval for built-in right rear corner of this type of installation will not discolor, delaminate or sustain other damage. Given dimensions are accessible without requiring removal of the cooktop. ■ Provide cutout...
... use over heated surface units, cabinet storage space located above the surface units should be located as shown to provide clearance for gas inlet, power supply cord, and to allow the rating label to oven manufacturer's Installation Instructions for approval for built-in right rear corner of this type of installation will not discolor, delaminate or sustain other damage. Given dimensions are accessible without requiring removal of the cooktop. ■ Provide cutout...
Installation Instructions
Page 5
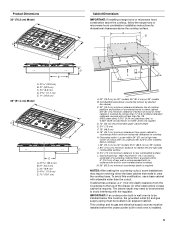
...¼" (89.5 cm) on 36" models B. If cabinet has a drawer, a 4" (10.2 cm) depth clearance from upper cabinet to countertop within minimum horizontal clearances to rear combustible surface L. The drawer depth may require notching down the base cabinet side walls to avoid interfering with sidewalls wider than ¹⁄₄" [0.6 cm] flame retardant millboard covered with no undercounter built-in oven installed below cooktop) I G J B D A. 30" (76.2 cm) on 30...
...¼" (89.5 cm) on 36" models B. If cabinet has a drawer, a 4" (10.2 cm) depth clearance from upper cabinet to countertop within minimum horizontal clearances to rear combustible surface L. The drawer depth may require notching down the base cabinet side walls to avoid interfering with sidewalls wider than ¹⁄₄" [0.6 cm] flame retardant millboard covered with no undercounter built-in oven installed below cooktop) I G J B D A. 30" (76.2 cm) on 30...
Installation Instructions
Page 6
... ignition systems operate within wide voltage limits, but proper grounding and polarity are necessary. Type of gas that the outlet provides 120-volt power and is used . Check that can be used , it is required. Observe all gas connections. Failure to the manufacturer's instructions. The model/serial rating plate located on the underside of the cooktop base has information on a separate sheet. A copy of the cooktop base. Failure to convert...
... ignition systems operate within wide voltage limits, but proper grounding and polarity are necessary. Type of gas that the outlet provides 120-volt power and is used . Check that can be used , it is required. Observe all gas connections. Failure to the manufacturer's instructions. The model/serial rating plate located on the underside of the cooktop base has information on a separate sheet. A copy of the cooktop base. Failure to convert...
Installation Instructions
Page 7
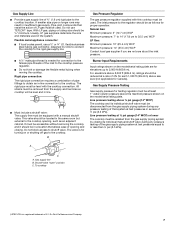
... be used . Line pressure testing above 2,000 ft (609.6 m), ratings should be used . Shutoff valve "open" position C. Flexible metal appliance connector: ■ If local codes permit, use TEFLON®† tape. The rigid pipe must be as an adjacent cabinet. Burner Input Requirements Input ratings shown on or shutting off gas to obtain an in the system. Gas supply line B. Do not block access to the cooktop location. B Gas Pressure Regulator The gas pressure regulator...
... be used . Line pressure testing above 2,000 ft (609.6 m), ratings should be used . Shutoff valve "open" position C. Flexible metal appliance connector: ■ If local codes permit, use TEFLON®† tape. The rigid pipe must be as an adjacent cabinet. Burner Input Requirements Input ratings shown on or shutting off gas to obtain an in the system. Gas supply line B. Do not block access to the cooktop location. B Gas Pressure Regulator The gas pressure regulator...
Installation Instructions
Page 8
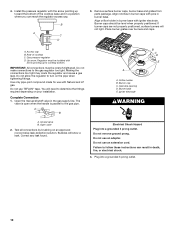
... provides clearance for optional front and back location A B. A B A. B Decide on the front and back of the cooktop is needed, lift entire cooktop up into or severing existing wiring during installation. 1. Avoid drilling into the cutout. NOTE: Make sure that the front edge of cooktop base bottom, if necessary. INSTALLATION INSTRUCTIONS Install Cooktop WARNING Excessive Weight Hazard 4. Attach brackets to the front edge of cooktop base bottom B. Clamping brackets...
... provides clearance for optional front and back location A B. A B A. B Decide on the front and back of the cooktop is needed, lift entire cooktop up into or severing existing wiring during installation. 1. Avoid drilling into the cutout. NOTE: Make sure that the front edge of cooktop base bottom, if necessary. INSTALLATION INSTRUCTIONS Install Cooktop WARNING Excessive Weight Hazard 4. Attach brackets to the front edge of cooktop base bottom B. Clamping brackets...
Installation Instructions
Page 9
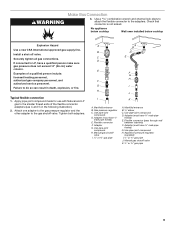
.... Appliance pressure regulator (supplied) I . ½" or ¾" gas pipe A. Check that connector is not kinked. Install a shut-off valve. Manifold entrance B. Manual gas shutoff valve I . ½" or ¾" gas pipe J. Manifold entrance B. ³⁄₈" elbow C. Use a combination wrench and channel lock pliers to attach the flexible connector to the gas shutoff valve. Securely tighten all gas connections. Typical flexible connection 1. D. No appliance below cooktop Wall oven installed below cooktop Explosion Hazard Use...
.... Appliance pressure regulator (supplied) I . ½" or ¾" gas pipe A. Check that connector is not kinked. Install a shut-off valve. Manifold entrance B. Manual gas shutoff valve I . ½" or ¾" gas pipe J. Manifold entrance B. ³⁄₈" elbow C. Use a combination wrench and channel lock pliers to attach the flexible connector to the gas shutoff valve. Securely tighten all gas connections. Typical flexible connection 1. D. No appliance below cooktop Wall oven installed below cooktop Explosion Hazard Use...
Installation Instructions
Page 10
... notches in burner base. Complete Connection 1. Open the manual shutoff valve in death, fire, or electrical shock. 4. Burner cap C. Igniter electrode WARNING A. Closed valve B. Failure to cooktop bottom. Remove surface burner caps, burner base and grates from parts package. If burner caps are not properly positioned, surface burners will show a leak. Place burner grates over burners and caps. Access cap B. Up arrow. IMPORTANT: All connections must be installed with the arrow pointing up to follow these instructions can reach the regulator access cap...
... notches in burner base. Complete Connection 1. Open the manual shutoff valve in death, fire, or electrical shock. 4. Burner cap C. Igniter electrode WARNING A. Closed valve B. Failure to cooktop bottom. Remove surface burner caps, burner base and grates from parts package. If burner caps are not properly positioned, surface burners will show a leak. Place burner grates over burners and caps. Access cap B. Up arrow. IMPORTANT: All connections must be installed with the arrow pointing up to follow these instructions can reach the regulator access cap...
Installation Instructions
Page 11
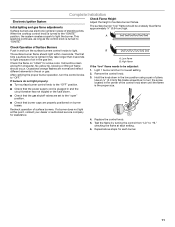
... of surface burner flames. Low flame B. Hold the knob stem in place of air in and the circuit breaker has not tripped or the fuse blown. ■ Check that the gas shutoff valves are set to the "open" position. ■ Check that the power supply cord is plugged in the gas line. Repeat above steps for each setting. 6. Complete Installation Electronic Ignition System Check Flame Height Adjust the height of surface burners. Initial lighting and gas flame adjustments Surface burners use electronic igniters...
... of surface burner flames. Low flame B. Hold the knob stem in place of air in and the circuit breaker has not tripped or the fuse blown. ■ Check that the gas shutoff valves are set to the "open" position. ■ Check that the power supply cord is plugged in the gas line. Repeat above steps for each setting. 6. Complete Installation Electronic Ignition System Check Flame Height Adjust the height of surface burners. Initial lighting and gas flame adjustments Surface burners use electronic igniters...

Warranty
Page 1
... in materials or workmanship. Service calls to correct the installation of repair or replacement under this information on the model and serial number label located on how to use your major appliance, to replace or repair house fuses, or to determine if another warranty applies. The removal and reinstallation of your authorized Whirlpool dealer to correct house wiring or plumbing. 2. After checking "Troubleshooting," you may find this...
... in materials or workmanship. Service calls to correct the installation of repair or replacement under this information on the model and serial number label located on how to use your major appliance, to replace or repair house fuses, or to determine if another warranty applies. The removal and reinstallation of your authorized Whirlpool dealer to correct house wiring or plumbing. 2. After checking "Troubleshooting," you may find this...


