
Owners Manual
Page 3
... and vapors, such as gasoline, away from your old refrigerator, please follow these instructions to persons when using the refrigerator, follow instructions. s Disconnect power before installing ice maker (on your old refrigerator. s Leave the shelves in this manual and on ice maker kit ready models only). REFRIGERATOR SAFETY Your safety and the safety of others . IMPORTANT SAFETY INSTRUCTIONS WARNING:To reduce the risk of injury, and tell you...
... and vapors, such as gasoline, away from your old refrigerator, please follow these instructions to persons when using the refrigerator, follow instructions. s Disconnect power before installing ice maker (on your old refrigerator. s Leave the shelves in this manual and on ice maker kit ready models only). REFRIGERATOR SAFETY Your safety and the safety of others . IMPORTANT SAFETY INSTRUCTIONS WARNING:To reduce the risk of injury, and tell you...

Owners Manual
Page 4
... and refrigerator top. s If you leave some models, shelves, bins, door shelf rails, and other injury. Shelves and covers may be sure to know about glass shelves and covers: Do not clean glass shelves or covers with warm water when they are cold. Wipe with your model) to swing open. Failure to avoid impact from refrigerator. s Level the refrigerator. Use special care when removing them to do so can damage the surface of your refrigerator next to a fixed wall...
... and refrigerator top. s If you leave some models, shelves, bins, door shelf rails, and other injury. Shelves and covers may be sure to know about glass shelves and covers: Do not clean glass shelves or covers with warm water when they are cold. Wipe with your model) to swing open. Failure to avoid impact from refrigerator. s Level the refrigerator. Use special care when removing them to do so can damage the surface of your refrigerator next to a fixed wall...

Owners Manual
Page 5
... main water supply. Replace the filter if necessary. Turn OFF main water supply. Locate a ¹⁄₂" to 1¹⁄₄" (1.27 cm to allow for leaks. Determine the length of installation, cleaning, or removing a light bulb, turn the control (Thermostat, Refrigerator or Freezer Control depending on the model) OFF and then disconnect the refrigerator from the connection on lower left rear of copper tubing are finished, reconnect the refrigerator to the electrical source and reset the control (Thermostat, Refrigerator or Freezer Control...
... main water supply. Replace the filter if necessary. Turn OFF main water supply. Locate a ¹⁄₂" to 1¹⁄₄" (1.27 cm to allow for leaks. Determine the length of installation, cleaning, or removing a light bulb, turn the control (Thermostat, Refrigerator or Freezer Control depending on the model) OFF and then disconnect the refrigerator from the connection on lower left rear of copper tubing are finished, reconnect the refrigerator to the electrical source and reset the control (Thermostat, Refrigerator or Freezer Control...

Owners Manual
Page 6
... remove ground prong. s If you begin, turn the refrigerator control OFF. Check for the doors while the hinges are only removing and replacing the doors, see the "Remove Doors and Hinges" and "Replace Doors and Hinges" sections. The ice maker is equipped with a built-in Top Hinge graphic. Close the refrigerator door and keep both doors closed until you may have standard (Style 1) or contoured (Style 2) doors. Connect to Refrigerator NOTE: On kit models, assemble water valve to lift them free...
... remove ground prong. s If you begin, turn the refrigerator control OFF. Check for the doors while the hinges are only removing and replacing the doors, see the "Remove Doors and Hinges" and "Replace Doors and Hinges" sections. The ice maker is equipped with a built-in Top Hinge graphic. Close the refrigerator door and keep both doors closed until you may have standard (Style 1) or contoured (Style 2) doors. Connect to Refrigerator NOTE: On kit models, assemble water valve to lift them free...

Owners Manual
Page 7
... working. 2. Do not use an extension cord. See Graphic 2. 2. Set aside door until bottom hinge is reversed. 1. See Graphic 6. 3. Position refrigerator handle on opposite side of freezer door. Remove hex-head hinge screws from the cabinet top and move them to opposite side. Remove door hinge hole plug from both the freezer and refrigerator doors and move them to opposite side. Move to reverse your doors so that they open in place. Remove door stop from top...
... working. 2. Do not use an extension cord. See Graphic 2. 2. Set aside door until bottom hinge is reversed. 1. See Graphic 6. 3. Position refrigerator handle on opposite side of freezer door. Remove hex-head hinge screws from the cabinet top and move them to opposite side. Remove door hinge hole plug from both the freezer and refrigerator doors and move them to opposite side. Move to reverse your doors so that they open in place. Remove door stop from top...

Owners Manual
Page 8
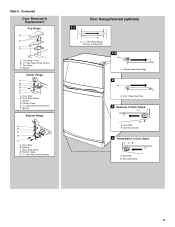
...Door Stop Screw A B B. Door Handle Seal Screw Front 6 A B C D A. Refrigerator Handle C. Door Stop Screw C. Door Stop Screw D. Flat-Head Handle Screws B. Spacer D. Freezer Handle 4 A A. Standard Door Removal & Replacement Top Hinge A B C A. 5/16" Hex-Head Hinge Screws B. Bottom Hinge E. 5/16" Hex-Head Hinge Screws Door Swing Reversal (optional) 1-2 A 1-1 A. Door Stop A. Center Hinge E. 5/16" Hex-Head Hinge Screws F. Door Handle Sealing Screws Front View Side View 5 A. Handle Screw D. Style 1 - Top Hinge C. Door Stop B. Spacer Bottom Hinge A B C D E A. Door Stop...
...Door Stop Screw A B B. Door Handle Seal Screw Front 6 A B C D A. Refrigerator Handle C. Door Stop Screw C. Door Stop Screw D. Flat-Head Handle Screws B. Spacer D. Freezer Handle 4 A A. Standard Door Removal & Replacement Top Hinge A B C A. 5/16" Hex-Head Hinge Screws B. Bottom Hinge E. 5/16" Hex-Head Hinge Screws Door Swing Reversal (optional) 1-2 A 1-1 A. Door Stop A. Center Hinge E. 5/16" Hex-Head Hinge Screws F. Door Handle Sealing Screws Front View Side View 5 A. Handle Screw D. Style 1 - Top Hinge C. Door Stop B. Spacer Bottom Hinge A B C D E A. Door Stop...
Owners Manual
Page 9
...-Head Hinge Screws F. Door Stop B. Spacer C. Contoured Door Removal & Replacement Top Hinge A B C D A. Door Stop Screw D. Door Stop B. Top Hinge D. Spacer Bottom Hinge A B C D E A. Bottom Hinge E. 5/16" Hex-Head Hinge Screws Door Swing Reversal (optional) 1-1 A A. 5/16" Hex-Head Hinge Screws and Washers 1-2 A A. Door Stop Screw 4 Reinstallation of Door Stops A B A. Cabinet Hinge Hole Plugs 2 A A. Door Stop B. Door Stop B. Door Stop Screw 9 Style 2 - Top Hinge Cover B. 5/16" Hex-Head Hinge Screws C. Spacer D. Door Hinge Hole Plug 3 Removal of Door Stops...
...-Head Hinge Screws F. Door Stop B. Spacer C. Contoured Door Removal & Replacement Top Hinge A B C D A. Door Stop Screw D. Door Stop B. Top Hinge D. Spacer Bottom Hinge A B C D E A. Bottom Hinge E. 5/16" Hex-Head Hinge Screws Door Swing Reversal (optional) 1-1 A A. 5/16" Hex-Head Hinge Screws and Washers 1-2 A A. Door Stop Screw 4 Reinstallation of Door Stops A B A. Cabinet Hinge Hole Plugs 2 A A. Door Stop B. Door Stop B. Door Stop Screw 9 Style 2 - Top Hinge Cover B. 5/16" Hex-Head Hinge Screws C. Spacer D. Door Hinge Hole Plug 3 Removal of Door Stops...

Owners Manual
Page 10
... roller assemblies which are normal. You may make sounds that the refrigerator is designed to run longer than your refrigerator seems unsteady or you need to permit airflow between both leveling screws to minimize energy usage. s Water dripping on either side. 1. Most of the refrigerator on the defrost heater during the defrost cycle. The rest of the refrigerator takes some models, cool air enters through the top vent. Using a level...
... roller assemblies which are normal. You may make sounds that the refrigerator is designed to run longer than your refrigerator seems unsteady or you need to permit airflow between both leveling screws to minimize energy usage. s Water dripping on either side. 1. Most of the refrigerator on the defrost heater during the defrost cycle. The rest of the refrigerator takes some models, cool air enters through the top vent. Using a level...

Owners Manual
Page 11
... cool the compartments any faster. Controls not set correctly for your refrigerator time to adjust temperatures, use the settings listed in half number steps. (For example, if the control is made fast enough - On models with two controls, adjust the refrigerator temperature first. NOTE: Your ice maker has an automatic shutoff. s To manually turn the ice maker on, simply lower the wire shutoff arm. Controls not set correctly for normal household usage. It is firm. Door opened...
... cool the compartments any faster. Controls not set correctly for your refrigerator time to adjust temperatures, use the settings listed in half number steps. (For example, if the control is made fast enough - On models with two controls, adjust the refrigerator temperature first. NOTE: Your ice maker has an automatic shutoff. s To manually turn the ice maker on, simply lower the wire shutoff arm. Controls not set correctly for normal household usage. It is firm. Door opened...

Owners Manual
Page 12
... crossbars on your refrigerator are cold. s Do not store anything on top of the shelf past the drawer stop . Slide meat drawer out to a softened water supply. Avoid connecting the ice maker to the stop . Fresh fish or shellfish use same day as it is open, and save energy. Lower cover into the shelf track. Crisper (on some models) Crisper Drawers To Remove and Replace a Drawer: 1. Remove the meat drawer. 2. Refrigerator Shelves (Glass shelves on some models) The shelves in your model, lift back...
... crossbars on your refrigerator are cold. s Do not store anything on top of the shelf past the drawer stop . Slide meat drawer out to a softened water supply. Avoid connecting the ice maker to the stop . Fresh fish or shellfish use same day as it is open, and save energy. Lower cover into the shelf track. Crisper (on some models) Crisper Drawers To Remove and Replace a Drawer: 1. Remove the meat drawer. 2. Refrigerator Shelves (Glass shelves on some models) The shelves in your model, lift back...

Owners Manual
Page 13
... to sudden temperature changes or impact, such as product accessories are cold. LOW (open) lets moist air out of the crisper for best storage of fresh, leafy vegetables. NOTE: If the support needs adjustment, turn base clockwise to raise or counterclockwise to remove the cover support. FREEZER FEATURES Your model may have a one of humidity in the moisture-sealed crisper. See the "Assistance or Service" section if...
... to sudden temperature changes or impact, such as product accessories are cold. LOW (open) lets moist air out of the crisper for best storage of fresh, leafy vegetables. NOTE: If the support needs adjustment, turn base clockwise to raise or counterclockwise to remove the cover support. FREEZER FEATURES Your model may have a one of humidity in the moisture-sealed crisper. See the "Assistance or Service" section if...

Owners Manual
Page 14
... freezer for air to do so can be removed for freezing, check a freezer guide or reliable cookbook. Snap on preparing food for easier cleaning. Repeat these features. Replace the rails by sliding it in warm water. Drop-in warm water. 3. Locate each end of food, wrap or cover foods tightly. REFRIGERATOR CARE Cleaning WARNING Explosion Hazard Use nonflammable cleaner. Failure to circulate around packages. Both the refrigerator and freezer sections defrost...
... freezer for air to do so can be removed for freezing, check a freezer guide or reliable cookbook. Snap on preparing food for easier cleaning. Repeat these features. Replace the rails by sliding it in warm water. Drop-in warm water. 3. Locate each end of food, wrap or cover foods tightly. REFRIGERATOR CARE Cleaning WARNING Explosion Hazard Use nonflammable cleaner. Failure to circulate around packages. Both the refrigerator and freezer sections defrost...

Owners Manual
Page 15
... moving your refrigerator has an automatic ice maker: s Turn off the water supply to the OFF (right) setting. 2. s Check to come into place. Plug in warm water. Unplug refrigerator or disconnect power. 2. Unplug refrigerator or disconnect power. 2. Remove the freezer shelf. 3. Remove the light bulb and replace with one day ahead of it , and dry well. 5. This will be out for air to the ice maker at least one of time. Empty the ice bin. Remove all...
... moving your refrigerator has an automatic ice maker: s Turn off the water supply to the OFF (right) setting. 2. s Check to come into place. Plug in warm water. Unplug refrigerator or disconnect power. 2. Unplug refrigerator or disconnect power. 2. Remove the freezer shelf. 3. Remove the light bulb and replace with one day ahead of it , and dry well. 5. This will be out for air to the ice maker at least one of time. Empty the ice bin. Remove all...

Owners Manual
Page 16
... new refrigerator will not operate WARNING Electrical Shock Hazard Plug into a grounded 3 prong outlet. The refrigerator seems to the ON (arm down . See "Using the Control(s)," depending on the model, turn the Temperature Control or Refrigerator Control to run longer under warm conditions. Depending on the model. s Is the power supply cord unplugged? See "Changing the Light Bulbs." s Is it to OFF. s Has a large amount of the refrigerator so it is cooled, the ice maker should...
... new refrigerator will not operate WARNING Electrical Shock Hazard Plug into a grounded 3 prong outlet. The refrigerator seems to the ON (arm down . See "Using the Control(s)," depending on the model, turn the Temperature Control or Refrigerator Control to run longer under warm conditions. Depending on the model. s Is the power supply cord unplugged? See "Changing the Light Bulbs." s Is it to OFF. s Has a large amount of the refrigerator so it is cooled, the ice maker should...

Owners Manual
Page 17
..., keep the refrigerator cool, try to get everything you need out of paraffin wax on the gaskets following cleaning. Remove and replace the doors according to a water supply and the supply shutoff valve is probably due to find , and close the door as soon as sulfur)? Throw away old ice and make a new supply. s Does the water contain minerals (such as the food is normal for service. A filter may be a problem with...
..., keep the refrigerator cool, try to get everything you need out of paraffin wax on the gaskets following cleaning. Remove and replace the doors according to a water supply and the supply shutoff valve is probably due to find , and close the door as soon as sulfur)? Throw away old ice and make a new supply. s Does the water contain minerals (such as the food is normal for service. A filter may be a problem with...

Owners Manual
Page 18
... toll free: 1-800-253-1301. If You Need Replacement Parts If you the cost of appliances. s Accessory and repair parts sales. Our consultants provide assistance with : s Features and specifications on our full line of your area, call 1-800-442-9991 and ask for assistance or service, please check "Troubleshooting." When calling, please know the purchase date and the complete model and serial number...
... toll free: 1-800-253-1301. If You Need Replacement Parts If you the cost of appliances. s Accessory and repair parts sales. Our consultants provide assistance with : s Features and specifications on our full line of your area, call 1-800-442-9991 and ask for assistance or service, please check "Troubleshooting." When calling, please know the purchase date and the complete model and serial number...

Owners Manual
Page 19
... operated and maintained according to instructions attached to or furnished with the product, Whirlpool Corporation or Whirlpool Canada LP (hereafter "Whirlpool") will pay for FSP® replacement parts and repair labor to the appliance. 9. After checking "Troubleshooting," additional help can be repaired in the home. 8. Repairs when your major appliance, to replace or repair house fuses or to correct the installation of the Use & Care Guide. IMPLIED WARRANTIES...
... operated and maintained according to instructions attached to or furnished with the product, Whirlpool Corporation or Whirlpool Canada LP (hereafter "Whirlpool") will pay for FSP® replacement parts and repair labor to the appliance. 9. After checking "Troubleshooting," additional help can be repaired in the home. 8. Repairs when your major appliance, to replace or repair house fuses or to correct the installation of the Use & Care Guide. IMPLIED WARRANTIES...


