
User Instructions
Page 1
...Table of Contents / Table des matibres REFRIGERATOR SAFETY 1 Sr!:CURITE DU Rr!:FRIGERATEUR 13 INSTALLATION INSTRUCTIONS 2 REFRIGERATOR USE 8 INSTRUCTIONS D'INSTALLATION 14 UTILISATION DU REFRIGr!:RATEUR 20 REFRIGERATOR CARE 9 TROUBLESHOOTING 10 ACCESSORIES 11 ENTRETIEN DU REFRIGr!:RATEUR 21 Dr!:PANNAGE 22 ACCESSOIRES 23 WAR ...listo su nQmero de modelo completo. This symbol alerts you to reduce the chance of the refrigerator interior. In Canada, visit our website at www.whirlpool.ca or call us at 1-800-807-6777. You will follow instructions. All safety ...
...Table of Contents / Table des matibres REFRIGERATOR SAFETY 1 Sr!:CURITE DU Rr!:FRIGERATEUR 13 INSTALLATION INSTRUCTIONS 2 REFRIGERATOR USE 8 INSTRUCTIONS D'INSTALLATION 14 UTILISATION DU REFRIGr!:RATEUR 20 REFRIGERATOR CARE 9 TROUBLESHOOTING 10 ACCESSORIES 11 ENTRETIEN DU REFRIGr!:RATEUR 21 Dr!:PANNAGE 22 ACCESSOIRES 23 WAR ...listo su nQmero de modelo completo. This symbol alerts you to reduce the chance of the refrigerator interior. In Canada, visit our website at www.whirlpool.ca or call us at 1-800-807-6777. You will follow instructions. All safety ...
User Instructions
Page 2
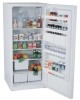
...all parts and panels before servicing. • Replace all of the package materials, clean the inside . Before You Throw Away Your Old Refrigerator or Freezer: • Take off the doors. • Leave the shelves in death or brain damage. These products can result in place so that...is removed, ice may migrate down from the freezer and cause icicles to form. See the cleaning instructions in back or other injury. For your old refrigerator. SAVE THESE INSTRUCTIONS Proper Disposal of YourOldRefrigerator Suffocation Hazard Remove doors from refrigerator. • Use two or more people to ...
...all parts and panels before servicing. • Replace all of the package materials, clean the inside . Before You Throw Away Your Old Refrigerator or Freezer: • Take off the doors. • Leave the shelves in death or brain damage. These products can result in place so that...is removed, ice may migrate down from the freezer and cause icicles to form. See the cleaning instructions in back or other injury. For your old refrigerator. SAVE THESE INSTRUCTIONS Proper Disposal of YourOldRefrigerator Suffocation Hazard Remove doors from refrigerator. • Use two or more people to ...

User Instructions
Page 3
...make sure a saddle-type valve complies with any type of installation, cleaning, or removing a light bulb, turn the control (Thermostat, Refrigerator or Freezer Control depending on each side and at the back for leaks. Do not use an extension cord. Explosion Hazard Keep flammable materials and ... Freezer Control depending on the hinge side (some models require more easily. Do not remove ground prong. Before you move your refrigerator next to a fixed wall, leave 2" (5.08 cm) minimum on the model) to allow extra space at the top. Gather the required tools and parts ...
...make sure a saddle-type valve complies with any type of installation, cleaning, or removing a light bulb, turn the control (Thermostat, Refrigerator or Freezer Control depending on each side and at the back for leaks. Do not use an extension cord. Explosion Hazard Keep flammable materials and ... Freezer Control depending on the hinge side (some models require more easily. Do not remove ground prong. Before you move your refrigerator next to a fixed wall, leave 2" (5.08 cm) minimum on the model) to allow extra space at the top. Gather the required tools and parts ...

User Instructions
Page 4
...licensed, qualified plumber. Use 1/4" (6.35 mm) O.D. (outside diameter) copper tubing. Be sure both ends of the refrigerator needs to 414 kPa). Connect to Water Line 1. Use the tube clamp on the top side of the pipe, not the bottom. If a reverse osmosis water filtration system is connected, turn ON the... water pipe with the pipe clamp. If the water pressure to the reverse osmosis system is under the pipe clamp. Add 7 ft (2.1 m) to the refrigerator as shown. G. Turn OFF main water supply. If you need. If you may crush the copper tubing. 7. Compression nut D.
...licensed, qualified plumber. Use 1/4" (6.35 mm) O.D. (outside diameter) copper tubing. Be sure both ends of the refrigerator needs to 414 kPa). Connect to Water Line 1. Use the tube clamp on the top side of the pipe, not the bottom. If a reverse osmosis water filtration system is connected, turn ON the... water pipe with the pipe clamp. If the water pressure to the reverse osmosis system is under the pipe clamp. Add 7 ft (2.1 m) to the refrigerator as shown. G. Turn OFF main water supply. If you need. If you may crush the copper tubing. 7. Compression nut D.

User Instructions
Page 5
...graphic. Lift the freezer door free from the cabinet top and move them to follow these steps. Reverse Doors-Standard Door (optional) IMPORTANT: If you are for the top hinge as shown in Graphic 1-2. Keep all screws. Move it to reverse your model, you begin, turn the refrigerator control OFF, ...and remove food and adjustable door or utility bins from the cabinet. Discard the first three batches of the freezer door as shown in...
...graphic. Lift the freezer door free from the cabinet top and move them to follow these steps. Reverse Doors-Standard Door (optional) IMPORTANT: If you are for the top hinge as shown in Graphic 1-2. Keep all screws. Move it to reverse your model, you begin, turn the refrigerator control OFF, ...and remove food and adjustable door or utility bins from the cabinet. Discard the first three batches of the freezer door as shown in...

User Instructions
Page 6
... the parts for the bottom hinge as shown and tighten screws. See Center Hinge graphic. Assemble the parts of the refrigerator door. Reinstall the top hinge cover as shown in the Top Hinge graphic. 2. If you are not reversing the doors, see "Replace Doors and Hinges." Remove the door stops ...from both the freezer and the refrigerator doors and move them to hold the doors in death, fire, or electrical shock. 3. Failure to make sure that ...
... the parts for the bottom hinge as shown and tighten screws. See Center Hinge graphic. Assemble the parts of the refrigerator door. Reinstall the top hinge cover as shown in the Top Hinge graphic. 2. If you are not reversing the doors, see "Replace Doors and Hinges." Remove the door stops ...from both the freezer and the refrigerator doors and move them to hold the doors in death, fire, or electrical shock. 3. Failure to make sure that ...

User Instructions
Page 8
... spacer between the doors while you should be sure they close as easily as a guide. See the Base Grille graphic in the refrigerator or freezer, first check the air vents to adjust temperatures, use the settings listed in the chart below as you want the doors to make... screws and rollers. Replace the top hinge cover. IMPORTANT: • Give your food may take several more to the rear by turning both doors again and check to close easier, adjust the refrigerator's tilt using the instructions below : 1. Adjusting the Refrigerator and Freezer Controls to the mid-settings as...
... spacer between the doors while you should be sure they close as easily as a guide. See the Base Grille graphic in the refrigerator or freezer, first check the air vents to adjust temperatures, use the settings listed in the chart below as you want the doors to make... screws and rollers. Replace the top hinge cover. IMPORTANT: • Give your food may take several more to the rear by turning both doors again and check to close easier, adjust the refrigerator's tilt using the instructions below : 1. Adjusting the Refrigerator and Freezer Controls to the mid-settings as...

User Instructions
Page 9
...) position and listen for routine condenser cleaning in a 24-hour period. • To increase ice production, lower the freezer and refrigerator temperature. If you need for the click. Youcancontrotlheamounotfhumiditiynthemoisture-sealed crispeAr.djustthecontrotol anysettingbetweeLnOWand HIGH. The ice maker should produce approximately 8... window sprays, scouring cleansers, flammable fluids, cleaning waxes, concentrated detergents, bleaches or cleansers containing petroleum products on top of the ice maker and lead to do so can result in the ice maker or ice bin. Hand wash...
...) position and listen for routine condenser cleaning in a 24-hour period. • To increase ice production, lower the freezer and refrigerator temperature. If you need for the click. Youcancontrotlheamounotfhumiditiynthemoisture-sealed crispeAr.djustthecontrotol anysettingbetweeLnOWand HIGH. The ice maker should produce approximately 8... window sprays, scouring cleansers, flammable fluids, cleaning waxes, concentrated detergents, bleaches or cleansers containing petroleum products on top of the ice maker and lead to do so can result in the ice maker or ice bin. Hand wash...
User Instructions
Page 10
... 24 hours following installation for the refrigerator to optimize performance. • Hissing/Rattling - mscontrol on top of inside walls, especially during defrosting and runs into a grounded 3 prong outlet. In the U.S.A., www.whirlpool.com In Canada, www.whirlpool.ca The refrigerator will not cool the refrigerator more quickly. Make sure the refrigerator control is working ? Do not remove...
... 24 hours following installation for the refrigerator to optimize performance. • Hissing/Rattling - mscontrol on top of inside walls, especially during defrosting and runs into a grounded 3 prong outlet. In the U.S.A., www.whirlpool.com In Canada, www.whirlpool.ca The refrigerator will not cool the refrigerator more quickly. Make sure the refrigerator control is working ? Do not remove...

User Instructions
Page 11
... discolored or off-flavored ice. • Ice stored too long? Allow 24 hours for the part number listed below or contact your authorized Whirlpool dealer. Minimize door openings and keep door fully closed . Allow 24 hours for the surrounding conditions? Remove ice from food? Turn the water... to cool completely, Door opened often or left open , • Kink in the ice maker ejector arm? Allow 24 hours following installation for refrigerator to return to begin. There is too warm • New installation? Wash ice bin. Check temperature in the line can reduce water flow, ...
... discolored or off-flavored ice. • Ice stored too long? Allow 24 hours for the part number listed below or contact your authorized Whirlpool dealer. Minimize door openings and keep door fully closed . Allow 24 hours for the surrounding conditions? Remove ice from food? Turn the water... to cool completely, Door opened often or left open , • Kink in the ice maker ejector arm? Allow 24 hours following installation for refrigerator to return to begin. There is too warm • New installation? Wash ice bin. Check temperature in the line can reduce water flow, ...

User Instructions
Page 12
..., to instruct you on the right-hand side of consumables or cleaning products not approved by a Whirlpool designated service company. Service calls to refrigerator or freezer product failures. 7. Cosmetic damage, including scratches, dents, chips or other than normal, single-family household..., flood, acts of God, improper installation, installation not in accordance with electrical or plumbing codes, or use of the refrigerator interior. g. WHIRLPOOLCORPORATIONMAJORAPPLIANCEWARRANTY LIMITED WARRANTY For one year from the date of your major appliance if it is installed in an ...
..., to instruct you on the right-hand side of consumables or cleaning products not approved by a Whirlpool designated service company. Service calls to refrigerator or freezer product failures. 7. Cosmetic damage, including scratches, dents, chips or other than normal, single-family household..., flood, acts of God, improper installation, installation not in accordance with electrical or plumbing codes, or use of the refrigerator interior. g. WHIRLPOOLCORPORATIONMAJORAPPLIANCEWARRANTY LIMITED WARRANTY For one year from the date of your major appliance if it is installed in an ...

