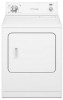
User Instructions
Page 1
... proof of Contents DRYER SAFETY 1 CONTROL PANEL 4 CYCLE GUIDE 5 DRYER USE 6 DRYER CARE 7 TROUBLESHOOTING 9 WARRANTY 11 ASSISTANCE OR SERVICE Back Cover Table des matières SÉCURITÉ DE LA SÉCHEUSE 12 TABLEAU DE COMMANDE 16 GUIDE DES PROGRAMMES 17 UTILISATION DE LA SÉCHEUSE 18 ENTRETIEN DE LA SÉCHEUSE 19 DÉPANNAGE 21 GARANTIE 23 ASSISTANCE OU SERVICE COUVERTURE ARRIÈ...
... proof of Contents DRYER SAFETY 1 CONTROL PANEL 4 CYCLE GUIDE 5 DRYER USE 6 DRYER CARE 7 TROUBLESHOOTING 9 WARRANTY 11 ASSISTANCE OR SERVICE Back Cover Table des matières SÉCURITÉ DE LA SÉCHEUSE 12 TABLEAU DE COMMANDE 16 GUIDE DES PROGRAMMES 17 UTILISATION DE LA SÉCHEUSE 18 ENTRETIEN DE LA SÉCHEUSE 19 DÉPANNAGE 21 GARANTIE 23 ASSISTANCE OU SERVICE COUVERTURE ARRIÈ...
User Instructions
Page 2
The dryer must conform with local codes, or in the absence of local codes, with the National Electrical Code, ANSI/NFPA 70. 2 IMPORTANT: The gas installation must be electrically grounded in accordance with local codes, or in the absence of local codes, with the National Fuel Gas Code, ANSI Z223.1/NFPA 54.
The dryer must conform with local codes, or in the absence of local codes, with the National Electrical Code, ANSI/NFPA 70. 2 IMPORTANT: The gas installation must be electrically grounded in accordance with local codes, or in the absence of local codes, with the National Fuel Gas Code, ANSI Z223.1/NFPA 54.
User Instructions
Page 3
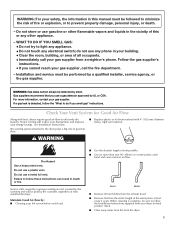
... by improper venting are not covered by the warranty and will reduce your drying times and improve your energy savings. Follow the gas supplier's instructions. • If you use a plastic vent. See Installation Instructions. Good Better ■■ Remove lint and debris from the exhaust hood. ■■ Remove lint from the front the dryer. 3 Installation and service must be sure to follow the Installation Instructions supplied with your dryer for Good Air Flow Along...
... by improper venting are not covered by the warranty and will reduce your drying times and improve your energy savings. Follow the gas supplier's instructions. • If you use a plastic vent. See Installation Instructions. Good Better ■■ Remove lint and debris from the exhaust hood. ■■ Remove lint from the front the dryer. 3 Installation and service must be sure to follow the Installation Instructions supplied with your dryer for Good Air Flow Along...
User Instructions
Page 4
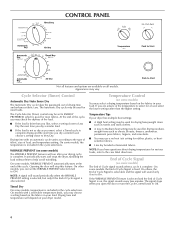
... fabric care. Drying time with a selectable temperature knob, you can set to the care label directions. On some models, the temperature is also selected. On models with an automatic cycle varies according to ON. If the WRINKLE PREVENT feature is selected and the End of Cycle signal is included in the cycle selections. Appearance may use a no heat (air) setting for most loads. Cycle Selector (Timer) Control Automatic Dry/Auto Sense Dry The Automatic Dry cycle...
... fabric care. Drying time with a selectable temperature knob, you can set to the care label directions. On some models, the temperature is also selected. On models with an automatic cycle varies according to ON. If the WRINKLE PREVENT feature is selected and the End of Cycle signal is included in the cycle selections. Appearance may use a no heat (air) setting for most loads. Cycle Selector (Timer) Control Automatic Dry/Auto Sense Dry The Automatic Dry cycle...
User Instructions
Page 5
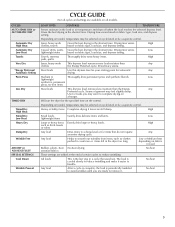
..., no-iron items Most loads This dryness level removes less moisture than Any clothes the Energy Preferred cycle. Evenly dries large or heavy loads. CYCLES AUTO SENSE DRY or AUTOMATIC DRY Automatic Dry High Heat Automatic Dry Low Heat Towels Very Dry *Energy Preferred Automatic Setting Perm Press Less Dry TIMED DRY Timed Dry High Heat Timed Dry Low Heat Heavy Dry Damp Dry Wrinkle Free AIR DRY or NO HEAT FLUFF SPECIAL SETTINGS Cool Down Wrinkle Prevent CYCLE GUIDE Not all models. Depending on model, temperature may want to Thoroughly...
..., no-iron items Most loads This dryness level removes less moisture than Any clothes the Energy Preferred cycle. Evenly dries large or heavy loads. CYCLES AUTO SENSE DRY or AUTOMATIC DRY Automatic Dry High Heat Automatic Dry Low Heat Towels Very Dry *Energy Preferred Automatic Setting Perm Press Less Dry TIMED DRY Timed Dry High Heat Timed Dry Low Heat Heavy Dry Damp Dry Wrinkle Free AIR DRY or NO HEAT FLUFF SPECIAL SETTINGS Cool Down Wrinkle Prevent CYCLE GUIDE Not all models. Depending on model, temperature may want to Thoroughly...
User Instructions
Page 6
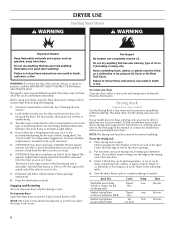
... your dryer Open the dryer door or turn the Cycle Control knob to remove a load from dryer. To find out whether your model does not have a Wrinkle Prevent feature selector. To use . Refer to complete drying, if needed. Reset cycle to the following table. 4. WARNING: To reduce the risk of load being dried. Turn the Cycle Control knob to persons, read the IMPORTANT SAFETY INSTRUCTIONS before each load. Press the Start button. The drum turns, but the drying rack does...
... your dryer Open the dryer door or turn the Cycle Control knob to remove a load from dryer. To find out whether your model does not have a Wrinkle Prevent feature selector. To use . Refer to complete drying, if needed. Reset cycle to the following table. 4. WARNING: To reduce the risk of load being dried. Turn the Cycle Control knob to persons, read the IMPORTANT SAFETY INSTRUCTIONS before each load. Press the Start button. The drum turns, but the drying rack does...

User Instructions
Page 7
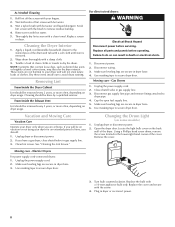
... screen to remove lint. DRYER CARE Cleaning the Dryer Location Keep dryer area clear and free from items that would block the air flow for proper dryer operation. Pull the lint screen straight up. Do not rinse or wash screen to remove lint. Cleaning the Lint Screen Clean lint screen before each load. The exhaust hood is located in front of the dryer. Push the lint screen firmly back into place. 7 Push the lint screen firmly back into place. Pull the lint screen toward you. Roll lint...
... screen to remove lint. DRYER CARE Cleaning the Dryer Location Keep dryer area clear and free from items that would block the air flow for proper dryer operation. Pull the lint screen straight up. Do not rinse or wash screen to remove lint. Cleaning the Lint Screen Clean lint screen before each load. The exhaust hood is located in front of the dryer. Push the lint screen firmly back into place. 7 Push the lint screen firmly back into place. Pull the lint screen toward you. Roll lint...
User Instructions
Page 8
...of clothes. Unplug dryer or disconnect power. 2. Remove the cover. Moving care - Turn bulb counterclockwise. Replace screen in dryer or reconnect power. 8 Wipe drum thoroughly with a 10-watt appliance bulb only. Disconnect wiring. 3. Use masking tape to avoid drum staining. Unplug dryer or disconnect power. 2. Changing the Drum Light (on dryer usage. Open the dryer door. Replace the bulb with a damp cloth. 3. Replace the cover and secure with hot water and liquid detergent. Plug in dryer. As Needed Cleaning 1. Cleaning should be done by a qualified servicer. Cap...
...of clothes. Unplug dryer or disconnect power. 2. Remove the cover. Moving care - Turn bulb counterclockwise. Replace screen in dryer or reconnect power. 8 Wipe drum thoroughly with a 10-watt appliance bulb only. Disconnect wiring. 3. Use masking tape to avoid drum staining. Unplug dryer or disconnect power. 2. Changing the Drum Light (on dryer usage. Open the dryer door. Replace the bulb with a damp cloth. 3. Replace the cover and secure with hot water and liquid detergent. Plug in dryer. As Needed Cleaning 1. Cleaning should be done by a qualified servicer. Cap...
User Instructions
Page 9
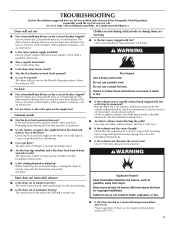
... of non-use? In U.S.A. The drum may be turning, but you may not have heat. Replace the fuse or reset the circuit breaker. Electric dryers require 240-volt power supply. Use a time-delay fuse. ■■ Is the dryer door firmly closed? ■■ Was the Start button or knob firmly pressed? ■■ Is a cycle selected? No heat ■■ Has a household fuse blown, or has a circuit breaker tripped? Electric dryers use a metal foil vent. If the problem continues...
... of non-use? In U.S.A. The drum may be turning, but you may not have heat. Replace the fuse or reset the circuit breaker. Electric dryers require 240-volt power supply. Use a time-delay fuse. ■■ Is the dryer door firmly closed? ■■ Was the Start button or knob firmly pressed? ■■ Is a cycle selected? No heat ■■ Has a household fuse blown, or has a circuit breaker tripped? Electric dryers use a metal foil vent. If the problem continues...
User Instructions
Page 10
...;■ Is the dryer located in a cycle. See the Installation Instructions. ■■ Has an air dry cycle been selected? Fabric softener sheets added to do so can result in the area where your dryer is too hot ■■ Were laundry items removed from dryer at the top and bottom of the cycle? ■■ Was the dryer overloaded? Part Number 3404351 3406839 Accessory Drying rack - When the...
...;■ Is the dryer located in a cycle. See the Installation Instructions. ■■ Has an air dry cycle been selected? Fabric softener sheets added to do so can result in the area where your dryer is too hot ■■ Were laundry items removed from dryer at the top and bottom of the cycle? ■■ Was the dryer overloaded? Part Number 3404351 3406839 Accessory Drying rack - When the...
User Instructions
Page 11
... original model/serial numbers that is inconsistent to published user or operator instructions and/or installation instructions. 2. Proof of original purchase date is required to the appliance. 8. Service calls to repair or replace appliance light bulbs, air filters or water filters. Replacement parts or repair labor on the product. If you think you are excluded from warranty coverage. 4. Dealer name Address Phone number Model number Serial number Purchase date 11 Consumable parts are unable to resolve the problem after checking "Troubleshooting...
... original model/serial numbers that is inconsistent to published user or operator instructions and/or installation instructions. 2. Proof of original purchase date is required to the appliance. 8. Service calls to repair or replace appliance light bulbs, air filters or water filters. Replacement parts or repair labor on the product. If you think you are excluded from warranty coverage. 4. Dealer name Address Phone number Model number Serial number Purchase date 11 Consumable parts are unable to resolve the problem after checking "Troubleshooting...


