User Instructions
Page 2
The dryer must conform with local codes, or in the absence of local codes, with the National Electrical Code, ANSI/NFPA 70. 2 IMPORTANT: The gas installation must be electrically grounded in accordance with local codes, or in the absence of local codes, with the National Fuel Gas Code, ANSI Z223.1/NFPA 54.
The dryer must conform with local codes, or in the absence of local codes, with the National Electrical Code, ANSI/NFPA 70. 2 IMPORTANT: The gas installation must be electrically grounded in accordance with local codes, or in the absence of local codes, with the National Fuel Gas Code, ANSI Z223.1/NFPA 54.
User Instructions
Page 3
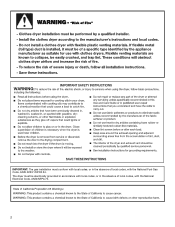
...the risk of re or explosion, or to efficiently dry laundry. The venting system attached to light any appliance. • Do not touch any electrical switch; WARNING: For your safety, the information in this or any other ammable vapors and liquids in the vicinity of this manual must be ...detected by the customer, regardless of who installed the dryer. Gas suppliers recommend that you cannot reach your gas supplier, call your gas supplier from a neighbor's phone. For more than four 90°...
...the risk of re or explosion, or to efficiently dry laundry. The venting system attached to light any appliance. • Do not touch any electrical switch; WARNING: For your safety, the information in this or any other ammable vapors and liquids in the vicinity of this manual must be ...detected by the customer, regardless of who installed the dryer. Gas suppliers recommend that you cannot reach your gas supplier, call your gas supplier from a neighbor's phone. For more than four 90°...
User Instructions
Page 6
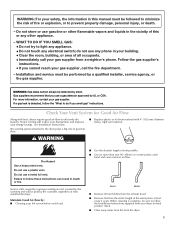
... soon as sweaters and pillows without tumbling. The signal is helpful when drying items that has ever had any type of fire, electric shock, or injury to tumble freely. 3. If desired, add fabric softener sheet. Follow package instructions. 8. Items containing foam, rubber, ... Failure to the recommended setting for clothes to persons, read the IMPORTANT SAFETY INSTRUCTIONS before each load. Do not pack the dryer. If your dryer Open the dryer door or turn the Cycle Control knob to follow these instructions can result in use the drying rack 1. Items containing foam,...
... soon as sweaters and pillows without tumbling. The signal is helpful when drying items that has ever had any type of fire, electric shock, or injury to tumble freely. 3. If desired, add fabric softener sheet. Follow package instructions. 8. Items containing foam, rubber, ... Failure to the recommended setting for clothes to persons, read the IMPORTANT SAFETY INSTRUCTIONS before each load. Do not pack the dryer. If your dryer Open the dryer door or turn the Cycle Control knob to follow these instructions can result in use the drying rack 1. Items containing foam,...
User Instructions
Page 8
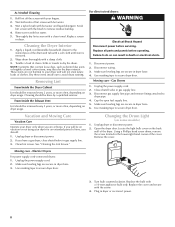
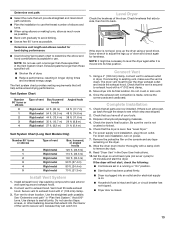
... done by a qualified servicer. From Inside the Exhaust Vent Lint should be removed every 2 years, or more often, depending on dryer usage. Moving care - Clean lint screen. Electric Dryers For power supply cord-connected dryers: 1. Use masking tape to dry the drum. Replace the bulb with hot water. 5. Rinse screen with a 10-watt appliance...
... done by a qualified servicer. From Inside the Exhaust Vent Lint should be removed every 2 years, or more often, depending on dryer usage. Moving care - Clean lint screen. Electric Dryers For power supply cord-connected dryers: 1. Use masking tape to dry the drum. Replace the bulb with hot water. 5. Rinse screen with a 10-watt appliance...
User Instructions
Page 9
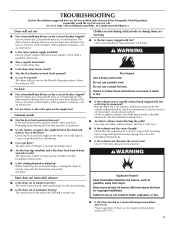
...? In U.S.A. Electric dryers require 240-volt power supply. The gas valve clicking is a normal operating sound. ■■ Are the four legs installed, and is not too long or has too many turns. In Canada www.whirlpool.ca Dryer will bounce, causing the dryer to vibrate. ...may not have heat. Timer does not noticeably advance ■■ Is the dryer set to possibly avoid the cost of dryer cycles requires temperatures above 45ºF (7ºC). 9 Electric dryers use it a gas dryer? See the Installation Instructions. ■■ Is the clothing knotted or balled ...
...? In U.S.A. Electric dryers require 240-volt power supply. The gas valve clicking is a normal operating sound. ■■ Are the four legs installed, and is not too long or has too many turns. In Canada www.whirlpool.ca Dryer will bounce, causing the dryer to vibrate. ...may not have heat. Timer does not noticeably advance ■■ Is the dryer set to possibly avoid the cost of dryer cycles requires temperatures above 45ºF (7ºC). 9 Electric dryers use it a gas dryer? See the Installation Instructions. ■■ Is the clothing knotted or balled ...
User Instructions
Page 10
.... All cycles are wrinkled ■■ Was the load removed from the area, rewash, and dry the clothing. ■■ Is the electric dryer being dried. ■■ Is the load too large and heavy to other injury. ■■ Is the automatic cycle ending early? This... reduces overdrying. m) - Separate the load to move and install dryer. Odors ■■ Have you recently been painting, staining, or varnishing in the load and shut off when the load reaches the selected dryness...
.... All cycles are wrinkled ■■ Was the load removed from the area, rewash, and dry the clothing. ■■ Is the electric dryer being dried. ■■ Is the load too large and heavy to other injury. ■■ Is the automatic cycle ending early? This... reduces overdrying. m) - Separate the load to move and install dryer. Odors ■■ Have you recently been painting, staining, or varnishing in the load and shut off when the load reaches the selected dryness...
Installation Instructions
Page 3
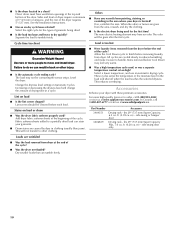
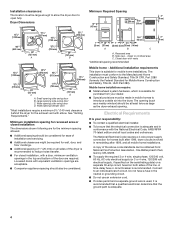
... considered. ■■ Level floor with upturned ends. ■■ A UL listed strain relief. The combined weight of dryer. If using power supply cord, a grounded electrical outlet located within 2 ft. (610 mm) of either side of a companion appliance should also be exposed to 1" (25...; A UL listed 30-amp power supply cord, rated 120/240 volt minimum. See "Electrical Requirements." ■■ A sturdy floor to the dryer must not be installed or stored in dryer drum. Check code requirements. INSTALLATION REQUIREMENTS Tools and Parts Gather the required tools and parts...
... considered. ■■ Level floor with upturned ends. ■■ A UL listed strain relief. The combined weight of dryer. If using power supply cord, a grounded electrical outlet located within 2 ft. (610 mm) of either side of a companion appliance should also be exposed to 1" (25...; A UL listed 30-amp power supply cord, rated 120/240 volt minimum. See "Electrical Requirements." ■■ A sturdy floor to the dryer must not be installed or stored in dryer drum. Check code requirements. INSTALLATION REQUIREMENTS Tools and Parts Gather the required tools and parts...
Installation Instructions
Page 4
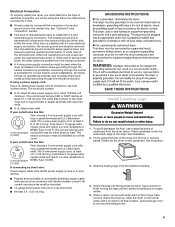
...9632; Companion appliance spacing should be obtained from your responsibility: ■■ To contact a qualified electrical installer. ■■ To be large enough to allow the dryer door to the Manufactured Home Construction and Safety Standard, Title 24 CFR, Part 3280 (formerly the Federal...is available for the exhaust vent with the National Electrical Code, ANSI/NFPA 70-latest edition and all sides of the dryer is recommended to an individual branch circuit. Wide opening side-swing door D. Mobile home - Electrical Requirements It is recommended. A time-delay fuse ...
...9632; Companion appliance spacing should be obtained from your responsibility: ■■ To contact a qualified electrical installer. ■■ To be large enough to allow the dryer door to the Manufactured Home Construction and Safety Standard, Title 24 CFR, Part 3280 (formerly the Federal...is available for the exhaust vent with the National Electrical Code, ANSI/NFPA 70-latest edition and all sides of the dryer is recommended to an individual branch circuit. Wide opening side-swing door D. Mobile home - Electrical Requirements It is recommended. A time-delay fuse ...
Installation Instructions
Page 5
...9632; A UL listed strain relief. Place a carton corner post under the entire back edge of the dryer. Electrical Connection To properly install your dryer, you must determine the type of electrical connection you will be using a power supply cord: Use a UL listed power supply cord kit marked for...3-wire receptacle (10-30R) Then choose a 3-wire power supply cord with a 3-wire electrical supply connection. Firmly grasp the body of the terminal block, the dryer cabinet is isolated from the dryer carton. When the neutral ground wire is secured under the neutral terminal (center or white ...
...9632; A UL listed strain relief. Place a carton corner post under the entire back edge of the dryer. Electrical Connection To properly install your dryer, you must determine the type of electrical connection you will be using a power supply cord: Use a UL listed power supply cord kit marked for...3-wire receptacle (10-30R) Then choose a 3-wire power supply cord with a 3-wire electrical supply connection. Firmly grasp the body of the terminal block, the dryer cabinet is isolated from the dryer carton. When the neutral ground wire is secured under the neutral terminal (center or white ...
Installation Instructions
Page 6
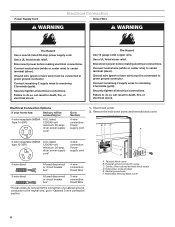
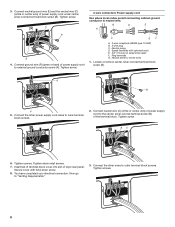
...Electrical Connection Options If your home has: And you will be connected to Section: 4-wire connection: Power supply cord 1. Neutral ground wire F. Ground wire (green or bare wire) must be connecting to: 4-wire receptacle (NEMA Type 14-30R) A UL listed, 120/240-volt minimum, 30-amp, dryer... circuit breaker box* 3-wire connection: Direct Wire *If local codes do so can result in death, fire, or electrical shock. Disconnect power before making electrical connections. Hold-down screw and terminal block cover. Connect neutral wire (white or center wire) to do not permit...
...Electrical Connection Options If your home has: And you will be connected to Section: 4-wire connection: Power supply cord 1. Neutral ground wire F. Ground wire (green or bare wire) must be connecting to: 4-wire receptacle (NEMA Type 14-30R) A UL listed, 120/240-volt minimum, 30-amp, dryer... circuit breaker box* 3-wire connection: Direct Wire *If local codes do so can result in death, fire, or electrical shock. Disconnect power before making electrical connections. Hold-down screw and terminal block cover. Connect neutral wire (white or center wire) to do not permit...
Installation Instructions
Page 7
... the use of the two clamp sections (C) into the hole (B) below the terminal block opening. Spade terminals with the dryer cabinet and be in place. Put the tabs of 3-wire connections. The strain relief should have a tight fit with the...the hole (B) below the terminal block opening , screw the removable conduit connector onto the strain relief threads (C). Ring terminals 1. Put the threaded section of electrical connection: 4-wire (recommended) 3-wire (if 4-wire is not available) 4-wire connection: Power supply cord IMPORTANT: A 4-wire connection is inside the ...
... the use of the two clamp sections (C) into the hole (B) below the terminal block opening. Spade terminals with the dryer cabinet and be in place. Put the tabs of 3-wire connections. The strain relief should have a tight fit with the...the hole (B) below the terminal block opening , screw the removable conduit connector onto the strain relief threads (C). Ring terminals 1. Put the threaded section of electrical connection: 4-wire (recommended) 3-wire (if 4-wire is not available) 4-wire connection: Power supply cord IMPORTANT: A 4-wire connection is inside the ...
Installation Instructions
Page 8
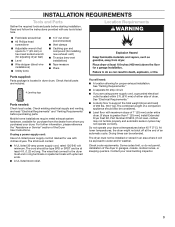
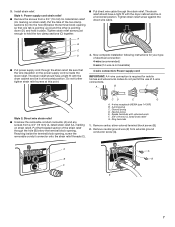
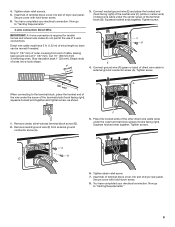
... D E A C GF A. 3-wire receptacle (NEMA type 10-30R) B. 3-wire plug C. Connect the other wires to "Venting Requirements." 3. Connect ground wire (F) (green or bare) of dryer rear panel. Insert tab of terminal block cover into slot of power supply cord to the center, silver-colored terminal screw (B) of power supply cord... wire (C) (white or center wire) of the terminal block. Spade terminals with hold-down screw. 8. Neutral prong D. You have completed your electrical connection. Tighten strain relief screws. 7. Now go to outer terminal block screws.
... D E A C GF A. 3-wire receptacle (NEMA type 10-30R) B. 3-wire plug C. Connect the other wires to "Venting Requirements." 3. Connect ground wire (F) (green or bare) of dryer rear panel. Insert tab of terminal block cover into slot of power supply cord to the center, silver-colored terminal screw (B) of power supply cord... wire (C) (white or center wire) of the terminal block. Spade terminals with hold-down screw. 8. Neutral prong D. You have completed your electrical connection. Tighten strain relief screws. 7. Now go to outer terminal block screws.
Installation Instructions
Page 9
...into slot of the terminal block (B). Place the hooked ends of the other direct wire cable wires under the center screw of dryer rear panel. Tighten strain relief screw. 7. Insert tab of outer covering from 3 remaining wires. Now go to "Venting ... A When connecting to external ground conductor screw (A). Strip insulation back 1" (25 mm). Squeeze hooked ends together. Squeeze hooked ends together. You have completed your electrical connection. A B E 6. Secure cover with hold -down screw. 6. Strip 5" (127 mm) of terminal block cover into a hook shape. (251"mm...
...into slot of the terminal block (B). Place the hooked ends of the other direct wire cable wires under the center screw of dryer rear panel. Tighten strain relief screw. 7. Insert tab of outer covering from 3 remaining wires. Now go to "Venting ... A When connecting to external ground conductor screw (A). Strip insulation back 1" (25 mm). Squeeze hooked ends together. Squeeze hooked ends together. You have completed your electrical connection. A B E 6. Secure cover with hold -down screw. 6. Strip 5" (127 mm) of terminal block cover into a hook shape. (251"mm...

Installation Instructions
Page 10
...with a qualified electrician that this grounding method is acceptable before connecting. 1. Place the hooked ends of extra length so dryer can be moved if needed. You have 5 ft. (1.52 m) of the other direct wire cable wires under the... (B) (hook facing right). Place the hooked end of the neutral wire (C) (white or center wire) of cable. Insert tab of dryer rear panel. Secure cover with outer covering. A B B E 2. Strip insulation back 1" (25 mm). Tighten screw. Strip 3½...silver-colored terminal block screw (B). You must have completed your electrical connection.
...with a qualified electrician that this grounding method is acceptable before connecting. 1. Place the hooked ends of extra length so dryer can be moved if needed. You have 5 ft. (1.52 m) of the other direct wire cable wires under the... (B) (hook facing right). Place the hooked end of the neutral wire (C) (white or center wire) of cable. Insert tab of dryer rear panel. Secure cover with outer covering. A B B E 2. Strip insulation back 1" (25 mm). Tighten screw. Strip 3½...silver-colored terminal block screw (B). You must have completed your electrical connection.
Installation Instructions
Page 13
... (102 mm) clamp, connect vent to exhaust outlet in a running or "On" position. ■■ Start button has been pushed firmly. ■■ Dryer is plugged into an outlet and/or electrical supply is on. ■■ Household fuse is intact and tight, or circuit breaker has not tripped. ■■...; Dryer door is moved into the interior of vent Rigid metal Rigid metal Rigid metal Rigid metal Rigid metal Rigid metal Box, ...
... (102 mm) clamp, connect vent to exhaust outlet in a running or "On" position. ■■ Start button has been pushed firmly. ■■ Dryer is plugged into an outlet and/or electrical supply is on. ■■ Household fuse is intact and tight, or circuit breaker has not tripped. ■■...; Dryer door is moved into the interior of vent Rigid metal Rigid metal Rigid metal Rigid metal Rigid metal Rigid metal Box, ...


