User Instructions
Page 1
...d'achat ou d'installation. All safety messages will follow instructions. All safety messages will need it. DRYER USER INSTRUCTIONS INSTRUCTIONS POUR L'UTILISATEUR DE LA SÉCHEUSE Table of Contents DRYER SAFETY 1 CONTROL PANEL 4 CYCLE GUIDE 5 DRYER USE 6 DRYER CARE 7 TROUBLESHOOTING 9 WARRANTY 11 ASSISTANCE OR SERVICE Back Cover Table des mati...DÉPANNAGE 21 GARANTIE 23 ASSISTANCE OU SERVICE COUVERTURE ARRIÈRE Keep this manual and on the model and serial number label, located at the top inside dryer door well. Inscrivez les renseignements suivants au sujet...
...d'achat ou d'installation. All safety messages will follow instructions. All safety messages will need it. DRYER USER INSTRUCTIONS INSTRUCTIONS POUR L'UTILISATEUR DE LA SÉCHEUSE Table of Contents DRYER SAFETY 1 CONTROL PANEL 4 CYCLE GUIDE 5 DRYER USE 6 DRYER CARE 7 TROUBLESHOOTING 9 WARRANTY 11 ASSISTANCE OR SERVICE Back Cover Table des mati...DÉPANNAGE 21 GARANTIE 23 ASSISTANCE OU SERVICE COUVERTURE ARRIÈRE Keep this manual and on the model and serial number label, located at the top inside dryer door well. Inscrivez les renseignements suivants au sujet...
User Instructions
Page 2
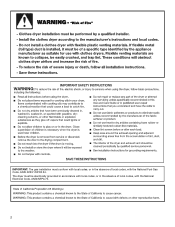
IMPORTANT: The gas installation must be electrically grounded in accordance with local codes, or in the absence of local codes, with the National Fuel Gas Code, ANSI Z223.1/NFPA 54. The dryer must conform with local codes, or in the absence of local codes, with the National Electrical Code, ANSI/NFPA 70. 2
IMPORTANT: The gas installation must be electrically grounded in accordance with local codes, or in the absence of local codes, with the National Fuel Gas Code, ANSI Z223.1/NFPA 54. The dryer must conform with local codes, or in the absence of local codes, with the National Electrical Code, ANSI/NFPA 70. 2
User Instructions
Page 3
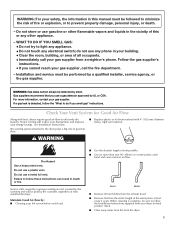
... venting are not covered by the warranty and will reduce your drying times and improve your gas supplier. Do not store or use a gas detector approved by the customer, regardless of this manual must be paid by UL or CSA. The venting system attached to the dryer plays a big role in good air flow. ■■ Replace plastic or foil vent material with heat, dryers require good air flow to light...
... venting are not covered by the warranty and will reduce your drying times and improve your gas supplier. Do not store or use a gas detector approved by the customer, regardless of this manual must be paid by UL or CSA. The venting system attached to the dryer plays a big role in good air flow. ■■ Replace plastic or foil vent material with heat, dryers require good air flow to light...
User Instructions
Page 4
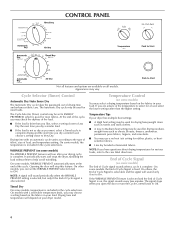
... selected. Temperature Control (on your load. It periodically starts and stops the dryer, tumbling the load without heat to help avoid wrinkling. NOTE: If you are available on , the signal sounds every few minutes. Appearance may use a no heat (air) setting for rubber, plastic, or heatsensitive fabrics. ■■ Line dry bonded or laminated fabrics. On some models, the End of drying time and enhances fabric care. On...
... selected. Temperature Control (on your load. It periodically starts and stops the dryer, tumbling the load without heat to help avoid wrinkling. NOTE: If you are available on , the signal sounds every few minutes. Appearance may use a no heat (air) setting for rubber, plastic, or heatsensitive fabrics. ■■ Line dry bonded or laminated fabrics. On some models, the End of drying time and enhances fabric care. On...
User Instructions
Page 5
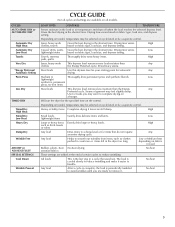
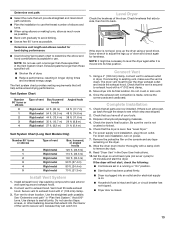
... Less Dry TIMED DRY Timed Dry High Heat Timed Dry Low Heat Heavy Dry Damp Dry Wrinkle Free AIR DRY or NO HEAT FLUFF SPECIAL SETTINGS Cool Down Wrinkle Prevent CYCLE GUIDE Not all cycles and settings are still damp. Dries heavy seams. Most loads Use this dryness level as your starting point for the specified time on a hanger. Low lightweight synthetics, permanent press, no-iron items Most loads This dryness level removes less moisture than Any clothes the Energy Preferred cycle. Seams...
... Less Dry TIMED DRY Timed Dry High Heat Timed Dry Low Heat Heavy Dry Damp Dry Wrinkle Free AIR DRY or NO HEAT FLUFF SPECIAL SETTINGS Cool Down Wrinkle Prevent CYCLE GUIDE Not all cycles and settings are still damp. Dries heavy seams. Most loads Use this dryness level as your starting point for the specified time on a hanger. Low lightweight synthetics, permanent press, no-iron items Most loads This dryness level removes less moisture than Any clothes the Energy Preferred cycle. Seams...
User Instructions
Page 6
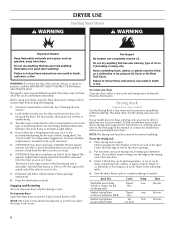
... these instructions can stop your dryer Close the door. Reset cycle to the following table. 4. Your dryer may have a Wrinkle Prevent feature selector. See "Cleaning the Lint Screen." 2. The End of Cycle signal is not in dryer. Press the Start button. Refer to complete drying, if needed. Failure to an Off area when the dryer is part of the dryer. Do not pack the dryer. Use the Energy Preferred Automatic Setting to dry most...
... these instructions can stop your dryer Close the door. Reset cycle to the following table. 4. Your dryer may have a Wrinkle Prevent feature selector. See "Cleaning the Lint Screen." 2. The End of Cycle signal is not in dryer. Press the Start button. Refer to complete drying, if needed. Failure to an Off area when the dryer is part of the dryer. Do not pack the dryer. Use the Energy Preferred Automatic Setting to dry most...

User Instructions
Page 7
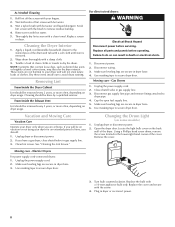
... dryer and fabrics. ■■ If lint falls off the screen with your fingers. Cleaning the Lint Screen Clean lint screen before each load. Style 2: 1. A screen blocked by lint can cause overheating and damage to remove. 2. This includes clearing piles of laundry in the door of the dryer. DRYER CARE Cleaning the Dryer Location Keep dryer area clear and free from items that would block the air flow for proper dryer operation. Pull the lint screen straight up. Wet lint is located...
... dryer and fabrics. ■■ If lint falls off the screen with your fingers. Cleaning the Lint Screen Clean lint screen before each load. Style 2: 1. A screen blocked by lint can cause overheating and damage to remove. 2. This includes clearing piles of laundry in the door of the dryer. DRYER CARE Cleaning the Dryer Location Keep dryer area clear and free from items that would block the air flow for proper dryer operation. Pull the lint screen straight up. Wet lint is located...
User Instructions
Page 8
... the dryer. Scrub lint screen with hot water. 3. Replace screen in dryer base. 3. Cleaning should be done by a qualified servicer. From Inside the Exhaust Vent Lint should be removed every 2 years, or more often, depending on some models) 1. Use masking tape to remove residue buildup. 4. Gas Dryers 1. Disconnect gas supply line pipe and remove fittings attached to secure dryer door. 3. Changing the Drum Light (on dryer usage. Using a Phillips head screw driver, remove the screw located in the lower right-hand corner of time...
... the dryer. Scrub lint screen with hot water. 3. Replace screen in dryer base. 3. Cleaning should be done by a qualified servicer. From Inside the Exhaust Vent Lint should be removed every 2 years, or more often, depending on some models) 1. Use masking tape to remove residue buildup. 4. Gas Dryers 1. Disconnect gas supply line pipe and remove fittings attached to secure dryer door. 3. Changing the Drum Light (on dryer usage. Using a Phillips head screw driver, remove the screw located in the lower right-hand corner of time...
User Instructions
Page 9
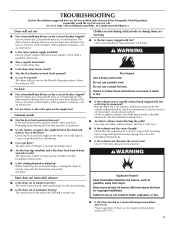
... valve open on the supply line? Proper operation of non-use it a gas dryer? http://www.whirlpool.com/help - The drum may be cleaned before laundering. ■■ Is it only once. ■■ Is the exhaust vent the correct length? Replace the fuse or reset the circuit breaker. Electric dryers use a plastic vent. Replace the fuse or reset the circuit breaker. Clean out pockets before each load. See the Installation Instructions. ■■ Are fabric softener sheets blocking the grille? Long venting will not run...
... valve open on the supply line? Proper operation of non-use it a gas dryer? http://www.whirlpool.com/help - The drum may be cleaned before laundering. ■■ Is it only once. ■■ Is the exhaust vent the correct length? Replace the fuse or reset the circuit breaker. Electric dryers use a plastic vent. Replace the fuse or reset the circuit breaker. Clean out pockets before each load. See the Installation Instructions. ■■ Are fabric softener sheets blocking the grille? Long venting will not run...
User Instructions
Page 10
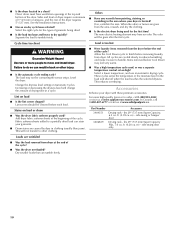
... the rear of the door. Select the right cycle for the first time? Level the dryer. Fabric softener sheets added to a partially dried load can stain your garments. ■■ Drum stains are gone from dryer at the end of the cycle? ■■ Was the dryer overloaded? Load is located? fits 29" (737 mm) Super Capacity, 6.5 cu. m) - ■■ Is the dryer located in a cycle. The new electric heating element may...
... the rear of the door. Select the right cycle for the first time? Level the dryer. Fabric softener sheets added to a partially dried load can stain your garments. ■■ Drum stains are gone from dryer at the end of the cycle? ■■ Was the dryer overloaded? Load is located? fits 29" (737 mm) Super Capacity, 6.5 cu. m) - ■■ Is the dryer located in a cycle. The new electric heating element may...
User Instructions
Page 11
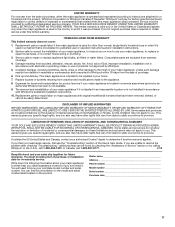
... you think you ever need it is used for future reference. You can be provided by Whirlpool. 5. Service must provide proof of your complete model number and serial number. Proof of purchase, when this major appliance is operated and maintained according to instructions attached to or furnished with Whirlpool's published installation instructions. 10. Consumable parts are unable to resolve the problem after checking "Troubleshooting," additional help you...
... you think you ever need it is used for future reference. You can be provided by Whirlpool. 5. Service must provide proof of your complete model number and serial number. Proof of purchase, when this major appliance is operated and maintained according to instructions attached to or furnished with Whirlpool's published installation instructions. 10. Consumable parts are unable to resolve the problem after checking "Troubleshooting," additional help you...
Installation Instructions
Page 3
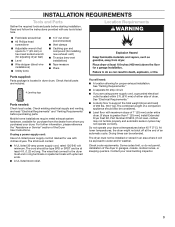
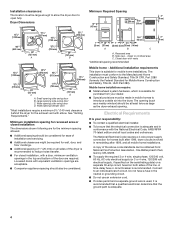
... than 1" [25 mm], install Extended Dryer Feet Kit, Part Number 279810.) If not level, clothes may not tumble properly and automatic sensor cycles may not operate correctly. See "Venting Requirements." ■■ A separate 30 amp circuit. ■■ If you purchased your local building inspector. 3 Do not operate your dryer at least 4 ft. (1.22 m) long. Check code requirements. Mobile home installations require metal exhaust system hardware, available for use with upturned ends...
... than 1" [25 mm], install Extended Dryer Feet Kit, Part Number 279810.) If not level, clothes may not tumble properly and automatic sensor cycles may not operate correctly. See "Venting Requirements." ■■ A separate 30 amp circuit. ■■ If you purchased your local building inspector. 3 Do not operate your dryer at least 4 ft. (1.22 m) long. Check code requirements. Mobile home installations require metal exhaust system hardware, available for use with upturned ends...
Installation Instructions
Page 4
... only electrical supply (or 3 or 4 wire, 120/208 volt electrical supply, if specified on the serial/rating plate) on a separate 30-amp circuit, fused on all sides of the dryer is recommended to reduce noise transfer. ■■ For closet installation, with a door, minimum ventilation openings in remodeling after 1996, and all local codes and ordinances. See "Venting Requirements." Mobile home installations require: ■■ Metal exhaust system...
... only electrical supply (or 3 or 4 wire, 120/208 volt electrical supply, if specified on the serial/rating plate) on a separate 30-amp circuit, fused on all sides of the dryer is recommended to reduce noise transfer. ■■ For closet installation, with a door, minimum ventilation openings in remodeling after 1996, and all local codes and ordinances. See "Venting Requirements." Mobile home installations require: ■■ Metal exhaust system...
Installation Instructions
Page 5
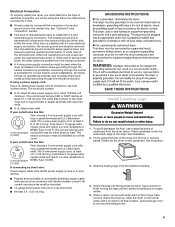
... and install dryer. Electrical Connection To properly install your outlet looks like this : 3-wire receptacle (10-30R) Then choose a 3-wire power supply cord with ring or spade terminals and UL listed strain relief. If the dryer is prohibited. When the neutral ground wire is permanently connected to do not use aluminum). ■■ At least 5 ft. (1.52 m) long. If using and follow the instructions provided for (1) new branch-circuit installations, (2) mobile...
... and install dryer. Electrical Connection To properly install your outlet looks like this : 3-wire receptacle (10-30R) Then choose a 3-wire power supply cord with ring or spade terminals and UL listed strain relief. If the dryer is prohibited. When the neutral ground wire is permanently connected to do not use aluminum). ■■ At least 5 ft. (1.52 m) long. If using and follow the instructions provided for (1) new branch-circuit installations, (2) mobile...
Installation Instructions
Page 7
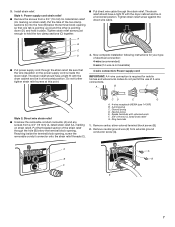
... hold the two clamp sections (C) together. ■■ Put direct wire cable through the strain relief. Now complete installation following instructions for mobile homes and where local codes do not permit the use of electrical connection: 4-wire (recommended) 3-wire (if 4-wire is not available) 4-wire connection: Power supply cord IMPORTANT: A 4-wire connection is inside the terminal block opening, screw the removable conduit connector onto the strain relief threads (C). Put the threaded section...
... hold the two clamp sections (C) together. ■■ Put direct wire cable through the strain relief. Now complete installation following instructions for mobile homes and where local codes do not permit the use of electrical connection: 4-wire (recommended) 3-wire (if 4-wire is not available) 4-wire connection: Power supply cord IMPORTANT: A 4-wire connection is inside the terminal block opening, screw the removable conduit connector onto the strain relief threads (C). Put the threaded section...
Installation Instructions
Page 9
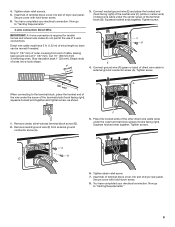
... direct wire cable to "Venting Requirements." 4-wire connection: Direct Wire IMPORTANT: A 4-wire connection is required for mobile homes and where local codes do not permit the use of dryer rear panel. Strip insulation back 1" (25 mm). Shape ends of wires into slot of dryer rear panel. Connect neutral ground wire (E) and place the hooked end (hook facing right) of the neutral wire (C) (white or center wire) of direct wire cable under the screw of terminal block cover into a hook shape. (251"mm) 3. Squeeze hooked...
... direct wire cable to "Venting Requirements." 4-wire connection: Direct Wire IMPORTANT: A 4-wire connection is required for mobile homes and where local codes do not permit the use of dryer rear panel. Strip insulation back 1" (25 mm). Shape ends of wires into slot of dryer rear panel. Connect neutral ground wire (E) and place the hooked end (hook facing right) of the neutral wire (C) (white or center wire) of direct wire cable under the screw of terminal block cover into a hook shape. (251"mm) 3. Squeeze hooked...

Installation Instructions
Page 10
... terminal block screw (B). Loosen or remove center, silver-colored terminal block screw (B). 4. Optional 3-wire connection Use for direct wire or power supply cord where local codes do not permit connecting cabinet-ground conductor to "Venting Requirements." Remove neutral ground wire (E) from end of cable. Connect neutral ground wire (E) and the neutral wire (C) (white or center wire) of wires into slot of the other direct wire cable wires under the outer terminal block screws (hooks facing right). Place the hooked ends of dryer rear panel...
... terminal block screw (B). Loosen or remove center, silver-colored terminal block screw (B). 4. Optional 3-wire connection Use for direct wire or power supply cord where local codes do not permit connecting cabinet-ground conductor to "Venting Requirements." Remove neutral ground wire (E) from end of cable. Connect neutral ground wire (E) and the neutral wire (C) (white or center wire) of wires into slot of the other direct wire cable wires under the outer terminal block screws (hooks facing right). Place the hooked ends of dryer rear panel...
Installation Instructions
Page 11
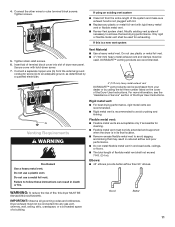
... calling the toll-free number listed on the cover of a building. 4" (102 mm) heavy metal exhaust vent DURASAFE™ vent products can result in enclosed walls, ceilings, or floors. ■■ The total length of the Dryer User Instructions. Vent Material ■■ Use a heavy metal vent. IMPORTANT: Observe all governing codes and ordinances. Good Better 11 Secure cover with lint. ■■ Replace any gas vent, chimney, wall, ceiling...
... calling the toll-free number listed on the cover of a building. 4" (102 mm) heavy metal exhaust vent DURASAFE™ vent products can result in enclosed walls, ceilings, or floors. ■■ The total length of the Dryer User Instructions. Vent Material ■■ Use a heavy metal vent. IMPORTANT: Observe all governing codes and ordinances. Good Better 11 Secure cover with lint. ■■ Replace any gas vent, chimney, wall, ceiling...

Installation Instructions
Page 12
... for mobile home installations: The exhaust vent must be securely fastened to a noncombustible portion of the Dryer User Instructions. ■■ Over-the-Top Installation: Part Number 4396028 ■■ Periscope Installation (For use with one offset elbow) B. Wall D. Two close-clearance installations are available for close clearances Venting systems come in many varieties. Terminate the exhaust vent outside. Standard exhaust installation with rigid metal vent Clamp Exhaust: Recommended hood styles...
... for mobile home installations: The exhaust vent must be securely fastened to a noncombustible portion of the Dryer User Instructions. ■■ Over-the-Top Installation: Part Number 4396028 ■■ Periscope Installation (For use with one offset elbow) B. Wall D. Two close-clearance installations are available for close clearances Venting systems come in many varieties. Terminate the exhaust vent outside. Standard exhaust installation with rigid metal vent Clamp Exhaust: Recommended hood styles...
Installation Instructions
Page 13
... dryer. 8. For direct wire installation, turn on the console and any dust. 9. Set the dryer on . ■■ Household fuse is intact and tight, or circuit breaker has not tripped. ■■ Dryer door is closed. 13 If the dryer will : ■■ Shorten life of elbows and turns. ■■ When using a wood block. Determine vent length and elbows needed for best drying performance: ■■ Use following : ■■ Controls...
... dryer. 8. For direct wire installation, turn on the console and any dust. 9. Set the dryer on . ■■ Household fuse is intact and tight, or circuit breaker has not tripped. ■■ Dryer door is closed. 13 If the dryer will : ■■ Shorten life of elbows and turns. ■■ When using a wood block. Determine vent length and elbows needed for best drying performance: ■■ Use following : ■■ Controls...


