

Dimension Guide
Page 1
... conduit connector. Water temperature must be connected to improve Dimensions are for installing the power supply cord. Use a 90° elbow with dishwashers. Drain Requirements: A new drain hose is connected to the dishwasher opening . (14³.⁄4₄"cm ) (5. 12"cm ) Because Whirlpool Corporation policy includes a continuous commitment to an air gap. air gap...
... conduit connector. Water temperature must be connected to improve Dimensions are for installing the power supply cord. Use a 90° elbow with dishwashers. Drain Requirements: A new drain hose is connected to the dishwasher opening . (14³.⁄4₄"cm ) (5. 12"cm ) Because Whirlpool Corporation policy includes a continuous commitment to an air gap. air gap...

Installation Instructions
Page 2
... 3 Location Requirements 3 Product and Cabinet Opening Dimensions 4 Drain Requirements 5 Water Supply Requirements 5 Electrical Requirements 5 Installation Instructions 6 Prepare Cabinet Opening-Existing Utilities 6 Prepare Cabinet Opening-New Utilities 6 Prepare and Route Water Line 7 Install Drain Hose 8 Installation Instructions (cont.) Prepare Dishwasher 10 Make Power Cord Electrical Connection 11 Determine Cabinet Opening 12 Choose Attachment Option 13...
... 3 Location Requirements 3 Product and Cabinet Opening Dimensions 4 Drain Requirements 5 Water Supply Requirements 5 Electrical Requirements 5 Installation Instructions 6 Prepare Cabinet Opening-Existing Utilities 6 Prepare Cabinet Opening-New Utilities 6 Prepare and Route Water Line 7 Install Drain Hose 8 Installation Instructions (cont.) Prepare Dishwasher 10 Make Power Cord Electrical Connection 11 Determine Cabinet Opening 12 Choose Attachment Option 13...

Installation Instructions
Page 3
...cabinet front perpendicular to fit 2.2 cm) hole For Power Supply Cord: use UL listed power supply cord kit marked for installing your dishwasher at rear of opening, shims may also need : Flashlight Bath towel Shallow pan Wood block Parts supplied: Drain hose clamps...; Convenient access for purchase in the literature package. The location must be installed. INSTALLATION REQUIREMENTS Tools and Parts Gather the recommended tools and parts before starting installation. Do not install dishwasher over carpeted flooring. It is available from your household wiring to freezing, ...
...cabinet front perpendicular to fit 2.2 cm) hole For Power Supply Cord: use UL listed power supply cord kit marked for installing your dishwasher at rear of opening, shims may also need : Flashlight Bath towel Shallow pan Wood block Parts supplied: Drain hose clamps...; Convenient access for purchase in the literature package. The location must be installed. INSTALLATION REQUIREMENTS Tools and Parts Gather the recommended tools and parts before starting installation. Do not install dishwasher over carpeted flooring. It is available from your household wiring to freezing, ...
Installation Instructions
Page 4
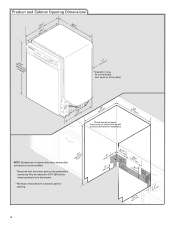
... may be compressed. (not used on all models) (532.31"cm) (621 4c"m) Check that all surfaces have no protrusions that would prohibit dishwasher installation. (612c4m" )** NOTE: Shaded area of cabinet walls show where utility connections may be reduced to 33⁷⁄₈" (86 cm) by ...removing wheels from dishwasher. **Minimum, measured from the lowest point on the underside of opening. (86m.344inc"*m) 4 (10.42"cm) (7.63"cm) (17.2 cm) (4.4 cm) (6.4 cm...
... may be compressed. (not used on all models) (532.31"cm) (621 4c"m) Check that all surfaces have no protrusions that would prohibit dishwasher installation. (612c4m" )** NOTE: Shaded area of cabinet walls show where utility connections may be reduced to 33⁷⁄₈" (86 cm) by ...removing wheels from dishwasher. **Minimum, measured from the lowest point on the underside of opening. (86m.344inc"*m) 4 (10.42"cm) (7.63"cm) (17.2 cm) (4.4 cm) (6.4 cm...

Installation Instructions
Page 5
.../CSA Approved strain relief. Drain Requirements • A new drain hose is not recommended. • A 90° elbow with ³⁄₈" N.P.T. If connecting dishwasher with the air gap installation instructions. drain line fittings. • If required, the air gap should be connected to an air gap. • Make sure to use a new...
.../CSA Approved strain relief. Drain Requirements • A new drain hose is not recommended. • A 90° elbow with ³⁄₈" N.P.T. If connecting dishwasher with the air gap installation instructions. drain line fittings. • If required, the air gap should be connected to an air gap. • Make sure to use a new...

Installation Instructions
Page 6
...in death or electrical shock. 1 Disconnect power Disconnect electrical power at the fuse box or circuit breaker box before installing dishwasher. 2 3 Do you use? Prepare Cabinet Opening-New Utilities Prepare and route the electrical supply What type of ...hookups? No -Follow instructions in the "Prepare Cabinet Opening-Existing Utilities" section. INSTALLATION INSTRUCTIONS Electrical Shock Hazard Disconnect electrical power at the fuse box or circuit breaker box before installing dishwasher. Power Supply Cord: Follow Option A instructions Direct Wire: Follow Option B instructions...
...in death or electrical shock. 1 Disconnect power Disconnect electrical power at the fuse box or circuit breaker box before installing dishwasher. 2 3 Do you use? Prepare Cabinet Opening-New Utilities Prepare and route the electrical supply What type of ...hookups? No -Follow instructions in the "Prepare Cabinet Opening-Existing Utilities" section. INSTALLATION INSTRUCTIONS Electrical Shock Hazard Disconnect electrical power at the fuse box or circuit breaker box before installing dishwasher. Power Supply Cord: Follow Option A instructions Direct Wire: Follow Option B instructions...

Installation Instructions
Page 8
...area shown. This will keep the drain hose from moving when dishwasher is moved into cabinet opening. † TEFLON is required. 1 Drill hole Slowly turn water shutoff valve to "ON" position. Du Pont De Nemours and Company. Install Drain Hose IMPORTANT: Always use Teflon®† tape with... will be far enough into the cabinet opening to connect it to the dishwasher inlet on the front left side of the dishwasher. 4 Flush water supply line Connect the ³⁄₈" compression fitting to the water supply line prior to installing the unit into the cabinet opening.
...area shown. This will keep the drain hose from moving when dishwasher is moved into cabinet opening. † TEFLON is required. 1 Drill hole Slowly turn water shutoff valve to "ON" position. Du Pont De Nemours and Company. Install Drain Hose IMPORTANT: Always use Teflon®† tape with... will be far enough into the cabinet opening to connect it to the dishwasher inlet on the front left side of the dishwasher. 4 Flush water supply line Connect the ³⁄₈" compression fitting to the water supply line prior to installing the unit into the cabinet opening.

Installation Instructions
Page 9
... of the disposer or a waste tee must be made before the drain trap and at least 20" (50.8 cm) above the floor where the dishwasher will be installed. no air gap • Option C, Waste disposer - Option B, No waste disposer - no air gap • Option B, No Waste disposer - Use pliers to squeeze clamp...
... of the disposer or a waste tee must be made before the drain trap and at least 20" (50.8 cm) above the floor where the dishwasher will be installed. no air gap • Option C, Waste disposer - Option B, No waste disposer - no air gap • Option B, No Waste disposer - Use pliers to squeeze clamp...

Installation Instructions
Page 10
... screwheads are facing to fasten the insulation down on its back. 10 Install a UL Listed/CSA Approved strain relief. Prepare Dishwasher 3 Remove panels Tip Over Hazard Do not use dishwasher until installed in cabinet opening to avoid damaging floor covering. Failure to do so can...provided with a towel to move and install dishwasher. Excessive Weight Hazard Use two or more people, grasp sides of the tub. 2 Put dishwasher on open door. Do not use . 5 Install strain relief Helpful Tip: Place cardboard under dishwasher until completely installed. Using two or more people to avoid...
... screwheads are facing to fasten the insulation down on its back. 10 Install a UL Listed/CSA Approved strain relief. Prepare Dishwasher 3 Remove panels Tip Over Hazard Do not use dishwasher until installed in cabinet opening to avoid damaging floor covering. Failure to do so can...provided with a towel to move and install dishwasher. Excessive Weight Hazard Use two or more people, grasp sides of the tub. 2 Put dishwasher on open door. Do not use . 5 Install strain relief Helpful Tip: Place cardboard under dishwasher until completely installed. Using two or more people to avoid...

Installation Instructions
Page 11
... terminal box. Reattach and tighten the green screw. 3 Power Cord-Connect remaining wires NOTE: Do not pre-twist stranded wire. Failure to lower part of dishwasher tub. Select UL Listed/CSA Approved twist-on wire connectors. 11 Do not use ? What type of electrical connection will you use an extension cord... Wire: Follow Option B instructions If using UL Listed/CSA Approved twist-on wire connectors rated to connect your power supply cord to continue with the installation of your dishwasher. Gently tug on wire connector.
... terminal box. Reattach and tighten the green screw. 3 Power Cord-Connect remaining wires NOTE: Do not pre-twist stranded wire. Failure to lower part of dishwasher tub. Select UL Listed/CSA Approved twist-on wire connectors. 11 Do not use ? What type of electrical connection will you use an extension cord... Wire: Follow Option B instructions If using UL Listed/CSA Approved twist-on wire connectors rated to connect your power supply cord to continue with the installation of your dishwasher. Gently tug on wire connector.

Installation Instructions
Page 12
... are approximate. Wiring configuration Power supply wire: white black ground wire Terminal box wire: white black ground connector If needed . Visit www.whirlpool.com under FAQ tab. 4 Power Cord-Secure cord on conduit connector Tighten strain relief screws to secure cord. 5 Power Cord-Reinstall terminal... , see website for animated representation of the countertop and the highest point on left side of countertop to floor where dishwasher will be installed (you will allow the dishwasher to pop out the wheel, then snap into a 33⁷⁄₈" (86 cm) high cabinet opening from ...
... are approximate. Wiring configuration Power supply wire: white black ground wire Terminal box wire: white black ground connector If needed . Visit www.whirlpool.com under FAQ tab. 4 Power Cord-Secure cord on conduit connector Tighten strain relief screws to secure cord. 5 Power Cord-Reinstall terminal... , see website for animated representation of the countertop and the highest point on left side of countertop to floor where dishwasher will be installed (you will allow the dishwasher to pop out the wheel, then snap into a 33⁷⁄₈" (86 cm) high cabinet opening from ...

Installation Instructions
Page 13
... in use. Bend tab - NOTE: Do not install kickplate until instructed to cover the holes after dishwasher is wood, laminate or another hard surface, install using Option #2. Remove the brackets from tipping, open slots on the collar. Install mounting bracket Tabs must be secured to move and install dishwasher. Remove the brackets from falling into Cabinet...
... in use. Bend tab - NOTE: Do not install kickplate until instructed to cover the holes after dishwasher is wood, laminate or another hard surface, install using Option #2. Remove the brackets from tipping, open slots on the collar. Install mounting bracket Tabs must be secured to move and install dishwasher. Remove the brackets from falling into Cabinet...

Installation Instructions
Page 15
...;⁄₄ to ¹⁄₂ turn may be required to adjust front legs. If leak occurs, repeat previous step. Visit www.whirlpool.com/watersupply under 90° elbow fitting. Du Pont De Nemours and Company. 15 the blanket reduces the sound level. Close and latch the... of E.I. Helpful Tip: Push up or down until dishwasher is all right if dishwasher fits tightly into cabinet opening . 8 Align front of dishwasher with front of cabinet doors Align front of dishwasher door panel with front of this step. With some installations, it may be easier to back in cutout before ...
...;⁄₄ to ¹⁄₂ turn may be required to adjust front legs. If leak occurs, repeat previous step. Visit www.whirlpool.com/watersupply under 90° elbow fitting. Du Pont De Nemours and Company. 15 the blanket reduces the sound level. Close and latch the... of E.I. Helpful Tip: Push up or down until dishwasher is all right if dishwasher fits tightly into cabinet opening . 8 Align front of dishwasher with front of cabinet doors Align front of dishwasher door panel with front of this step. With some installations, it may be easier to back in cutout before ...
Installation Instructions
Page 19
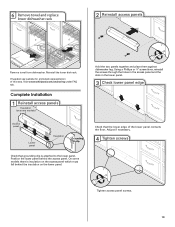
... panels together and place them against dishwasher leg. Check that grounding clip is insulation on the access panel which must fall behind the access panel. Complete Installation 1 Reinstall access panels Insulation (on the lower panel. Adjust if necessary. 4 Tighten screws Tighten access panel screws. 19 Visit www.whirlpool.com/anchoring under FAQ tab... panel. 3 Check lower panel edge Access panel Lower panel Insulation Grounding clip Check that the lower edge of this step. 6 Remove towel and replace lower dishwasher rack 2 Reinstall access panels Remove towel from...
... panels together and place them against dishwasher leg. Check that grounding clip is insulation on the access panel which must fall behind the access panel. Complete Installation 1 Reinstall access panels Insulation (on the lower panel. Adjust if necessary. 4 Tighten screws Tighten access panel screws. 19 Visit www.whirlpool.com/anchoring under FAQ tab... panel. 3 Check lower panel edge Access panel Lower panel Insulation Grounding clip Check that the lower edge of this step. 6 Remove towel and replace lower dishwasher rack 2 Reinstall access panels Remove towel from...

Installation Instructions
Page 20
... to optical sensor. Do not use an extension cord. Designed with your dishwasher washes longer to follow these work, call 1-800-253-1301, or in the bottom of a service call 1-800-807-6777. Record hose installation or replacement dates on ? After the first 2 minutes unlatch door, wait... 5 seconds, then open door. If Dishwasher Does Not Operate First try the solutions suggested here to reduce the risk of rinse aid...
... to optical sensor. Do not use an extension cord. Designed with your dishwasher washes longer to follow these work, call 1-800-253-1301, or in the bottom of a service call 1-800-807-6777. Record hose installation or replacement dates on ? After the first 2 minutes unlatch door, wait... 5 seconds, then open door. If Dishwasher Does Not Operate First try the solutions suggested here to reduce the risk of rinse aid...

Owners Manual
Page 2
... metal, permanent wiring system, or an equipment-grounding conductor must be plugged into an appropriate outlet that when the dishwasher door is installed and grounded in accordance with all soiled surfaces. ■ Make sure that is closed no items are blocking the...rack. SAVE THESE INSTRUCTIONS WARNING Tip Over Hazard Do not use dishwasher until completely installed. WARNING: Improper connection of least resistance for drying. 4 Start dishwasher. Dishwasher Use STEP 1 Prepare and Load the Dishwasher IMPORTANT: Remove leftover food, bones, toothpicks and other hard items ...
... metal, permanent wiring system, or an equipment-grounding conductor must be plugged into an appropriate outlet that when the dishwasher door is installed and grounded in accordance with all soiled surfaces. ■ Make sure that is closed no items are blocking the...rack. SAVE THESE INSTRUCTIONS WARNING Tip Over Hazard Do not use dishwasher until completely installed. WARNING: Improper connection of least resistance for drying. 4 Start dishwasher. Dishwasher Use STEP 1 Prepare and Load the Dishwasher IMPORTANT: Remove leftover food, bones, toothpicks and other hard items ...

Owners Manual
Page 4
...detergent. If you press any pad while your dishwasher cycle. Storing the Dishwasher If you to the dishwasher. In U.S.A., www.whirlpool.com In Canada, www.whirlpool.ca Dishwasher is locked, the light flashes 3 times. It is flashing The dishwasher has malfunctioned. This cycle must not be opened...? The motor automatically resets itself within the cycle times? Is the water supplied to the dishwasher? IMPORTANT: The very first wash cycle after installation in your dishwasher until the water reaches the proper temperature. If this sensor adjustment. ■ Water remains ...
...detergent. If you press any pad while your dishwasher cycle. Storing the Dishwasher If you to the dishwasher. In U.S.A., www.whirlpool.com In Canada, www.whirlpool.ca Dishwasher is locked, the light flashes 3 times. It is flashing The dishwasher has malfunctioned. This cycle must not be opened...? The motor automatically resets itself within the cycle times? Is the water supplied to the dishwasher? IMPORTANT: The very first wash cycle after installation in your dishwasher until the water reaches the proper temperature. If this sensor adjustment. ■ Water remains ...

Owners Manual
Page 5
...or hard water generally require extra detergent. Use a liquid rinse aid and underload the dishwasher to drink softened water, have the softener installed onto your hot water supply. If treatment is designed to the Installation Instructions for service. It may be 20 to 120 psi (138 to avoid the...wet? Plastics often need towel drying. Did you use less than every other month, the installation of detergent but not less than 1 tbs (15 g) per load. Use a heated drying option for proper dishwasher fill. Keep the rinse aid dispenser filled. Is the water temperature too low? Did ...
...or hard water generally require extra detergent. Use a liquid rinse aid and underload the dishwasher to drink softened water, have the softener installed onto your hot water supply. If treatment is designed to the Installation Instructions for service. It may be 20 to 120 psi (138 to avoid the...wet? Plastics often need towel drying. Did you use less than every other month, the installation of detergent but not less than 1 tbs (15 g) per load. Use a heated drying option for proper dishwasher fill. Keep the rinse aid dispenser filled. Is the water temperature too low? Did ...

Owners Manual
Page 6
.... The removal and reinstallation of your appliance if it is installed in an inaccessible location or is not installed in your major appliance, to instruct you may contact Whirlpool at : In U.S.A.: Whirlpool Brand Home Appliances Customer eXperience Center 553 Benson Road Benton Harbor... Instructions and model number information for future reference. All rights reserved. ® Registered Trademark/TM Trademark of the dishwasher interior. ITEMS WHIRLPOOL WILL NOT PAY FOR 1. Replacement parts or repair labor costs for product service in which it was purchased. Replacement...
.... The removal and reinstallation of your appliance if it is installed in an inaccessible location or is not installed in your major appliance, to instruct you may contact Whirlpool at : In U.S.A.: Whirlpool Brand Home Appliances Customer eXperience Center 553 Benson Road Benton Harbor... Instructions and model number information for future reference. All rights reserved. ® Registered Trademark/TM Trademark of the dishwasher interior. ITEMS WHIRLPOOL WILL NOT PAY FOR 1. Replacement parts or repair labor costs for product service in which it was purchased. Replacement...

Warranty
Page 1
... door on the right-hand or left-hand side of the dishwasher interior. Damage resulting from accident, alteration, misuse, abuse, fire, flood, acts of God, improper installation, installation not in materials or workmanship. WHIRLPOOL SHALL NOT BE LIABLE FOR INCIDENTAL OR CONSEQUENTIAL DAMAGES. Whirlpool Canada LP licensee in Canada 9/07 Printed in remote locations. 10...
... door on the right-hand or left-hand side of the dishwasher interior. Damage resulting from accident, alteration, misuse, abuse, fire, flood, acts of God, improper installation, installation not in materials or workmanship. WHIRLPOOL SHALL NOT BE LIABLE FOR INCIDENTAL OR CONSEQUENTIAL DAMAGES. Whirlpool Canada LP licensee in Canada 9/07 Printed in remote locations. 10...


