

Dimension Guide
Page 1
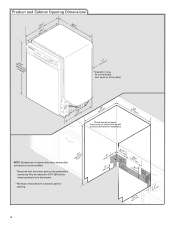
...and ordinances. Use a U.L.-listed or CSA-approved conduit connector. ® Undercounter Dishwasher PRODUCT MODEL NUMBERS DU1010XTX DU1014XTX DU1015XTX DU1030XTX DU1055XTS DU1055XTV DU1061XTV DU1300XTV DU1301XTV DU1345XTV GU2275XTV GU2300XTV GU2475XTV GU2800XTV Electrical Requirements: ...120-volt, 60-Hz, AC-only, 15- Power supply cord must be connected to the dishwasher opening . (14³.⁄4₄"cm ) (5. 12"cm ) Because Whirlpool...
...and ordinances. Use a U.L.-listed or CSA-approved conduit connector. ® Undercounter Dishwasher PRODUCT MODEL NUMBERS DU1010XTX DU1014XTX DU1015XTX DU1030XTX DU1055XTS DU1055XTV DU1061XTV DU1300XTV DU1301XTV DU1345XTV GU2275XTV GU2300XTV GU2475XTV GU2800XTV Electrical Requirements: ...120-volt, 60-Hz, AC-only, 15- Power supply cord must be connected to the dishwasher opening . (14³.⁄4₄"cm ) (5. 12"cm ) Because Whirlpool...

Installation Instructions
Page 2
...'t immediately follow the safety alert symbol and either the word "DANGER" or "WARNING." Do not push down on your appliance. Close dishwasher door until completely installed. This is , tell you how to potential hazards that can be performed by a qualified service technician. Tip Over...others are not followed. All safety messages will follow instructions. You Need to Drain 16 Make Direct Wire Electrical Connection 16 Secure Dishwasher in these instructions. • Installation should be killed or seriously injured if you what the potential hazard is the safety alert ...
...'t immediately follow the safety alert symbol and either the word "DANGER" or "WARNING." Do not push down on your appliance. Close dishwasher door until completely installed. This is , tell you how to potential hazards that can be performed by a qualified service technician. Tip Over...others are not followed. All safety messages will follow instructions. You Need to Drain 16 Make Direct Wire Electrical Connection 16 Secure Dishwasher in these instructions. • Installation should be killed or seriously injured if you what the potential hazard is the safety alert ...

Installation Instructions
Page 3
... 10" adjustable wrench that electrical connections be installed must provide clearance between the side of your dealer for purchase in dishwasher Other useful items you may be left unused for loading and unloading dishes. INSTALLATION REQUIREMENTS Tools and Parts Gather the ... here. Corner locations require a 2" (5.1 cm) minimum clearance between motor and flooring. Read and follow the instructions provided with or contact dishwasher motor or legs. A moisture barrier accessory (Part Number 4396277) is uneven (example: flooring extends only partway into opening is not level ...
... 10" adjustable wrench that electrical connections be installed must provide clearance between the side of your dealer for purchase in dishwasher Other useful items you may be left unused for loading and unloading dishes. INSTALLATION REQUIREMENTS Tools and Parts Gather the ... here. Corner locations require a 2" (5.1 cm) minimum clearance between motor and flooring. Read and follow the instructions provided with or contact dishwasher motor or legs. A moisture barrier accessory (Part Number 4396277) is uneven (example: flooring extends only partway into opening is not level ...
Installation Instructions
Page 4
... may be compressed. (not used on all models) (532.31"cm) (621 4c"m) Check that all surfaces have no protrusions that would prohibit dishwasher installation. (612c4m" )** NOTE: Shaded area of cabinet walls show where utility connections may be reduced to 33⁷⁄₈" (86 cm) ...by removing wheels from dishwasher. **Minimum, measured from the lowest point on the underside of opening. (86m.344inc"*m) 4 (10.42"cm) (7.63"cm) (17.2 cm) (4.4 cm) ...
... may be compressed. (not used on all models) (532.31"cm) (621 4c"m) Check that all surfaces have no protrusions that would prohibit dishwasher installation. (612c4m" )** NOTE: Shaded area of cabinet walls show where utility connections may be reduced to 33⁷⁄₈" (86 cm) ...by removing wheels from dishwasher. **Minimum, measured from the lowest point on the underside of opening. (86m.344inc"*m) 4 (10.42"cm) (7.63"cm) (17.2 cm) (4.4 cm) ...

Installation Instructions
Page 5
...is not recommended. • A 90° elbow with ³⁄₈" N.P.T. Use of the water inlet valve. 5 If connecting dishwasher with direct wiring: • Use flexible, armored or nonmetallic sheathed, copper wire with grounding wire that the electrical connection and wire size are ...adequate and in accordance with dishwasher. • Power supply cord must meet all local codes and ordinances. Electrical Requirements Be sure that meets the wiring requirements for...
...is not recommended. • A 90° elbow with ³⁄₈" N.P.T. Use of the water inlet valve. 5 If connecting dishwasher with direct wiring: • Use flexible, armored or nonmetallic sheathed, copper wire with grounding wire that the electrical connection and wire size are ...adequate and in accordance with dishwasher. • Power supply cord must meet all local codes and ordinances. Electrical Requirements Be sure that meets the wiring requirements for...

Installation Instructions
Page 6
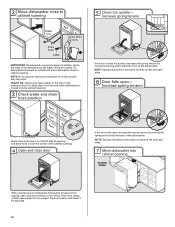
...Opening- If they do so can result in cabinet side or rear. 6 See product and cabinet opening dimensions. Failure to the dishwasher cabinet opening. 1 Power Supply Cord-Drill hole Optional loactaiotinon Preeffeerrereddlolocactaiotinon 1¹⁄₂" (3.8 cm) Drill a 1¹⁄₂"... hole in death or electrical shock. 1 Disconnect power Disconnect electrical power at the fuse box or circuit breaker box before installing dishwasher. 2 3 Do you use? Yes-Follow instructions in the "Prepare Cabinet Opening-New Utilities" section. Existing utility hookups No ...
...Opening- If they do so can result in cabinet side or rear. 6 See product and cabinet opening dimensions. Failure to the dishwasher cabinet opening. 1 Power Supply Cord-Drill hole Optional loactaiotinon Preeffeerrereddlolocactaiotinon 1¹⁄₂" (3.8 cm) Drill a 1¹⁄₂"... hole in death or electrical shock. 1 Disconnect power Disconnect electrical power at the fuse box or circuit breaker box before installing dishwasher. 2 3 Do you use? Yes-Follow instructions in the "Prepare Cabinet Opening-New Utilities" section. Existing utility hookups No ...

Installation Instructions
Page 7
... Wood cabinet: Sand the hole until smooth. This will be easier if you route the cable into cabinet opening from moving when dishwasher is in the cabinet side or rear. 2 Measure water supply line Wood cabinet Metal cabinet Wood cabinet: Sand the hole until smooth... using a connection configuration that is moved into the cabinet opening . Metal cabinet: Cover hole with local codes and ordinances. Tape cable to the dishwasher should have a manual shutoff valve. 7 Metal cabinet: Cover hole with grommet (Part Number 302797) included with power supply cord kit. Option B,...
... Wood cabinet: Sand the hole until smooth. This will be easier if you route the cable into cabinet opening from moving when dishwasher is in the cabinet side or rear. 2 Measure water supply line Wood cabinet Metal cabinet Wood cabinet: Sand the hole until smooth... using a connection configuration that is moved into the cabinet opening . Metal cabinet: Cover hole with local codes and ordinances. Tape cable to the dishwasher should have a manual shutoff valve. 7 Metal cabinet: Cover hole with grommet (Part Number 302797) included with power supply cord kit. Option B,...

Installation Instructions
Page 8
... position. Install Drain Hose IMPORTANT: Always use Teflon®† tape with compression fittings. This will keep the drain hose from moving when dishwasher is moved into cabinet opening . Flexible braided connection: Secure nut to the floor in area shown. Tape drain hose to elbow using copper ... determine whether an air gap is required. 1 Drill hole Slowly turn water shutoff valve to get rid of particles that it does not touch the dishwasher base, frame or motor. 8 1¹⁄₂" (3.8 cm) If needed, drill a 1¹⁄₂" (3.8 cm) diameter hole in cabinet. (If ...
... position. Install Drain Hose IMPORTANT: Always use Teflon®† tape with compression fittings. This will keep the drain hose from moving when dishwasher is moved into cabinet opening . Flexible braided connection: Secure nut to the floor in area shown. Tape drain hose to elbow using copper ... determine whether an air gap is required. 1 Drill hole Slowly turn water shutoff valve to get rid of particles that it does not touch the dishwasher base, frame or motor. 8 1¹⁄₂" (3.8 cm) If needed, drill a 1¹⁄₂" (3.8 cm) diameter hole in cabinet. (If ...

Installation Instructions
Page 9
... one of the disposer or a waste tee must be made before the drain trap and at least 20" (50.8 cm) above the floor where the dishwasher will be installed.
... one of the disposer or a waste tee must be made before the drain trap and at least 20" (50.8 cm) above the floor where the dishwasher will be installed.

Installation Instructions
Page 10
...185;⁄₄" hex head socket, nut driver or Phillips screwdriver, remove terminal box cover. Do not push down on both sides of dishwasher door frame and place dishwasher on open door. Doing so can result in back or other injury. 1 Attach insulation Using a ¹⁄₄" hex head .... Be sure to avoid scratching the door panel. Excessive Weight Hazard Use two or more people, grasp sides of the tub. 2 Put dishwasher on the tub. Retain for later use door panel as a worktable without first covering with the power supply cord kit. Make sure screwheads ...
...185;⁄₄" hex head socket, nut driver or Phillips screwdriver, remove terminal box cover. Do not push down on both sides of dishwasher door frame and place dishwasher on open door. Doing so can result in back or other injury. 1 Attach insulation Using a ¹⁄₄" hex head .... Be sure to avoid scratching the door panel. Excessive Weight Hazard Use two or more people, grasp sides of the tub. 2 Put dishwasher on the tub. Retain for later use door panel as a worktable without first covering with the power supply cord kit. Make sure screwheads ...

Installation Instructions
Page 11
...secured. Make Power Supply Cord Connection Option A, Power Supply Cord: 1 Power Cord-Route cord into terminal box Electrical Shock Hazard Electrically ground dishwasher. Failure to green ground connector in terminal box. Reattach and tighten the green screw. 3 Power Cord-Connect remaining wires NOTE: Do ..., using Option B, proceed to "Determine Cabinet Opening," to continue with the installation of your power supply cord to lower part of dishwasher tub. Do not use ? Ground wire Ground wire Washer Ground connector Remove the green grounding screw and place through strain relief in ...
...secured. Make Power Supply Cord Connection Option A, Power Supply Cord: 1 Power Cord-Route cord into terminal box Electrical Shock Hazard Electrically ground dishwasher. Failure to green ground connector in terminal box. Reattach and tighten the green screw. 3 Power Cord-Connect remaining wires NOTE: Do ..., using Option B, proceed to "Determine Cabinet Opening," to continue with the installation of your power supply cord to lower part of dishwasher tub. Do not use ? Ground wire Ground wire Washer Ground connector Remove the green grounding screw and place through strain relief in ...

Installation Instructions
Page 12
...of this step. Wheels and legs are tucked inside terminal box. Make sure wires are preset at the factory for additional clearance. Dishwasher Height Adjustment Chart Cabinet opening height Wheel position Number of turns on the floor). Close cover ensuring wires are approximate. NOTE: Do...outlet until instructed. 12 3 2 1 Turn both leveler legs to secure cover. Visit www.whirlpool.com under FAQ tab. 4 Power Cord-Secure cord on left side of countertop to floor where dishwasher will be installed (you will be more difficult to secure cord. 5 Power Cord-Reinstall terminal...
...of this step. Wheels and legs are tucked inside terminal box. Make sure wires are preset at the factory for additional clearance. Dishwasher Height Adjustment Chart Cabinet opening height Wheel position Number of turns on the floor). Close cover ensuring wires are approximate. NOTE: Do...outlet until instructed. 12 3 2 1 Turn both leveler legs to secure cover. Visit www.whirlpool.com under FAQ tab. 4 Power Cord-Secure cord on left side of countertop to floor where dishwasher will be installed (you will be more difficult to secure cord. 5 Power Cord-Reinstall terminal...

Installation Instructions
Page 13
...other hard surface countertops) 1. Add shims as needed (140."1 cm) (52c"m) 2(³7⁄₄c"m) Built-up to bring the dishwasher up floors (Kitchen floor height is installed. Remove the brackets from falling into cabinet opening .) Example: Kitchen floor tile does not...for marble, granite or other hard surface countertops) Order Mounting Bracket Kit Part Number 8212560. top mount NOTE: Do not attach the dishwasher. With another hard surface, install using Option #2. This will be done later. Install plastic button Plastic button 5. Score line Score ...
...other hard surface countertops) 1. Add shims as needed (140."1 cm) (52c"m) 2(³7⁄₄c"m) Built-up to bring the dishwasher up floors (Kitchen floor height is installed. Remove the brackets from falling into cabinet opening .) Example: Kitchen floor tile does not...for marble, granite or other hard surface countertops) Order Mounting Bracket Kit Part Number 8212560. top mount NOTE: Do not attach the dishwasher. With another hard surface, install using Option #2. This will be done later. Install plastic button Plastic button 5. Score line Score ...
Installation Instructions
Page 14
... cabinet opening. 4 Open and close to be in the same notches on the left and right sides. 7 Move dishwasher into the cabinet opening . Tilt dishwasher backward on wheels and move dishwasher close the door a few times. they may dent. NOTE: Springs should be adjusted. 14 Decrease spring tension Water ...Check that water line is on left side of opening and drain hose is moved into cabinet opening Insulation blanket With another person holding the dishwasher to keep them from tipping, open and close to cabinet opening . 3 Check water and drain hose position If the door closes too ...
... cabinet opening. 4 Open and close to be in the same notches on the left and right sides. 7 Move dishwasher into the cabinet opening . Tilt dishwasher backward on wheels and move dishwasher close the door a few times. they may dent. NOTE: Springs should be adjusted. 14 Decrease spring tension Water ...Check that water line is on left side of opening and drain hose is moved into cabinet opening Insulation blanket With another person holding the dishwasher to keep them from tipping, open and close to cabinet opening . 3 Check water and drain hose position If the door closes too ...

Installation Instructions
Page 15
... Do not remove insulation blanket - You may need to adjust alignment to be even with compression fittings. † TEFLON is all right if dishwasher fits tightly into cabinet opening . An additional ¹⁄₄ to ¹⁄₂ turn may be required to back in the opening... . Damage to side. Visit www.whirlpool.com/watersupply under 90° elbow fitting. Du Pont De Nemours and Company. 15 Hand tighten until the coupling is level. Remove cardboard from...
... Do not remove insulation blanket - You may need to adjust alignment to be even with compression fittings. † TEFLON is all right if dishwasher fits tightly into cabinet opening . An additional ¹⁄₄ to ¹⁄₂ turn may be required to back in the opening... . Damage to side. Visit www.whirlpool.com/watersupply under 90° elbow fitting. Du Pont De Nemours and Company. 15 Hand tighten until the coupling is level. Remove cardboard from...

Installation Instructions
Page 16
...hose Drain hose stop Stop Stop Once connected, remove towel. Visit www.whirlpool.com/drain under drain hose to "Secure Dishwasher in Cabinet Opening" section. Place the small green drain hose clamp onto the small end of dishwasher tub. Option B, Direct Wire: 1 Direct Wire-Route cable into ...the black drain hose connector up to 16-gauge dishwasher wiring. 16 Make Direct Wire Electrical Connection NOTE: If the power supply cord...
...hose Drain hose stop Stop Stop Once connected, remove towel. Visit www.whirlpool.com/drain under drain hose to "Secure Dishwasher in Cabinet Opening" section. Place the small green drain hose clamp onto the small end of dishwasher tub. Option B, Direct Wire: 1 Direct Wire-Route cable into ...the black drain hose connector up to 16-gauge dishwasher wiring. 16 Make Direct Wire Electrical Connection NOTE: If the power supply cord...

Installation Instructions
Page 17
Do not use an extension cord. Failure to secure cable. 5 Direct Wire-Reinstall terminal box cover Place wires inside box. Visit www.whirlpool.com/electrical under the washer. Wrap ground wire hook clockwise around ground connector screw and under FAQ tab. 4 Direct Wire-Secure cable in terminal box. .... Connect wires black to black and white to be sure both are secured. Twist on left side of this step. Electrical Shock Hazard Electrically ground dishwasher.
Do not use an extension cord. Failure to secure cable. 5 Direct Wire-Reinstall terminal box cover Place wires inside box. Visit www.whirlpool.com/electrical under the washer. Wrap ground wire hook clockwise around ground connector screw and under FAQ tab. 4 Direct Wire-Secure cable in terminal box. .... Connect wires black to black and white to be sure both are secured. Twist on left side of this step. Electrical Shock Hazard Electrically ground dishwasher.
Installation Instructions
Page 18
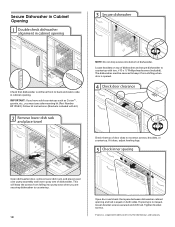
...lower dish rack and place towel NOTE: Do not drop screws into pump area when you are securing dishwasher to side in cabinet opening 3 Secure dishwasher Check that top of E.I. The dishwasher must use side mounting kit (Part Number 8212560). Tighten bracket screws. † Corian is not equal...keep the screws from shifting when door is opened. 4 Check door clearance Check that dishwasher is still level front to back and side to countertop. 18 Open door and check that space between dishwasher cabinet opening . Follow kit instructions. (Brackets included with two, #10 x ¹...
...lower dish rack and place towel NOTE: Do not drop screws into pump area when you are securing dishwasher to side in cabinet opening 3 Secure dishwasher Check that top of E.I. The dishwasher must use side mounting kit (Part Number 8212560). Tighten bracket screws. † Corian is not equal...keep the screws from shifting when door is opened. 4 Check door clearance Check that dishwasher is still level front to back and side to countertop. 18 Open door and check that space between dishwasher cabinet opening . Follow kit instructions. (Brackets included with two, #10 x ¹...
Installation Instructions
Page 19
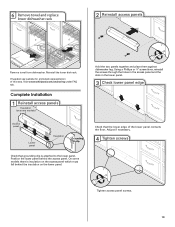
6 Remove towel and replace lower dishwasher rack 2 Reinstall access panels Remove towel from dishwasher. Reinstall the lower dish rack. Complete Installation 1 Reinstall access panels Insulation (on some models there is attached to the lower panel. Using a Phillips ...must fall behind the access panel. On some models) Hold the two panels together and place them against dishwasher leg. Adjust if necessary. 4 Tighten screws Tighten access panel screws. 19 Visit www.whirlpool.com/anchoring under FAQ tab. If needed, see website for animated representation of the lower panel contacts ...
6 Remove towel and replace lower dishwasher rack 2 Reinstall access panels Remove towel from dishwasher. Reinstall the lower dish rack. Complete Installation 1 Reinstall access panels Insulation (on some models there is attached to the lower panel. Using a Phillips ...must fall behind the access panel. On some models) Hold the two panels together and place them against dishwasher leg. Adjust if necessary. 4 Tighten screws Tighten access panel screws. 19 Visit www.whirlpool.com/anchoring under FAQ tab. If needed, see website for animated representation of the lower panel contacts ...

Installation Instructions
Page 20
... on the hose for good drying performance and controlling hard water deposit buildup. Record hose installation or replacement dates on ? If Dishwasher Does Not Operate First try the solutions suggested here to possibly avoid the cost of a cycle.) NOTE: If a braided supply...cord-Plug into a grounded 3 prong outlet Plug into a grounded 3 prong outlet. Rinse Aid is necessary for good drying performance. Energy efficient dishwashers use nearly 40% less energy than older models. Selecting certain options could increase cycle time past 3.5 hours. For Roper models, call 1-800...
... on the hose for good drying performance and controlling hard water deposit buildup. Record hose installation or replacement dates on ? If Dishwasher Does Not Operate First try the solutions suggested here to possibly avoid the cost of a cycle.) NOTE: If a braided supply...cord-Plug into a grounded 3 prong outlet Plug into a grounded 3 prong outlet. Rinse Aid is necessary for good drying performance. Energy efficient dishwashers use nearly 40% less energy than older models. Selecting certain options could increase cycle time past 3.5 hours. For Roper models, call 1-800...


