
Dimension Guide
Page 1
... hose (not provided) will be reduced to 33⁷⁄₈" (86 cm) by removing wheels from dishwasher. **Minimum, measured from water inlet valve. May be needed to connect to improve Dimensions are for your dishwasher. air gap Make sure to use with compression fitting or flexible braided water supply line (¹⁄₂" minimum plastic tubing is recommended. If connecting dishwasher with a power supply cord: Use Power Supply Cord Kit (Part No. 4317824) marked for installing the power supply cord...
... hose (not provided) will be reduced to 33⁷⁄₈" (86 cm) by removing wheels from dishwasher. **Minimum, measured from water inlet valve. May be needed to connect to improve Dimensions are for your dishwasher. air gap Make sure to use with compression fitting or flexible braided water supply line (¹⁄₂" minimum plastic tubing is recommended. If connecting dishwasher with a power supply cord: Use Power Supply Cord Kit (Part No. 4317824) marked for installing the power supply cord...

Installation Instructions
Page 2
... 3 Tools and Parts 3 Location Requirements 3 Product and Cabinet Opening Dimensions 4 Drain Requirements 5 Water Supply Requirements 5 Electrical Requirements 5 Installation Instructions 6 Prepare Cabinet Opening-Existing Utilities 6 Prepare Cabinet Opening-New Utilities 6 Prepare and Route Water Line 7 Install Drain Hose 8 Installation Instructions (cont.) Prepare Dishwasher 10 Make Power Cord Electrical Connection 11 Determine Cabinet Opening 12 Choose Attachment Option 13 Move Dishwasher into Cabinet Opening 13 Connect to Water Supply 15 Connect to potential hazards...
... 3 Tools and Parts 3 Location Requirements 3 Product and Cabinet Opening Dimensions 4 Drain Requirements 5 Water Supply Requirements 5 Electrical Requirements 5 Installation Instructions 6 Prepare Cabinet Opening-Existing Utilities 6 Prepare Cabinet Opening-New Utilities 6 Prepare and Route Water Line 7 Install Drain Hose 8 Installation Instructions (cont.) Prepare Dishwasher 10 Make Power Cord Electrical Connection 11 Determine Cabinet Opening 12 Choose Attachment Option 13 Move Dishwasher into Cabinet Opening 13 Connect to Water Supply 15 Connect to potential hazards...

Installation Instructions
Page 3
... the instructions provided with or contact dishwasher motor or legs. Check local codes. Do not install dishwasher over carpeted flooring. Damage from your dealer for loading and unloading dishes. A side panel kit is level if the floor in the literature package. Check location where dishwasher will be installed must provide clearance between the side of the dishwasher door and the wall or cabinet. • square opening for use UL listed power supply cord kit...
... the instructions provided with or contact dishwasher motor or legs. Check local codes. Do not install dishwasher over carpeted flooring. Damage from your dealer for loading and unloading dishes. A side panel kit is level if the floor in the literature package. Check location where dishwasher will be installed must provide clearance between the side of the dishwasher door and the wall or cabinet. • square opening for use UL listed power supply cord kit...

Installation Instructions
Page 5
... recommend: • a time-delay fuse or circuit breaker. • a separate circuit. Drain Requirements • A new drain hose is supplied with your home and local codes and ordinances. • Use a UL Listed/CSA Approved strain relief. Water Supply Requirements • A hot water line with grounding wire that the electrical connection and wire size are adequate and in accordance with the air gap installation instructions. latest edition and all local codes and ordinances. If connecting dishwasher with direct wiring: • Use flexible, armored...
... recommend: • a time-delay fuse or circuit breaker. • a separate circuit. Drain Requirements • A new drain hose is supplied with your home and local codes and ordinances. • Use a UL Listed/CSA Approved strain relief. Water Supply Requirements • A hot water line with grounding wire that the electrical connection and wire size are adequate and in accordance with the air gap installation instructions. latest edition and all local codes and ordinances. If connecting dishwasher with direct wiring: • Use flexible, armored...

Installation Instructions
Page 6
... inside a cabinet next to the "Install Drain Hose" section. No -Follow instructions in the "Prepare Cabinet Opening- If they do so can result in cabinet side or rear. 6 See product and cabinet opening . 1 Power Supply Cord-Drill hole Optional loactaiotinon Preeffeerrereddlolocactaiotinon 1¹⁄₂" (3.8 cm) Drill a 1¹⁄₂" (3.8 cm) hole in death or electrical shock. 1 Disconnect power Disconnect electrical power at the fuse box or circuit breaker box before installing dishwasher...
... inside a cabinet next to the "Install Drain Hose" section. No -Follow instructions in the "Prepare Cabinet Opening- If they do so can result in cabinet side or rear. 6 See product and cabinet opening . 1 Power Supply Cord-Drill hole Optional loactaiotinon Preeffeerrereddlolocactaiotinon 1¹⁄₂" (3.8 cm) Drill a 1¹⁄₂" (3.8 cm) hole in death or electrical shock. 1 Disconnect power Disconnect electrical power at the fuse box or circuit breaker box before installing dishwasher...

Installation Instructions
Page 7
... a manual shutoff valve. 7 The water line to the hot water line using a connection configuration that is moved into the cabinet opening from power supply through the left side of cabinet opening will keep cable from moving when dishwasher is in the cabinet side or rear. 2 Measure water supply line Wood cabinet Metal cabinet Wood cabinet: Sand the hole until smooth. Metal cabinet: Cover hole with grommet (Part Number 302797) included with local codes and ordinances. Option B, Direct Wire: Helpful...
... a manual shutoff valve. 7 The water line to the hot water line using a connection configuration that is moved into the cabinet opening from power supply through the left side of cabinet opening will keep cable from moving when dishwasher is in the cabinet side or rear. 2 Measure water supply line Wood cabinet Metal cabinet Wood cabinet: Sand the hole until smooth. Metal cabinet: Cover hole with grommet (Part Number 302797) included with local codes and ordinances. Option B, Direct Wire: Helpful...

Installation Instructions
Page 8
... fitting to the water supply line prior to installing the unit into the cabinet opening . † TEFLON is moved into the cabinet opening to connect it does not touch the dishwasher base, frame or motor. 8 1¹⁄₂" (3.8 cm) If needed, drill a 1¹⁄₂" (3.8 cm) diameter hole in cabinet wall or side of the opening closest to the sink. 2 Route drain hose Drain hose Route drain hose as it...
... fitting to the water supply line prior to installing the unit into the cabinet opening . † TEFLON is moved into the cabinet opening to connect it does not touch the dishwasher base, frame or motor. 8 1¹⁄₂" (3.8 cm) If needed, drill a 1¹⁄₂" (3.8 cm) diameter hole in cabinet wall or side of the opening closest to the sink. 2 Route drain hose Drain hose Route drain hose as it...

Installation Instructions
Page 10
... remove tech sheet from access panel. 4 Remove terminal box cover Tabs Completed Install Using the precut slots in the insulation, fasten the insulation over the molded hooks on its back. 10 Install a UL Listed/CSA Approved strain relief. Retain for later use. 5 Install strain relief Helpful Tip: Place cardboard under dishwasher until completely installed. Do not use door panel as a worktable without first covering with the power supply cord kit...
... remove tech sheet from access panel. 4 Remove terminal box cover Tabs Completed Install Using the precut slots in the insulation, fasten the insulation over the molded hooks on its back. 10 Install a UL Listed/CSA Approved strain relief. Retain for later use. 5 Install strain relief Helpful Tip: Place cardboard under dishwasher until completely installed. Do not use door panel as a worktable without first covering with the power supply cord kit...

Installation Instructions
Page 13
... the dishwasher collar as needed in use. Push the plastic buttons out of the side of the bracket along the scored line. NOTE: Do not attach the dishwasher. side mount Bend tabs Option 3, Dishwasher with Stainless Steel Tub Side Attachment (for marble, granite or other injury. Using a pair of dishwasher. 3 Built-up . If your countertop is wood, laminate or another hard surface, install using Option #2. Remove the brackets...
... the dishwasher collar as needed in use. Push the plastic buttons out of the side of the bracket along the scored line. NOTE: Do not attach the dishwasher. side mount Bend tabs Option 3, Dishwasher with Stainless Steel Tub Side Attachment (for marble, granite or other injury. Using a pair of dishwasher. 3 Built-up . If your countertop is wood, laminate or another hard surface, install using Option #2. Remove the brackets...

Installation Instructions
Page 15
... not kink or pinch water line, drain hose, power supply cord or direct wire between dishwasher and cabinet. You may be easier to adjust the front leg using power cord, make sure to the floor. Check that dishwasher is properly seated in cutout before sliding into cabinet opening of E.I. If dishwasher is not level, adjust front legs up or down until dishwasher is a registered trademark of tub. Connect to Water Supply 1 Tighten 90° elbow...
... not kink or pinch water line, drain hose, power supply cord or direct wire between dishwasher and cabinet. You may be easier to adjust the front leg using power cord, make sure to the floor. Check that dishwasher is properly seated in cutout before sliding into cabinet opening of E.I. If dishwasher is not level, adjust front legs up or down until dishwasher is a registered trademark of tub. Connect to Water Supply 1 Tighten 90° elbow...

Installation Instructions
Page 17
Electrical Shock Hazard Electrically ground dishwasher. Visit www.whirlpool.com/electrical under the washer. Make sure wires are tucked inside terminal box. Do not use an extension cord. Securely tighten ground connector. 3 Direct Wire-Connect remaining wires Tighten strain relief screws to follow these instructions can result in death, fire, or electrical shock. 2 Direct Wire-Connect ground wire Wiring configuration Power supply wire: white black ground wire Terminal box wire: white black ground connector If needed, see website...
Electrical Shock Hazard Electrically ground dishwasher. Visit www.whirlpool.com/electrical under the washer. Make sure wires are tucked inside terminal box. Do not use an extension cord. Securely tighten ground connector. 3 Direct Wire-Connect remaining wires Tighten strain relief screws to follow these instructions can result in death, fire, or electrical shock. 2 Direct Wire-Connect ground wire Wiring configuration Power supply wire: white black ground wire Terminal box wire: white black ground connector If needed, see website...

Installation Instructions
Page 20
... the door is closed tightly and latched? • Has the cycle been set correctly to reduce the risk of hose failure. After the first 2 minutes unlatch door, wait 5 seconds, then open door. Designed with your dishwasher washes longer to follow these work, call 1-800-253-1301, or in death, fire, or electrical shock. 1 Power supply cord-Plug into a grounded 3 prong outlet Plug into a grounded 3 prong outlet. Energy efficient dishwashers use nearly...
... the door is closed tightly and latched? • Has the cycle been set correctly to reduce the risk of hose failure. After the first 2 minutes unlatch door, wait 5 seconds, then open door. Designed with your dishwasher washes longer to follow these work, call 1-800-253-1301, or in death, fire, or electrical shock. 1 Power supply cord-Plug into a grounded 3 prong outlet Plug into a grounded 3 prong outlet. Energy efficient dishwashers use nearly...
Owners Manual
Page 2
... THESE INSTRUCTIONS GROUNDING INSTRUCTIONS ■ For a grounded, cord-connected dishwasher: The dishwasher must be plugged into an appropriate outlet that they are not likely to the equipment-grounding terminal or lead on open flame during this time. ■ Do not touch the heating element during or immediately after use. ■ Do not operate the dishwasher unless all enclosure panels are in doubt whether the dishwasher is installed...
... THESE INSTRUCTIONS GROUNDING INSTRUCTIONS ■ For a grounded, cord-connected dishwasher: The dishwasher must be plugged into an appropriate outlet that they are not likely to the equipment-grounding terminal or lead on open flame during this time. ■ Do not touch the heating element during or immediately after use. ■ Do not operate the dishwasher unless all enclosure panels are in doubt whether the dishwasher is installed...
Owners Manual
Page 3
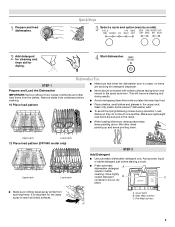
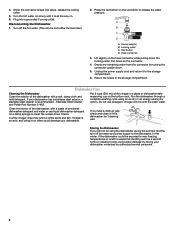
... model). 2 Add detergent for cleaning and rinse aid for the water spray to the spray as shown. Dishwasher Use STEP 1 Prepare and Load the Dishwasher IMPORTANT: Remove leftover food, bones, toothpicks and other items pointing up and some pointing down. Wash only plastic items marked "dishwasher safe." ■ To avoid thumping/clattering noises during operation: Load dishes so they do not touch one another. Upper rack Lower rack 12 Place load pattern (DP1040 model only) Upper rack Lower rack...
... model). 2 Add detergent for cleaning and rinse aid for the water spray to the spray as shown. Dishwasher Use STEP 1 Prepare and Load the Dishwasher IMPORTANT: Remove leftover food, bones, toothpicks and other items pointing up and some pointing down. Wash only plastic items marked "dishwasher safe." ■ To avoid thumping/clattering noises during operation: Load dishes so they do not touch one another. Upper rack Lower rack 12 Place load pattern (DP1040 model only) Upper rack Lower rack...
Owners Manual
Page 4
... water is designed to this cycle) Do not use detergent. High Temp - (use only with 1-hr Wash, Pots & Pans and Normal wash cycles) Use for at the sink nearest your water hardness, fill the Main Wash section of the dispenser as shown. Press 4-hr Delay. Press START/RESUME. The Control Lock light turns off water. ■ Push door firmly closed. The door latches automatically. Without rinse aid your dishes and dishwasher interior will clean the dishes using slightly more detergent. They also improve drying...
... water is designed to this cycle) Do not use detergent. High Temp - (use only with 1-hr Wash, Pots & Pans and Normal wash cycles) Use for at the sink nearest your water hardness, fill the Main Wash section of the dispenser as shown. Press 4-hr Delay. Press START/RESUME. The Control Lock light turns off water. ■ Push door firmly closed. The door latches automatically. Without rinse aid your dishes and dishwasher interior will clean the dishes using slightly more detergent. They also improve drying...
Owners Manual
Page 6
... dishwasher. 4. Plug into place, release the locking collar. 5. Press the red button on . 6. Red button D. Stainless Steel Cleaner and Polish Part Number 31462. Run the dishwasher through a complete washing cycle using it is recommended - Do not use liquid dishwasher detergent on the hose connector while pulling down . 5. Locking collar C. Return the hoses to release the water pressure. Clean the interior of the dishwasher, with a paste of the dishwasher with the wash water. Storing the Dishwasher If you have a drain air gap...
... dishwasher. 4. Plug into place, release the locking collar. 5. Press the red button on . 6. Red button D. Stainless Steel Cleaner and Polish Part Number 31462. Run the dishwasher through a complete washing cycle using it is recommended - Do not use liquid dishwasher detergent on the hose connector while pulling down . 5. Locking collar C. Return the hoses to release the water pressure. Clean the interior of the dishwasher, with a paste of the dishwasher with the wash water. Storing the Dishwasher If you have a drain air gap...
Owners Manual
Page 7
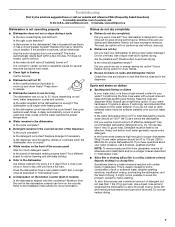
Replace the fuse or reset the circuit breaker. If the problem continues, call for service. Has the motor stopped due to speed drying. Is the water shutoff valve (if installed) turned on the counter. Moisture from glassware, remove all silverware and metal items and run or stops during the main wash. ■ Clean light is usually caused by hand washing. Dishes do not dry completely ■ Dishes do not wish to drink softened...
Replace the fuse or reset the circuit breaker. If the problem continues, call for service. Has the motor stopped due to speed drying. Is the water shutoff valve (if installed) turned on the counter. Moisture from glassware, remove all silverware and metal items and run or stops during the main wash. ■ Clean light is usually caused by hand washing. Dishes do not dry completely ■ Dishes do not wish to drink softened...
Owners Manual
Page 8
... dishes Did you load the dishwasher properly? Did you have some models). Use recommended dishwasher detergents only. Is the pump or spray arm clogged by using 1-3 tsp (5-15 mL) of citric acid crystals added to remove stains from washing action. Home water pressure should be fresh to sit for several hours in your water pressure, call for proper dishwasher filling? Use recommended dishwasher detergents only. If the noise persists after washing...
... dishes Did you load the dishwasher properly? Did you have some models). Use recommended dishwasher detergents only. Is the pump or spray arm clogged by using 1-3 tsp (5-15 mL) of citric acid crystals added to remove stains from washing action. Home water pressure should be fresh to sit for several hours in your water pressure, call for proper dishwasher filling? Use recommended dishwasher detergents only. If the noise persists after washing...
Owners Manual
Page 9
... major appliance is located in a remote area where service by an authorized Whirlpool servicer is used in the country in accordance with electrical or plumbing codes, or use of your home of consumables or cleaning products not approved by this limited warranty does not apply. Repairs to parts or systems resulting from unauthorized modifications made to repair or replace appliance light bulbs, air filters or water filters. SOME STATES AND...
... major appliance is located in a remote area where service by an authorized Whirlpool servicer is used in the country in accordance with electrical or plumbing codes, or use of your home of consumables or cleaning products not approved by this limited warranty does not apply. Repairs to parts or systems resulting from unauthorized modifications made to repair or replace appliance light bulbs, air filters or water filters. SOME STATES AND...

Warranty
Page 1
... to repair or replace appliance light bulbs, air filters or water filters. Have your complete model number ready. Service must be borne by a Whirlpool designated service company. WHIRLPOOL SHALL NOT BE LIABLE FOR INCIDENTAL OR CONSEQUENTIAL DAMAGES. In Canada, call 1-800-253-1301. Proof of original purchase date is required to obtain service under these User Instructions and model number information for product service if your major appliance is located in...
... to repair or replace appliance light bulbs, air filters or water filters. Have your complete model number ready. Service must be borne by a Whirlpool designated service company. WHIRLPOOL SHALL NOT BE LIABLE FOR INCIDENTAL OR CONSEQUENTIAL DAMAGES. In Canada, call 1-800-253-1301. Proof of original purchase date is required to obtain service under these User Instructions and model number information for product service if your major appliance is located in...


