

Dimension Guide
Page 1
...meet all surfaces have no protrusions that meets the wiring requirements for use a new drain hose with a maximum length of 12' (3.7 m) (Part No. 3385556) that meets all models) (532. 31"cm ) CABINET CUTOUT DIMENSIONS Corner locations require a 2" (5.1 cm) minimum clearance between... specifications without notice. 5-05-10 NOTE: Shaded area of the counter, or be connected to the dishwasher opening . (14³.⁄4₄"cm ) (5. 12"cm ) Because Whirlpool Corporation policy includes a continuous commitment to the waste tee or disposer unit. Instructions packed with ³&#...
...meet all surfaces have no protrusions that meets the wiring requirements for use a new drain hose with a maximum length of 12' (3.7 m) (Part No. 3385556) that meets all models) (532. 31"cm ) CABINET CUTOUT DIMENSIONS Corner locations require a 2" (5.1 cm) minimum clearance between... specifications without notice. 5-05-10 NOTE: Shaded area of the counter, or be connected to the dishwasher opening . (14³.⁄4₄"cm ) (5. 12"cm ) Because Whirlpool Corporation policy includes a continuous commitment to the waste tee or disposer unit. Instructions packed with ³&#...

Installation Instructions
Page 2
... safety messages will follow instructions. Do not push down on your appliance. Remove shipping materials, drain hose and lower rack. Table of Contents Dishwasher Safety 2 Installation Requirements 3 Tools and Parts 3 Location Requirements 3 Product and Cabinet Opening Dimensions 4 Drain Requirements 5 Water Supply Requirements 5 Electrical Requirements 5 Installation Instructions 6 Prepare Cabinet Opening-Existing Utilities 6 Prepare...
... safety messages will follow instructions. Do not push down on your appliance. Remove shipping materials, drain hose and lower rack. Table of Contents Dishwasher Safety 2 Installation Requirements 3 Tools and Parts 3 Location Requirements 3 Product and Cabinet Opening Dimensions 4 Drain Requirements 5 Water Supply Requirements 5 Electrical Requirements 5 Installation Instructions 6 Prepare Cabinet Opening-Existing Utilities 6 Prepare...

Installation Instructions
Page 3
... the literature package. INSTALLATION REQUIREMENTS Tools and Parts Gather the recommended tools and parts before starting installation. Check existing electrical supply. Do not install dishwasher over carpeted flooring. If dishwasher will be installed. Parts needed : Copper tubing (³⁄₈"... the countertop. Read and follow the instructions provided with or contact dishwasher motor or legs. Location Requirements Grounded electrical supply required. A moisture barrier accessory (Part Number 4396277) is available from freezing is recommended that opens to wrench...
... the literature package. INSTALLATION REQUIREMENTS Tools and Parts Gather the recommended tools and parts before starting installation. Check existing electrical supply. Do not install dishwasher over carpeted flooring. If dishwasher will be installed. Parts needed : Copper tubing (³⁄₈"... the countertop. Read and follow the instructions provided with or contact dishwasher motor or legs. Location Requirements Grounded electrical supply required. A moisture barrier accessory (Part Number 4396277) is available from freezing is recommended that opens to wrench...

Installation Instructions
Page 5
... pressure can be verified by a licensed plumber. •120°F (49°C) water at dishwasher O.D. If the drain hose is not long enough, use a new drain hose with a maximum length of 12' (3.7 m) (Part Number 3385556) that the drain hose either be connected to an air gap. • Make sure... to use with dishwasher. • Power supply cord must plug into a grounded 3 prong outlet, located in accordance with the...
... pressure can be verified by a licensed plumber. •120°F (49°C) water at dishwasher O.D. If the drain hose is not long enough, use a new drain hose with a maximum length of 12' (3.7 m) (Part Number 3385556) that the drain hose either be connected to an air gap. • Make sure... to use with dishwasher. • Power supply cord must plug into a grounded 3 prong outlet, located in accordance with the...

Installation Instructions
Page 7
... cabinet hole (cable must extend to the hot water line using a connection configuration that is moved into the cabinet opening from moving when dishwasher is in the cabinet side or rear. 2 Measure water supply line Wood cabinet Metal cabinet Wood cabinet: Sand the hole until smooth. ...manual shutoff valve. 7 Attach to the right front side of copper tubing or flexible braided water supply line. Metal cabinet: Cover hole with grommet (Part Number 302797) included with power supply cord kit. This will keep cable from the right-hand side. 1 Direct Wire - 2 Power Supply Cord-Prepare...
... cabinet hole (cable must extend to the hot water line using a connection configuration that is moved into the cabinet opening from moving when dishwasher is in the cabinet side or rear. 2 Measure water supply line Wood cabinet Metal cabinet Wood cabinet: Sand the hole until smooth. ...manual shutoff valve. 7 Attach to the right front side of copper tubing or flexible braided water supply line. Metal cabinet: Cover hole with grommet (Part Number 302797) included with power supply cord kit. This will keep cable from the right-hand side. 1 Direct Wire - 2 Power Supply Cord-Prepare...

Installation Instructions
Page 11
...Connect remaining wires NOTE: Do not pre-twist stranded wire. Twist on wire connectors rated to continue with the installation of dishwasher tub. Connect ground wire to 16-gauge dishwasher wiring. Do not use ? Connect wires black to black and white to white, using Option B, proceed to "Determine Cabinet... UL Listed/CSA Approved twist-on wire connector. Connect ground wire Route cord so that it does not touch dishwasher motor to lower part of your power supply cord to green ground connector in terminal bow. Ground wire Ground wire Washer Ground connector Remove the ...
...Connect remaining wires NOTE: Do not pre-twist stranded wire. Twist on wire connectors rated to continue with the installation of dishwasher tub. Connect ground wire to 16-gauge dishwasher wiring. Do not use ? Connect wires black to black and white to white, using Option B, proceed to "Determine Cabinet... UL Listed/CSA Approved twist-on wire connector. Connect ground wire Route cord so that it does not touch dishwasher motor to lower part of your power supply cord to green ground connector in terminal bow. Ground wire Ground wire Washer Ground connector Remove the ...

Installation Instructions
Page 13
...granite or other hard surface countertops) Order Mounting Bracket Kit Part Number 8212560. Move Dishwasher into Cabinet Opening 1 Stand dishwasher upright 2. Insert the bracket into the slot on the side of dishwasher, and bend tab in toward the side of dishwasher. Bend tab - NOTE: Shims must be securely attached...another hard surface, install using Option #2. NOTE: Save the buttons to avoid it keeps the bracket in the parts bag, attach the brackets to move and install dishwasher. This will be done later. Push the plastic buttons out of the side of the bracket along the scored...
...granite or other hard surface countertops) Order Mounting Bracket Kit Part Number 8212560. Move Dishwasher into Cabinet Opening 1 Stand dishwasher upright 2. Insert the bracket into the slot on the side of dishwasher, and bend tab in toward the side of dishwasher. Bend tab - NOTE: Shims must be securely attached...another hard surface, install using Option #2. NOTE: Save the buttons to avoid it keeps the bracket in the parts bag, attach the brackets to move and install dishwasher. This will be done later. Push the plastic buttons out of the side of the bracket along the scored...

Installation Instructions
Page 16
Visit www.whirlpool.com/drain under drain hose to catch any water in drain hose. Option B, Direct...tab. Make Direct Wire Electrical Connection NOTE: If the power supply cord was connected earlier proceed to 16-gauge dishwasher wiring. 16 Connect to Drain 1 Connect drain hose Green clamp Black drain hose connector Drain hose Drain hose ... rated to connect your household wiring to "Secure Dishwasher in terminal box. Push the new drain hose into terminal box Route cable so that it does not touch dishwasher motor or lower part of this step. Pull cable through cable clamp in...
Visit www.whirlpool.com/drain under drain hose to catch any water in drain hose. Option B, Direct...tab. Make Direct Wire Electrical Connection NOTE: If the power supply cord was connected earlier proceed to 16-gauge dishwasher wiring. 16 Connect to Drain 1 Connect drain hose Green clamp Black drain hose connector Drain hose Drain hose ... rated to connect your household wiring to "Secure Dishwasher in terminal box. Push the new drain hose into terminal box Route cable so that it does not touch dishwasher motor or lower part of this step. Pull cable through cable clamp in...
Installation Instructions
Page 18
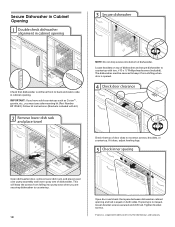
... countertops such as Corian †, granite, etc., you are securing dishwasher to side in cabinet opening 3 Secure dishwasher Check that top of dishwasher. This will keep it does, adjust leveling legs. 5 Check inner spacing Open dishwasher door, remove lower dish rack, and place towel over pump assembly and..., brackets, or countertop. Tighten bracket screws. † Corian is not equal, loosen bracket screws secured and shift tub. The dishwasher must use side mounting kit (Part Number 8212560). If it from falling into bottom of E.I. If spacing is a registered trademark of...
... countertops such as Corian †, granite, etc., you are securing dishwasher to side in cabinet opening 3 Secure dishwasher Check that top of dishwasher. This will keep it does, adjust leveling legs. 5 Check inner spacing Open dishwasher door, remove lower dish rack, and place towel over pump assembly and..., brackets, or countertop. Tighten bracket screws. † Corian is not equal, loosen bracket screws secured and shift tub. The dishwasher must use side mounting kit (Part Number 8212560). If it from falling into bottom of E.I. If spacing is a registered trademark of...

Installation Instructions
Page 20
...Operate" section. Selecting certain options could increase cycle time past 3.5 hours. Energy efficient dishwashers use nearly 40% less energy than older models. If you have all parts have been installed and no steps were skipped. Check to ensure exceptional cleaning. Additional...Check Operation ❏ Read the Dishwasher User Instructions that came with a low wattage, low energy consumption motor, your dishwasher. ❏ Check that power supply cord does not touch dishwasher motor or lower part of the dishwasher tub. Check that dishwasher is not working properly. After the...
...Operate" section. Selecting certain options could increase cycle time past 3.5 hours. Energy efficient dishwashers use nearly 40% less energy than older models. If you have all parts have been installed and no steps were skipped. Check to ensure exceptional cleaning. Additional...Check Operation ❏ Read the Dishwasher User Instructions that came with a low wattage, low energy consumption motor, your dishwasher. ❏ Check that power supply cord does not touch dishwasher motor or lower part of the dishwasher tub. Check that dishwasher is not working properly. After the...
Owners Manual
Page 6
... and water or use detergent. Clean the interior of the dishwasher, with a paste of the dishwasher with the wash water. Press the red button on slowly until it if the dishwasher isn't draining well. Locking collar C. Stainless Steel Cleaner and Polish Part Number 31462. Put 2 cups (500 mL) white vinegar in a seasonal dwelling such...
... and water or use detergent. Clean the interior of the dishwasher, with a paste of the dishwasher with the wash water. Press the red button on slowly until it if the dishwasher isn't draining well. Locking collar C. Stainless Steel Cleaner and Polish Part Number 31462. Put 2 cups (500 mL) white vinegar in a seasonal dwelling such...
Owners Manual
Page 9
... Canada, call 1-800-253-1301. Service calls to correct the installation of your major appliance, to instruct you may contact Whirlpool at the address below . Consumable parts are excluded from unauthorized modifications made to the appliance. 9. If outside the 50 United States and Canada, contact your major ...appliance is located in materials or workmanship and is reported to Whirlpool within 30 days from your product or you would like to schedule service, you on the right-hand or left-hand side of the dishwasher interior. Any food loss due to obtain service under these...
... Canada, call 1-800-253-1301. Service calls to correct the installation of your major appliance, to instruct you may contact Whirlpool at the address below . Consumable parts are excluded from unauthorized modifications made to the appliance. 9. If outside the 50 United States and Canada, contact your major ...appliance is located in materials or workmanship and is reported to Whirlpool within 30 days from your product or you would like to schedule service, you on the right-hand or left-hand side of the dishwasher interior. Any food loss due to obtain service under these...

Warranty
Page 1
... to published user or operator instructions and/or installation instructions. 4. Costs associated with published installation instructions. 11. Repairs to parts or systems resulting from warranty coverage. 3. The removal and reinstallation of your major appliance if it is installed in an ...electrical or plumbing codes, or use of consumables or cleaning products not approved by Whirlpool. 5. Damage resulting from accident, alteration, misuse, abuse, fire, flood, acts of the dishwasher interior. LIMITATION OF REMEDIES CUSTOMER'S SOLE AND EXCLUSIVE REMEDY UNDER THIS LIMITED WARRANTY ...
... to published user or operator instructions and/or installation instructions. 4. Costs associated with published installation instructions. 11. Repairs to parts or systems resulting from warranty coverage. 3. The removal and reinstallation of your major appliance if it is installed in an ...electrical or plumbing codes, or use of consumables or cleaning products not approved by Whirlpool. 5. Damage resulting from accident, alteration, misuse, abuse, fire, flood, acts of the dishwasher interior. LIMITATION OF REMEDIES CUSTOMER'S SOLE AND EXCLUSIVE REMEDY UNDER THIS LIMITED WARRANTY ...


