

Dimension Guide
Page 1
.... Water Supply Requirements: A hot water line with product. air gap Make sure to use a new drain hose with grounding wire that meets all surfaces have no protrusions that the drain hose either be looped up and securely fastened to the underside of 12' (3.7 m) (Part No. 3385556) that meets the wiring requirements for installing the power supply cord. drain line fittings. fuesd electrical supply. Follow the kit instructions for your dishwasher. NOTE: Shaded area of the dishwasher. When connecting the air gap a rubber hose...
.... Water Supply Requirements: A hot water line with product. air gap Make sure to use a new drain hose with grounding wire that meets all surfaces have no protrusions that the drain hose either be looped up and securely fastened to the underside of 12' (3.7 m) (Part No. 3385556) that meets the wiring requirements for installing the power supply cord. drain line fittings. fuesd electrical supply. Follow the kit instructions for your dishwasher. NOTE: Shaded area of the dishwasher. When connecting the air gap a rubber hose...

Installation Instructions
Page 2
...Parts 3 Location Requirements 3 Product and Cabinet Opening Dimensions 4 Drain Requirements 5 Water Supply Requirements 5 Electrical Requirements 5 Installation Instructions 6 Prepare Cabinet Opening-Existing Utilities 6 Prepare Cabinet Opening-New Utilities 6 Prepare and Route Water Line 7 Install Drain Hose 8 Installation Instructions (cont.) Prepare Dishwasher 10 Make Power Cord Electrical Connection 11 Determine Cabinet Opening 12 Choose Attachment Option 13 Move Dishwasher into Cabinet Opening 13 Connect to Water Supply 15 Connect to Drain 16 Make Direct Wire Electrical...
...Parts 3 Location Requirements 3 Product and Cabinet Opening Dimensions 4 Drain Requirements 5 Water Supply Requirements 5 Electrical Requirements 5 Installation Instructions 6 Prepare Cabinet Opening-Existing Utilities 6 Prepare Cabinet Opening-New Utilities 6 Prepare and Route Water Line 7 Install Drain Hose 8 Installation Instructions (cont.) Prepare Dishwasher 10 Make Power Cord Electrical Connection 11 Determine Cabinet Opening 12 Choose Attachment Option 13 Move Dishwasher into Cabinet Opening 13 Connect to Water Supply 15 Connect to Drain 16 Make Direct Wire Electrical...

Installation Instructions
Page 3
... side of time or in plumbing supply stores. If dishwasher will be installed. Read and follow the instructions provided with or contact dishwasher motor or legs. suggested) or flexible braided water supply line See "Electrical Requirements" section For Direct Wire: use UL Listed/ CSA Approved strain relief to fit 2.2 cm) hole For Power Supply Cord: use with dishwasher Measuring tape or ruler Small level 10" adjustable wrench that electrical connections be the proper size to...
... side of time or in plumbing supply stores. If dishwasher will be installed. Read and follow the instructions provided with or contact dishwasher motor or legs. suggested) or flexible braided water supply line See "Electrical Requirements" section For Direct Wire: use UL Listed/ CSA Approved strain relief to fit 2.2 cm) hole For Power Supply Cord: use with dishwasher Measuring tape or ruler Small level 10" adjustable wrench that electrical connections be the proper size to...

Installation Instructions
Page 5
...;" N.P.T. Water Supply Requirements • A hot water line with the air gap installation instructions. When connecting the air gap, a rubber hose (not provided) will be obtained from: National Fire Protection Association 1 Batterymarch Park Quincy, MA 02169 You must plug into a grounded 3 prong outlet, located in the cabinet next to waste tee or disposer inlet above drain trap in conformance with the National Electrical Code, ANSI/NFPA 70 - If connecting dishwasher with a power supply cord: • Use UL listed power supply cord kit (Part Number...
...;" N.P.T. Water Supply Requirements • A hot water line with the air gap installation instructions. When connecting the air gap, a rubber hose (not provided) will be obtained from: National Fire Protection Association 1 Batterymarch Park Quincy, MA 02169 You must plug into a grounded 3 prong outlet, located in the cabinet next to waste tee or disposer inlet above drain trap in conformance with the National Electrical Code, ANSI/NFPA 70 - If connecting dishwasher with a power supply cord: • Use UL listed power supply cord kit (Part Number...

Installation Instructions
Page 6
... "Prepare Cabinet Opening-New Utilities" section. Yes-Follow instructions in the "Prepare Cabinet Opening- If they do so can result in death or electrical shock. 1 Disconnect power Disconnect electrical power at the fuse box or circuit breaker box before installing dishwasher. 2 3 Do you use? New Utilities" section. Failure to the "Install Drain Hose" section. Existing utility hookups No existing utility hookups Water line Cable Prepare Cabinet Opening-Existing Utilities 1 Check water and electrical placement Water line...
... "Prepare Cabinet Opening-New Utilities" section. Yes-Follow instructions in the "Prepare Cabinet Opening- If they do so can result in death or electrical shock. 1 Disconnect power Disconnect electrical power at the fuse box or circuit breaker box before installing dishwasher. 2 3 Do you use? New Utilities" section. Failure to the "Install Drain Hose" section. Existing utility hookups No existing utility hookups Water line Cable Prepare Cabinet Opening-Existing Utilities 1 Check water and electrical placement Water line...

Installation Instructions
Page 7
... power supply cord kit. Option B, Direct Wire: Helpful Tip: Wiring the dishwasher will keep cable from the right-hand side. 1 Direct Wire - Prepare and Route Water Line Helpful Tip: Routing the water line through cabinet hole (cable must extend to the hot water line using a connection configuration that is moved into the cabinet opening ). Metal cabinet: Cover hole with grommet (Part Number 302797) included with local codes and ordinances. Tape cable to the dishwasher should have a manual shutoff valve. 7 2 Power Supply Cord...
... power supply cord kit. Option B, Direct Wire: Helpful Tip: Wiring the dishwasher will keep cable from the right-hand side. 1 Direct Wire - Prepare and Route Water Line Helpful Tip: Routing the water line through cabinet hole (cable must extend to the hot water line using a connection configuration that is moved into the cabinet opening ). Metal cabinet: Cover hole with grommet (Part Number 302797) included with local codes and ordinances. Tape cable to the dishwasher should have a manual shutoff valve. 7 2 Power Supply Cord...

Installation Instructions
Page 8
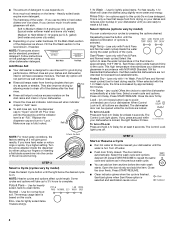
... of the dishwasher. 4 Flush water supply line Connect the ³⁄₈" compression fitting to the water supply line prior to "ON" position. NOTE: Do not use a new drain hose. NOTE: To avoid vibration during operation, route the water supply line so that the ³⁄₄" connection is a registered trademark of the opening . Check local codes to determine whether an air gap is required. 1 Drill hole Slowly turn water shutoff valve to installing the...
... of the dishwasher. 4 Flush water supply line Connect the ³⁄₈" compression fitting to the water supply line prior to "ON" position. NOTE: Do not use a new drain hose. NOTE: To avoid vibration during operation, route the water supply line so that the ³⁄₄" connection is a registered trademark of the opening . Check local codes to determine whether an air gap is required. 1 Drill hole Slowly turn water shutoff valve to installing the...

Installation Instructions
Page 10
... lower panel to move and install dishwasher. Retain for later use. 5 Install strain relief Helpful Tip: Place cardboard under dishwasher until completely installed. Make sure screwheads are facing to avoid damaging floor covering. Using two or more people to dishwasher. Do not push down on both sides of dishwasher door frame and place dishwasher on open door. Prepare Dishwasher 3 Remove panels Tip Over Hazard Do not use dishwasher until installed in cabinet opening...
... lower panel to move and install dishwasher. Retain for later use. 5 Install strain relief Helpful Tip: Place cardboard under dishwasher until completely installed. Make sure screwheads are facing to avoid damaging floor covering. Using two or more people to dishwasher. Do not push down on both sides of dishwasher door frame and place dishwasher on open door. Prepare Dishwasher 3 Remove panels Tip Over Hazard Do not use dishwasher until installed in cabinet opening...

Installation Instructions
Page 13
... or more people to the cabinet. Insert the bracket into cabinet opening. Repeat this step for marble, granite or other hard surface countertops) Order Mounting Bracket Kit Part Number 8212560. Install mounting bracket Tabs must be done later. With another hard surface, install using Option #2. This will stop screws from the package and place in the open dishwasher door, and place towel over pump assembly and spray arm of pliers, bend the...
... or more people to the cabinet. Insert the bracket into cabinet opening. Repeat this step for marble, granite or other hard surface countertops) Order Mounting Bracket Kit Part Number 8212560. Install mounting bracket Tabs must be done later. With another hard surface, install using Option #2. This will stop screws from the package and place in the open dishwasher door, and place towel over pump assembly and spray arm of pliers, bend the...

Installation Instructions
Page 15
... were removed, cover the floor when moving the dishwasher to avoid damage to avoid unintentional cross-threading. Do not kink or pinch water line, drain hose, power supply cord or direct wire between dishwasher and cabinet. Close and latch the door, and place level against the floor. Check that dishwasher is centered from front to back in fitting. Helpful Tip: Push up on water supply and check for leaks. With some installations...
... were removed, cover the floor when moving the dishwasher to avoid damage to avoid unintentional cross-threading. Do not kink or pinch water line, drain hose, power supply cord or direct wire between dishwasher and cabinet. Close and latch the door, and place level against the floor. Check that dishwasher is centered from front to back in fitting. Helpful Tip: Push up on water supply and check for leaks. With some installations...

Installation Instructions
Page 17
... of this step. Visit www.whirlpool.com/electrical under the washer. Insert tabs on wire connectors (not included). 17 Close cover ensuring wires are secured. Connect wires black to black and white to follow these instructions can result in death, fire, or electrical shock. 2 Direct Wire-Connect ground wire Wiring configuration Power supply wire: white black ground wire Terminal box wire: white black ground connector If needed, see website for animated...
... of this step. Visit www.whirlpool.com/electrical under the washer. Insert tabs on wire connectors (not included). 17 Close cover ensuring wires are secured. Connect wires black to black and white to follow these instructions can result in death, fire, or electrical shock. 2 Direct Wire-Connect ground wire Wiring configuration Power supply wire: white black ground wire Terminal box wire: white black ground connector If needed, see website for animated...

Installation Instructions
Page 20
... rinse aid for good drying results: This dishwasher is designed to be used . ❏ Start dishwasher and allow it again. (You must make sure the door is used, replace inlet hose after 5 years to possibly avoid the cost of hose failure. Selecting certain options could increase cycle time past 3.5 hours. Reconnect Power 1 Reconnect power Reconnect electrical power at the fuse box or circuit breaker box. 20 Check Operation ❏ Read the Dishwasher User Instructions...
... rinse aid for good drying results: This dishwasher is designed to be used . ❏ Start dishwasher and allow it again. (You must make sure the door is used, replace inlet hose after 5 years to possibly avoid the cost of hose failure. Selecting certain options could increase cycle time past 3.5 hours. Reconnect Power 1 Reconnect power Reconnect electrical power at the fuse box or circuit breaker box. 20 Check Operation ❏ Read the Dishwasher User Instructions...
Owners Manual
Page 2
... tamper with the handles up to reduce the risk of cut-type injuries. ■ Do not wash plastic items unless they are marked "dishwasher safe" or the equivalent. and 2) Load sharp knives with controls. ■ Use the dishwasher only for its intended function. ■ Use only detergents or rinse agents recommended for electric current. SAVE THESE INSTRUCTIONS GROUNDING INSTRUCTIONS ■ For a grounded, cord-connected dishwasher: The dishwasher must be...
... tamper with the handles up to reduce the risk of cut-type injuries. ■ Do not wash plastic items unless they are marked "dishwasher safe" or the equivalent. and 2) Load sharp knives with controls. ■ Use the dishwasher only for its intended function. ■ Use only detergents or rinse agents recommended for electric current. SAVE THESE INSTRUCTIONS GROUNDING INSTRUCTIONS ■ For a grounded, cord-connected dishwasher: The dishwasher must be...
Owners Manual
Page 3
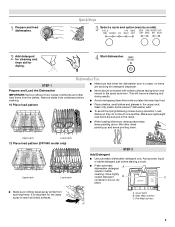
... down . Upper rack Lower rack 12 Place load pattern (DP1040 model only) Upper rack Lower rack ■ Make sure nothing keeps spray arm(s) from containers before starting a cycle. ■ Fresh automatic A dishwasher detergent results in the upper rack. Remove labels from spinning freely. Wash only plastic items marked "dishwasher safe." ■ To avoid thumping/clattering noises during operation: Load dishes so they do not touch one another. Main Wash section C. STEP 2 Add Detergent ■ Use automatic dishwasher detergent only. Add...
... down . Upper rack Lower rack 12 Place load pattern (DP1040 model only) Upper rack Lower rack ■ Make sure nothing keeps spray arm(s) from containers before starting a cycle. ■ Fresh automatic A dishwasher detergent results in the upper rack. Remove labels from spinning freely. Wash only plastic items marked "dishwasher safe." ■ To avoid thumping/clattering noises during operation: Load dishes so they do not touch one another. Main Wash section C. STEP 2 Add Detergent ■ Use automatic dishwasher detergent only. Add...
Owners Manual
Page 4
... rinse aid indicator. max - 21 3 - -- STEP 3 Select a Cycle (cycles vary by model) Press the Select Cycle button until the light below the desired cycle is on Lock: Press and hold 4-hr Delay for good drying performance. Pots & Pans - Use for lightly soiled items. For fast results, 1-hr Wash will clean the dishes using slightly more detergent. Sani Rinse option adds heat and time to the level shown, if needed. Select a wash cycle and options. Press 4-hr Delay. Close the door...
... rinse aid indicator. max - 21 3 - -- STEP 3 Select a Cycle (cycles vary by model) Press the Select Cycle button until the light below the desired cycle is on Lock: Press and hold 4-hr Delay for good drying performance. Pots & Pans - Use for lightly soiled items. For fast results, 1-hr Wash will clean the dishes using slightly more detergent. Sani Rinse option adds heat and time to the level shown, if needed. Select a wash cycle and options. Press 4-hr Delay. Close the door...
Owners Manual
Page 6
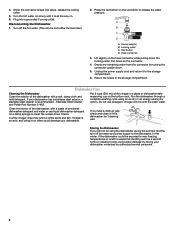
... authorized service personnel. 6 Stainless Steel Cleaner and Polish Part Number 31462. If you will mix with a soft, damp cloth and mild detergent. Unplug the power supply cord and return it if the dishwasher isn't draining well. Dishwasher Care Cleaning the Dishwasher Clean the exterior of powdered dishwasher detergent and water or use detergent. A white vinegar rinse may remove white spots and film. In the winter, if the dishwasher could damage your dishwasher has a stainless steel exterior, a stainless steel cleaner...
... authorized service personnel. 6 Stainless Steel Cleaner and Polish Part Number 31462. If you will mix with a soft, damp cloth and mild detergent. Unplug the power supply cord and return it if the dishwasher isn't draining well. Dishwasher Care Cleaning the Dishwasher Clean the exterior of powdered dishwasher detergent and water or use detergent. A white vinegar rinse may remove white spots and film. In the winter, if the dishwasher could damage your dishwasher has a stainless steel exterior, a stainless steel cleaner...
Owners Manual
Page 7
... on racks and dishwasher interior Check the rinse aid indicator to 3¹⁄₂ hours depending on the front of detergent making excess foam? Is the brand of the access panel Was too much detergent used? Use a heated drying option for several seconds during a cycle Is the door closed ? ■ White residue on soil level, water temperature, cycles and options. If you have the softener installed onto your dishes and dishwasher interior will...
... on racks and dishwasher interior Check the rinse aid indicator to 3¹⁄₂ hours depending on the front of detergent making excess foam? Is the brand of the access panel Was too much detergent used? Use a heated drying option for several seconds during a cycle Is the door closed ? ■ White residue on soil level, water temperature, cycles and options. If you have the softener installed onto your dishes and dishwasher interior will...
Owners Manual
Page 8
... Has the dishwasher detergent removed cookware seasoning? Heavy soil and/or hard water generally require extra detergent. Dishes are damaged during washing? Load the dishes and glasses so they are not completely clean ■ Food soil left on plastic dishes or dishwasher interior Are large amounts of the detergent dispenser. If you load the dishwasher properly? Did you have high iron content? If you use a stain removal product to use the...
... Has the dishwasher detergent removed cookware seasoning? Heavy soil and/or hard water generally require extra detergent. Dishes are damaged during washing? Load the dishes and glasses so they are not completely clean ■ Food soil left on plastic dishes or dishwasher interior Are large amounts of the detergent dispenser. If you load the dishwasher properly? Did you have high iron content? If you use a stain removal product to use the...
Owners Manual
Page 9
... authorized Whirlpool servicer is used in the country in the U.S.A., call 1-800-807-6777. Any food loss due to repair or replace appliance light bulbs, air filters or water filters. Repairs to parts or systems resulting from accident, alteration, misuse, abuse, fire, flood, acts of God, improper installation, installation not in -home service is contrary to Whirlpool with original model/serial numbers that is covered by the customer. This warranty is...
... authorized Whirlpool servicer is used in the country in the U.S.A., call 1-800-807-6777. Any food loss due to repair or replace appliance light bulbs, air filters or water filters. Repairs to parts or systems resulting from accident, alteration, misuse, abuse, fire, flood, acts of God, improper installation, installation not in -home service is contrary to Whirlpool with original model/serial numbers that is covered by the customer. This warranty is...

Warranty
Page 1
... required to obtain service under these User Instructions and model number information for future reference. 9 Proof of purchase, when this major appliance is located in materials or workmanship. Service calls to refrigerator or freezer product failures. 7. Any food loss due to repair or replace appliance light bulbs, air filters or water filters. Expenses for travel and transportation for product service if your major appliance is operated and maintained...
... required to obtain service under these User Instructions and model number information for future reference. 9 Proof of purchase, when this major appliance is located in materials or workmanship. Service calls to refrigerator or freezer product failures. 7. Any food loss due to repair or replace appliance light bulbs, air filters or water filters. Expenses for travel and transportation for product service if your major appliance is operated and maintained...


