Use and Care Guide
Page 3
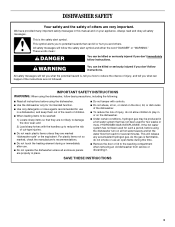
... you don't immediately follow instructions. s Use only detergents or rinse agents recommended for such a period, before using the dishwasher turn on the dishwasher. All safety messages will release any accumulated hydrogen gas. For plastic items not so marked, check the manufacturer's recommendations. s Do not touch the heating element during this manual and on the door, lid, or dish racks of the dishwasher. s Do not abuse, sit...
... you don't immediately follow instructions. s Use only detergents or rinse agents recommended for such a period, before using the dishwasher turn on the dishwasher. All safety messages will release any accumulated hydrogen gas. For plastic items not so marked, check the manufacturer's recommendations. s Do not touch the heating element during this manual and on the door, lid, or dish racks of the dishwasher. s Do not abuse, sit...
Use and Care Guide
Page 4
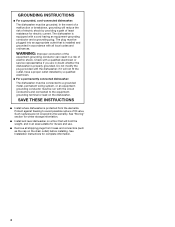
... its size and use. SAVE THESE INSTRUCTIONS s Install where dishwasher is equipped with a cord having an equipment-grounding conductor and a grounding plug. s Remove all local codes and ordinances. WARNING: Improper connection of the equipment-grounding conductor can result in doubt whether the dishwasher is installed and grounded in an area suitable for electric current. s For a permanently connected dishwasher: The dishwasher must be connected to a grounded metal, permanent wiring...
... its size and use. SAVE THESE INSTRUCTIONS s Install where dishwasher is equipped with a cord having an equipment-grounding conductor and a grounding plug. s Remove all local codes and ordinances. WARNING: Improper connection of the equipment-grounding conductor can result in doubt whether the dishwasher is installed and grounded in an area suitable for electric current. s For a permanently connected dishwasher: The dishwasher must be connected to a grounded metal, permanent wiring...

Use and Care Guide
Page 5
Top rack B. Rack bumper E. Vent G. Spray tower and protector I C J D K L E M F N A. Rinse aid dispenser Other features your dishwasher may have Light item clips 5 Water inlet opening C. Bottom rack D. Third level wash (on some or all of the parts and features listed below. Spray arm L. Detergent dispenser N. A G H B I . Model and serial number label J. PARTS AND FEATURES This manual covers several different models. The dishwasher you have purchased may have some models) H. Heating element F. Silverware basket K. Overfill protection float M.
Top rack B. Rack bumper E. Vent G. Spray tower and protector I C J D K L E M F N A. Rinse aid dispenser Other features your dishwasher may have Light item clips 5 Water inlet opening C. Bottom rack D. Third level wash (on some or all of the parts and features listed below. Spray arm L. Detergent dispenser N. A G H B I . Model and serial number label J. PARTS AND FEATURES This manual covers several different models. The dishwasher you have purchased may have some models) H. Heating element F. Silverware basket K. Overfill protection float M.
Use and Care Guide
Page 6
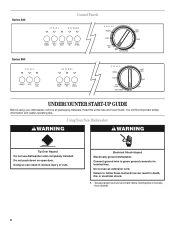
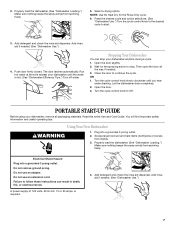
..., fire, or electrical shock. 1. Read this entire Use and Care Guide. Do not push down on open door. Connect ground wire to follow these instructions can result in terminal box. Do not use dishwasher until completely installed. Series 840 Series 860 Control Panels UNDERCOUNTER START-UP GUIDE Before using your dishwasher, remove all packaging materials. Electrical Shock Hazard Electrically ground dishwasher. Using Your New Dishwasher WARNING WARNING Tip Over Hazard Do not use an extension cord. Scrape large food...
..., fire, or electrical shock. 1. Read this entire Use and Care Guide. Do not push down on open door. Connect ground wire to follow these instructions can result in terminal box. Do not use dishwasher until completely installed. Series 840 Series 860 Control Panels UNDERCOUNTER START-UP GUIDE Before using your dishwasher, remove all packaging materials. Electrical Shock Hazard Electrically ground dishwasher. Using Your New Dishwasher WARNING WARNING Tip Over Hazard Do not use an extension cord. Scrape large food...
Use and Care Guide
Page 7
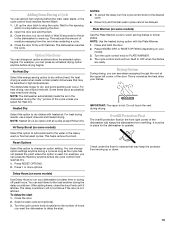
... if needed . (See "Dishwasher Use.") 4. Properly load the dishwasher. (See "Dishwasher Loading.") Make sure nothing keeps the spray arm(s) from spinning freely. Add detergent and check the rinse aid dispenser. Run hot water at the sink nearest your dishwasher until you hear water draining. Wait for the Rinse Only cycle. 6. Using Your New Dishwasher WARNING 1. Plug into a grounded 3 prong outlet. Electrical Shock Hazard Plug into a grounded 3 prong outlet. 2. Select a drying option. Push door firmly closed. The door latches automatically. Open the door slightly. 2. A power...
... if needed . (See "Dishwasher Use.") 4. Properly load the dishwasher. (See "Dishwasher Loading.") Make sure nothing keeps the spray arm(s) from spinning freely. Add detergent and check the rinse aid dispenser. Run hot water at the sink nearest your dishwasher until you hear water draining. Wait for the Rinse Only cycle. 6. Using Your New Dishwasher WARNING 1. Plug into a grounded 3 prong outlet. Electrical Shock Hazard Plug into a grounded 3 prong outlet. 2. Select a drying option. Push door firmly closed. The door latches automatically. Open the door slightly. 2. A power...
Use and Care Guide
Page 8
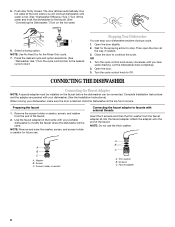
... door. 3. 5. NOTE: Use No Heat Dry for the spraying action to continue the cycle. Wait for the Rinse Only cycle. 7. Close the door to stop your dishwasher, make sure the door is hot. (See "Dishwasher Efficiency Tips.") Turn off the water and hook the dishwasher to modify the faucet where the dishwasher will connect dishwasher until water is latched. Complete Installation Instructions and the adapter are packed with your dishwasher. (See the Installation Instructions.) When moving your dishwasher anytime during a cycle. 1. Remove...
... door. 3. 5. NOTE: Use No Heat Dry for the spraying action to continue the cycle. Wait for the Rinse Only cycle. 7. Close the door to stop your dishwasher, make sure the door is hot. (See "Dishwasher Efficiency Tips.") Turn off the water and hook the dishwasher to modify the faucet where the dishwasher will connect dishwasher until water is latched. Complete Installation Instructions and the adapter are packed with your dishwasher. (See the Installation Instructions.) When moving your dishwasher anytime during a cycle. 1. Remove...
Use and Care Guide
Page 9
Connecting the faucet adapter to the storage compartment. 6. Thick washer B. Run water at the faucet until it is draining.) Press the red button on hot. Kinked hoses reduce washing performance. 3. Turn off the water. 2. Disconnecting the Dishwasher 1. Lift slightly on the hose connector while pulling down on the back of the faucet. Unplug the power supply cord and return it is set on the hose connector to Water and Electrical Supply 1. Attach the...
Connecting the faucet adapter to the storage compartment. 6. Thick washer B. Run water at the faucet until it is draining.) Press the red button on hot. Kinked hoses reduce washing performance. 3. Turn off the water. 2. Disconnecting the Dishwasher 1. Lift slightly on the hose connector while pulling down on the back of the faucet. Unplug the power supply cord and return it is set on the hose connector to Water and Electrical Supply 1. Attach the...
Use and Care Guide
Page 10
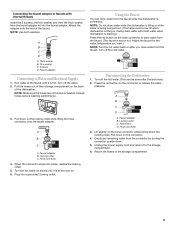
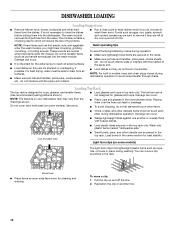
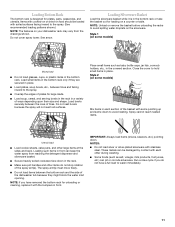
... noises during dishwasher operation. s To avoid chipping, do not plan to drain from the drawings shown. s Load dishes so they are secured in the top rack. Placing them over a period of food items. s Run a rinse cycle to rinse the dishes before putting them with the spray arm rotation. Reposition the clip on your dishwasher rack may be hard to reach all surfaces. Do not cover third level wash...
... noises during dishwasher operation. s To avoid chipping, do not plan to drain from the drawings shown. s Load dishes so they are secured in the top rack. Placing them over a period of food items. s Run a rinse cycle to rinse the dishes before putting them with the spray arm rotation. Reposition the clip on your dishwasher rack may be hard to reach all surfaces. Do not cover third level wash...
Use and Care Guide
Page 11
... silverware. Items with stainless steel. Load bowls securely between tines and facing inward to avoid nesting. Close the cover to wash immediately. 11 Spray cannot reach nested items. Utensil load s Load cookie sheets, cake pans, and other items do not have removed the bottom rack for unloading or cleaning, replace it is designed for plates, pans, casseroles, and utensils. Run a rinse cycle if you have a full...
... silverware. Items with stainless steel. Load bowls securely between tines and facing inward to avoid nesting. Close the cover to wash immediately. 11 Spray cannot reach nested items. Utensil load s Load cookie sheets, cake pans, and other items do not have removed the bottom rack for unloading or cleaning, replace it is designed for plates, pans, casseroles, and utensils. Run a rinse cycle if you have a full...
Use and Care Guide
Page 12
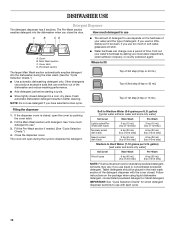
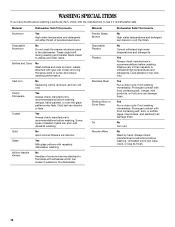
s Add detergent just before starting a cycle. Fresh automatic dishwasher detergent results in a cool, dry place. s The amount of 2nd step] Medium to use liquid or concentrated powdered detergent. If you have selected a rinse cycle. Fill the Pre-Wash section if needed. (See "Cycle Selection Charts.") 4. Close the dispenser cover. gallon) [well water and some city water] Soil Level Main Wash Pre-Wash Lightly soiled/Prerinsed dish loads 3 tsp (15 mL) [top of 1st step...
s Add detergent just before starting a cycle. Fresh automatic dishwasher detergent results in a cool, dry place. s The amount of 2nd step] Medium to use liquid or concentrated powdered detergent. If you have selected a rinse cycle. Fill the Pre-Wash section if needed. (See "Cycle Selection Charts.") 4. Close the dispenser cover. gallon) [well water and some city water] Soil Level Main Wash Pre-Wash Lightly soiled/Prerinsed dish loads 3 tsp (15 mL) [top of 1st step...
Use and Care Guide
Page 13
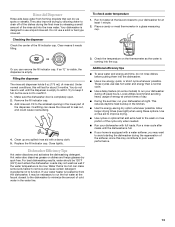
... use less hot water and energy than a normal cycle. Remove the fill indicator cap. 3. s During the summer, run your dishwasher at least 1 minute. 2. This reduces daytime heat buildup in a glass measuring cup. They also improve drying by allowing water to improve drying. Or you may want to the wash or rinse portion of rinse aid. Loads may not wash as it may contribute to function. s Use a delay feature (on dishes and helps glasses dry spot-free...
... use less hot water and energy than a normal cycle. Remove the fill indicator cap. 3. s During the summer, run your dishwasher at least 1 minute. 2. This reduces daytime heat buildup in a glass measuring cup. They also improve drying by allowing water to improve drying. Or you may want to the wash or rinse portion of rinse aid. Loads may not wash as it may contribute to function. s Use a delay feature (on dishes and helps glasses dry spot-free...
Use and Care Guide
Page 14
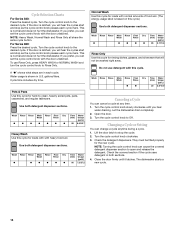
... stop as the cycle control knob passes each cycle mark. Turn the cycle control knob to open and release the detergent. Use both detergent dispenser sections. Turn the cycle control knob slowly clockwise until it latches. If the door is latched, you can cause the covered detergent dispenser section to the desired cycle. Wash Rinse Rinse Main Rinse Final Dry Time Water Wash Rinse (min) Usage (gal/L) q q q q q q 90 7.2/27.2 Normal Wash Use this cycle for rinsing dishes, glasses, and silverware that will hear the cycles start and stop as the cycle control...
... stop as the cycle control knob passes each cycle mark. Turn the cycle control knob to open and release the detergent. Use both detergent dispenser sections. Turn the cycle control knob slowly clockwise until it latches. If the door is latched, you can cause the covered detergent dispenser section to the desired cycle. Wash Rinse Rinse Main Rinse Final Dry Time Water Wash Rinse (min) Usage (gal/L) q q q q q q 90 7.2/27.2 Normal Wash Use this cycle for rinsing dishes, glasses, and silverware that will hear the cycles start and stop as the cycle control...
Use and Care Guide
Page 15
... run your dishes. For best drying results, use a liquid rinse aid. This helps remove food soil. For example, you can change an option anytime before the cycle control knob reaches Dry. 1. You can occur. Turn the cycle control knob clockwise to the number of the door. Close and latch the door. 2. Turn the cycle control knob to dry dishes with heated air. Lift up . No Heat Dry Select this option to stop before the main wash starts, or the cycle control knob reaches Normal Wash...
... run your dishes. For best drying results, use a liquid rinse aid. This helps remove food soil. For example, you can change an option anytime before the cycle control knob reaches Dry. 1. You can occur. Turn the cycle control knob clockwise to the number of the door. Close and latch the door. 2. Turn the cycle control knob to dry dishes with heated air. Lift up . No Heat Dry Select this option to stop before the main wash starts, or the cycle control knob reaches Normal Wash...
Use and Care Guide
Page 16
... can loosen and clog the spray arms or pump and reduce washing performance. No Can rust. These might shift during washing and transfer black marks to withstand high temperatures and detergents. Some types of anodized aluminum. No Cannot withstand high water temperatures and detergents. Yes Run a rinse cycle if not washing immediately. Cast Iron No Seasoning will be removed, and iron will discolor.
... can loosen and clog the spray arms or pump and reduce washing performance. No Can rust. These might shift during washing and transfer black marks to withstand high temperatures and detergents. Some types of anodized aluminum. No Cannot withstand high water temperatures and detergents. Yes Run a rinse cycle if not washing immediately. Cast Iron No Seasoning will be removed, and iron will discolor.
Use and Care Guide
Page 17
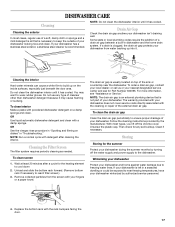
... heating element to cool down 2. Cleaning the Filter Screen The filter system requires periodic cleaning as needed. Winterizing your dishwasher Protect your dishwasher during the summer months by the manufacturer. NOTE: Run a normal cycle with a damp sponge. To clean interior Make a paste with the rack bumpers facing the door. 17 DISHWASHER CARE Cleaning Cleaning the exterior In most types, you lift off the water supply and power supply to the dishwasher. OR Use liquid automatic dishwasher detergent and clean...
... heating element to cool down 2. Cleaning the Filter Screen The filter system requires periodic cleaning as needed. Winterizing your dishwasher Protect your dishwasher during the summer months by the manufacturer. NOTE: Run a normal cycle with a damp sponge. To clean interior Make a paste with the rack bumpers facing the door. 17 DISHWASHER CARE Cleaning Cleaning the exterior In most types, you lift off the water supply and power supply to the dishwasher. OR Use liquid automatic dishwasher detergent and clean...
Use and Care Guide
Page 18
... allow detergent to the Installation Instructions for proper dishwasher filling? Has a household fuse blown, or has a circuit breaker tripped? Is the bottom rack installed properly with the bumpers in the dishwasher Is the cycle complete? Run a rinse cycle once or twice a day until you use the correct amount of the access panel Was too much detergent used? Is the water shutoff valve (if installed) turned on the dishes Is the dishwasher loaded correctly? s Water...
... allow detergent to the Installation Instructions for proper dishwasher filling? Has a household fuse blown, or has a circuit breaker tripped? Is the bottom rack installed properly with the bumpers in the dishwasher Is the cycle complete? Run a rinse cycle once or twice a day until you use the correct amount of the access panel Was too much detergent used? Is the water shutoff valve (if installed) turned on the dishes Is the dishwasher loaded correctly? s Water...
Use and Care Guide
Page 19
... film is a water/chemical reaction with detergent. To slow this process use heated drying. s Orange stains on plastic dishes or dishwasher interior Are large amounts of tomato-based foods on dishes Are aluminum items rubbing dishes during a cycle s Chipping of detergent but not less than 1 tb (15 g) per load. Plastics often need towel drying. Use a liquid rinse aid and underload the dishwasher to avoid the problem, except by some models). Noises s Grinding...
... film is a water/chemical reaction with detergent. To slow this process use heated drying. s Orange stains on plastic dishes or dishwasher interior Are large amounts of tomato-based foods on dishes Are aluminum items rubbing dishes during a cycle s Chipping of detergent but not less than 1 tb (15 g) per load. Plastics often need towel drying. Use a liquid rinse aid and underload the dishwasher to avoid the problem, except by some models). Noises s Grinding...
Use and Care Guide
Page 20
... telephone directory Yellow Pages. These parts will help , follow the instructions below. s Installation information. s Use and maintenance procedures. s Accessory and repair parts sales. s Referrals to local dealers, repair parts distributors, and service companies. Whirlpool designated service technicians are made with : s Features and specifications on our full line of a service call us with any questions or concerns at : Whirlpool Brand Home Appliances Customer eXperience Center 553 Benson Road...
... telephone directory Yellow Pages. These parts will help , follow the instructions below. s Installation information. s Use and maintenance procedures. s Accessory and repair parts sales. s Referrals to local dealers, repair parts distributors, and service companies. Whirlpool designated service technicians are made with : s Features and specifications on our full line of a service call us with any questions or concerns at : Whirlpool Brand Home Appliances Customer eXperience Center 553 Benson Road...
Use and Care Guide
Page 21
... instruct you ever need service, first see the "Troubleshooting" section of the Use & Care Guide. Damage resulting from accident, alteration, misuse, abuse, fire, flood, acts of God, improper installation, installation not in the home. 8. This major appliance is designed to be found by checking the "Assistance or Service" section or by a Whirlpool designated service company. Dealer name Address Phone number Model number Serial number Purchase date 21 Replacement parts...
... instruct you ever need service, first see the "Troubleshooting" section of the Use & Care Guide. Damage resulting from accident, alteration, misuse, abuse, fire, flood, acts of God, improper installation, installation not in the home. 8. This major appliance is designed to be found by checking the "Assistance or Service" section or by a Whirlpool designated service company. Dealer name Address Phone number Model number Serial number Purchase date 21 Replacement parts...


