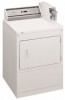

Installation Instructions
Page 2
...CAME DE MINUTAGE POUR 30 OU 60 MINUTES 34 DRYER SAFETY Your safety and the safety of others . We have provided many important safety messages in the event the customer smells gas. This is , tell you how to potential hazards...vacuation 28 Achever l'installation 29 INSTRUCTIONS D'INSTALLATION - TABLE OF CONTENTS DRYER SAFETY 2 INSTALLATION REQUIREMENTS 4 Tools and Parts 4 Location Requirements 4 Electrical Requirements 6 Gas Supply Requirements 7 Venting Requirements 8 INSTALLATION INSTRUCTIONS - ELECTRIC DRYER........ 11 Install Coin Slide and Coin Box 11 Make Electrical Connection...
...CAME DE MINUTAGE POUR 30 OU 60 MINUTES 34 DRYER SAFETY Your safety and the safety of others . We have provided many important safety messages in the event the customer smells gas. This is , tell you how to potential hazards...vacuation 28 Achever l'installation 29 INSTRUCTIONS D'INSTALLATION - TABLE OF CONTENTS DRYER SAFETY 2 INSTALLATION REQUIREMENTS 4 Tools and Parts 4 Location Requirements 4 Electrical Requirements 6 Gas Supply Requirements 7 Venting Requirements 8 INSTALLATION INSTRUCTIONS - ELECTRIC DRYER........ 11 Install Coin Slide and Coin Box 11 Make Electrical Connection...
Installation Instructions
Page 3
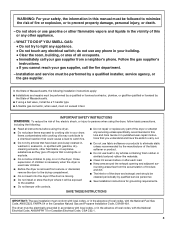
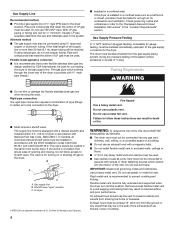
...; Read all occupants. • Immediately call the fire department. - SAVE THESE INSTRUCTIONS IMPORTANT: The gas installation must be followed to minimize the risk of Massachusetts. ■ If using the dryer. ■ Do not place items exposed to cooking oils in the absence of local codes, with.... ■ Do not repair or replace any electrical switch; rounding areas free from a neighbor's phone. WARNING: For your gas supplier, call your dryer. Items contaminated with cooking oils may contribute to a chemical reaction that could ignite or explode. ■ Do not allow children...
...; Read all occupants. • Immediately call the fire department. - SAVE THESE INSTRUCTIONS IMPORTANT: The gas installation must be followed to minimize the risk of Massachusetts. ■ If using the dryer. ■ Do not place items exposed to cooking oils in the absence of local codes, with.... ■ Do not repair or replace any electrical switch; rounding areas free from a neighbor's phone. WARNING: For your gas supplier, call your dryer. Items contaminated with cooking oils may contribute to a chemical reaction that could ignite or explode. ■ Do not allow children...
Installation Instructions
Page 4
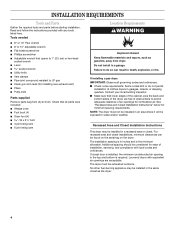
... spacing is in garages, closets, or sleeping quarters. Do not install in the same closet as gasoline, away from dryer drum. Failure to LP gas ■ Caulk gun and caulk (for installing new exhaust vent) ■ Pliers ■ Putty knife Parts supplied Remove...installed, the minimum unobstructed air opening in death, explosion, or fire. The dryer must not be installed in a recessed area or closet. If installing a gas dryer: IMPORTANT: Observe all parts were included. ■ Wedge cone ■ Foot boot (4) ■ Dryer foot (4 18 x 2 ¹⁄₂" bolt ■ 3 ...
... spacing is in garages, closets, or sleeping quarters. Do not install in the same closet as gasoline, away from dryer drum. Failure to LP gas ■ Caulk gun and caulk (for installing new exhaust vent) ■ Pliers ■ Putty knife Parts supplied Remove...installed, the minimum unobstructed air opening in death, explosion, or fire. The dryer must not be installed in a recessed area or closet. If installing a gas dryer: IMPORTANT: Observe all parts were included. ■ Wedge cone ■ Foot boot (4) ■ Dryer foot (4 18 x 2 ¹⁄₂" bolt ■ 3 ...

Installation Instructions
Page 5
...;" (18.1 cm) coin-operated models: 7⁷⁄₈" (20 cm) Product Dimensions 27" (68.6 cm) dryer 27" (68.6 cm) ELECTRIC 14" (35.6 cm) BACK VIEW 37" (94 cm) 6 ³⁄₄" (15.2 cm) 13" (33 cm) GAS 4" (10.2 cm) dia. 4 ³⁄₄" (12.1 cm) EXHAUST 1¹⁄₄" (3.2 cm) 29¹...
...;" (18.1 cm) coin-operated models: 7⁷⁄₈" (20 cm) Product Dimensions 27" (68.6 cm) dryer 27" (68.6 cm) ELECTRIC 14" (35.6 cm) BACK VIEW 37" (94 cm) 6 ³⁄₄" (15.2 cm) 13" (33 cm) GAS 4" (10.2 cm) dia. 4 ³⁄₄" (12.1 cm) EXHAUST 1¹⁄₄" (3.2 cm) 29¹...
Installation Instructions
Page 6
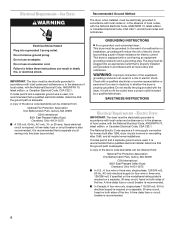
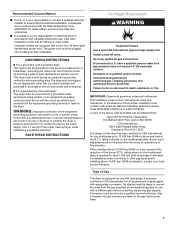
...latest edition, or Canadian Electrical Code, CSA C22.1, and all mobile home installations. GROUNDING INSTRUCTIONS ■ For a grounded, cord-connected dryer: This dryer must be grounded. A time-delay fuse or circuit breaker is recommended that is required. It is recommended. 6 A time-delay ... grounded in accordance with local codes and ordinances or, in the absence of the line. Electrical Requirements - Gas Dryer WARNING Recommended Ground Method The dryer, when installed, must be electrically grounded in accordance with local codes or, in remodeling after 1996, and ...
...latest edition, or Canadian Electrical Code, CSA C22.1, and all mobile home installations. GROUNDING INSTRUCTIONS ■ For a grounded, cord-connected dryer: This dryer must be grounded. A time-delay fuse or circuit breaker is recommended that is required. It is recommended. 6 A time-delay ... grounded in accordance with local codes and ordinances or, in the absence of the line. Electrical Requirements - Gas Dryer WARNING Recommended Ground Method The dryer, when installed, must be electrically grounded in accordance with local codes or, in remodeling after 1996, and ...
Installation Instructions
Page 7
...) water column. The plug must be plugged into a mating 30-amp receptacle. Do not modify the plug on the dryer. If connected to other gas types and/or installing above code standards can be run with the circuit conductors and connected to the equipment-grounding terminal or..., and all local codes and ordinances. ■ In Canada: It is your responsibility to install the dryer in accordance with Canadian Electrical Code, CSA C22.1 installation codes and all gas connections. For assistance when converting to LP, have a proper outlet installed by a qualified electrician. No attempt...
...) water column. The plug must be plugged into a mating 30-amp receptacle. Do not modify the plug on the dryer. If connected to other gas types and/or installing above code standards can be run with the circuit conductors and connected to the equipment-grounding terminal or..., and all local codes and ordinances. ■ In Canada: It is your responsibility to install the dryer in accordance with Canadian Electrical Code, CSA C22.1 installation codes and all gas connections. For assistance when converting to LP, have a proper outlet installed by a qualified electrician. No attempt...
Installation Instructions
Page 8
.... Do not use TEFLON®† tape. IMPORTANT: Observe all joints. Rigid metal vent is for connecting the dryer to the gas supply line. (The gas pipe which extend into any gas vent, chimney, wall, ceiling, or a concealed space of a building. ■ Do not use an exhaust ... International, be used in a confined area such as a bathroom or closet, provision must be used for turning on or shutting off gas to the dryer. Gas Supply Pressure Testing A ¹⁄₈" NPT minimum plugged tapping, accessible for combustion and ventilation. Do not block access to prevent...
.... Do not use TEFLON®† tape. IMPORTANT: Observe all joints. Rigid metal vent is for connecting the dryer to the gas supply line. (The gas pipe which extend into any gas vent, chimney, wall, ceiling, or a concealed space of a building. ■ Do not use an exhaust ... International, be used in a confined area such as a bathroom or closet, provision must be used for turning on or shutting off gas to the dryer. Gas Supply Pressure Testing A ¹⁄₈" NPT minimum plugged tapping, accessible for combustion and ventilation. Do not block access to prevent...
Installation Instructions
Page 10
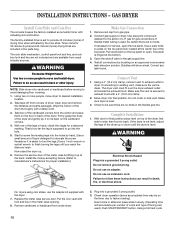
...it is supposed to manufacturer's instructions for proper installation.) Make Gas Connection 1. Remove red cap from under dryer. 2. gas for a diamond marking. Using a 4" (10.2 cm) clamp, connect vent to open the toe panel. GAS DRYER Install Coin Slide and Coin Box The console houses the factory...screw threads so it up . 6. Start to screw the leveling legs into a grounded 3 prong outlet. 3. Connect gas supply to finish turning the legs until the dryer is set to avoid damaging floor covering. 1. If flexible metal tubing is level. 3. Use a putty knife to desired...
...it is supposed to manufacturer's instructions for proper installation.) Make Gas Connection 1. Remove red cap from under dryer. 2. gas for a diamond marking. Using a 4" (10.2 cm) clamp, connect vent to open the toe panel. GAS DRYER Install Coin Slide and Coin Box The console houses the factory...screw threads so it up . 6. Start to screw the leveling legs into a grounded 3 prong outlet. 3. Connect gas supply to finish turning the legs until the dryer is set to avoid damaging floor covering. 1. If flexible metal tubing is level. 3. Use a putty knife to desired...
Installation Instructions
Page 17
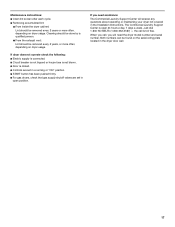
...9632; Controls are set in a running or "ON" position. ■ START button has been pushed firmly. ■ For gas dryers, check that gas supply shutoff valves are set in the dryer door well. 17 Just dial 1-800 NO BELTS (1-800-662-3587) - the call , you need assistance: The Commercial Laundry... Support Center will need the dryer model number and serial number. Maintenance instructions: ■ Clean lint screen after each ...
...9632; Controls are set in a running or "ON" position. ■ START button has been pushed firmly. ■ For gas dryers, check that gas supply shutoff valves are set in the dryer door well. 17 Just dial 1-800 NO BELTS (1-800-662-3587) - the call , you need assistance: The Commercial Laundry... Support Center will need the dryer model number and serial number. Maintenance instructions: ■ Clean lint screen after each ...
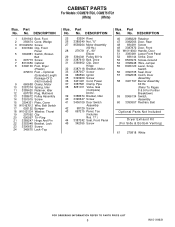
Parts List
Page 5
...Bracket, Motor 33 3387057 Screw 34 686590 Ignitor 35 3393909 Screw 36 3401401 Cord, Power 37 3387561 Clamp, Pipe 38 8281911 Valve, Gas (Complete) 60 Hz. 39 3388674 Bracket, Idler 40 3390647 Screw 41 3406109 Door Switch Assembly 42 98129 Screw 43 697215 Panel, ...Boot, Foot 2 356674 Cone, Wedge 3 W10045050 Screw 4 3391846 Clip, Front Panel 5 3394881 Switch, Broken Belt 6 697773 Screw 7 8310656 Cabinet 8 3392100 Foot, Dryer (Plastic) 279810 Foot − Optional (Extended Length Package Of 2) (Not Included) 9 660658 Clamp, Motor 10 3387374 Spring, Idler 11 3389420 Retainer, Idler 12 ...
...Bracket, Motor 33 3387057 Screw 34 686590 Ignitor 35 3393909 Screw 36 3401401 Cord, Power 37 3387561 Clamp, Pipe 38 8281911 Valve, Gas (Complete) 60 Hz. 39 3388674 Bracket, Idler 40 3390647 Screw 41 3406109 Door Switch Assembly 42 98129 Screw 43 697215 Panel, ...Boot, Foot 2 356674 Cone, Wedge 3 W10045050 Screw 4 3391846 Clip, Front Panel 5 3394881 Switch, Broken Belt 6 697773 Screw 7 8310656 Cabinet 8 3392100 Foot, Dryer (Plastic) 279810 Foot − Optional (Extended Length Package Of 2) (Not Included) 9 660658 Clamp, Motor 10 3387374 Spring, Idler 11 3389420 Retainer, Idler 12 ...


