Use and Care Guide
Page 1
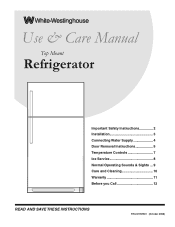
Use & Care Manual Top Mount Refrigerator Important Safety Instructions 2 Installation 3 Connecting Water Supply 4 Door Removal Instructions 5 Temperature Controls 7 Ice Service 8 Normal Operating Sounds & Sights.... 9 Care and Cleaning 10 Warranty 11 Before you Call 12 ReaD aND Save TheSe INSTRuCTIONS ReaD aND Save TheSe INSTRuCTIONS P/N 241997501 (October 2008)
Use & Care Manual Top Mount Refrigerator Important Safety Instructions 2 Installation 3 Connecting Water Supply 4 Door Removal Instructions 5 Temperature Controls 7 Ice Service 8 Normal Operating Sounds & Sights.... 9 Care and Cleaning 10 Warranty 11 Before you Call 12 ReaD aND Save TheSe INSTRuCTIONS ReaD aND Save TheSe INSTRuCTIONS P/N 241997501 (October 2008)
Use and Care Guide
Page 2
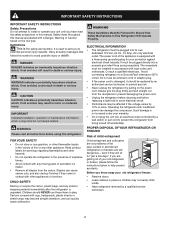
... an electrical outlet controlled by 10% or more. Read product labels for "just a few days." Junked or abondoned refrigerators or freezers are not problems of your protection against electrical shock hazards. If you to avoid possible injury or death. WARNING WARNING indicates... operation or maintenance information which , if not avoided, could result in contact with a three-prong grounding plug for your old refrigerator or freezer, please follow this symbol to potential personal injury hazards. The power cord of explosive fumes. • Avoid contact with a ...
... an electrical outlet controlled by 10% or more. Read product labels for "just a few days." Junked or abondoned refrigerators or freezers are not problems of your protection against electrical shock hazards. If you to avoid possible injury or death. WARNING WARNING indicates... operation or maintenance information which , if not avoided, could result in contact with a three-prong grounding plug for your old refrigerator or freezer, please follow this symbol to potential personal injury hazards. The power cord of explosive fumes. • Avoid contact with a ...
Use and Care Guide
Page 3
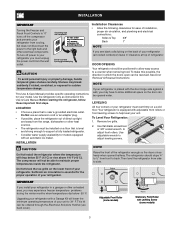
...Top 3/8" Back 1" note If you see back cover). Do Not block the toe grille on the back of direct sunlight and away from the range, dishwasher or other electrical components. Installation important Turning the Freezer and Fresh Food Controls to "0" turns off power to your refrigerator... will drop below 55° F. door opening Your refrigerator should slope ¼" to ½" from the wall outlet. Leveling All four corners of your refrigerator (air-cooled condenser) leave 3" clearance at top of the refrigerator enough so the doors close freely when opened wider. ...
...Top 3/8" Back 1" note If you see back cover). Do Not block the toe grille on the back of direct sunlight and away from the range, dishwasher or other electrical components. Installation important Turning the Freezer and Fresh Food Controls to "0" turns off power to your refrigerator... will drop below 55° F. door opening Your refrigerator should slope ¼" to ½" from the wall outlet. Leveling All four corners of your refrigerator (air-cooled condenser) leave 3" clearance at top of the refrigerator enough so the doors close freely when opened wider. ...
Use and Care Guide
Page 4
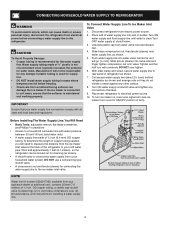
... a self-piercing type shutoff valve. • A compression nut and ferrule (sleeve) for water leaks. Water supply tubing made of refrigerator as it greatly increases the potential for connecting the water supply line to measure the distance from the ice maker inlet valve at shutoff valve... damage if plastic tubing is not recommended since it will go (¼ inch). Coil excess water supply line (about 2½ turns) behind refrigerator as shown. 5. Before Installing The Water Supply Line, You Will Need • Basic Tools: adjustable wrench, flat-blade screwdriver, and PhillipsTM ...
... a self-piercing type shutoff valve. • A compression nut and ferrule (sleeve) for water leaks. Water supply tubing made of refrigerator as it greatly increases the potential for connecting the water supply line to measure the distance from the ice maker inlet valve at shutoff valve... damage if plastic tubing is not recommended since it will go (¼ inch). Coil excess water supply line (about 2½ turns) behind refrigerator as shown. 5. Before Installing The Water Supply Line, You Will Need • Basic Tools: adjustable wrench, flat-blade screwdriver, and PhillipsTM ...
Use and Care Guide
Page 5
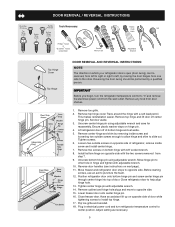
... easier. Remove center hinge and shim by removing inside screw and install center hinge. 7. Move freezer and refrigerator door stops to opposite side. 15. Flip toe grille and reinstall. 18. Tighten screws. 6. Remove two screws on opposite side with a soft lead pencil. Before starting...from door shelves. 1. Loosen two outside screws on opposite side of door. important Before you begin, turn refrigerator temperature control to slide out. Remove top hinge cover. Ensure plastic washer stays on next page). 11. Door Removal / reversal Instructions Tools Necessary: ...
... easier. Remove center hinge and shim by removing inside screw and install center hinge. 7. Move freezer and refrigerator door stops to opposite side. 15. Flip toe grille and reinstall. 18. Tighten screws. 6. Remove two screws on opposite side with a soft lead pencil. Before starting...from door shelves. 1. Loosen two outside screws on opposite side of door. important Before you begin, turn refrigerator temperature control to slide out. Remove top hinge cover. Ensure plastic washer stays on next page). 11. Door Removal / reversal Instructions Tools Necessary: ...

Use and Care Guide
Page 6
... from corresponding holes to opposite side. Remove two screws attaching handle to top of freezer door. 2. Swing top of dovetail button. 3. Start with two screws removed earlier. To attach freezer handle: 1. Dovetail Button Screw Handle Lock Handle over Dovetail Button Dovetail ... place. 2. Door Removal / reversal Instructions To Remove Freezer Handle: (Handles may be easier to reverse while doors are off.) 1. Place top of handle away from door. Remove two screws attaching handle to bottom of refrigerator door. 2. Swing bottom of handle over Dovetail Button...
... from corresponding holes to opposite side. Remove two screws attaching handle to top of freezer door. 2. Swing top of dovetail button. 3. Start with two screws removed earlier. To attach freezer handle: 1. Dovetail Button Screw Handle Lock Handle over Dovetail Button Dovetail ... place. 2. Door Removal / reversal Instructions To Remove Freezer Handle: (Handles may be easier to reverse while doors are off.) 1. Place top of handle away from door. Remove two screws attaching handle to bottom of refrigerator door. 2. Swing bottom of handle over Dovetail Button...
Use and Care Guide
Page 7
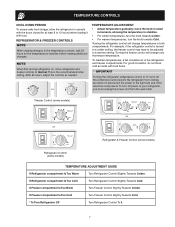
... refrigerator from the wall outlet. Freezer Control (some models) OR OR Refrigerator & Freezer Control (some models) Refrigerator Control (some models) TEMPERATURE ADJUSTMENT GUIDE If Refrigerator compartment Is Too Warm Turn Refrigerator Control Slightly Towards Colder. If Freezer compartment Is Too Warm Turn Freezer.... • For colder temperatures, turn the knob towards Cold. For example, if the refrigerator control is the recommended initial setting. Refrigerator & freezer controls note When making changes to the temperature controls, wait 24 hours for at least 8...
... refrigerator from the wall outlet. Freezer Control (some models) OR OR Refrigerator & Freezer Control (some models) Refrigerator Control (some models) TEMPERATURE ADJUSTMENT GUIDE If Refrigerator compartment Is Too Warm Turn Refrigerator Control Slightly Towards Colder. If Freezer compartment Is Too Warm Turn Freezer.... • For colder temperatures, turn the knob towards Cold. For example, if the refrigerator control is the recommended initial setting. Refrigerator & freezer controls note When making changes to the temperature controls, wait 24 hours for at least 8...
Use and Care Guide
Page 8
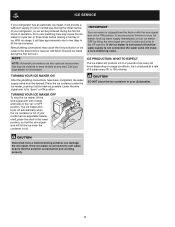
During the initial startup of your refrigerator, no usage, it as far back as possible. Discard ice made during the first 24 hours of ice. ICE PRODUCTION: WHAT TO EXPECT The ice ... cycle two or three times before making a full tray of operation. ice service If your refrigerator has an automatic ice maker, it clicks and locks in the UP position. If your model has an adjustable freezer shelf, place the shelf in new plumbing lines may cause the first production of your local...
During the initial startup of your refrigerator, no usage, it as far back as possible. Discard ice made during the first 24 hours of ice. ICE PRODUCTION: WHAT TO EXPECT The ice ... cycle two or three times before making a full tray of operation. ice service If your refrigerator has an automatic ice maker, it clicks and locks in the UP position. If your model has an adjustable freezer shelf, place the shelf in new plumbing lines may cause the first production of your local...
Use and Care Guide
Page 9
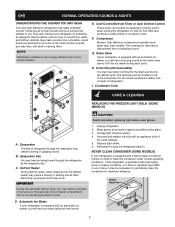
...automatic ice maker, you may notice a red glow in the vents on the back wall of your home, it may be located on top of the most common sounds you will hear ice cubes falling into the drain pan during the defrost cycle. Listed below are all normal ... condenser, there's no need to fill the ice maker during the defrost cycle. If the refrigerator is operated under normal operating conditions. The timer also produces sounds similar to plug the refrigerator back in your freezer compartment. E. note Rigid foam insulation is very energy efficient, but is significant pet traffic in...
...automatic ice maker, you may notice a red glow in the vents on the back wall of your home, it may be located on top of the most common sounds you will hear ice cubes falling into the drain pan during the defrost cycle. Listed below are all normal ... condenser, there's no need to fill the ice maker during the defrost cycle. If the refrigerator is operated under normal operating conditions. The timer also produces sounds similar to plug the refrigerator back in your freezer compartment. E. note Rigid foam insulation is very energy efficient, but is significant pet traffic in...
Use and Care Guide
Page 10
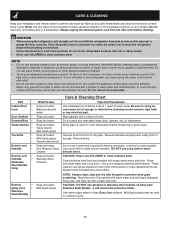
...spots. 10 Do not shift the refrigerator from tape or labels can be careful not to move the refrigerator beyond the plumbing connections. • Damp objects stick to your refrigerator and freezer clean to clean smooth handles. Do not touch refrigerated surfaces with wet or damp hands....liquid detergent. Always follow manufacturer's instructions. CAUTION: DO NOT use razor blades or other abrasive cleaning materials. • Turning the refrigerator temperature control to "0" turns off power to cold metal surfaces. CAUTION: Never use paper towels, scouring pads, or other sharp ...
...spots. 10 Do not shift the refrigerator from tape or labels can be careful not to move the refrigerator beyond the plumbing connections. • Damp objects stick to your refrigerator and freezer clean to clean smooth handles. Do not touch refrigerated surfaces with wet or damp hands....liquid detergent. Always follow manufacturer's instructions. CAUTION: DO NOT use razor blades or other abrasive cleaning materials. • Turning the refrigerator temperature control to "0" turns off power to cold metal surfaces. CAUTION: Never use paper towels, scouring pads, or other sharp ...
Use and Care Guide
Page 11
...remote areas, including the state of appliance or home incurred during installation, including but not limited to, any refrigerator or freezer failures. 6. Products used in accordance with replacing any obligations under this warranty. DISCLAIMER OF IMPLIED WARRANTIES; CLAIMS ...INCIDENTAL EXPENSES RESULTING FROM ANY BREACH OF THIS WRITTEN LIMITED WARRANTY OR ANY IMPLIED WARRANTY. white westinghouse APPLIANCE WARRANTY INFORMATION White Westinghouse Appliance Warranty Information Your appliance is covered by unauthorized service companies; use your appliance is ...
...remote areas, including the state of appliance or home incurred during installation, including but not limited to, any refrigerator or freezer failures. 6. Products used in accordance with replacing any obligations under this warranty. DISCLAIMER OF IMPLIED WARRANTIES; CLAIMS ...INCIDENTAL EXPENSES RESULTING FROM ANY BREACH OF THIS WRITTEN LIMITED WARRANTY OR ANY IMPLIED WARRANTY. white westinghouse APPLIANCE WARRANTY INFORMATION White Westinghouse Appliance Warranty Information Your appliance is covered by unauthorized service companies; use your appliance is ...
Use and Care Guide
Page 12
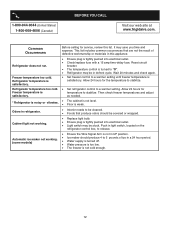
...9044 (United States) 1-800-668-4606 (Canada) Before You Call Visit our web site at www.frigidaire.com. Freezer temperature too cold. Refrigerator temperature too cold. Odors in defrost cycle. Automatic ice maker not working . This list includes common occurrences that ... should produce 4 to be covered or wrapped. x The temperature control is satisfactory. x Set freezer control to a warmer setting. x Set refrigerator control to a warmer setting until freezer temperature is turned to release. x Interior needs to 5 pounds of defective workmanship or materials in...
...9044 (United States) 1-800-668-4606 (Canada) Before You Call Visit our web site at www.frigidaire.com. Freezer temperature too cold. Refrigerator temperature too cold. Odors in defrost cycle. Automatic ice maker not working . This list includes common occurrences that ... should produce 4 to be covered or wrapped. x The temperature control is satisfactory. x Set freezer control to a warmer setting. x Set refrigerator control to a warmer setting until freezer temperature is turned to release. x Interior needs to 5 pounds of defective workmanship or materials in...
Installation Instructions
Page 1
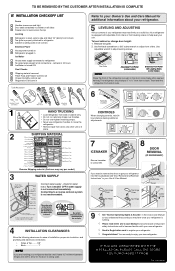
... REMOVED BY THE CUSTOMER AFTER INSTALLATION IS COMPLETE INSTALLATION CHECKOFF LIST Doors Handles are secure and tight Door seals completely to cabinet on all sides Freezer door is level across the top Leveling Refrigerator is level, side to side and tilted 1/4" (6mm) front to back Toe grille is properly attached to...
... REMOVED BY THE CUSTOMER AFTER INSTALLATION IS COMPLETE INSTALLATION CHECKOFF LIST Doors Handles are secure and tight Door seals completely to cabinet on all sides Freezer door is level across the top Leveling Refrigerator is level, side to side and tilted 1/4" (6mm) front to back Toe grille is properly attached to...

Parts Catalog
Page 1
White-Westinghouse Product No. BOX 212378 AUGUSTA, GA 30917 Publication No. 5995531794 09/01/20 (EN/SERVICE/DCS) 390 Model No. WWTR1802K Copyright © 2009 Electrolux ...R134a System Color white Volts 115 Wiring Diagram 241582401 Owner's Guide 241997501 Market North America Energy Guide 241613796 Service Data Sheet 241588203 Installation Instructions 240568303 TOP-MOUNT N05L00004.eps N05DBDCKA0.eps N05BBAABA26.eps N05SADDDA21.eps N05CBABAB5.eps W241582401.eps S241582801.eps REFRIGERATOR Electrolux Major Appliances North & Latin America P.O. All rights reserved.
White-Westinghouse Product No. BOX 212378 AUGUSTA, GA 30917 Publication No. 5995531794 09/01/20 (EN/SERVICE/DCS) 390 Model No. WWTR1802K Copyright © 2009 Electrolux ...R134a System Color white Volts 115 Wiring Diagram 241582401 Owner's Guide 241997501 Market North America Energy Guide 241613796 Service Data Sheet 241588203 Installation Instructions 240568303 TOP-MOUNT N05L00004.eps N05DBDCKA0.eps N05BBAABA26.eps N05SADDDA21.eps N05CBABAB5.eps W241582401.eps S241582801.eps REFRIGERATOR Electrolux Major Appliances North & Latin America P.O. All rights reserved.

