Use and Care Guide
Page 2
...; Remove all staples from the carton. proper disposal of your refrigerator or freezer Risk of child entrapment Child entrapment and suffocation are getting rid of the past. Before you throw away your warranty. • Do not plug the unit into an electrical outlet controlled by a wall switch or pull cord to prevent the...
...; Remove all staples from the carton. proper disposal of your refrigerator or freezer Risk of child entrapment Child entrapment and suffocation are getting rid of the past. Before you throw away your warranty. • Do not plug the unit into an electrical outlet controlled by a wall switch or pull cord to prevent the...
Use and Care Guide
Page 3
... any circumstances, cut, remove, or bypass the grounding prong. Use the refrigerator only as instructed in this possible, the direction in a garage or other unheated area, you may experience freezer temperature problems during the winter months when temperatures dip below 55°F ... Reversal Instructions. Do Not block the toe grille on the back of your refrigerator (air-cooled condenser) leave 3" clearance at top of installation, proper air circulation, and plumbing and electrical connections: Sides & Top 3/8" Back 1" note If you see back cover). Sufficient air circulation is...
... any circumstances, cut, remove, or bypass the grounding prong. Use the refrigerator only as instructed in this possible, the direction in a garage or other unheated area, you may experience freezer temperature problems during the winter months when temperatures dip below 55°F ... Reversal Instructions. Do Not block the toe grille on the back of your refrigerator (air-cooled condenser) leave 3" clearance at top of installation, proper air circulation, and plumbing and electrical connections: Sides & Top 3/8" Back 1" note If you see back cover). Sufficient air circulation is...
Use and Care Guide
Page 4
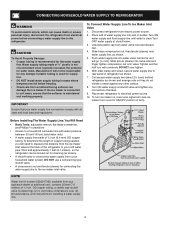
.... • Chemicals from a malfunctioning softener can cause death or severe personal injury, disconnect the refrigerator from electrical power before connecting a water supply line to the ice maker inlet valve. CONNECTING HOUSEHOLD WATER SUPPLY TO REFRIGERATOR Warning To avoid electric shock, which can damage the ice maker. caution To Avoid Property Damage: • Copper tubing...
.... • Chemicals from a malfunctioning softener can cause death or severe personal injury, disconnect the refrigerator from electrical power before connecting a water supply line to the ice maker inlet valve. CONNECTING HOUSEHOLD WATER SUPPLY TO REFRIGERATOR Warning To avoid electric shock, which can damage the ice maker. caution To Avoid Property Damage: • Copper tubing...
Use and Care Guide
Page 5
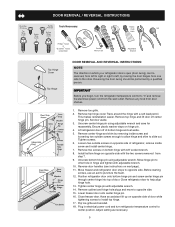
...freezer door. Plug in electrical power cord and turn the refrigerator temperature control to center position. Adjust setting as necessary. 5 Trace around the hinge with 3/8" socket wrench. 8. Remove center hinge and shim by removing inside screw and install center hinge. 7. Tighten screws. 6. Remove cabinet and hinge hole plugs and move to install top... hinge pin through center hinge into top of bottom hinge and set aside. 5. Tighten center hinge pin with the two screws removed from door shelves. 1. Flip toe grille and reinstall. 18. Ensure plastic washer stays on next...
...freezer door. Plug in electrical power cord and turn the refrigerator temperature control to center position. Adjust setting as necessary. 5 Trace around the hinge with 3/8" socket wrench. 8. Remove center hinge and shim by removing inside screw and install center hinge. 7. Tighten screws. 6. Remove cabinet and hinge hole plugs and move to install top... hinge pin through center hinge into top of bottom hinge and set aside. 5. Tighten center hinge pin with the two screws removed from door shelves. 1. Flip toe grille and reinstall. 18. Ensure plastic washer stays on next...
Use and Care Guide
Page 7
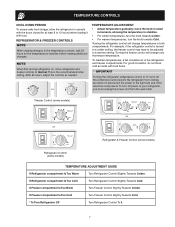
..., but does not disconnect the power to the light bulb and other electrical components. Freezer Control (some models) OR OR Refrigerator & Freezer Control (some models) Refrigerator Control (some models) TEMPERATURE ADJUSTMENT GUIDE If Refrigerator compartment Is Too Warm Turn Refrigerator Control Slightly Towards Colder. Turning the refrigerator control will change temperatures in both compartments. For example, if the...
..., but does not disconnect the power to the light bulb and other electrical components. Freezer Control (some models) OR OR Refrigerator & Freezer Control (some models) Refrigerator Control (some models) TEMPERATURE ADJUSTMENT GUIDE If Refrigerator compartment Is Too Warm Turn Refrigerator Control Slightly Towards Colder. Turning the refrigerator control will change temperatures in both compartments. For example, if the...
Use and Care Guide
Page 9
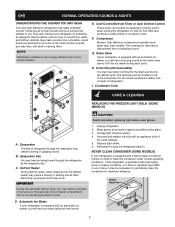
...Unscrew and replace old bulb with an automatic ice maker, you may notice a red glow in . They also indicate your freezer compartment. note Rigid foam insulation is very energy efficient, but is causing them. Cold Control/Defrost Timer or Auto Defrost Control ... top of some Models) A. Unplug refrigerator. 2. The timer also produces sounds similar to plug the refrigerator back in the vents on and off. F. E. B. If the refrigerator is normal during each cycle. G. Drain Pan (Nonremovable) You may cause a hissing or sizzling sound. Remember to an electric ...
...Unscrew and replace old bulb with an automatic ice maker, you may notice a red glow in . They also indicate your freezer compartment. note Rigid foam insulation is very energy efficient, but is causing them. Cold Control/Defrost Timer or Auto Defrost Control ... top of some Models) A. Unplug refrigerator. 2. The timer also produces sounds similar to plug the refrigerator back in the vents on and off. F. E. B. If the refrigerator is normal during each cycle. G. Drain Pan (Nonremovable) You may cause a hissing or sizzling sound. Remember to an electric ...
Use and Care Guide
Page 10
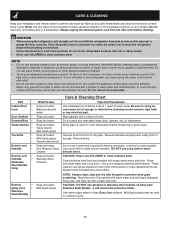
...8226; Do not use paper towels, scouring pads, or other abrasive cleaning materials. • Turning the refrigerator temperature control to "0" turns off power to your refrigerator and freezer clean to clean Easy Care surfaces. Rinse well, and wipe dry with soapy water and a dishcloth. Use... warm soapy water to prevent odor build-up any electrical part. Care & Cleaning Keep your refrigerator, you have already removed. Do...
...8226; Do not use paper towels, scouring pads, or other abrasive cleaning materials. • Turning the refrigerator temperature control to "0" turns off power to your refrigerator and freezer clean to clean Easy Care surfaces. Rinse well, and wipe dry with soapy water and a dishcloth. Use... warm soapy water to prevent odor build-up any electrical part. Care & Cleaning Keep your refrigerator, you have already removed. Do...
Use and Care Guide
Page 12
.... It may be cleaned. x Ensure plug is tightly pushed into electrical outlet. x Refrigerator may be covered or wrapped. x Water pressure is noisy or vibrates. Automatic ice maker not working . x Ensure the Wire Signal Arm is satisfactory. Freezer temperature too cold. Freezer temperature is satisfactory. * Refrigerator is too low. x Light switch may save you time and...
.... It may be cleaned. x Ensure plug is tightly pushed into electrical outlet. x Refrigerator may be covered or wrapped. x Water pressure is noisy or vibrates. Automatic ice maker not working . x Ensure the Wire Signal Arm is satisfactory. Freezer temperature too cold. Freezer temperature is satisfactory. * Refrigerator is too low. x Light switch may save you time and...
Installation Instructions
Page 1
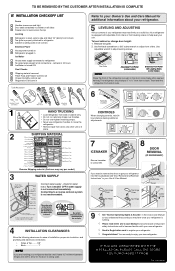
... SUPPLY 4 INSTALLATION CLEARANCES Allow the following clearances for ease of installation, proper air circulation, and plumbing and electrical connections: • Sides & Top..........3/8" • Back 1" NOTE If you are installing your refrigerator beside a wall, leave 1/2" minimum between hinges and wall to allow for the door to swing open. ... CHECKOFF LIST Doors Handles are secure and tight Door seals completely to cabinet on all sides Freezer door is level across the top Leveling Refrigerator is level, side to side and tilted 1/4" (6mm) front to back Toe grille is properly attached ...
... SUPPLY 4 INSTALLATION CLEARANCES Allow the following clearances for ease of installation, proper air circulation, and plumbing and electrical connections: • Sides & Top..........3/8" • Back 1" NOTE If you are installing your refrigerator beside a wall, leave 1/2" minimum between hinges and wall to allow for the door to swing open. ... CHECKOFF LIST Doors Handles are secure and tight Door seals completely to cabinet on all sides Freezer door is level across the top Leveling Refrigerator is level, side to side and tilted 1/4" (6mm) front to back Toe grille is properly attached ...