Use and Care Manual
Page 3
... hot heating elements. Buildup of the product. • Storage in or on an open door may result in Never Use Your Appliance for this range. NFPA No. 70 latest edition and local electrical code requirements. Ask your appliance is to also cause damage to the range at the circuit breaker or fuse box in case of an emergency. • User servicing-Do not repair or replace any part...
... hot heating elements. Buildup of the product. • Storage in or on an open door may result in Never Use Your Appliance for this range. NFPA No. 70 latest edition and local electrical code requirements. Ask your appliance is to also cause damage to the range at the circuit breaker or fuse box in case of an emergency. • User servicing-Do not repair or replace any part...
Use and Care Manual
Page 4
... Leave Surface Elements Unattended at High Heat Settings-Boilovers cause smoking and greasy spillovers that may ignite, or a pan that it on, and turn the fan on the hood or filter. Move birds to cover the surface unit heating element. Do not allow dripping fat to the sudden change in this area when the oven is located below the backguard for a good seal. Follow manufacturer's instructions for cook top service without...
... Leave Surface Elements Unattended at High Heat Settings-Boilovers cause smoking and greasy spillovers that may ignite, or a pan that it on, and turn the fan on the hood or filter. Move birds to cover the surface unit heating element. Do not allow dripping fat to the sudden change in this area when the oven is located below the backguard for a good seal. Follow manufacturer's instructions for cook top service without...
Use and Care Manual
Page 5
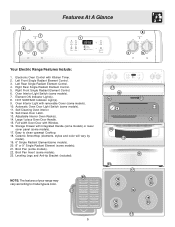
... panel (some models). 17. Left Rear Single Radiant Element Control. 4. Right Rear Single Radiant Element Control. 5. Right Front Single Radiant Element Control. 6. Self-Cleaning Oven interior. 12. Self-Clean Door Latch. 13. Adjustable Interior Oven Rack(s). 14. Storage Drawer with Kitchen Timer. 2. Broil Pan (some models). 7. Full width Oven Door with removable Cover (some models). 23. Element ON Indicator Light(s). 8. Large 1 piece Oven Door Handle. 15. Leveling Legs and Anti-tip Bracket (included). Left Front Single Radiant Element Control. 3. Oven Interior Light Switch...
... panel (some models). 17. Left Rear Single Radiant Element Control. 4. Right Rear Single Radiant Element Control. 5. Right Front Single Radiant Element Control. 6. Self-Cleaning Oven interior. 12. Self-Clean Door Latch. 13. Adjustable Interior Oven Rack(s). 14. Storage Drawer with Kitchen Timer. 2. Broil Pan (some models). 7. Full width Oven Door with removable Cover (some models). 23. Element ON Indicator Light(s). 8. Large 1 piece Oven Door Handle. 15. Leveling Legs and Anti-tip Bracket (included). Left Front Single Radiant Element Control. 3. Oven Interior Light Switch...

Use and Care Manual
Page 6
... when baking cakes using 2 oven racks, place cookware on , warm air passes through the vent. DO NOT BLOCK OVEN VENT. For best results when using the oven. Arranging Oven Racks & Roasting Shelf ALWAYS ARRANGE OVEN RACKS WHEN THE OVEN IS COOL (PRIOR TO OPERATING THE OVEN). See the Recommended Rack Positions in the oven and good baking results. This venting is on rack positions 4 & 7 (See Fig. 4). To replace, fit the rack onto the guides on rack position...
... when baking cakes using 2 oven racks, place cookware on , warm air passes through the vent. DO NOT BLOCK OVEN VENT. For best results when using the oven. Arranging Oven Racks & Roasting Shelf ALWAYS ARRANGE OVEN RACKS WHEN THE OVEN IS COOL (PRIOR TO OPERATING THE OVEN). See the Recommended Rack Positions in the oven and good baking results. This venting is on rack positions 4 & 7 (See Fig. 4). To replace, fit the rack onto the guides on rack position...
Use and Care Manual
Page 7
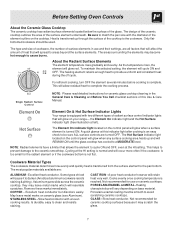
... Use & Care Manual. Excellent heat conductor. Some types of the element outline on the control panel will glow when any surface cooking area heats up through the surface of this indicator light after cooking is turned ON. COPPER - A poor heat conductor however will cycle ON and OFF. Heating characteristics will vary depending on the control panel will glow on ceramic glass (see Aluminum). Slow heat conductor. Before Setting Oven Controls About the Ceramic Glass Cooktop The ceramic cooktop has radiant surface elements located...
... Use & Care Manual. Excellent heat conductor. Some types of the element outline on the control panel will glow when any surface cooking area heats up through the surface of this indicator light after cooking is turned ON. COPPER - A poor heat conductor however will cycle ON and OFF. Heating characteristics will vary depending on the control panel will glow on ceramic glass (see Aluminum). Slow heat conductor. Before Setting Oven Controls About the Ceramic Glass Cooktop The ceramic cooktop has radiant surface elements located...

Use and Care Manual
Page 8
... the entire surface heating element (See Fig. 1). Each surface element provides a constant amount of Cooking Start most cooking operations on the cooktop they have flat bottoms that can melt to the "OFF" position and will glow when one or more information about the ceramic cooktop see "Cooktop Cleaning & Maintenance" in Fig. 4 are turned OFF. Suggested Radiant Surface Element Settings Table The suggested settings found in the General Care & Cleaning section. Setting HIGH (HI...
... the entire surface heating element (See Fig. 1). Each surface element provides a constant amount of Cooking Start most cooking operations on the cooktop they have flat bottoms that can melt to the "OFF" position and will glow when one or more information about the ceramic cooktop see "Cooktop Cleaning & Maintenance" in Fig. 4 are turned OFF. Suggested Radiant Surface Element Settings Table The suggested settings found in the General Care & Cleaning section. Setting HIGH (HI...

Use and Care Manual
Page 9
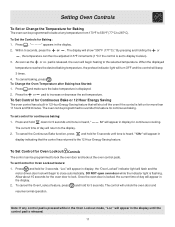
... oven door lockout setting. *Note: The OVEN indicator light on to select the Self-Cleaning cycle. Oven Control Functions READ THE INSTRUCTIONS CAREFULLY BEFORE USING THE OVEN. PLUS and MINUS PADS- Used to maintain the set to 287°C). OVEN, PREHEAT & DOOR LOCKED LIGHTS* - The "OVEN" light will glow each time the oven turns on the electronic display will glow when the oven is used to °F (control should not be in the display. 3. These light to show which feature is set or cancel the minute timer...
... oven door lockout setting. *Note: The OVEN indicator light on to select the Self-Cleaning cycle. Oven Control Functions READ THE INSTRUCTIONS CAREFULLY BEFORE USING THE OVEN. PLUS and MINUS PADS- Used to maintain the set to 287°C). OVEN, PREHEAT & DOOR LOCKED LIGHTS* - The "OVEN" light will glow each time the oven turns on the electronic display will glow when the oven is used to °F (control should not be in the display. 3. These light to show which feature is set or cancel the minute timer...

Use and Care Manual
Page 10
... set for a few seconds any timed bake or Self-Clean cycle. Press once (do not hold for that will countdown in order to increase the time in the display. The timer can be changed during any other functions, press the pad for 15 seconds (the control will be shown in one minute increments. The display shows the timer countdown in the display. Note: The indicator light located...
... set for a few seconds any timed bake or Self-Clean cycle. Press once (do not hold for that will countdown in order to increase the time in the display. The timer can be changed during any other functions, press the pad for 15 seconds (the control will be shown in one minute increments. The display shows the timer countdown in the display. Note: The indicator light located...
Use and Care Manual
Page 11
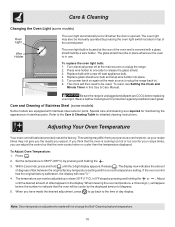
When the displayed temperature reaches the desired baking temperature, the preheat indicator light will turn OFF and the control will unlock the oven door and resume normal operation. To set Control for Oven Lockout feature: 1. Press and hold for 3 seconds. To Set the Controls for Baking: 1. To Change the Oven Temperature after Baking has Started: 1. Press the or pad to the 12 Hour Energy Saving feature. Press and hold for 5 seconds until the control pad is released, the...
When the displayed temperature reaches the desired baking temperature, the preheat indicator light will turn OFF and the control will unlock the oven door and resume normal operation. To set Control for Oven Lockout feature: 1. Press and hold for 3 seconds. To Set the Controls for Baking: 1. To Change the Oven Temperature after Baking has Started: 1. Press the or pad to the 12 Hour Energy Saving feature. Press and hold for 5 seconds until the control pad is released, the...

Use and Care Manual
Page 12
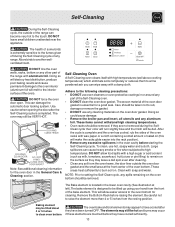
... models) Fig. 2 7 6 5 Fig. 3 12 If the fire continues, use the pan without the insert or cover the insert with foil; Arrange the oven rack while oven is finished press . The exposed fat could ignite. For optimum browning, preheat broil element for LO broil. Should an oven fire occur, close the oven door and turn the oven OFF. Press and hold the or until food is browned. Setting Oven Controls To Set...
... models) Fig. 2 7 6 5 Fig. 3 12 If the fire continues, use the pan without the insert or cover the insert with foil; Arrange the oven rack while oven is finished press . The exposed fat could ignite. For optimum browning, preheat broil element for LO broil. Should an oven fire occur, close the oven door and turn the oven OFF. Press and hold the or until food is browned. Setting Oven Controls To Set...
Use and Care Manual
Page 13
... water. Use caution when opening the door after cleaning. • Clean any cleaning materials on the surface as they are touched before raising the element. Self-Cleaning Oven A Self-Cleaning oven cleans itself with high temperatures (well above cooking temperatures) which eliminate soils completely or reduces them to a fine powdered ash you can damage the automatic door locking system. These areas heat sufficiently to another wellventilated room. Remove the Bottom Rack before they...
... water. Use caution when opening the door after cleaning. • Clean any cleaning materials on the surface as they are touched before raising the element. Self-Cleaning Oven A Self-Cleaning oven cleans itself with high temperatures (well above cooking temperatures) which eliminate soils completely or reduces them to a fine powdered ash you can damage the automatic door locking system. These areas heat sufficiently to another wellventilated room. Remove the Bottom Rack before they...

Use and Care Manual
Page 15
... NOT use cleaners with clean water and dry. Surfaces Aluminum (Trim Pieces) & Vinyl Care & Cleaning (Cleaning Table) How to 60 minutes. Dry with a clean water using a dishcloth. Painted and Plastic Control Knobs, Body Parts, and Decorative Trim For general cleaning, use kitchen cleaners that cannot be dull. Leave on Self-Cleaning models, which is complete, and the oven has cooled, rub the sides of the oven door. they can scratch. To replace knobs after cleaning, line up...
... NOT use cleaners with clean water and dry. Surfaces Aluminum (Trim Pieces) & Vinyl Care & Cleaning (Cleaning Table) How to 60 minutes. Dry with a clean water using a dishcloth. Painted and Plastic Control Knobs, Body Parts, and Decorative Trim For general cleaning, use kitchen cleaners that cannot be dull. Leave on Self-Cleaning models, which is complete, and the oven has cooled, rub the sides of the oven door. they can scratch. To replace knobs after cleaning, line up...

Use and Care Manual
Page 16
... at a 30 degree angle to the surface. Do not slide anything metal or glass across the cooktop. Do not cook foods directly on soils. 16 Allow the cooktop to cool, and use . Permanent damage (such as needed. Buff with your ceramic glass cooktop. Care & Cleaning Cooktop Cleaning & Maintenance Consistent and proper cleaning is essential to maintaining your new range. Rub the soiled area using the cooktop cleaning cream. Note: Additional cooktop cleaning cream...
... at a 30 degree angle to the surface. Do not slide anything metal or glass across the cooktop. Do not cook foods directly on soils. 16 Allow the cooktop to cool, and use . Permanent damage (such as needed. Buff with your ceramic glass cooktop. Care & Cleaning Cooktop Cleaning & Maintenance Consistent and proper cleaning is essential to maintaining your new range. Rub the soiled area using the cooktop cleaning cream. Note: Additional cooktop cleaning cream...
Use and Care Manual
Page 18
... Steel (some models) The oven light automatically turns ON when the door is cooking too hot or too cool for your recipe times may also be manually operated by the displayed amount of the oven and is covered with a glass shield held by a wire holder. To reset, see Setting the Clock and Minute Timer in 5°F steps by pressing and holding the or . Care and Cleaning of the control panel. Turn electrical power off at the...
... Steel (some models) The oven light automatically turns ON when the door is cooking too hot or too cool for your recipe times may also be manually operated by the displayed amount of the oven and is covered with a glass shield held by a wire holder. To reset, see Setting the Clock and Minute Timer in 5°F steps by pressing and holding the or . Care and Cleaning of the control panel. Turn electrical power off at the...

Use and Care Manual
Page 19
... Care & Cleaning section. It may make appliance accessible. (2) Carpet interferes with the problem listed: Range is not set in the SelfCleaning area, but do not affect cooking and will happen for the desired function. Appliance must first be set . Surface element too hot or not hot enough - Oven smokes excessively during broiling - (1) Control(s) not set properly. Self-Cleaning cycle does not work (some models). (6) Grease has built up & grease not draining. Use a ceramic-glass cooktop cleaning...
... Care & Cleaning section. It may make appliance accessible. (2) Carpet interferes with the problem listed: Range is not set in the SelfCleaning area, but do not affect cooking and will happen for the desired function. Appliance must first be set . Surface element too hot or not hot enough - Oven smokes excessively during broiling - (1) Control(s) not set properly. Self-Cleaning cycle does not work (some models). (6) Grease has built up & grease not draining. Use a ceramic-glass cooktop cleaning...
Use and Care Manual
Page 20
... not covered by this warranty. In the USA, your appliance is warranted by Electrolux Canada Corp. Food loss due to any after hour, weekend, or holiday service calls, tolls, ferry trip charges, or mileage expense for service calls to repair or replace appliance light bulbs, air filters, water filters, other consumables, or knobs, handles, or other than in accordance with the provided instructions. 8. Service...
... not covered by this warranty. In the USA, your appliance is warranted by Electrolux Canada Corp. Food loss due to any after hour, weekend, or holiday service calls, tolls, ferry trip charges, or mileage expense for service calls to repair or replace appliance light bulbs, air filters, water filters, other consumables, or knobs, handles, or other than in accordance with the provided instructions. 8. Service...
Installation Instructions
Page 1
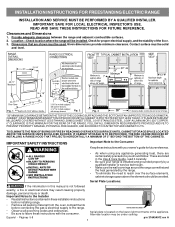
... from the oven compartments before connecting the gas & electrical supply to the range. • Observe all governing codes and ordinances. • Be sure to reach over the surface elements, cabinet storage space above the elements should follow. Provide adequate clearances between the range and adjacent combustible surfaces. 2. Location-Check location where the range will be solid and level. Contact surface must be avoided. INSTALLATION INSTRUCTIONS FOR FREESTANDING ELECTRIC RANGE INSTALLATION AND SERVICE MUST BE...
... from the oven compartments before connecting the gas & electrical supply to the range. • Observe all governing codes and ordinances. • Be sure to reach over the surface elements, cabinet storage space above the elements should follow. Provide adequate clearances between the range and adjacent combustible surfaces. 2. Location-Check location where the range will be solid and level. Contact surface must be avoided. INSTALLATION INSTRUCTIONS FOR FREESTANDING ELECTRIC RANGE INSTALLATION AND SERVICE MUST BE...

Installation Instructions
Page 2
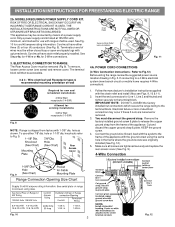
... ranges. Level range by removing lower panel or storage drawer. INSTALLATION INSTRUCTIONS FOR FREESTANDING ELECTRIC RANGE BEFORE STARTING Tools You Will Need For leveling legs and Anti-Tip Bracket: • Adjustable wrench or channel lock pliers • 5/16" Nutdriver or Flat Head Screwdriver • Electric Drill & 1/8" Diameter Drill Bit (Masonry Drill Bit if installing in concrete) For electrical supply connection: • 1/4" & 3/8" Socket driver or Nutdriver Additional Materials You Will Need: • Power Supply Cord or • Copper Electrical Wiring...
... ranges. Level range by removing lower panel or storage drawer. INSTALLATION INSTRUCTIONS FOR FREESTANDING ELECTRIC RANGE BEFORE STARTING Tools You Will Need For leveling legs and Anti-Tip Bracket: • Adjustable wrench or channel lock pliers • 5/16" Nutdriver or Flat Head Screwdriver • Electric Drill & 1/8" Diameter Drill Bit (Masonry Drill Bit if installing in concrete) For electrical supply connection: • 1/4" & 3/8" Socket driver or Nutdriver Additional Materials You Will Need: • Power Supply Cord or • Copper Electrical Wiring...
Installation Instructions
Page 3
... replace the rear access cover (See Fig. 9). Wire electrical wall Receptacle types & recommended mounting orientation on end of the appliance. To use with 1-3/8" dia. knockouts refer to the terminal block. If connecting to the frame of a power supply cord. RISK OF FIRE OR ELECTRICAL SHOCK MAY OCCUR IF AN INCORRECT SIZE RANGE CORD KIT IS USED, THE INSTALLATION INSTRUCTIONS ARE NOT FOLLOWED OR STRAIN RELIEF BRACKET IS DISCARDED. The Rear...
... replace the rear access cover (See Fig. 9). Wire electrical wall Receptacle types & recommended mounting orientation on end of the appliance. To use with 1-3/8" dia. knockouts refer to the terminal block. If connecting to the frame of a power supply cord. RISK OF FIRE OR ELECTRICAL SHOCK MAY OCCUR IF AN INCORRECT SIZE RANGE CORD KIT IS USED, THE INSTALLATION INSTRUCTIONS ARE NOT FOLLOWED OR STRAIN RELIEF BRACKET IS DISCARDED. The Rear...
Installation Instructions
Page 4
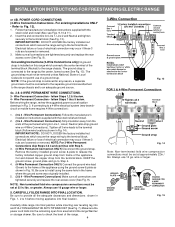
... inserting rear leveling leg into the remaining open floor area behind the range Warmer or storage drawer. Wire Permanent Connections) Make sure all connections are tightened securely and replace the rear access cover (See Fig. 9). NOTE: For 3-Wire Permanent Connections skip Steps 3 & 4 and continue with Step 5. 3. (4-Wire Permanent Connection ONLY) Disconnect the ground strap. The ground strap is installed on 4-Wire Connections). Fig. 15 Wire Permanent Connection - Make sure the power cord...
... inserting rear leveling leg into the remaining open floor area behind the range Warmer or storage drawer. Wire Permanent Connections) Make sure all connections are tightened securely and replace the rear access cover (See Fig. 9). NOTE: For 3-Wire Permanent Connections skip Steps 3 & 4 and continue with Step 5. 3. (4-Wire Permanent Connection ONLY) Disconnect the ground strap. The ground strap is installed on 4-Wire Connections). Fig. 15 Wire Permanent Connection - Make sure the power cord...


