
User Manual
Page 3
English Contents PRODUCT SAFETY INSTRUCTIONS 4 Antenna Installation Safety 5 Safety Guidelines 6 LCD TV Overview 7 Package Contents 7 Front View of the LCD TV 7 Rear View of the LCD TV 7 Side View of the LCD TV 8 Control Key 8 Input Connector 9 Remote Control 10 Installation 12 Function adjustment 15 Viewing OSD Menu 15 Picture 16 Audio Setting 18 Channels 19 Settings 22 Locks 29 Guide 32 Product Specification 33 Troubleshooting 34 2
English Contents PRODUCT SAFETY INSTRUCTIONS 4 Antenna Installation Safety 5 Safety Guidelines 6 LCD TV Overview 7 Package Contents 7 Front View of the LCD TV 7 Rear View of the LCD TV 7 Side View of the LCD TV 8 Control Key 8 Input Connector 9 Remote Control 10 Installation 12 Function adjustment 15 Viewing OSD Menu 15 Picture 16 Audio Setting 18 Channels 19 Settings 22 Locks 29 Guide 32 Product Specification 33 Troubleshooting 34 2

User Manual
Page 4
...1. If it still is not clean, apply a small amount of any ammonia or alcohol-based cleaners on the LCD TV screen or case. Westinghouse Digital will not be liable for purchasing a Westinghouse LCD TV www.westinghousedigital.com 3 Wipe the screen with a clean, soft, lint-free cloth. Some chemical cleaners have... been reported to damage the screen and/or LCD TV case. Disclaimer Westinghouse Digital does not recommend the use of non-ammonia, non-alcohol based, mild non- English Cleaning the LCD TV • MAKE SURE THE LCD TV IS TURNED OFF • NEVER SPRAY OR POUR ANY...
...1. If it still is not clean, apply a small amount of any ammonia or alcohol-based cleaners on the LCD TV screen or case. Westinghouse Digital will not be liable for purchasing a Westinghouse LCD TV www.westinghousedigital.com 3 Wipe the screen with a clean, soft, lint-free cloth. Some chemical cleaners have... been reported to damage the screen and/or LCD TV case. Disclaimer Westinghouse Digital does not recommend the use of non-ammonia, non-alcohol based, mild non- English Cleaning the LCD TV • MAKE SURE THE LCD TV IS TURNED OFF • NEVER SPRAY OR POUR ANY...
User Manual
Page 5
..., these openings must not be seriously injured if you operate the LCD TV. Keep this user's manual for a long period of moisture. • Do not place heavy objects on or pinched by Westinghouse Digital. • If your LCD display with liquids, such as a bookcase or rack unless proper ...ventilation is clean and free of time, unplug the LCD TV and remove the batteries from direct sunlight to reduce glare. •...
..., these openings must not be seriously injured if you operate the LCD TV. Keep this user's manual for a long period of moisture. • Do not place heavy objects on or pinched by Westinghouse Digital. • If your LCD display with liquids, such as a bookcase or rack unless proper ...ventilation is clean and free of time, unplug the LCD TV and remove the batteries from direct sunlight to reduce glare. •...
User Manual
Page 6
... a lightning storm, or when it from touching such power lines or circuits. 5 Power Lines An outside antenna or cable system is connected to the LCD TV, be taken to qualified service personnel. Turn off your wall outlet, consult an electrician for replacement of time. 14) Refer all instructions. 5) ... power lines or other . lightning may strike while you are holding the cable cord, causing serious injury. This will prevent damage to the LCD TV due to bypass the safety purpose of the cord. 11) Only use caution when moving the cart to prevent voltage surges and built-...
... a lightning storm, or when it from touching such power lines or circuits. 5 Power Lines An outside antenna or cable system is connected to the LCD TV, be taken to qualified service personnel. Turn off your wall outlet, consult an electrician for replacement of time. 14) Refer all instructions. 5) ... power lines or other . lightning may strike while you are holding the cable cord, causing serious injury. This will prevent damage to the LCD TV due to bypass the safety purpose of the cord. 11) Only use caution when moving the cart to prevent voltage surges and built-...

User Manual
Page 7
...FCC Warning To assure continued FCC compliance, the user must use only a shielded BNC (5) cable. Some examples are designed to correct the interference by Westinghouse Digital will not occur in a residential installation. Please consult the table below : USA UL Canada CSA Japan .. ...... Cord Type SJT SVT Size of...AWG 14 AWG 18 AWG 17 AWG Maximum Current Rating of the cord set is connected. • Consult the Westinghouse Service Center or an experienced radio/TV technician for the LCD TV. If this device. 6 The female receptacle of Unit 10 Amps 12 Amps 12 Amps 10 Amps 12...
...FCC Warning To assure continued FCC compliance, the user must use only a shielded BNC (5) cable. Some examples are designed to correct the interference by Westinghouse Digital will not occur in a residential installation. Please consult the table below : USA UL Canada CSA Japan .. ...... Cord Type SJT SVT Size of...AWG 14 AWG 18 AWG 17 AWG Maximum Current Rating of the cord set is connected. • Consult the Westinghouse Service Center or an experienced radio/TV technician for the LCD TV. If this device. 6 The female receptacle of Unit 10 Amps 12 Amps 12 Amps 10 Amps 12...
User Manual
Page 8
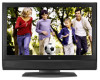
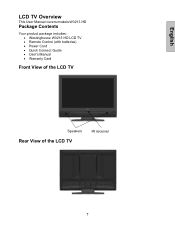
English LCD TV Overview This User Manual covers models:W3213 HD Package Contents Your product package includes: • Westinghouse W3213 HD LCD TV • Remote Control (with batteries) • Power Cord • Quick Connect Guide • User's Manual • Warranty Card Front View of the LCD TV Speakers Rear View of the LCD TV IR receiver 7
English LCD TV Overview This User Manual covers models:W3213 HD Package Contents Your product package includes: • Westinghouse W3213 HD LCD TV • Remote Control (with batteries) • Power Cord • Quick Connect Guide • User's Manual • Warranty Card Front View of the LCD TV Speakers Rear View of the LCD TV IR receiver 7

User Manual
Page 9
Channel + / INPUT 4. Input source 5. Volume + / + CH - 3. Menu + VOL - 2. Power Turn OSD Menu ON/OFF Increase/Decrease sound volume or adjust a highlighted control while in the OSD Menu Channel up/down when input is TV or highlight a control while in the OSD Menu Select Active Video Input or choose a selection while in the OSD MENU Power ON/OFF 8 English Side View of the LCD TV Control keys Spine Design Input connector Control Key MENU 1.
Channel + / INPUT 4. Input source 5. Volume + / + CH - 3. Menu + VOL - 2. Power Turn OSD Menu ON/OFF Increase/Decrease sound volume or adjust a highlighted control while in the OSD Menu Channel up/down when input is TV or highlight a control while in the OSD Menu Select Active Video Input or choose a selection while in the OSD MENU Power ON/OFF 8 English Side View of the LCD TV Control keys Spine Design Input connector Control Key MENU 1.
User Manual
Page 10
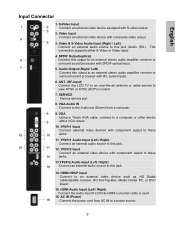
This connection supports either S-Video or Video input. 4. AC IN (Power) Connect the power cord from a computer. 9. ANT. (RF-input) Connect the LCD TV to an over-the-air antenna or cable service to a computer or other device with a VGA output. 10. VGA Using a 15-pin VGA cable, ...
This connection supports either S-Video or Video input. 4. AC IN (Power) Connect the power cord from a computer. 9. ANT. (RF-input) Connect the LCD TV to an over-the-air antenna or cable service to a computer or other device with a VGA output. 10. VGA Using a 15-pin VGA cable, ...
User Manual
Page 11
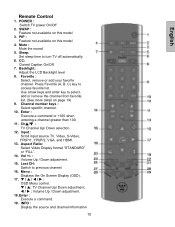
... model 3. Ch▲/▼ : TV Channel Up/ Down selection. 12. W / X : Volume Up / Down adjustment. 18. SWAP : Feature not available on page 19) 9. Backlight: Adjust the LCD Backlight level 8. T / S / W / X : OSD Menu control. Channel number keys : Select specific channel. 10. Input : Scroll input source TV, Video, S-Video, YPbPr1, YPbPr2, VGA, and HDMI. 13...
... model 3. Ch▲/▼ : TV Channel Up/ Down selection. 12. W / X : Volume Up / Down adjustment. 18. SWAP : Feature not available on page 19) 9. Backlight: Adjust the LCD Backlight level 8. T / S / W / X : OSD Menu control. Channel number keys : Select specific channel. 10. Input : Scroll input source TV, Video, S-Video, YPbPr1, YPbPr2, VGA, and HDMI. 13...

User Manual
Page 14
AUDIO CONNECTION: Connect a stereo mini cable from the PC's AUDIO OUT port to the back panel of the LCD TV. Connect Video, S-Video, YPbPr, Antenna/Cable to Video Devices Connect Video/Audio cables from your PC VGA OUT port to the TV , make sure all of the following into the back of the LCD TV. 13 Connect audio and video cables from a PC VGA CONNECTION: Connect an analog VGA cable from compatible devices to the AUDIO IN port on the LCD TV. 3. English Connect one or all device are turned off. 2. IMPORTANT: Before connecting to the LCD TV VGA IN port.
AUDIO CONNECTION: Connect a stereo mini cable from the PC's AUDIO OUT port to the back panel of the LCD TV. Connect Video, S-Video, YPbPr, Antenna/Cable to Video Devices Connect Video/Audio cables from your PC VGA OUT port to the TV , make sure all of the following into the back of the LCD TV. 13 Connect audio and video cables from a PC VGA CONNECTION: Connect an analog VGA cable from compatible devices to the AUDIO IN port on the LCD TV. 3. English Connect one or all device are turned off. 2. IMPORTANT: Before connecting to the LCD TV VGA IN port.
User Manual
Page 15
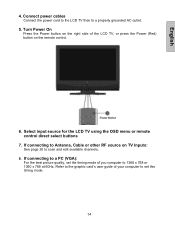
... set the timing mode of your computer to 1366 x 768 or 1360 x 768 at 60Hz. English 4. Connect power cables Connect the power cord to the LCD TV then to scan and edit available channels. 8. Turn Power On Press the Power button on the right side of the... LCD TV, or press the Power (Red) button on TV Inputs: See page 20 to a properly grounded AC outlet. 5. Select input source for the LCD TV using the OSD menu or remote control direct select buttons 7.
... set the timing mode of your computer to 1366 x 768 or 1360 x 768 at 60Hz. English 4. Connect power cables Connect the power cord to the LCD TV then to scan and edit available channels. 8. Turn Power On Press the Power button on the right side of the... LCD TV, or press the Power (Red) button on TV Inputs: See page 20 to a properly grounded AC outlet. 5. Select input source for the LCD TV using the OSD menu or remote control direct select buttons 7.

User Manual
Page 16
Viewing OSD Menu To display the OSD main menu, press the Menu button on the right side of front control keys of the LCD TV or the MENU key on the of LCD TV's right side. Press arrow keys to select desired OSD Menu and Enter keys to select desired OSD setting. 15 All the functions can be adjusted either by the remote control or using the control keys on the remote control. English Function adjustment There are six main OSD menus, these are Picture, Audio, Channels, Settings, Locks and Guide.
Viewing OSD Menu To display the OSD main menu, press the Menu button on the right side of front control keys of the LCD TV or the MENU key on the of LCD TV's right side. Press arrow keys to select desired OSD Menu and Enter keys to select desired OSD setting. 15 All the functions can be adjusted either by the remote control or using the control keys on the remote control. English Function adjustment There are six main OSD menus, these are Picture, Audio, Channels, Settings, Locks and Guide.
User Manual
Page 34
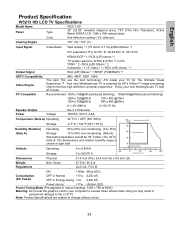
... and relative humidity range is powered by ATI's Xilleon™ image processing chip for the true high definition cinematic experience. Enjoy your new Westinghouse TV with ATI inside your TV for PC; fh: 30-49 kHz, fv: 50-75 Hz HDMI-HDCP *1 / RCA (L/R) stereo...), Active Matrix WXGA LCD, 1366 x 768 vertical stripe Color Anti-reflective coating < 2% reflection Viewing Angles 176° (H) / 176° (V) Input Signal Video/Audio VGA Analog * 1 (75 ohms, 0.7 Vp-p)/Mini-Stereo *1 H/V separated (TTL) for The Ultimate Visual Experience.™ Your new Westinghouse TV is shown in...
... and relative humidity range is powered by ATI's Xilleon™ image processing chip for the true high definition cinematic experience. Enjoy your new Westinghouse TV with ATI inside your TV for PC; fh: 30-49 kHz, fv: 50-75 Hz HDMI-HDCP *1 / RCA (L/R) stereo...), Active Matrix WXGA LCD, 1366 x 768 vertical stripe Color Anti-reflective coating < 2% reflection Viewing Angles 176° (H) / 176° (V) Input Signal Video/Audio VGA Analog * 1 (75 ohms, 0.7 Vp-p)/Mini-Stereo *1 H/V separated (TTL) for The Ultimate Visual Experience.™ Your new Westinghouse TV is shown in...

User Manual
Page 35
... connection. • Check the TV / CATV selection. Power is ON but No Screen Image • Make sure the video cable connected to the LCD TV is tightly secured to verify that headphones are using a Macintosh computer older than G3, you are not connected to the Headphone Jack on the.... • Check the audio settings. Snow Appears on the remote control, so that S-Video and Composite (Video) share the same audio source. The LCD TV audio may be set to reset the password. Parental Control Password is connected securely. Loose or broken pins in the cable connector could cause...
... connection. • Check the TV / CATV selection. Power is ON but No Screen Image • Make sure the video cable connected to the LCD TV is tightly secured to verify that headphones are using a Macintosh computer older than G3, you are not connected to the Headphone Jack on the.... • Check the audio settings. Snow Appears on the remote control, so that S-Video and Composite (Video) share the same audio source. The LCD TV audio may be set to reset the password. Parental Control Password is connected securely. Loose or broken pins in the cable connector could cause...


