Installation Instructions
Page 1
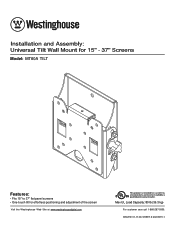
Installation and Assembly: Universal Tilt Wall Mount for 15" - 37" Screens Model: MT80A TILT Features: • Fits 15" to 37" flat panel screens • One-touch tilt for effortless positioning and adjustment of the screen Visit the Westinghouse Web Site at www.westinghousedigital.com This product is intended for use with UL Listed products and must be installed by a R qualified professional installer. ISSUED: 01-17-06 SHEET #: 202-9091-1 Max UL Load Capacity: 80 lb (36.3 kg) For customer care call 1-866-287-5555.
Installation and Assembly: Universal Tilt Wall Mount for 15" - 37" Screens Model: MT80A TILT Features: • Fits 15" to 37" flat panel screens • One-touch tilt for effortless positioning and adjustment of the screen Visit the Westinghouse Web Site at www.westinghousedigital.com This product is intended for use with UL Listed products and must be installed by a R qualified professional installer. ISSUED: 01-17-06 SHEET #: 202-9091-1 Max UL Load Capacity: 80 lb (36.3 kg) For customer care call 1-866-287-5555.

Installation Instructions
Page 2
... Plate to Flat Panel Screen ...6 Installing and Removing Flat Panel Screen ...7 Adjusting the Tilt Angle of the Flat Panel Screen ...7 For customer care call customer care at 1-866...exceed the Maximum UL Load Capacity of 80 lb (36.3 kg). • If mounting to wood wall studs, make sure that the wall will safely support the combined load of an "edge to edge" stud finder is ...stud wall • 5/32" bit for Assembly • stud finder ("edge to edge" stud finder is highly recommended. • Always use an assistant or mechanical lifting equipment to install your Westinghouse product...
... Plate to Flat Panel Screen ...6 Installing and Removing Flat Panel Screen ...7 Adjusting the Tilt Angle of the Flat Panel Screen ...7 For customer care call customer care at 1-866...exceed the Maximum UL Load Capacity of 80 lb (36.3 kg). • If mounting to wood wall studs, make sure that the wall will safely support the combined load of an "edge to edge" stud finder is ...stud wall • 5/32" bit for Assembly • stud finder ("edge to edge" stud finder is highly recommended. • Always use an assistant or mechanical lifting equipment to install your Westinghouse product...
Installation Instructions
Page 4
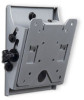
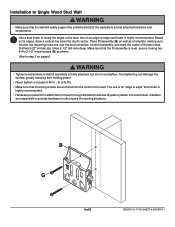
...center of the stud. Based on page 6. Place tilt assembly (B) on wall as shown. WARNING • Tighten wood screws so that tilt assembly is level, secure it using two #14 x 2-1/2" wood screws (G) as a template, making sure that the two mounting holes are responsible to step 2 on its edges...8226; Never tighten in excess of 80 in. • lb (9 N.M.). • Make sure that mounting screws are anchored into wood studs. holes 2-1/2" (65 mm) deep. Make sure that the tilt assembly is firmly attached, but do not overtighten. B G 4 of the stud. Installation to Single Wood...
...center of the stud. Based on page 6. Place tilt assembly (B) on wall as shown. WARNING • Tighten wood screws so that tilt assembly is level, secure it using two #14 x 2-1/2" wood screws (G) as a template, making sure that the two mounting holes are responsible to step 2 on its edges...8226; Never tighten in excess of 80 in. • lb (9 N.M.). • Make sure that mounting screws are anchored into wood studs. holes 2-1/2" (65 mm) deep. Make sure that the tilt assembly is firmly attached, but do not overtighten. B G 4 of the stud. Installation to Single Wood...
Installation Instructions
Page 5
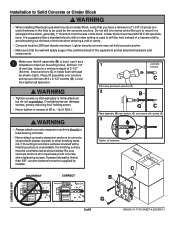
... density concrete may not hold concrete anchor. • Make sure that the wall will safely support the combined load of the equipment and all fasteners. Place tilt assembly over anchors (C) and secure with wall as shown (right). Level, then tighten all attached hardware and components. 1... covered with two #14 x 2-1/2" screws (G). If mounting to concrete surfaces covered with a finishing surface is level, use it as shown below. Installation to Solid Concrete or Cinder Block WARNING • When installing Westinghouse wall mounts on slow setting is firmly attached, but do not...
... density concrete may not hold concrete anchor. • Make sure that the wall will safely support the combined load of the equipment and all fasteners. Place tilt assembly over anchors (C) and secure with wall as shown (right). Level, then tighten all attached hardware and components. 1... covered with two #14 x 2-1/2" screws (G). If mounting to concrete surfaces covered with a finishing surface is level, use it as shown below. Installation to Solid Concrete or Cinder Block WARNING • When installing Westinghouse wall mounts on slow setting is firmly attached, but do not...