User Manual
Page 2
OSD FUNCTION OSD FUNCTION 12 PICTURE 13 PC PARAMETERS 14 AUDIO 15 PICTURE-IN-PICTURE 17 GENERAL SETTINGS 17 4. APPENDIX TROUBLESHOOTING 18 CLEANING THE 1080P MONITOR 20 SPECIFICATIONS 20 i PRODUCT SAFETY SAFETY GUIDELINES 2 PRODUCT SAFETY INSTRUCTIONS 3 2. English CONTENTS 1. INSTALLATION PACKAGE CONTENTS 4 FRONT VIEW OF THE 1080PMONITOR 5 REAR VIEW OF THE 1080P MONITOR 5 SIDE VIEW OF THE 1080P MONITOR 6 REMOTE CONTROL 8 INSTALLATION 9 3.
OSD FUNCTION OSD FUNCTION 12 PICTURE 13 PC PARAMETERS 14 AUDIO 15 PICTURE-IN-PICTURE 17 GENERAL SETTINGS 17 4. APPENDIX TROUBLESHOOTING 18 CLEANING THE 1080P MONITOR 20 SPECIFICATIONS 20 i PRODUCT SAFETY SAFETY GUIDELINES 2 PRODUCT SAFETY INSTRUCTIONS 3 2. English CONTENTS 1. INSTALLATION PACKAGE CONTENTS 4 FRONT VIEW OF THE 1080PMONITOR 5 REAR VIEW OF THE 1080P MONITOR 5 SIDE VIEW OF THE 1080P MONITOR 6 REMOTE CONTROL 8 INSTALLATION 9 3.
User Manual
Page 4
... be used in the United States and Canada. Always use the appropriate AC cord that is connected. • Consult the Westinghouse Service Center or an experienced technician for your specific country. SEV Canada CSA Britain BASE/BS Germany..........VDE Japan Electric Appliance Control...for this device. 2 Use the following measures: • Reorient or relocate the receiving antenna. • Increase the separation between the 1080p monitor and receiver. • Connect the equipment into an outlet on a circuit different from that interference will void the user's authority ...
... be used in the United States and Canada. Always use the appropriate AC cord that is connected. • Consult the Westinghouse Service Center or an experienced technician for your specific country. SEV Canada CSA Britain BASE/BS Germany..........VDE Japan Electric Appliance Control...for this device. 2 Use the following measures: • Reorient or relocate the receiving antenna. • Increase the separation between the 1080p monitor and receiver. • Connect the equipment into an outlet on a circuit different from that interference will void the user's authority ...
User Manual
Page 5
... turn it and remove the batteries from the remote control • Only use attachments/accessories specified by the manufacturer • If your LCD display with the apparatus. Keep these instructions. 2. Install in any ventilation openings. The wide blade or the third prong are difficult to rain... not attempt repairs yourself. Do not defeat the safety purpose of time, unplug it off and contact the Westinghouse Service Center. 3 Your 1080p monitor contains high-voltage parts. Servicing is required when the apparatus has been damaged in accordance with dry cloth. 7.
... turn it and remove the batteries from the remote control • Only use attachments/accessories specified by the manufacturer • If your LCD display with the apparatus. Keep these instructions. 2. Install in any ventilation openings. The wide blade or the third prong are difficult to rain... not attempt repairs yourself. Do not defeat the safety purpose of time, unplug it off and contact the Westinghouse Service Center. 3 Your 1080p monitor contains high-voltage parts. Servicing is required when the apparatus has been damaged in accordance with dry cloth. 7.
User Manual
Page 6
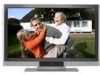
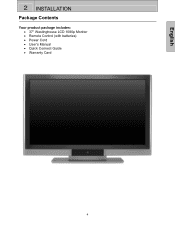
English 2 INSTALLATION Package Contents Your product package includes: • 37" Westinghouse LCD 1080p Monitor • Remote Control (with batteries) • Power Cord • User's Manual • Quick Connect Guide • Warranty Card 4
English 2 INSTALLATION Package Contents Your product package includes: • 37" Westinghouse LCD 1080p Monitor • Remote Control (with batteries) • Power Cord • User's Manual • Quick Connect Guide • Warranty Card 4
User Manual
Page 7
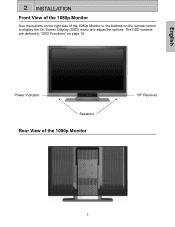
English 2 INSTALLATION Front View of the 1080p Monitor Use the buttons on the right side of the 1080p Monitor "IR" Receiver 5 Power Indicator Speakers Rear View of the 1080p Monitor or the buttons on page 16. The OSD controls are defined in "OSD Functions" on the remote control to display the On Screen Display (OSD) menu and adjust the options.
English 2 INSTALLATION Front View of the 1080p Monitor Use the buttons on the right side of the 1080p Monitor "IR" Receiver 5 Power Indicator Speakers Rear View of the 1080p Monitor or the buttons on page 16. The OSD controls are defined in "OSD Functions" on the remote control to display the On Screen Display (OSD) menu and adjust the options.
User Manual
Page 8
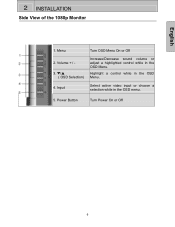
Power Button Turn Power On or Off 6 Highlight a control while in the OSD menu. 5. Input Select active video input or choose a selection while in the OSD Menu. 4. Volume + / - 3. Menu Turn OSD Menu On or Off 2. T/S ( OSD Selection) Increase/Decrease sound volume or adjust a highlighted control while in the OSD Menu. English 2 INSTALLATION Side View of the 1080p Monitor 1.
Power Button Turn Power On or Off 6 Highlight a control while in the OSD menu. 5. Input Select active video input or choose a selection while in the OSD Menu. 4. Volume + / - 3. Menu Turn OSD Menu On or Off 2. T/S ( OSD Selection) Increase/Decrease sound volume or adjust a highlighted control while in the OSD Menu. English 2 INSTALLATION Side View of the 1080p Monitor 1.
User Manual
Page 10
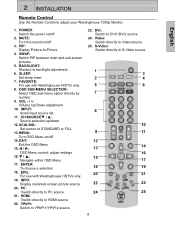
... only. 8. W / X: OSD Menu control; ENTER: To choose a selection 18. EPG: For use with Westinghouse HDTVs only. 19. INFO: Display main/sub-screen picture source 20. YPbPr: Switch to HDMI source 22. SWAP: Switch PIP between main and sub-screen pictures 5. INPUT...FILL 13. MENU: Turn OSD Menu on /off 2. SCALING: Set screen to backlight adjustment 6. EXIT: Exit the OSD Menu 15. adjust settings 16. PIP: Display Picture-In-Picture 4. CH/SOURCET / S: Source selection up/down 12. POWER: Switch the power on/off 3. English 1. 2 INSTALLATION Remote Control Use the ...
... only. 8. W / X: OSD Menu control; ENTER: To choose a selection 18. EPG: For use with Westinghouse HDTVs only. 19. INFO: Display main/sub-screen picture source 20. YPbPr: Switch to HDMI source 22. SWAP: Switch PIP between main and sub-screen pictures 5. INPUT...FILL 13. MENU: Turn OSD Menu on /off 2. SCALING: Set screen to backlight adjustment 6. EXIT: Exit the OSD Menu 15. adjust settings 16. PIP: Display Picture-In-Picture 4. CH/SOURCET / S: Source selection up/down 12. POWER: Switch the power on/off 3. English 1. 2 INSTALLATION Remote Control Use the ...
User Manual
Page 12
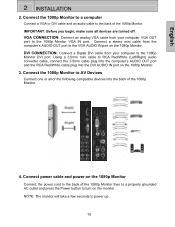
Connect a stereo mini cable from your computer to power up. 10 Using a 3.5mm mini cable to the 1080p Monitor VGA IN port. NOTE: The monitor will take a few seconds to the 1080p Monitor DVI port. VGA CONNECTION: Connect an analog VGA cable from the computer's AUDIO OUT port to AV Devices Connect one... back of the following compatible devices into the DVI AUDIO IN port on the monitor. Connect the 1080p Monitor to a computer Connect a VGA or DVI cable and an audio cable to the back of the 1080p Monitor then to a properly grounded AC outlet and press the Power button to the back of...
Connect a stereo mini cable from your computer to power up. 10 Using a 3.5mm mini cable to the 1080p Monitor VGA IN port. NOTE: The monitor will take a few seconds to the 1080p Monitor DVI port. VGA CONNECTION: Connect an analog VGA cable from the computer's AUDIO OUT port to AV Devices Connect one... back of the following compatible devices into the DVI AUDIO IN port on the monitor. Connect the 1080p Monitor to a computer Connect a VGA or DVI cable and an audio cable to the back of the 1080p Monitor then to a properly grounded AC outlet and press the Power button to the back of...
User Manual
Page 13
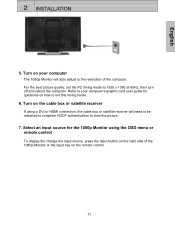
...or satellite receiver will need to be restarted to complete HDCP authentication to the resolution of the 1080p Monitor or the Input key on how to set the PC timing mode to your computer The 1080p Monitor will auto adjust to view the picture. 7. Select an input source for questions on ... turn off and reboot the computer. English 2 INSTALLATION 5. Turn on the cable box or satellite receiver If using the OSD menu or remote control To display the change the input source, press the Input button on the right side of the computer. For the best picture quality, set this timing mode. ...
...or satellite receiver will need to be restarted to complete HDCP authentication to the resolution of the 1080p Monitor or the Input key on how to set the PC timing mode to your computer The 1080p Monitor will auto adjust to view the picture. 7. Select an input source for questions on ... turn off and reboot the computer. English 2 INSTALLATION 5. Turn on the cable box or satellite receiver If using the OSD menu or remote control To display the change the input source, press the Input button on the right side of the computer. For the best picture quality, set this timing mode. ...
User Manual
Page 14
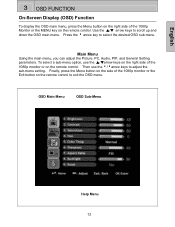
...the OSD main menu. Then use the ▲/▼arrow keys on the right side of the 1080p monitor or the Exit button on the remote control to select the desired OSD sub-menu. OSD ...Main Menu OSD Sub-Menu Help Menu 12 Finally, press the Menu button on the side of the 1080p monitor or on the remote control. Main Menu Using the main menu, you can adjust the Picture, PC...key to exit the OSD menu. English 3 OSD FUNCTION On-Screen Display (OSD) Function To display the OSD main menu, press the Menu button on the right side of the 1080p Monitor or the MENU key on the remote control.
...the OSD main menu. Then use the ▲/▼arrow keys on the right side of the 1080p monitor or the Exit button on the remote control to select the desired OSD sub-menu. OSD ...Main Menu OSD Sub-Menu Help Menu 12 Finally, press the Menu button on the side of the 1080p monitor or on the remote control. Main Menu Using the main menu, you can adjust the Picture, PC...key to exit the OSD menu. English 3 OSD FUNCTION On-Screen Display (OSD) Function To display the OSD main menu, press the Menu button on the right side of the 1080p Monitor or the MENU key on the remote control.
User Manual
Page 15
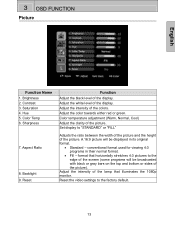
Brightness 2. Hue 5. Adjust the white level of the colors. format that illuminates the 1080p monitor. 3 OSD FUNCTION Picture English Function Name 1. Adjust the intensity of the display. conventional format used for viewing 4:3 programs in its original format. • Standard - Color Temp 6. Reset Function Adjust the... black level of the picture. Adjust the color towards either red or green. Set display to the edge of the screen (some programs will be broadcasted with black or gray bars on the top and bottom or sides...
Brightness 2. Hue 5. Adjust the white level of the colors. format that illuminates the 1080p monitor. 3 OSD FUNCTION Picture English Function Name 1. Adjust the intensity of the display. conventional format used for viewing 4:3 programs in its original format. • Standard - Color Temp 6. Reset Function Adjust the... black level of the picture. Adjust the color towards either red or green. Set display to the edge of the screen (some programs will be broadcasted with black or gray bars on the top and bottom or sides...
User Manual
Page 19
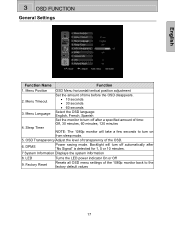
... "No Signal" is detected for 1, 5 or 10 minutes. 7 System Information Displays the system information 8. Menu Language 4. DPMS Power saving mode. OSD Transparency Adjust the level of transparency of the 1080p monitor back to turn off automatically after a specified amount of time before the OSD... Sleep Timer OSD Menu horizontal/vertical position adjustment Set the amount of time: Off, 30 minutes, 60 minutes, 120 minutes NOTE: The 1080p monitor will turn on from sleep mode. 5. 3 OSD FUNCTION General Settings English Function Name Function 1. LED 9. Menu Position 2. Factory...
... "No Signal" is detected for 1, 5 or 10 minutes. 7 System Information Displays the system information 8. Menu Language 4. DPMS Power saving mode. OSD Transparency Adjust the level of transparency of the 1080p monitor back to turn off automatically after a specified amount of time before the OSD... Sleep Timer OSD Menu horizontal/vertical position adjustment Set the amount of time: Off, 30 minutes, 60 minutes, 120 minutes NOTE: The 1080p monitor will turn on from sleep mode. 5. 3 OSD FUNCTION General Settings English Function Name Function 1. LED 9. Menu Position 2. Factory...
User Manual
Page 20
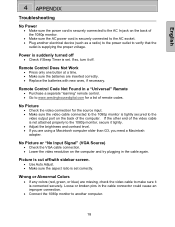
... is cut off/with new ones, if necessary. Loose or broken pins in the cable connector could cause an improper connection. • Connect the 1080p monitor to another electrical device (such as a radio) to the power outlet to verify that the outlet is supplying the proper voltage. English 4 ...than G3, you need a Macintosh adapter. No Picture • Check the video connection for a list of remote codes. If the other end of the 1080p monitor. • Make sure the AC power cord is suddenly turned off . Power is securely connected to the AC socket. • Plug another computer...
... is cut off/with new ones, if necessary. Loose or broken pins in the cable connector could cause an improper connection. • Connect the 1080p monitor to another electrical device (such as a radio) to the power outlet to verify that the outlet is supplying the proper voltage. English 4 ...than G3, you need a Macintosh adapter. No Picture • Check the video connection for a list of remote codes. If the other end of the 1080p monitor. • Make sure the AC power cord is suddenly turned off . Power is securely connected to the AC socket. • Plug another computer...
User Manual
Page 22
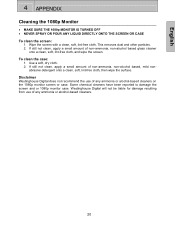
...then wipe the surface. Wipe the screen with a clean, soft, lint-free cloth. Westinghouse Digital will not be liable for damage resulting from use of any ammonia or alcohol-based cleaners on the 1080p monitor screen or case. If still not clean, apply a small amount of non-... small amount of non-ammonia, non-alcohol based, mild non- Disclaimer Westinghouse Digital does not recommend the use of any ammonia or alcohol-based cleaners. 20 English 4 APPENDIX Cleaning the 1080p Monitor • MAKE SURE THE 1080p MONITOR IS TURNED OFF • NEVER SPRAY OR POUR ANY LIQUID DIRECTLY...
...then wipe the surface. Wipe the screen with a clean, soft, lint-free cloth. Westinghouse Digital will not be liable for damage resulting from use of any ammonia or alcohol-based cleaners on the 1080p monitor screen or case. If still not clean, apply a small amount of non-... small amount of non-ammonia, non-alcohol based, mild non- Disclaimer Westinghouse Digital does not recommend the use of any ammonia or alcohol-based cleaners. 20 English 4 APPENDIX Cleaning the 1080p Monitor • MAKE SURE THE 1080p MONITOR IS TURNED OFF • NEVER SPRAY OR POUR ANY LIQUID DIRECTLY...
User Manual
Page 23
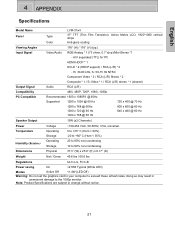
... Stereo * 2 Composite * 1 / S-Video * 1 / RCA (L/R) stereo * 1 (shared) Output Signal Audio RCA (L/R) Compatibility 480i, 480P, 720P, 1080i, 1080p PC Compatible Recommended 1920 x 1080P/I @ 60Hz Supported 1280 x 1024 @ 60 Hz 1280 x 768 @ 60Hz 1280 x 720 @ 60 Hz 1024 x 768 @ 60 Hz 720 x 400 @ 70... Channels) Power Voltage ~100-264 VAC, 50-60Hz, 3.5A, universal. English 4 APPENDIX Specifications Model Name Panel Type Color LVM-37w3 37" TFT (Thin Film Transistor), Active Matrix LCD, 1920*1080 vertical stripe Anti-glare coating Viewing Angles 176° (H) / 176° (V) (typ.)...
... Stereo * 2 Composite * 1 / S-Video * 1 / RCA (L/R) stereo * 1 (shared) Output Signal Audio RCA (L/R) Compatibility 480i, 480P, 720P, 1080i, 1080p PC Compatible Recommended 1920 x 1080P/I @ 60Hz Supported 1280 x 1024 @ 60 Hz 1280 x 768 @ 60Hz 1280 x 720 @ 60 Hz 1024 x 768 @ 60 Hz 720 x 400 @ 70... Channels) Power Voltage ~100-264 VAC, 50-60Hz, 3.5A, universal. English 4 APPENDIX Specifications Model Name Panel Type Color LVM-37w3 37" TFT (Thin Film Transistor), Active Matrix LCD, 1920*1080 vertical stripe Anti-glare coating Viewing Angles 176° (H) / 176° (V) (typ.)...
