
User Manual
Page 2
English CONTENTS 1. OSD FUNCTION OSD FUNCTION 12 PICTURE 13 PC PARAMETERS 14 AUDIO 15 PICTURE-IN-PICTURE 17 GENERAL SETTINGS 17 4. APPENDIX TROUBLESHOOTING 18 CLEANING THE 1080P MONITOR 20 SPECIFICATIONS 20 i INSTALLATION PACKAGE CONTENTS 4 FRONT VIEW OF THE 1080PMONITOR 5 REAR VIEW OF THE 1080P MONITOR 5 SIDE VIEW OF THE 1080P MONITOR 6 REMOTE CONTROL 8 INSTALLATION 9 3. PRODUCT SAFETY SAFETY GUIDELINES 2 PRODUCT SAFETY INSTRUCTIONS 3 2.
English CONTENTS 1. OSD FUNCTION OSD FUNCTION 12 PICTURE 13 PC PARAMETERS 14 AUDIO 15 PICTURE-IN-PICTURE 17 GENERAL SETTINGS 17 4. APPENDIX TROUBLESHOOTING 18 CLEANING THE 1080P MONITOR 20 SPECIFICATIONS 20 i INSTALLATION PACKAGE CONTENTS 4 FRONT VIEW OF THE 1080PMONITOR 5 REAR VIEW OF THE 1080P MONITOR 5 SIDE VIEW OF THE 1080P MONITOR 6 REMOTE CONTROL 8 INSTALLATION 9 3. PRODUCT SAFETY SAFETY GUIDELINES 2 PRODUCT SAFETY INSTRUCTIONS 3 2.
User Manual
Page 4
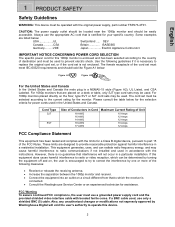
...tested and complies with the instructions. If this device. 2 For 1080p monitors that are listed below: USA UL Switzerland ..... The cord set must be operated with bonded ferrite cores. This equipment generates, uses, and can be used in a particular installation. FCC Warning To ...energy, and may be used , use only a shielded BNC (5) cable. Also, any unauthorized changes or modifications not expressly approved by Westinghouse Digital will not occur in the United States and Canada. English 1 PRODUCT SAFETY Safety Guidelines WARNING: This device must be selected according ...
...tested and complies with the instructions. If this device. 2 For 1080p monitors that are listed below: USA UL Switzerland ..... The cord set must be operated with bonded ferrite cores. This equipment generates, uses, and can be used in a particular installation. FCC Warning To ...energy, and may be used , use only a shielded BNC (5) cable. Also, any unauthorized changes or modifications not expressly approved by Westinghouse Digital will not occur in the United States and Canada. English 1 PRODUCT SAFETY Safety Guidelines WARNING: This device must be selected according ...
User Manual
Page 10
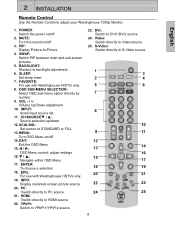
... Switch directly to adjust your Westinghouse 1080p Monitor. POWER: Switch the power on/off 3. BACKLIGHT: Shortcut to STANDARD or FILL 13. PIP: Display Picture-In-Picture 4. SWAP: Switch PIP between main and sub-screen pictures 5. SCALING: Set screen to backlight adjustment 6. YPbPr...: Switch to YPbPr1/YPrPr2 source 23. FAVORITE: For use with Westinghouse HDTVs only. 8. adjust settings 16. INPUT: Scroll input ...
... Switch directly to adjust your Westinghouse 1080p Monitor. POWER: Switch the power on/off 3. BACKLIGHT: Shortcut to STANDARD or FILL 13. PIP: Display Picture-In-Picture 4. SWAP: Switch PIP between main and sub-screen pictures 5. SCALING: Set screen to backlight adjustment 6. YPbPr...: Switch to YPbPr1/YPrPr2 source 23. FAVORITE: For use with Westinghouse HDTVs only. 8. adjust settings 16. INPUT: Scroll input ...
User Manual
Page 13
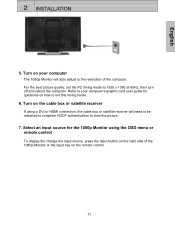
... using the OSD menu or remote control To display the change the input source, press the Input button on the right side of the 1080p Monitor or the Input key on how to the resolution of the computer. For the best picture quality, set this timing mode. 6. Select an input source for... your computer's graphic card user guide for the 1080p Monitor using a DVI or HDMI connection, the cable box or satellite receiver will auto adjust to set the PC timing mode to view the picture. 7.
... using the OSD menu or remote control To display the change the input source, press the Input button on the right side of the 1080p Monitor or the Input key on how to the resolution of the computer. For the best picture quality, set this timing mode. 6. Select an input source for... your computer's graphic card user guide for the 1080p Monitor using a DVI or HDMI connection, the cable box or satellite receiver will auto adjust to set the PC timing mode to view the picture. 7.
User Manual
Page 14
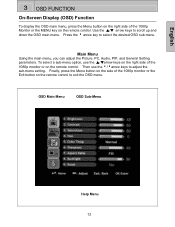
... of the 1080p monitor or the Exit button on the remote control to adjust the sub-menu setting. Main Menu Using the main menu, you can adjust the Picture, PC, Audio, PIP, and General Setting parameters. Finally, press the Menu button on the side of the 1080p monitor or on the remote... control. Press the 4 arrow key to scroll up and down the OSD main menu. English 3 OSD FUNCTION On-Screen Display (OSD) Function To display the OSD main menu, press the...
... of the 1080p monitor or the Exit button on the remote control to adjust the sub-menu setting. Main Menu Using the main menu, you can adjust the Picture, PC, Audio, PIP, and General Setting parameters. Finally, press the Menu button on the side of the 1080p monitor or on the remote... control. Press the 4 arrow key to scroll up and down the OSD main menu. English 3 OSD FUNCTION On-Screen Display (OSD) Function To display the OSD main menu, press the...
User Manual
Page 15
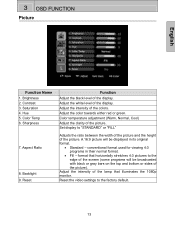
... adjustment (Warm, Normal, Cool) Adjust the clarity of the picture. A 16:9 picture will be displayed in their normal format. • Fill - format that illuminates the 1080p monitor. Hue 5. Set display to "STANDARD" or "FILL" Adjusts the ratio between the width of the picture and the height of... 3. Color Temp 6. Backlight 9. Reset the video settings to the edge of the colors. 3 OSD FUNCTION Picture English Function Name 1. Reset Function Adjust the black level of the display. Adjust the white level of the display. Adjust the intensity of the screen (some programs will...
... adjustment (Warm, Normal, Cool) Adjust the clarity of the picture. A 16:9 picture will be displayed in their normal format. • Fill - format that illuminates the 1080p monitor. Hue 5. Set display to "STANDARD" or "FILL" Adjusts the ratio between the width of the picture and the height of... 3. Color Temp 6. Backlight 9. Reset the video settings to the edge of the colors. 3 OSD FUNCTION Picture English Function Name 1. Reset Function Adjust the black level of the display. Adjust the white level of the display. Adjust the intensity of the screen (some programs will...

User Manual
Page 17
Mute Turn audio On or Off 6. Treble Treble adjustment 4. Speaker Select internal or external speakers 7. Balance Balance adjustment 5. Volume Volume adjustment 2. Reset Reset audio settings 15 English 3 OSD FUNCTION Audio Function Name Function 1. Bass Bass adjustment 3.
Mute Turn audio On or Off 6. Treble Treble adjustment 4. Speaker Select internal or external speakers 7. Balance Balance adjustment 5. Volume Volume adjustment 2. Reset Reset audio settings 15 English 3 OSD FUNCTION Audio Function Name Function 1. Bass Bass adjustment 3.
User Manual
Page 19
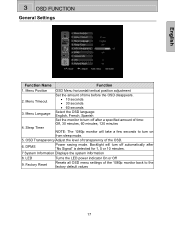
...automatically after "No Signal" is detected for 1, 5 or 10 minutes. 7 System Information Displays the system information 8. Menu Language 4. Factory Reset Turns the LED power indicator On or Off Resets all OSD menu settings of the OSD. 6. DPMS Power saving mode. LED 9. Sleep Timer OSD Menu horizontal/vertical...time before the OSD disappears. • 10 seconds • 30 seconds • 60 seconds Select the OSD language: English, French, Spanish Set the monitor to turn off after a specified amount of time: Off, 30 minutes, 60 minutes, 120 minutes NOTE: The 1080p monitor will ...
...automatically after "No Signal" is detected for 1, 5 or 10 minutes. 7 System Information Displays the system information 8. Menu Language 4. Factory Reset Turns the LED power indicator On or Off Resets all OSD menu settings of the OSD. 6. DPMS Power saving mode. LED 9. Sleep Timer OSD Menu horizontal/vertical...time before the OSD disappears. • 10 seconds • 30 seconds • 60 seconds Select the OSD language: English, French, Spanish Set the monitor to turn off after a specified amount of time: Off, 30 minutes, 60 minutes, 120 minutes NOTE: The 1080p monitor will ...
User Manual
Page 20
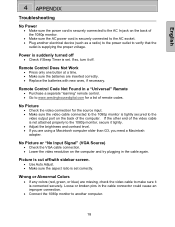
...brightness and contrast level. • If you are missing, check the video cable to make sure it off • Check if Sleep Timer is set correctly. English 4 APPENDIX Troubleshooting No Power • Make sure the power cord is securely connected to the AC In jack on the back of... correctly. • Replace the batteries with sidebar screen. • Use Auto Adjust. • Make sure the aspect ratio is suddenly turned off . Power is set . No Picture or "No Input Signal" (VGA Source) • Check the VGA cable connection. • Lower the video resolution on the computer and try...
...brightness and contrast level. • If you are missing, check the video cable to make sure it off • Check if Sleep Timer is set correctly. English 4 APPENDIX Troubleshooting No Power • Make sure the power cord is securely connected to the AC In jack on the back of... correctly. • Replace the batteries with sidebar screen. • Use Auto Adjust. • Make sure the aspect ratio is suddenly turned off . Power is set . No Picture or "No Input Signal" (VGA Source) • Check the VGA cable connection. • Lower the video resolution on the computer and try...
User Manual
Page 23
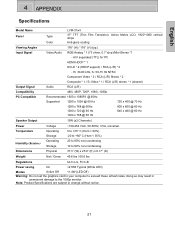
Dimensions Physical 37.3" (W) x 25.9" (H) x 8.17" (D) Weight Net / Gross 49.6 lbs / 60.6 lbs Regulations UL/C-UL, FCC-B Power saving On fh: 30-80 kHz, fv: 50-75 Hz NTSC ...-condensing 10 to 90% non-condensing. H/V separated (TTL) for PC HDMI-HDCP * 1 DVI-D * 2 (HDCP support) / RCA (L/R) * 2 - English 4 APPENDIX Specifications Model Name Panel Type Color LVM-37w3 37" TFT (Thin Film Transistor), Active Matrix LCD, 1920*1080 vertical stripe Anti-glare coating Viewing Angles 176° (H) / 176° (V) (typ.) Input Signal Video/Audio RGB Analog * 1 (75...
Dimensions Physical 37.3" (W) x 25.9" (H) x 8.17" (D) Weight Net / Gross 49.6 lbs / 60.6 lbs Regulations UL/C-UL, FCC-B Power saving On fh: 30-80 kHz, fv: 50-75 Hz NTSC ...-condensing 10 to 90% non-condensing. H/V separated (TTL) for PC HDMI-HDCP * 1 DVI-D * 2 (HDCP support) / RCA (L/R) * 2 - English 4 APPENDIX Specifications Model Name Panel Type Color LVM-37w3 37" TFT (Thin Film Transistor), Active Matrix LCD, 1920*1080 vertical stripe Anti-glare coating Viewing Angles 176° (H) / 176° (V) (typ.) Input Signal Video/Audio RGB Analog * 1 (75...


