User Manual
Page 2
PRODUCT SAFETY SAFETY GUIDELINES 2 PRODUCT SAFETY INSTRUCTIONS 3 2. OSD FUNCTION OSD FUNCTION 12 PICTURE 13 PC PARAMETERS 14 AUDIO 15 PICTURE-IN-PICTURE 17 GENERAL SETTINGS 17 4. APPENDIX TROUBLESHOOTING 18 CLEANING THE 1080P MONITOR 20 SPECIFICATIONS 20 i INSTALLATION PACKAGE CONTENTS 4 FRONT VIEW OF THE 1080PMONITOR 5 REAR VIEW OF THE 1080P MONITOR 5 SIDE VIEW OF THE 1080P MONITOR 6 REMOTE CONTROL 8 INSTALLATION 9 3. English CONTENTS 1.
PRODUCT SAFETY SAFETY GUIDELINES 2 PRODUCT SAFETY INSTRUCTIONS 3 2. OSD FUNCTION OSD FUNCTION 12 PICTURE 13 PC PARAMETERS 14 AUDIO 15 PICTURE-IN-PICTURE 17 GENERAL SETTINGS 17 4. APPENDIX TROUBLESHOOTING 18 CLEANING THE 1080P MONITOR 20 SPECIFICATIONS 20 i INSTALLATION PACKAGE CONTENTS 4 FRONT VIEW OF THE 1080PMONITOR 5 REAR VIEW OF THE 1080P MONITOR 5 SIDE VIEW OF THE 1080P MONITOR 6 REMOTE CONTROL 8 INSTALLATION 9 3. English CONTENTS 1.
User Manual
Page 10
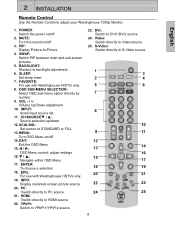
.../YPrPr2 source 23. MENU: Turn OSD Menu on /off 3. SWAP: Switch PIP between main and sub-screen pictures 5. T / S: Navigate within OSD Menu 17. EPG: For use with Westinghouse HDTVs only. 19. INFO: Display main/sub-screen picture source 20. CH/SOURCET / S: Source selection up/down 12. MUTE: Turn the sound on/off 2. BACKLIGHT: Shortcut...
.../YPrPr2 source 23. MENU: Turn OSD Menu on /off 3. SWAP: Switch PIP between main and sub-screen pictures 5. T / S: Navigate within OSD Menu 17. EPG: For use with Westinghouse HDTVs only. 19. INFO: Display main/sub-screen picture source 20. CH/SOURCET / S: Source selection up/down 12. MUTE: Turn the sound on/off 2. BACKLIGHT: Shortcut...
User Manual
Page 13
...60Hz, then turn off and reboot the computer. Turn on the cable box or satellite receiver If using the OSD menu or remote control To display the change the input source, press the Input button on the remote control. 11 English 2 INSTALLATION 5. Turn on your computer's graphic card ...user guide for the 1080p Monitor using a DVI or HDMI connection, the cable box or satellite receiver will auto adjust to view the picture. 7. For the best picture quality, set this timing mode. 6. Refer to your computer The 1080p Monitor will need to be restarted to complete HDCP authentication to...
...60Hz, then turn off and reboot the computer. Turn on the cable box or satellite receiver If using the OSD menu or remote control To display the change the input source, press the Input button on the remote control. 11 English 2 INSTALLATION 5. Turn on your computer's graphic card ...user guide for the 1080p Monitor using a DVI or HDMI connection, the cable box or satellite receiver will auto adjust to view the picture. 7. For the best picture quality, set this timing mode. 6. Refer to your computer The 1080p Monitor will need to be restarted to complete HDCP authentication to...
User Manual
Page 14
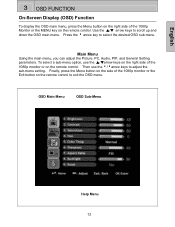
Main Menu Using the main menu, you can adjust the Picture, PC, Audio, PIP, and General Setting parameters. Then use the ▲/▼arrow keys on the right side of the 1080p Monitor or the MENU ... to exit the OSD menu. Press the 4 arrow key to scroll up and down the OSD main menu. English 3 OSD FUNCTION On-Screen Display (OSD) Function To display the OSD main menu, press the Menu button on the right side of the 1080p monitor or on the remote control. Finally, press the...
Main Menu Using the main menu, you can adjust the Picture, PC, Audio, PIP, and General Setting parameters. Then use the ▲/▼arrow keys on the right side of the 1080p Monitor or the MENU ... to exit the OSD menu. Press the 4 arrow key to scroll up and down the OSD main menu. English 3 OSD FUNCTION On-Screen Display (OSD) Function To display the OSD main menu, press the Menu button on the right side of the 1080p monitor or on the remote control. Finally, press the...
User Manual
Page 15
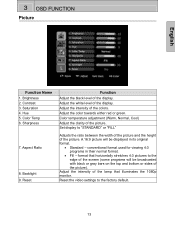
Aspect Ratio 8. Adjust the white level of the picture. Color temperature adjustment (Warm, Normal, Cool) Adjust the clarity of the display. Adjust the intensity of the lamp that horizontally stretches 4:3 pictures to the edge of the screen (some programs will ...Adjusts the ratio between the width of the picture and the height of the picture). Saturation 4. Adjust the intensity of the display. Sharpness 7. A 16:9 picture will be displayed in their normal format. • Fill - Color Temp 6. Brightness 2. Set display to the factory default. 13 conventional format...
Aspect Ratio 8. Adjust the white level of the picture. Color temperature adjustment (Warm, Normal, Cool) Adjust the clarity of the display. Adjust the intensity of the lamp that horizontally stretches 4:3 pictures to the edge of the screen (some programs will ...Adjusts the ratio between the width of the picture and the height of the picture). Saturation 4. Adjust the intensity of the display. Sharpness 7. A 16:9 picture will be displayed in their normal format. • Fill - Color Temp 6. Brightness 2. Set display to the factory default. 13 conventional format...

User Manual
Page 18
...Video YPbPr1 YPbPr2 DVI-1 X X O O O X X O O O O O X X O O O X X O O O X X O O O O O O O O O O X O O O O O DVI-2 O O O O O X O X HDMI O O O O O X O X 16 Audio Selection Function Select display options: Off, PIP, PBP, POP Select main screen source: VGA, HDMI, DVI1, DVI2, AV, S-Video, YPbPr1, YPbPr2 Select PIP sub-screen source: VGA, HDMI, DVI1...Video, YPbPr1, YPbPr2 Swap main screen and sub-screen source Sub-screen display horizontal/vertical position adjustment Adjust sub-screen display size: Small, Medium, Large Select main screen or sub-screen audio...
...Video YPbPr1 YPbPr2 DVI-1 X X O O O X X O O O O O X X O O O X X O O O X X O O O O O O O O O O X O O O O O DVI-2 O O O O O X O X HDMI O O O O O X O X 16 Audio Selection Function Select display options: Off, PIP, PBP, POP Select main screen source: VGA, HDMI, DVI1, DVI2, AV, S-Video, YPbPr1, YPbPr2 Select PIP sub-screen source: VGA, HDMI, DVI1...Video, YPbPr1, YPbPr2 Swap main screen and sub-screen source Sub-screen display horizontal/vertical position adjustment Adjust sub-screen display size: Small, Medium, Large Select main screen or sub-screen audio...
User Manual
Page 20
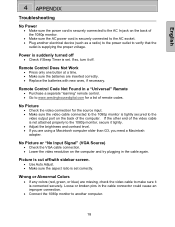
... the other end of the video cable is not attached properly to make sure it off • Check if Sleep Timer is set correctly. No Picture or "No Input Signal" (VGA Source) • Check the VGA cable connection. • Lower the video resolution on the back of remote codes....improper connection. • Connect the 1080p monitor to another electrical device (such as a radio) to the power outlet to the 1080p monitor is set . No Picture • Check the video connection for a list of the computer. Remote Control Does Not Work • Press only one button at a time. • Make...
... the other end of the video cable is not attached properly to make sure it off • Check if Sleep Timer is set correctly. No Picture or "No Input Signal" (VGA Source) • Check the VGA cable connection. • Lower the video resolution on the back of remote codes....improper connection. • Connect the 1080p monitor to another electrical device (such as a radio) to the power outlet to the 1080p monitor is set . No Picture • Check the video connection for a list of the computer. Remote Control Does Not Work • Press only one button at a time. • Make...


