
User Manual
Page 3
...with care when moving it. • Place the HD Monitor in installation such as vases, shall not be readily accessible. You may be used for future reference. English PRODUCT SAFETY INSTRUCTIONS Follow and obey all the safety and operating instructions before you touch them . Overloading Do not ...if you operate the HD Monitor Keep this user's manual for a long period of the HD Monitor and to protect it off and contact the Westinghouse Service Center. • WARNING - Precautions • Avoid touching the screen. don't place the HD Monitor in fire or electronic shock. For your...
...with care when moving it. • Place the HD Monitor in installation such as vases, shall not be readily accessible. You may be used for future reference. English PRODUCT SAFETY INSTRUCTIONS Follow and obey all the safety and operating instructions before you touch them . Overloading Do not ...if you operate the HD Monitor Keep this user's manual for a long period of the HD Monitor and to protect it off and contact the Westinghouse Service Center. • WARNING - Precautions • Avoid touching the screen. don't place the HD Monitor in fire or electronic shock. For your...

User Manual
Page 4
... Type SJT SVT Size of the cord set is connected. • Consult the Westinghouse Service Center or an experienced radio/Monitor technician for power cords used . This equipment generates, uses, and can be used in a residential installation. SEV Canada CSA Britain BASE/BS Germany..........VDE Japan Electric ...and may cause harmful interference to prevent electric shock. If a BNC cable is encouraged to try to correct the interference by Westinghouse Digital will not occur in Cord 18 AWG 16 AWG 14 AWG 18 AWG 17 AWG Maximum Current Rating of the following guidelines...
... Type SJT SVT Size of the cord set is connected. • Consult the Westinghouse Service Center or an experienced radio/Monitor technician for power cords used . This equipment generates, uses, and can be used in a residential installation. SEV Canada CSA Britain BASE/BS Germany..........VDE Japan Electric ...and may cause harmful interference to prevent electric shock. If a BNC cable is encouraged to try to correct the interference by Westinghouse Digital will not occur in Cord 18 AWG 16 AWG 14 AWG 18 AWG 17 AWG Maximum Current Rating of the following guidelines...
User Manual
Page 5
Disclaimer Westinghouse Digital does not recommend the use of non-ammonia, non-alcohol based glass cleaner onto a clean, soft...3 abrasive detergent onto a clean, soft, lint-free cloth, then wipe the surface. Westinghouse Digital will not be liable for damage resulting from the use of non-ammonia, non-alcohol based, mild non- If it still is not clean,...alcohol-based cleaners on the HD Monitor screen or case. Wipe the screen with a clean, soft, lint-free cloth. Use a soft, dry cloth. 2. This removes dust and other particles. 2. English Cleaning the HD Video Monitor • ...
Disclaimer Westinghouse Digital does not recommend the use of non-ammonia, non-alcohol based glass cleaner onto a clean, soft...3 abrasive detergent onto a clean, soft, lint-free cloth, then wipe the surface. Westinghouse Digital will not be liable for damage resulting from the use of non-ammonia, non-alcohol based, mild non- If it still is not clean,...alcohol-based cleaners on the HD Monitor screen or case. Wipe the screen with a clean, soft, lint-free cloth. Use a soft, dry cloth. 2. This removes dust and other particles. 2. English Cleaning the HD Video Monitor • ...
User Manual
Page 7
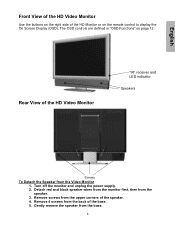
... control to display the On Screen Display (OSD). Turn off the monitor and unplug the power supply. 2. English Front View of the HD Video Monitor Use the buttons on the right side of the HD Monitor or on page 12.
... control to display the On Screen Display (OSD). Turn off the monitor and unplug the power supply. 2. English Front View of the HD Video Monitor Use the buttons on the right side of the HD Monitor or on page 12.
User Manual
Page 9
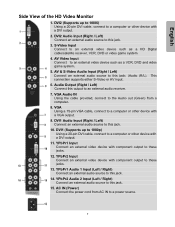
...to this output to this jack. 3. YPbPr1 Audio 1 Input (Left / Right) Connect an external audio source to an external audio receiver. 7. VGA Using a 15-pin VGA cable, connect to this jack. 14. DVI2 Audio Input (Right / Left) Connect an external audio source to a computer or other...input. 6. AV Video Input Connect to these jacks. 13. AC IN (Power) Connect the power cord from a computer. 8. DVI2 (Supports up to 1080p) Using a 20-pin DVI cable, connect to this jack; (Audio (R/L). YPbPr2 Audio 2 Input (Left / Right) Connect an external audio source to a computer or ...
...to this output to this jack. 3. YPbPr1 Audio 1 Input (Left / Right) Connect an external audio source to an external audio receiver. 7. VGA Using a 15-pin VGA cable, connect to this jack. 14. DVI2 Audio Input (Right / Left) Connect an external audio source to a computer or other...input. 6. AV Video Input Connect to these jacks. 13. AC IN (Power) Connect the power cord from a computer. 8. DVI2 (Supports up to 1080p) Using a 20-pin DVI cable, connect to this jack; (Audio (R/L). YPbPr2 Audio 2 Input (Left / Right) Connect an external audio source to a computer or ...

User Manual
Page 11
... Inserting the batteries incorrectly may result in cracking or leakage, which may pose a fire risk or lead to personal injury. • Dispose of used batteries in cracking or leakage, which may pose a fire risk or lead to personal injury. • Insert batteries according to the (+) and (&#...8722;) marks on the battery compartment. 3) Re-attach the battery cover. CAUTION: • Only use AAA batteries. • Do not mix new and old batteries. This may result in accordance with local laws and regulations. • Keep batteries ...
... Inserting the batteries incorrectly may result in cracking or leakage, which may pose a fire risk or lead to personal injury. • Dispose of used batteries in cracking or leakage, which may pose a fire risk or lead to personal injury. • Insert batteries according to the (+) and (&#...8722;) marks on the battery compartment. 3) Re-attach the battery cover. CAUTION: • Only use AAA batteries. • Do not mix new and old batteries. This may result in accordance with local laws and regulations. • Keep batteries ...
User Manual
Page 13
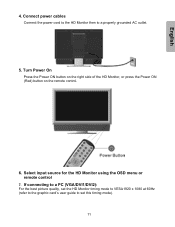
Connect power cables Connect the power cord to the HD Monitor then to set the HD Monitor timing mode to VESA1920 x 1080 at 60Hz (refer to the graphic card's user guide to a properly grounded AC outlet. 5. Turn Power On Press the Power ON button on the right side of the HD Monitor, or press the Power ON (Red) button on the remote control. 6. If connecting to a PC (VGA/DVI1/DVI2): For the best picture quality, set this timing mode). 11 Select input source for the HD Monitor using the OSD menu or remote control 7. English 4.
Connect power cables Connect the power cord to the HD Monitor then to set the HD Monitor timing mode to VESA1920 x 1080 at 60Hz (refer to the graphic card's user guide to a properly grounded AC outlet. 5. Turn Power On Press the Power ON button on the right side of the HD Monitor, or press the Power ON (Red) button on the remote control. 6. If connecting to a PC (VGA/DVI1/DVI2): For the best picture quality, set this timing mode). 11 Select input source for the HD Monitor using the OSD menu or remote control 7. English 4.
User Manual
Page 14
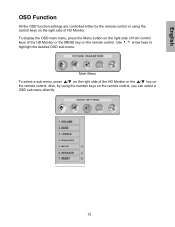
... right side of front control keys of the HD Monitor or the MENU key on the remote control. Use 3/4 arrow keys to highlight the desired OSD sub-menu. Also, by the remote control or using the number keys on the remote control, you can select a OSD sub-menu directly. 12 English OSD... Function All the OSD function settings are controlled either by using the control keys on the right side of the HD Monitor or the ▲/▼ key on the remote control. Main Menu To select a sub...
... right side of front control keys of the HD Monitor or the MENU key on the remote control. Use 3/4 arrow keys to highlight the desired OSD sub-menu. Also, by the remote control or using the number keys on the remote control, you can select a OSD sub-menu directly. 12 English OSD... Function All the OSD function settings are controlled either by using the control keys on the right side of the HD Monitor or the ▲/▼ key on the remote control. Main Menu To select a sub...
User Manual
Page 21
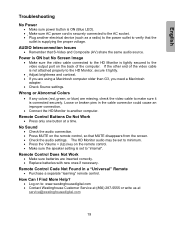
... to verify that MUTE disappears from the screen. • Check the audio settings. Remote Control Does Not Work • Make sure batteries are using a Macintosh computer older than G3, you are inserted correctly. • Replace batteries with new ones if necessary. Remote Control Code Not Found in...Monitor is tightly secured to the video output port on the remote control, so that the outlet is set to : www.westinghousedigital.com • Contact Westinghouse Customer Service at (866) 287-5555 or write us at a time. The HD Monitor audio may be set to minimum. • Press the ...
... to verify that MUTE disappears from the screen. • Check the audio settings. Remote Control Does Not Work • Make sure batteries are using a Macintosh computer older than G3, you are inserted correctly. • Replace batteries with new ones if necessary. Remote Control Code Not Found in...Monitor is tightly secured to the video output port on the remote control, so that the outlet is set to : www.westinghousedigital.com • Contact Westinghouse Customer Service at (866) 287-5555 or write us at a time. The HD Monitor audio may be set to minimum. • Press the ...
