
User Manual
Page 2
...SAFETY GUIDELINES ...2 FCC COMPLIANCE STATEMENT...2 CLEANING THE LCD MONITOR...3 FEATURES...4 POWER SAVER...4 PLUG & PLAY...4 INSTALLATION ...5 PACKAGE CONTENTS...5 FRONT VIEW OF THE LCD MONITOR ...6 REAR VIEW OF THE LCD MONITOR ...7 1. ATTACHING THE BASE STAND TO THE LCD MONITOR 8 2. TURN THE POWER ON ...9 MOUNTING THE MONITOR ON A WALL 10 OSD MENU FUNCTIONS...11 ... (size is not scaled correctly 21 Colors are Not Correct ...21 No Sound...21 Mounting the LCD Monitor on a Wall 21 Additional Questions...21 CONNECT POWER CABLES ...9 4. CONNECT AUDIO AND VIDEO CABLES TO A PC 8 3.
...SAFETY GUIDELINES ...2 FCC COMPLIANCE STATEMENT...2 CLEANING THE LCD MONITOR...3 FEATURES...4 POWER SAVER...4 PLUG & PLAY...4 INSTALLATION ...5 PACKAGE CONTENTS...5 FRONT VIEW OF THE LCD MONITOR ...6 REAR VIEW OF THE LCD MONITOR ...7 1. ATTACHING THE BASE STAND TO THE LCD MONITOR 8 2. TURN THE POWER ON ...9 MOUNTING THE MONITOR ON A WALL 10 OSD MENU FUNCTIONS...11 ... (size is not scaled correctly 21 Colors are Not Correct ...21 No Sound...21 Mounting the LCD Monitor on a Wall 21 Additional Questions...21 CONNECT POWER CABLES ...9 4. CONNECT AUDIO AND VIDEO CABLES TO A PC 8 3.
User Manual
Page 3
...You may be walked on your LCD Monitor in installation such as vases, shall not be readily accessible. Do not place anything on or pinched by Westinghouse Digital. • If your safety, please read all warnings and instructions marked on the LCD Monitor, audio/video cables, or ...power cord. • If the LCD Monitor emits smoke, abnormal noise, or a strange odor, immediately turn ...
...You may be walked on your LCD Monitor in installation such as vases, shall not be readily accessible. Do not place anything on or pinched by Westinghouse Digital. • If your safety, please read all warnings and instructions marked on the LCD Monitor, audio/video cables, or ...power cord. • If the LCD Monitor emits smoke, abnormal noise, or a strange odor, immediately turn ...
User Manual
Page 4
...by turning the equipment off and on, the user is encouraged to try to correct the interference by Westinghouse Digital will not occur in accordance with bonded ferrite cores. If this LCD Monitor is not enclosed. If a BNC cable used . The female receptacle of destination and must meet ... be located near the LCD Monitor and should look like Figure A1 below: Figure A1 Figure A2 For the United States and Canada In the United States and Canada the male plug is connected. • Consult the Westinghouse Service Center or an experienced radio/Monitor technician for assistance. Always...
...by turning the equipment off and on, the user is encouraged to try to correct the interference by Westinghouse Digital will not occur in accordance with bonded ferrite cores. If this LCD Monitor is not enclosed. If a BNC cable used . The female receptacle of destination and must meet ... be located near the LCD Monitor and should look like Figure A1 below: Figure A1 Figure A2 For the United States and Canada In the United States and Canada the male plug is connected. • Consult the Westinghouse Service Center or an experienced radio/Monitor technician for assistance. Always...
User Manual
Page 5
... alcohol-based cleaners. 3 Wipe the screen with a clean, soft, lint-free cloth. Some chemical cleaners have been reported to damage the screen and/or LCD Monitor case. Westinghouse Digital will not be liable for damage resulting from the use of non-ammonia, non-alcohol based, mild non- To clean the case: 1. abrasive detergent...
... alcohol-based cleaners. 3 Wipe the screen with a clean, soft, lint-free cloth. Some chemical cleaners have been reported to damage the screen and/or LCD Monitor case. Westinghouse Digital will not be liable for damage resulting from the use of non-ammonia, non-alcohol based, mild non- To clean the case: 1. abrasive detergent...
User Manual
Page 6
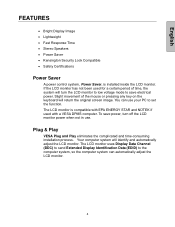
... & Play VESA Plug and Play eliminates the complicated and time-consuming installation process. Slight movement of time, the system will identify and automatically adjust the LCD monitor. English FEATURES • Bright Display Image • Lightweight • Fast Response Time • Stereo Speakers • Power Saver • Kensington Security Lock Compatible • Safety...
... & Play VESA Plug and Play eliminates the complicated and time-consuming installation process. Slight movement of time, the system will identify and automatically adjust the LCD monitor. English FEATURES • Bright Display Image • Lightweight • Fast Response Time • Stereo Speakers • Power Saver • Kensington Security Lock Compatible • Safety...

User Manual
Page 7
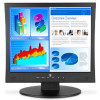
Male Cable • 3.5 mm Male - Package Contents Your product package includes: • 17" Westinghouse LCD Monitor • Detachable Base Stand • AC Power Cord • VGA (HD15) Male - Male Stereo Audio Cable • User's Manual • Warranty Card 5 English INSTALLATION Congratulations on your purchase of a Westinghouse 19" LCD Monitor. Sleek and practical, this lightweight and wall-mountable LCD monitor delivers a crisp and clear display optimized for 1280 x 1024 display resolution.
Male Cable • 3.5 mm Male - Package Contents Your product package includes: • 17" Westinghouse LCD Monitor • Detachable Base Stand • AC Power Cord • VGA (HD15) Male - Male Stereo Audio Cable • User's Manual • Warranty Card 5 English INSTALLATION Congratulations on your purchase of a Westinghouse 19" LCD Monitor. Sleek and practical, this lightweight and wall-mountable LCD monitor delivers a crisp and clear display optimized for 1280 x 1024 display resolution.

User Manual
Page 8
... indicator LED. • Blue: Normal • Orange: Power Saving • Off: Power Off • Audio Output. 6 English 7 1 2 3 7 6 5 4 1. Turbo/▲ 2. Auto/▼ 3. /W 4. /X 5. 6. 7. Front View of the LCD Monitor Use the buttons on page 11. The OSD controls are defined in "OSD Functions" on the front of the...
... indicator LED. • Blue: Normal • Orange: Power Saving • Off: Power Off • Audio Output. 6 English 7 1 2 3 7 6 5 4 1. Turbo/▲ 2. Auto/▼ 3. /W 4. /X 5. 6. 7. Front View of the LCD Monitor Use the buttons on page 11. The OSD controls are defined in "OSD Functions" on the front of the...

User Manual
Page 9
Audio-IN 3. DVI-D 4. Lock Hole 4 5 3 • Connect the power cord from AC IN to a power source. • Using the cable provided, connect to the Audio out (Green) from a computer. • Using a 24-pin DVI cable, connect to a computer or other device with a DVI output. • Use the enclosed 15-pin VGA cable, connect to a computer or other device with a VGA output. • For use with Kensington security locks. 7 AC IN (Power) 2. D-SUB (VGA) 5. Rear View of the LCD Monitor English 1 2 1.
Audio-IN 3. DVI-D 4. Lock Hole 4 5 3 • Connect the power cord from AC IN to a power source. • Using the cable provided, connect to the Audio out (Green) from a computer. • Using a 24-pin DVI cable, connect to a computer or other device with a DVI output. • Use the enclosed 15-pin VGA cable, connect to a computer or other device with a VGA output. • For use with Kensington security locks. 7 AC IN (Power) 2. D-SUB (VGA) 5. Rear View of the LCD Monitor English 1 2 1.

User Manual
Page 10
... and snap into the port, remove the plastic cover below the port. Attaching the Base Stand to the LCD Monitor Attach the base stand to the AUDIO-IN port on the bottom of the LCD Monitor IMPORTANT: Before beginning, make sure all of the following into the back of the stand neck and remove... the base. 2. To plug a DVI cable into place. Align the holes and tabs; To remove the base stand, press the tabs on the LCD Monitor. AUDIO CONNECTION: Connect a stereo mini cable from your PC VGA OUT port to a PC Connect one or all devices are turned off. DVI-D CONNECTION: Connect...
... and snap into the port, remove the plastic cover below the port. Attaching the Base Stand to the LCD Monitor Attach the base stand to the AUDIO-IN port on the bottom of the LCD Monitor IMPORTANT: Before beginning, make sure all of the following into the back of the stand neck and remove... the base. 2. To plug a DVI cable into place. Align the holes and tabs; To remove the base stand, press the tabs on the LCD Monitor. AUDIO CONNECTION: Connect a stereo mini cable from your PC VGA OUT port to a PC Connect one or all devices are turned off. DVI-D CONNECTION: Connect...

User Manual
Page 11
Turn the Power On Press the power button on the front of the LCD monitor. Connect Power Cables Connect the AC power adapter cord to the LCD Monitor (to the connector labeled "AC-IN") and then connect the female AC power cord to the adapter. Plug the AC power cord into a properly grounded AC outlet. 4. The LED light will turn blue if a signal input is detected or it will be orange if no input is detected. 9 English 3.
Turn the Power On Press the power button on the front of the LCD monitor. Connect Power Cables Connect the AC power adapter cord to the LCD Monitor (to the connector labeled "AC-IN") and then connect the female AC power cord to the adapter. Plug the AC power cord into a properly grounded AC outlet. 4. The LED light will turn blue if a signal input is detected or it will be orange if no input is detected. 9 English 3.
User Manual
Page 12
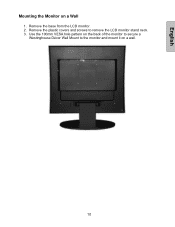
Remove the base from the LCD monitor. 2. Use the 100mm VESA hole pattern on the back of the monitor to secure a Westinghouse Décor Wall Mount to remove the LCD monitor stand neck. 3. Remove the plastic covers and screws to the monitor and mount it on a Wall 1. English Mounting the Monitor on a wall. 10
Remove the base from the LCD monitor. 2. Use the 100mm VESA hole pattern on the back of the monitor to secure a Westinghouse Décor Wall Mount to remove the LCD monitor stand neck. 3. Remove the plastic covers and screws to the monitor and mount it on a Wall 1. English Mounting the Monitor on a wall. 10
User Manual
Page 13
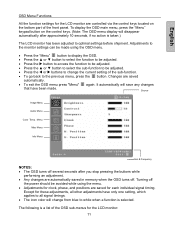
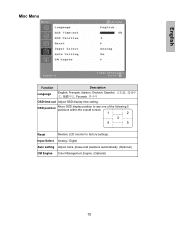
...Misc Menu Info Menu Resolution & Frequency NOTES: • The OSD turns off several seconds after approximately 10 seconds, if no action is taken.) The LCD monitor has been adjusted to white when a function is a list of the sub-function. • To go back to be made . Except for these...all signal timings. • The icon color will change the current setting of the OSD sub-menus for the LCD monitor: 11 Source Image Menu Audio Menu Color Temp. Adjustments to the monitor settings can be adjusted. • Press the W or X buttons to change from blue to optimal settings before...
...Misc Menu Info Menu Resolution & Frequency NOTES: • The OSD turns off several seconds after approximately 10 seconds, if no action is taken.) The LCD monitor has been adjusted to white when a function is a list of the sub-function. • To go back to be made . Except for these...all signal timings. • The icon color will change the current setting of the OSD sub-menus for the LCD monitor: 11 Source Image Menu Audio Menu Color Temp. Adjustments to the monitor settings can be adjusted. • Press the W or X buttons to change from blue to optimal settings before...
User Manual
Page 14
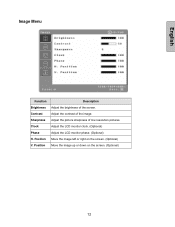
Clock Adjust the LCD monitor clock. (Optional) Phase Adjust the LCD monitor phase. (Optional) H. Position Move the image up or down on the screen. (Optional) V. Contrast Adjust the contrast of the screen. Image Menu English Function Description Brightness Adjust the brightness of the image. Position Move the image left or right on the screen. (Optional) 12 Sharpness Adjust the picture sharpness of low resolution pictures.
Clock Adjust the LCD monitor clock. (Optional) Phase Adjust the LCD monitor phase. (Optional) H. Position Move the image up or down on the screen. (Optional) V. Contrast Adjust the contrast of the screen. Image Menu English Function Description Brightness Adjust the brightness of the image. Position Move the image left or right on the screen. (Optional) 12 Sharpness Adjust the picture sharpness of low resolution pictures.
User Manual
Page 17
OSD position Move OSD display position to any one of the following 5 positions within the overall screen. 1 2 3 4 5 Reset Restore LCD monitor to factory settings. Input Select Analog / Digital Auto setting Adjust clock, phase and positions automatically. (Optional) CM Engine Color Management Engine. (Optional) 15 Misc Menu English Function Language Description English, Français, Italiano, Deutsch, Español OSD time-out Adjust OSD display time setting.
OSD position Move OSD display position to any one of the following 5 positions within the overall screen. 1 2 3 4 5 Reset Restore LCD monitor to factory settings. Input Select Analog / Digital Auto setting Adjust clock, phase and positions automatically. (Optional) CM Engine Color Management Engine. (Optional) 15 Misc Menu English Function Language Description English, Français, Italiano, Deutsch, Español OSD time-out Adjust OSD display time setting.
User Manual
Page 22
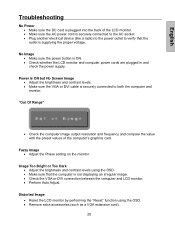
...the proper voltage. "Out Of Range" • Check the computer image output resolution and frequency and compare the value with the preset values of the LCD monitor. • Make sure the AC power cord is securely connected to the AC socket. • Plug another electrical device (like a radio) to the...Image • Adjust the brightness and contrast levels. • Make sure the VGA or DVI cable is ON. • Check whether the LCD monitor and computer power cords are plugged in and check the power supply. Image Too Bright or Too Dark • Adjust the brightness and contrast levels...
...the proper voltage. "Out Of Range" • Check the computer image output resolution and frequency and compare the value with the preset values of the LCD monitor. • Make sure the AC power cord is securely connected to the AC socket. • Plug another electrical device (like a radio) to the...Image • Adjust the brightness and contrast levels. • Make sure the VGA or DVI cable is ON. • Check whether the LCD monitor and computer power cords are plugged in and check the power supply. Image Too Bright or Too Dark • Adjust the brightness and contrast levels...
User Manual
Page 23
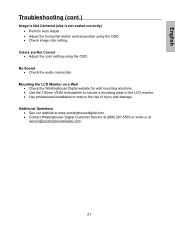
Mounting the LCD Monitor on a Wall • Check the Westinghouse Digital website for wall mounting solutions. • Use the 100mm VESA hole pattern to secure a mounting plate to the LCD monitor. • Use professional installation to reduce the risk of injury and damage. Colors are Not Correct • Adjust the color setting using the OSD. •...
Mounting the LCD Monitor on a Wall • Check the Westinghouse Digital website for wall mounting solutions. • Use the 100mm VESA hole pattern to secure a mounting plate to the LCD monitor. • Use professional installation to reduce the risk of injury and damage. Colors are Not Correct • Adjust the color setting using the OSD. •...


